TensorRT初探——MobileNet_V1
TensorRT初探——MobileNet_V1
引言
随着人工智能的发展,深度学习在计算机视觉上的应用越来越广泛,但如何落地实际工程项目的问题也越发受人关注,如何在边缘设备上运行深度学习模型也成为一个热点。本文主要对常见的轻量级模型进行学习,并尝试对模型进行加速优化,也希望能对自己课题起到帮助。
MobileNetV1模型结构


该模型是用来进行分类任务,并且网络将Conv->Bn->Relu的操作转变成了Depthwise Conv->BN->Relu->comv->BN->Relu,通过这种操作,模型的计算量会大幅减少,下面会讲mobilenet的两个核心操作:Depthwise Conv、Point Conv
Depthwise separable convolution(深度可分离卷积)和Point Conv(点卷积)
MobileNet的基本单位是(Depthwise separable convolution)深度可分离卷积,这种结构也是使得网络加速的关键所在。传统的卷积过程如下图所示:
假设图像大小为MxN,卷积核大小为KxL,输入特征通道数为m,卷积核数量为n,那么计算计算卷积的计算量为: M ∗ N ∗ K ∗ L ∗ m ∗ n M*N*K*L*m*n M∗N∗K∗L∗m∗n,而对于深度可分离卷积,卷积核不再在所有通道提取特征,而是为每个通道单独设置一个卷积,例如输入特征图维度为3,那么我们为就会设置3个二维卷积核与每个通道进行对应
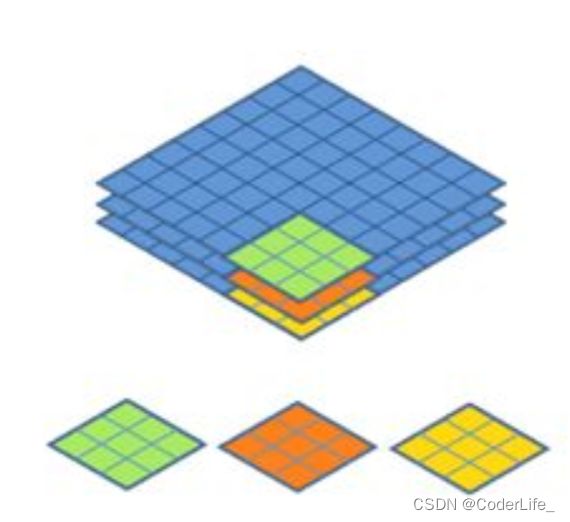
通过这种方案,我们可以将计算量减少为 M ∗ N ∗ K ∗ L ∗ m M*N*K*L*m M∗N∗K∗L∗m,可以看出计算量明显减少。
但就从目前来看,这种方案存在一个问题,那就是不同通道的特征向量完全没有交互,每个卷积核只是从一个通道提取特征,信息相对孤立。为了解决这个问题,模型又引入了pointwise convolution,这个结构其实就是用n个1x1维的卷积核对特征进行传统卷积,通过这种方案,既可以对不同通道特征起到融合作用,又可以对特征向量进行升维或者降维操作(因为输出特征维度取决于卷积核的个数)
使用TensorRT对图像进行推断
MobileNetv1代码
import os
import shutil
import time

import torch
import torch.nn as nn
from torch.nn.modules.activation import ReLU
from torch.nn.modules.batchnorm import BatchNorm2d
from torch.nn.modules.conv import Conv2d
import torch.nn.parallel
import torch.backends.cudnn as cudnn
import torch.optim
import torch.utils.data
import torchvision.transforms as transforms
import torchvision.datasets as datasets
import torchvision.models as models
from torch.autograd import Variable
class Net(nn.Module):
    def __init__(self,nclass=1000):
        super(Net,self).__init__()
        self.nclass=nclass
        def conv_bn(input_features,output_features,stride):
            return nn.Sequential(
                nn.Conv2d(input_features,output_features,3,stride,1,bias=False),
                nn.BatchNorm2d(output_features),
                nn.ReLU(inplace=True)
            )
        def conv_dw(input_features,output_features,stride):
            '''
            3为卷积核大小,stride为步长,在论文中有s1和s2两种步长,groups为是否进行分组卷积,此处应该设置为输入通道数量
            '''
            return nn.Sequential(
                nn.Conv2d(input_features,input_features,3,stride,1,groups=input_features,bias=False),
                nn.BatchNorm2d(input_features),
                nn.ReLU(inplace=True),
                '''
                论文中point convolution过程
                '''
                nn.Conv2d(input_features,output_features,1,1,0,bias=False),
                nn.BatchNorm2d(output_features),
                nn.ReLU(inplace=True)
            )
        self.model=nn.Sequential(
            conv_bn(3, 32, 2),
            conv_dw(32, 64, 1),
            conv_dw(64, 128, 2),
            conv_dw(128, 128, 1),
            conv_dw(128, 256, 2),
            conv_dw(256, 256, 1),
            conv_dw(256, 512, 2),
            conv_dw(512, 512, 1),
            conv_dw(512, 512, 1),
            conv_dw(512, 512, 1),
            conv_dw(512, 512, 1),
            conv_dw(512, 512, 1),
            conv_dw(512, 1024, 2),
            conv_dw(1024, 1024, 1),
            nn.AvgPool2d(7),
        )
        self.fc=nn.Linear(1024,self.nclass)
    def forward(self,X):
        x=self.model(X)
        x=x.view(-1,1024)
        x=self.fc(x)
        return x
def speed(model,name):
    t0 = time.time()
    input = torch.rand(1,3,224,224).cuda()    #input = torch.rand(1,3,224,224).cuda()
    input = Variable(input, volatile = True)
    t1 = time.time()

    model(input)

    t2 = time.time()
    for i in range(10):
        model(input)
    t3 = time.time()

    torch.save(model.state_dict(), "test_%s.pth"%name)
    print('%10s : %f' % (name, t3 - t2))
if __name__ == '__main__':
    t0=time.time()
    resnet18 = models.resnet18(num_classes=2).cuda()
    alexnet = models.alexnet(num_classes=2).cuda()
    vgg16 = models.vgg16(num_classes=2).cuda()
    squeezenet = models.squeezenet1_0(num_classes=2).cuda()
    mobilenet = Net().cuda()

    speed(resnet18, 'resnet18')
    speed(alexnet, 'alexnet')
    speed(vgg16, 'vgg16')
    speed(squeezenet, 'squeezenet')
    speed(mobilenet, 'mobilenet')
实验结果如下图所示:
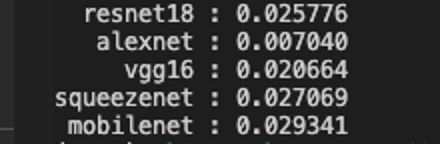
(不知道为什么比resnet18还要慢~~)
将模型权重保存后查看,结果如下图所示
[外链图片转存失败,源站可能有防盗链机制,建议将图片保存下来直接上传(img-z9q03Tmy-1640098240129)(/Users/johan/Library/Application Support/typora-user-images/image-20211220100048622.png)]
TensorRT推断
TensorRT简单介绍
为了加速模型推理,我们通常需要将模型转变为tensorRT格式。转变过程主要有如下路线:
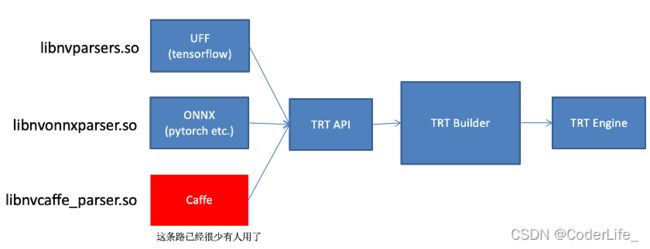
TensorRT中的组件主要由四部分组成
-
ONNX parser:将一个经过 PyTorch 训练的模型转换成 ONNX 格式作为输入,并在 TensorRT 中填充一个网络对象
-
Builder:使用 TensorRT 中的网络并生成针对目标平台优化的引擎
-
Engine:获取输入数据,执行推断,并产生推理输出。
-
Logger:与生成器和引擎关联,以在构建和推理阶段捕获错误、警告和其他信息。
通常一个TensorRT应用程序也应该有四个步骤组成:
- 将预训练模型转换为onnx
- 将onnx模型导入tensorRT
- 应用优化并产生引擎
- 使用GPU进行推理
生成Onnx模型
在这里我们选择第二种思路,我们先将mobileNet转变成onnx格式,本文测试平台为Jetson,转变代码如下
import torch
import torch.nn as nn
from torch.nn.modules.activation import ReLU
from torch.nn.modules.batchnorm import BatchNorm2d
from torch.nn.modules.conv import Conv2d
import torch.nn.parallel
import torch.backends.cudnn as cudnn
import torch.optim
import torch.utils.data
import torchvision.transforms as transforms
import torchvision.datasets as datasets
import torchvision.models as models

class Net(nn.Module):
    def __init__(self,nclass=1000):
        super(Net,self).__init__()
        self.nclass=nclass
        def conv_bn(input_features,output_features,stride):
            return nn.Sequential(
                nn.Conv2d(input_features,output_features,3,stride,1,bias=False),
                nn.BatchNorm2d(output_features),
                nn.ReLU(inplace=True)
            )
        def conv_dw(input_features,output_features,stride):
            '''
            3为卷积核大小,stride为步长,在论文中有s1和s2两种步长,groups为是否进行分组卷积,此处应该设置为输入通道数量
            '''
            return nn.Sequential(
                nn.Conv2d(input_features,input_features,3,stride,1,groups=input_features,bias=False),
                nn.BatchNorm2d(input_features),
                nn.ReLU(inplace=True),
               #此处为论文中point convolution过程
                nn.Conv2d(input_features,output_features,1,1,0,bias=False),
                nn.BatchNorm2d(output_features),
                nn.ReLU(inplace=True)
            )
        self.model=nn.Sequential(
            conv_bn(3, 32, 2),
            conv_dw(32, 64, 1),
            conv_dw(64, 128, 2),
            conv_dw(128, 128, 1),
            conv_dw(128, 256, 2),
            conv_dw(256, 256, 1),
            conv_dw(256, 512, 2),
            conv_dw(512, 512, 1),
            conv_dw(512, 512, 1),
            conv_dw(512, 512, 1),
            conv_dw(512, 512, 1),
            conv_dw(512, 512, 1),
            conv_dw(512, 1024, 2),
            conv_dw(1024, 1024, 1),
            nn.AvgPool2d(7),
        )
        self.fc=nn.Linear(1024,self.nclass)
    def forward(self,X):
        x=self.model(X)
        x=x.view(-1,1024)
        x=self.fc(x)
        return x.view(-1,int(x.numel()//x.size(0)))
model=Net()
model=torch.load("mobileNet.pth")
dummy_input = torch.randn(1, 3, 224, 224, device='cuda')
torch.onnx.export(model, (dummy_input,), "mobileNet.onnx", verbose=True)
TensorRT使用onnx模型进行推理
得到onnx模型后,我们使用tensorRt生成trt文件,如何安装tensorRT请自行搜索,本文使用的tensorRT版本为8.0,下面我们分别使用c++生成引擎
c++代码如下:
#include
#include "argsParser.h"
#include "buffers.h"
#include "common.h"
#include "logger.h"
#include "BatchStream.h"
#include "EntropyCalibrator.h"
#include "NvOnnxParser.h"
#include "NvInfer.h"

using namespace nvinfer1;
using namespace nvonnxparser;
int main() {
        std::cout<<"hello world"<(NetworkDefinitionCreationFlag::kEXPLICIT_BATCH);
        nvinfer1::INetworkDefinition* network = builder->createNetworkV2(explicitBatch);

        nvonnxparser::IParser* parser = nvonnxparser::createParser(*network, sample::gLogger.getTRTLogger());

        const char* onnx_filename="/home/case/Desktop/wza/mobileNetRT/weights/mobileNet.onnx";
        parser->parseFromFile(onnx_filename, static_cast(sample::gLogger.getReportableSeverity()));
        for (int i = 0; i < parser->getNbErrors(); ++i)
        {
                std::cout << parser->getError(i)->desc() << std::endl;
        }
        std::cout << "successfully load the onnx model" << std::endl;

        // 2、build the engine
        unsigned int maxBatchSize=1;
        builder->setMaxBatchSize(maxBatchSize);
        IBuilderConfig* config = builder->createBuilderConfig();
        config->setMaxWorkspaceSize(1 << 20);
        ICudaEngine* engine = builder->buildEngineWithConfig(*network, *config);

        // 3、serialize Model
        IHostMemory *gieModelStream = engine->serialize();
        std::string serialize_str;
        std::ofstream serialize_output_stream;
        serialize_str.resize(gieModelStream->size());
        memcpy((void*)serialize_str.data(),gieModelStream->data(),gieModelStream->size());
        serialize_output_stream.open("./serialize_engine_output.trt");
        serialize_output_stream<deserializeCudaEngine(cached_engine.data(), cached_engine.size(), nullptr);

        std::cout << "Hello, World!" << std::endl;
        return 0;
}
使用python代码生成引擎并且进行推理
python代码如下所示:
import tensorrt as trt
import numpy as np
import pycuda.driver as cuda
import pycuda.autoinit
import sys
import os
import common
import random
import torch
from PIL import Image
class ModelData(object):
    MODEL_PATH = "ResNet50.onnx"
    INPUT_SHAPE = (3, 224, 224)
    # We can convert TensorRT data types to numpy types with trt.nptype()
    DTYPE = trt.float32
TRT_LOGGER = trt.Logger(trt.Logger.WARNING)
def build_engine(model_file,engine_path):
    builder=trt.Builder(TRT_LOGGER)
    network = builder.create_network(common.EXPLICIT_BATCH)
    config = builder.create_builder_config()
    parser = trt.OnnxParser(network, TRT_LOGGER)

    config.max_workspace_size = common.GiB(1)
    # Load the Onnx model and parse it in order to populate the TensorRT network.
    with open(model_file, 'rb') as model:
        if not parser.parse(model.read()):
            print ('ERROR: Failed to parse the ONNX file.')
            for error in range(parser.num_errors):
                print (parser.get_error(error))
            return None
    engine= builder.build_engine(network, config)
    with open(engine_path,"wb") as f:
        f.write(engine.serialize())
    return engine
def load_normalized_test_case(test_image, pagelocked_buffer):
    # Converts the input image to a CHW Numpy array
    def normalize_image(image):
        # Resize, antialias and transpose the image to CHW.
        c, h, w = ModelData.INPUT_SHAPE
        image_arr = np.asarray(image.resize((w, h), Image.ANTIALIAS)).transpose([2, 0, 1]).astype(trt.nptype(ModelData.DTYPE)).ravel()
        # This particular ResNet50 model requires some preprocessing, specifically, mean normalization.
        return (image_arr / 255.0 - 0.45) / 0.225

    # Normalize the image and copy to pagelocked memory.
    np.copyto(pagelocked_buffer, normalize_image(Image.open(test_image)))
    # np.copyto(pagelocked_buffer, normalize_image(test_image))
    return test_image

if __name__ =="__main__":
    _, data_files = common.find_sample_data(description="Runs a ResNet50 network with a TensorRT inference engine.", subfolder="resnet50", find_files=["binoculars.jpeg", "reflex_camera.jpeg", "tabby_tiger_cat.jpg", ModelData.MODEL_PATH, "class_labels.txt"])
    # Get test images, models and labels.
    test_images = data_files[0:3]#测试图像
    onnx_path = 'weights/mobileNet.onnx'
    engine_path = 'weights/mobileNet.engine'
    engine=build_engine(onnx_path,engine_path)
    context = engine.create_execution_context()
    test_image = random.choice(test_images)
    engine=build_engine(onnx_path,engine_path)
    inputs, outputs, bindings, stream = common.allocate_buffers(engine)
    test_case = load_normalized_test_case(test_image, inputs[0].host)
    trt_outputs = common.do_inference_v2(context, bindings=bindings, inputs=inputs, outputs=outputs, stream=stream)
    print(len(trt_outputs[0]))#打印模型输出
打印结果维度如下图所示:
![]()
结尾
至此整个流程圆满结束,中间也碰到许多困难,本来打算使用c++完成整个过程,但编译生成trt文件后后续资料没有找到,其次是c++水平太差,退而选择了python来完成整个流程。在环境配置方面,cmake的版本需要和tensorRT相匹配,这就需要各位具体问题具体分析,在出现问题并解决问题的过程中,希望自己水平或许有一点点提高吧~~~。总而言之,路漫漫其修远兮,吾将上下而求索。