pytorch 笔记:使用Tune 进行调参
自动进行调参,我们以pytorch笔记:搭建简易CNN_UQI-LIUWJ的博客-CSDN博客的代码为基础,进行output_channel和learning rate的调参
1 导入库
from functools import partial
import numpy as np
import os
import torch
import torch.nn as nn
import torch.nn.functional as F
import torch.optim as optim
import torchvision
import torch.utils.data as Data
from ray import tune
from ray.tune import CLIReporter
from ray.tune.schedulers import ASHAScheduler
2 超参数(和CNN一致)
EPOCH=1
BATCH_SIZE=50
LR=0.001
DOWNLOAD_MNIST=False
#如果已经事先下载好了 mnist数据,那么DOWNLOAD_MNIST就是False,否则就是True
3 数据集&dataloader(和CNN一致)
train_data=torchvision.datasets.MNIST(
    root='./mnist/',
    #从这个路径找mnist数据/下载mnist数据到这个路径下
    train=True,
    #这时候数据是训练集(是训练集还是测试集对dropout等会有影响)
    transform=torchvision.transforms.ToTensor(),
    #将mnist数据集中的数据类型转换为Tensor形式,
    download=DOWNLOAD_MNIST)


#生成dataloader
train_loader=Data.DataLoader(
    dataset=train_data,
    batch_size=BATCH_SIZE,
    shuffle=True
)
4 模型框架
我们只能调整那些可配置的参数。在这个例子中,我们可以指定第一个卷积层输出的大小为可配置参数。
class CNN(nn.Module):
    def __init__(self,channel):
        super(CNN,self).__init__()

        self.conv1=nn.Sequential(
            nn.Conv2d(
                in_channels=1,
                #输入shape (1,28,28)


                out_channels=channel,

########################################################
#输出shape(channel,28,28),channel也是卷积核的数量
#这一行有改动,我们设置channel为外部传入参数

########################################################


                kernel_size=5,
                stride=1,
                padding=2),
#如果想要conv2d出来的图片长宽没有变化,那么当stride=1的时候,padding=(kernel_size-1)/2
            nn.ReLU(),
            nn.MaxPool2d(kernel_size=2)
 #在2*2空间里面下采样,输出shape(16,14,14)
        )


        self.conv2=nn.Sequential(
            nn.Conv2d(
                in_channels=channel,
                #输入shape (channel,14,14)
                #相应地改动
                out_channels=32,
                #输出shape(32,14,14)
                kernel_size=5,
                stride=1,
                padding=2),
                #输出shape(32,7,7),
            nn.ReLU(),
            nn.MaxPool2d(kernel_size=2)
        )

        self.fc=nn.Linear(32*7*7,10)
#输出一个十维的东西,表示我每个数字可能性的权重

    def forward(self,x):
            x=self.conv1(x)
            x=self.conv2(x)
            x=x.view(x.shape[0],-1)
            x=self.fc(x)
            return x
5 train函数包装
我们用函数train(config,)来包装训练脚本。config参数将接收我们想要训练的超参数。
def train(config):
    cnn=CNN(config['channel'])
###################################################################
    #将config中的‘channel’参数用来生成相应的cnn
###################################################################

    optimizer=torch.optim.SGD(cnn.parameters(),lr=config['lr'])
###################################################################
    #将config中的‘lr’参数作为学习率
###################################################################

    loss_func=torch.nn.CrossEntropyLoss()

    for epoch in range(10):
        for step,(b_x,b_y) in enumerate(train_loader):
            output=cnn(b_x)
            loss=loss_func(output,b_y)

            optimizer.zero_grad()
    #清除上一次参数更新的残余梯度

            loss.backward()
    #损失函数后向传播

            optimizer.step()
    #参数更新

        '''
上面的部分(‘#’之后的部分)和CNN是一样的
        '''


        with tune.checkpoint_dir(step=epoch) as checkpoint_dir:
            path = os.path.join(checkpoint_dir, "checkpoint")
            torch.save(
                (cnn.state_dict(), optimizer.state_dict()), path)

        tune.report(loss=loss.item())
#######################################################################
        '''
    和ray tune 通信的部分

    在这里,我们首先保存一个checkpoint,然后将一些指标反馈给Tune。

    Tune可以使用这些指标来决定哪个超参数配置能带来最佳结果。
    这些指标也可以用来提前停止性能不好的试验,以避免在这些试验上浪费资源。

    checkpoint的保存是可选的。
         '''
#######################################################################


    print('finish training')
最有趣的部分是与Ray Tune的通信。
6 main函数部分
def main(num_samples=5, max_num_epochs=10):
    config = {
    "channel": tune.sample_from(lambda _: np.random.randint(2, 31)),
    "lr": tune.loguniform(1e-4, 1e-1)
    }
#############################################################################
    '''
    定义各个参数的搜寻空间
    tune.sample_from()函数使你有可能定义自己的采样方法来获得超参数。

    在每次试验中,Tune现在将从这些搜索空间中随机抽出一个参数组合。
    然后,它将并行地训练一些模型,并在这些模型中找到表现最好的一个。
    '''

#############################################################################


    scheduler = ASHAScheduler(
        metric="loss",
        mode="min",
        max_t=max_num_epochs,
        grace_period=1,
        reduction_factor=2)
#############################################################################
    '''
    我们还使用ASHAS调度器,它将提前终止性能不好的试验。[Early stopping]

    ASHA 会终止不太有希望的试验,并将更多的时间和资源分配给更有希望的试验。

    ASHA 在 Tune 中被记作为“ Trial Scheduler”。
    这些 Trial Scheduler 可以提前终止不好的Trial、暂停 Trial、复制 Trial
 和更改正在运行的 Trial 的超参数。
    '''
#############################################################################

    result = tune.run(
        partial(train),
        config=config,
        num_samples=num_samples,
        scheduler=scheduler)
#############################################################################
    '''
 如果用GPU的话,需要在这里声明  resources_per_trial={"cpu": 2, "gpu": gpus_per_trial},
    '''
#############################################################################
    '''
Tune 将自动在机器或集群上的所有可用内核/GPU 上运行并行试验。

要限制 Tune 使用的内核数量,您可以在 tune.run 之前调用
ray.init(num_cpus=, num_gpus=)。
    '''
#############################################################################


    best_trial = result.get_best_trial("loss", "min", "last")
    print("Best trial config: {}".format(best_trial.config))
    print("Best trial final validation loss: {}".format(
        best_trial.last_result["loss"]))
7 输出结果(部分)
Number of trials: 5/5 (5 TERMINATED)
Trial name	status	loc	channel	lr	iter	total time (s)	loss
DEFAULT_c1831_00000	TERMINATED	127.0.0.1:32068	7	0.00181678	10	329.045	0.0394899
DEFAULT_c1831_00001	TERMINATED	127.0.0.1:18688	27	0.0041803	2	156.015	0.307976
DEFAULT_c1831_00002	TERMINATED	127.0.0.1:33904	23	0.000352946	1	66.1122	2.18557
DEFAULT_c1831_00003	TERMINATED	127.0.0.1:5776	18	0.0326092	10	534.814	0.100436
DEFAULT_c1831_00004	TERMINATED	127.0.0.1:12020	19	0.0783009	10	538.282	0.00954399


2022-03-08 00:33:07,119	INFO tune.py:636 -- Total run time: 650.41 seconds (643.75 seconds for the tuning loop).
Best trial config: {'channel': 19, 'lr': 0.0783008707603346}
Best trial final validation loss: 0.009543992578983307
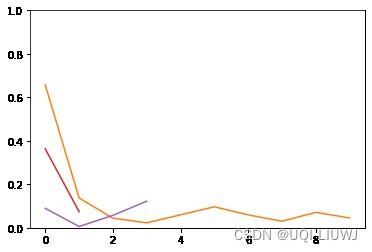
7.1可视化结果:
(要可视化的话,main函数里面的result需要设置为global)
import matplotlib.pyplot as plt
for d in result.trial_dataframes.values():
    plt.plot(d.loss)
    print(d.loss)
plt.ylim([0,1])
plt.show()
可以看到有一些是提前结束了(不好的trail)
7.2 获得最好的一组超参数
result.get_best_config('loss',mode='min')
#{'channel': 6, 'lr': 0.0072715026072560866}