alphafold-multimer环境部署
前言
Alphafold2(AF2,二狗)发布以后,一大堆科学家把这个人类历史上最高精度的蛋白质预测模型当起了玩具,并且把大家的新发现发在了推特上(open science 的形式)。其中一个最重要的发现是他们发现AF2虽然是在单体上进行的训练,却没有能力进行复合物的预测。在open science的召唤下,deepmind团队在2021年10月6号上线了Alphafold-multimer,一款针对复合物进行重新训练的神经网络。好了,下面进入正文(才疏学浅,欢迎批评指正)。
1.在alphafold目录执行
get fetch origin main
2.下载uniport数据库
uniport数据库提供了物种信息(可能与真核生物/原核生物有关)
./download_uniprot.sh
3.移除pdb_mmcif文件
rm /pdb_mmcif
4.下载pdb_mmcif文件,用多线程方式同步
#!/bin/sh

src='rsync.rcsb.org::ftp_data/structures/divided/mmCIF' #源路径,结尾不带斜线
dst='./pdb_mmcif/raw' #目标路径,结尾不带斜线
opt="--recursive --links --perms --times --compress --info=progress2 --delete --port=33444" #同步选项
num=10 #并发进程数
depth='5 4 3 2 1' #归递目录深度
task=/tmp/`echo $src$ | md5sum | head -c 16`
[ -f $task-next ] && cp $task-next $task-skip
[ -f $task-skip ] || touch $task-skip

# 创建目标目录结构
rsync $opt --include "*/" --exclude "*" $src/ $dst

# 从深到浅同步目录
for l in $depth ;do
    # 启动rsync进程
    for i in `find $dst -maxdepth $l -mindepth $l -type d`; do
        i=`echo $i | sed "s#$dst/##"`
        if `grep -q "$i$" $task-skip`; then
            echo "skip $i"
            continue
        fi
        while true; do
            now_num=`ps axw | grep rsync | grep $dst | grep -v '\-\-daemon' | wc -l`
            if [ $now_num -lt $num ]; then
                echo "rsync $opt $src/$i/ $dst/$i" >>$task-log
                rsync $opt $src/$i/ $dst/$i &
                echo $i >>$task-next
                sleep 1
                break
            else
                sleep 5
            fi
        done
    done
done
将以上代码保存至DOWNLOAD_DIR目录下再运行。使用时并发进程数num请勿设置的过大否则容易被服务器拉黑。
参考文章:https://blog.csdn.net/qq_20291997/article/details/122613497
5.下载pdb_seqres文件
./download_pdb_seqres.sh
6.移除旧的参数文件
删除单体结构预测模型
rm /params
7.下载新的参数文件
更新5个新的模型params_model_{1,2,3,4,5}_multimer.npz
./download_alphafold_params.sh
8.下载完成后一定要核对文件结构一一对应,实际的文件体积可能会更大,但不会少。一定要尽可能一一对应!!!!!!!
看当前文件夹大小的命令为du -sh *
du -ach *    #这个能看到当前目录下的所有文件占用磁盘大小和总大小

du -sh       #查看当前目录总大小

du -sh *     #查看所有子目录大小

du -sh ./*   #查看当前目录下所有文件/文件夹的大小

lsof | grep delete    #如果怀疑删掉的数据还在占用磁盘空间试试这个

kill -9 pid           #结束掉进程就能释放磁盘空间了
$DOWNLOAD_DIR/                             # Total: ~ 2.2 TB (download: 438 GB)
    bfd/                                   # ~ 1.7 TB (download: 271.6 GB)
        # 6 files.
    mgnify/                                # ~ 64 GB (download: 32.9 GB)
        mgy_clusters_2018_12.fa
    params/                                # ~ 3.5 GB (download: 3.5 GB)
        # 5 CASP14 models,
        # 5 pTM models,
        # 5 AlphaFold-Multimer models,
        # LICENSE,
        # = 16 files.
    pdb70/                                 # ~ 56 GB (download: 19.5 GB)
        # 9 files.
    pdb_mmcif/                             # ~ 206 GB (download: 46 GB)
        mmcif_files/
            # About 180,000 .cif files.
        obsolete.dat
    pdb_seqres/                            # ~ 0.2 GB (download: 0.2 GB)
        pdb_seqres.txt
    small_bfd/                             # ~ 17 GB (download: 9.6 GB)
        bfd-first_non_consensus_sequences.fasta
    uniclust30/                            # ~ 86 GB (download: 24.9 GB)
        uniclust30_2018_08/
            # 13 files.
    uniprot/                               # ~ 98.3 GB (download: 49 GB)
        uniprot.fasta
    uniref90/                              # ~ 58 GB (download: 29.7 GB)
        uniref90.fasta
9.运行命令
可预测单聚体,同源多聚体,异源多聚体
--db_preset=reduced_dbs 跑简易数据库(8CPU,600G空间)
--db_preset=full_dbs 跑整个数据库 (所有数据类型均使用CASP14规格)
1.monomer model preset 单聚体蛋白
序列文件格式
>sequence_name
<SEQUENCE>
python3 docker/run_docker.py \
  --fasta_paths=T1050.fasta \
  --max_template_date=2020-05-14 \
  --model_preset=monomer \
  --db_preset=reduced_dbs \
  --data_dir=$DOWNLOAD_DIR
2.multiple sequences 同源多聚体蛋白
有一种说法是预测多聚体要知道是真核生物还是原核生物,预测的更准,代码--is_prokaryote_list=true写在--max_template_date前面
默认每个模型跑5个种子,总共预测25个蛋白,可以通过--num_multimer_predictions_per_model=1命令让每个模型跑一个种子
>sequence_1
<SEQUENCE>
>sequence_2
<SEQUENCE>
>sequence_3
<SEQUENCE>
python3 docker/run_docker.py \
  --fasta_paths=multimer.fasta \
  --max_template_date=2020-05-14 \
  --model_preset=multimer \
  --data_dir=$DOWNLOAD_DIR
3.heteromer model 异聚体蛋白 比如2个A序列,3个B序列
>sequence_1
<SEQUENCE A>
>sequence_2
<SEQUENCE A>
>sequence_3
<SEQUENCE B>
>sequence_4
<SEQUENCE B>
>sequence_5
<SEQUENCE B>
命令同同源多聚体
4.连续预测多个单体的命令
python3 docker/run_docker.py \
  --fasta_paths=monomer1.fasta,monomer2.fasta \
  --max_template_date=2021-11-01 \
  --model_preset=monomer \
  --data_dir=$DOWNLOAD_DIR
5.连续预测多个多具体的命令
python3 docker/run_docker.py \
  --fasta_paths=multimer1.fasta,multimer2.fasta \
  --max_template_date=2021-11-01 \
  --model_preset=multimer \
  --data_dir=$DOWNLOAD_DIR
10.outputpdb文件解读
1.features.pkl 生成结构的NumPy数组
2.unrelaxed_model_*.pdb 预测的pdb格式,和输出的模型一致
3.relaxed_model_*.pdb 对未松弛结构执行Amber松弛后的结构
4.ranked_*.pdb 根据PLddt打分(包括松弛后的结构)排序,ranked_0.pdb 包含置信度最高的预测,ranked_4.pdb 应该包含置信度最低的预测。
5.ranking_debug.json json文件,包含PLddt和原始模型名称的映射
6.timings.json json文件,包含运行 AlphaFold 每个pipeline所花费的时间。
7.msas/ 构建MSA的各种遗传工具的文件
8.result_model_*.pkl 结构输出模块和辅助输出
11.遇到的坑
1. get fetch origin main无效
原因:可能是因为第一次下载时就不是从github上down下来,而是在别的电脑down下来在copy过来的。
解决:直接从github上down下来放在目标目录
2. .sh文件没有执行权限
解决方法:在ubantu环境下,找到这个sh文件,右键——属性——权限——勾选允许执行文件——退出即可
在centos环境下:chmod u+x xxx.sh
2. 解释器错误: 没有那个文件或目录 ,aria2 colud not be found

原因及解决方法:https://www.cnblogs.com/qingmuchuanqi48/p/14709432.html
aria2 colud not be found解决方法:按照提示安装即可
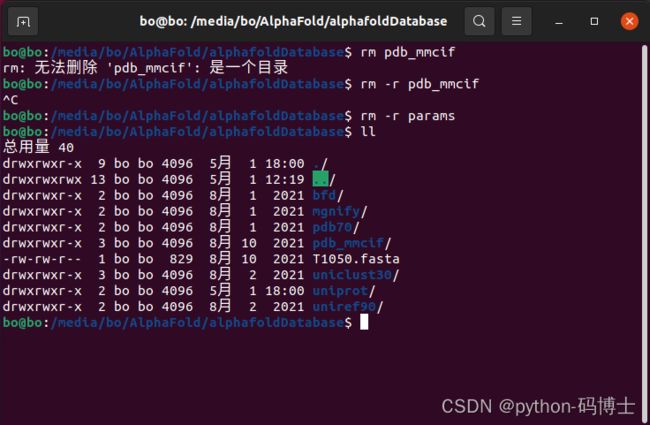
3.rm: 无法删除 ‘pdb_mmcif’: 是一个目录
-r:将参数中列出的全部目录和子目录都递归地删除。
4.用多线程下载pdb_mmcif时执行sed -i 's/\r$//' down.sh后依旧报错
5.编辑sh文件的方法
gedit xxx.sh
参考链接:https://www.csdn.net/tags/Mtzakg1sNjI2NDEtYmxvZwO0O0OO0O0O.html
6.解压pdb_mmcif数据包时太坑了
pdb_mmcif是一个大文件夹,里面又包含了1000来个小文件夹,小文件夹里的gz压缩包文件才是我们想要的,我们需要把他解压后放到大文件夹然后再把小文件夹删除。
解决方法:写一个脚本
#!/bin/bash
#
# Copyright 2021 DeepMind Technologies Limited
#
# Licensed under the Apache License, Version 2.0 (the "License");
# you may not use this file except in compliance with the License.
# You may obtain a copy of the License at
#
#      http://www.apache.org/licenses/LICENSE-2.0
#
# Unless required by applicable law or agreed to in writing, software
# distributed under the License is distributed on an "AS IS" BASIS,
# WITHOUT WARRANTIES OR CONDITIONS OF ANY KIND, either express or implied.
# See the License for the specific language governing permissions and
# limitations under the License.
#
# Downloads, unzips and flattens the PDB database for AlphaFold.
#
# Usage: bash download_pdb_mmcif.sh /path/to/download/directory
set -e


DOWNLOAD_DIR="$1"
ROOT_DIR="${DOWNLOAD_DIR}/pdb_mmcif1"
RAW_DIR="${ROOT_DIR}/raw"
MMCIF_DIR="${ROOT_DIR}/mmcif_files"


echo "Unzipping all mmCIF files..."
find "${RAW_DIR}/" -type f -iname "*.gz" -exec gunzip {} +

echo "Flattening all mmCIF files..."
mkdir --parents "${MMCIF_DIR}"
find "${RAW_DIR}" -type d -empty -delete  # Delete empty directories.
for subdir in "${RAW_DIR}"/*; do
  mv "${subdir}/"*.cif "${MMCIF_DIR}"
done

# Delete empty download directory structure.
find "${RAW_DIR}" -type d -empty -delete
7.linux 没有那个文件或目录,Linux 解决 bash ./ 没有那个文件或目录 的方法

解决方法:sudo apt-get install lib32z1
参考链接:https://blog.csdn.net/weixin_36065817/article/details/116601121
8.数据库终于搞定了,接下来
1.Clone this repository and cd into it.
git clone https://github.com/deepmind/alphafold.git
2.Build the Docker image:
docker build -f docker/Dockerfile -t alphafold .
3.Install the run_docker.py dependencies. Note: You may optionally wish to create a Python Virtual Environment to prevent conflicts with your system’s Python environment.
pip3 install -r docker/requirements.txt
4.Make sure that the output directory exists (the default is /tmp/alphafold) and that you have sufficient permissions to write into it. You can make sure that is the case by manually running mkdir /tmp/alphafold and chmod 770 /tmp/alphafold.
5.接下来请看运行命令即可。
9.现在就是小问题了
10.ERROR: Could not open requirements file: [Errno 2] 没有那个文件或目录: ‘requrements.txt’

解决方法:
1.需要先创建requirements.txt,方法:
sudo pip freeze > requirements.txt
2.重新执行命令:
sudo pip install -r requirements.txt
参考链接:https://blog.csdn.net/qq_30722795/article/details/104077236
11.docker中的一些目录挂载出错。
如果提示docker.errors.APIError: 400 Client Error for http+docker://localhost/v1.41/containers/create: Bad Request ("invalid mount config for type "bind": bind source path does not exist: /tmp/alphafold")。出现这个问题应该是因为官方示例里并没有给出程序的输出目录,而默认的输出目录是有问题的。可以在运行时增加--output_dir=你自己的输出目录字段;或者直接修改docker/run_docker.py中的flags.DEFINE_string('output_dir', '你自己的输出目录', 'Path to a directory that will store the results.'),可以顺便把下边的flags.DEFINE_string('data_dir', '你自己的数据集下载目录','Path to directory with supporting data: AlphaFold parameters and genetic and template databases. Set to the target of download_all_databases.sh.'),这样以后运行代码时就不用再手动给出data_dir了。
12.运行时提示ValueError: jaxlib is version 0.1.69, but this version of jax requires version 0.1.74.
这是一个让人非常无语的错误。当时因为这个折腾了很久怎么都修复不了。解决办法非常简单:将docker/Dockerfile中的&& pip3 install --upgrade jax jaxlib==0.1.69+cuda${CUDA/./} -f \修改成&& pip3 install --upgrade jax jaxlib>=0.1.69+cuda${CUDA/./} -f \,随后重新执行docker build -f docker/Dockerfile -t alphafold .即可。
如果还报错,请将docker/Dockerfile中的ARG CUDA=11.0修改为ARG CUDA=11.1,再重新执行docker build -f docker/Dockerfile -t alphafold .即可。
13.运行时报错,提示FileNotFoundError或者是某些方法找不到
出现这种错误首先看具体提示的是什么错误:
如果是数据集相关的文件找不到,或者query的时候失败。回去重新下载对应的数据集,务必对照目录结构确保数据集下载完整了,特别是两个需要额外处理的数据集。
如果是代码相关的文件,或者是import失败,又或者是一些莫名其妙的文件(路径不在数据集目录下),那么有非常大的可能你在创建docker的时候没下完整,请换个好点的网络,并且疯狂无脑反复执行docker build -f docker/Dockerfile -t alphafold .,并确保输出日志中的每一项都确实下载、安装完毕了。
12.最后终于成功了,泪奔
致谢
感谢各位老师同学对我的支持与信任,感谢身边的和不在身边的朋友们,感谢帮助过我的陌生人,不负所望alphfold-multimer环境部署成功。今年这个五一是我印象最深的一个假期。我是一个本科,研究生都是传统生物科学的学生,凭借着对计算机的热爱与执着,历时2天完成了alphafold-multimer环境的部署,因为对linux系统的生疏和对大项目部署配置的初次尝试,让我这几天都度日如年,一旦失败就意味着将会连中科院微生物所仅有的几台装有alphafold的服务器受到损失,这种置之死地而后生的强烈压迫感使甚至让我感到恐惧。2天来有7:00起床,2:00回家的时候,也有半夜4:00爬起来去修改bug的时候。在这个与大大小小数不清的bug斗争过程中,虽然精神上和身体上的压力都很大,但是也获得了成长。这份教程是经过一步一个脚印的坑踩过来的,希望可以帮到志同道合的伙伴们。本教程是在alphafold的基础上部署的,学通之后,同样也可以从头部署。


