卷积神经网络工具PlotNeuralNet在Windows安装并使用
目录
-
- 一、安装Git
- 二、安装MikTex
- 三、复制PlotNeuralNet源代码
- 四、使用PlotNeuralNet
-
- 1.编写python脚本Unet.py
- 2.执行程序Unet.py
- 3.使用Git Bash
一、安装Git
Git是一个开源的分布式版本控制系统,可以有效、高速地处理从很小到非常大的项目版本管理。 也是Linus Torvalds为了帮助管理Linux内核开发而开发的一个开放源码的版本控制软件。用过的同学都知道,非常香!
安装地址:Git官网
二、安装MikTex
为什么要安装这个呢?为了让你的电脑解析Latex文件,因为这个模型是先用python脚本生成.tex文件(这个是Latex语言),当然如果有大佬直接手写Latex代码,此处可以略过!
安装地址:https://miktex.org/download
三、复制PlotNeuralNet源代码
给出GitHub上源代码的链接:https://github.com/HarisIqbal88/PlotNeuralNet
我们可以直接进入你想安装的目录执行:git clone https://github.com/HarisIqbal88/PlotNeuralNet.git
或者直接下载压缩文件。

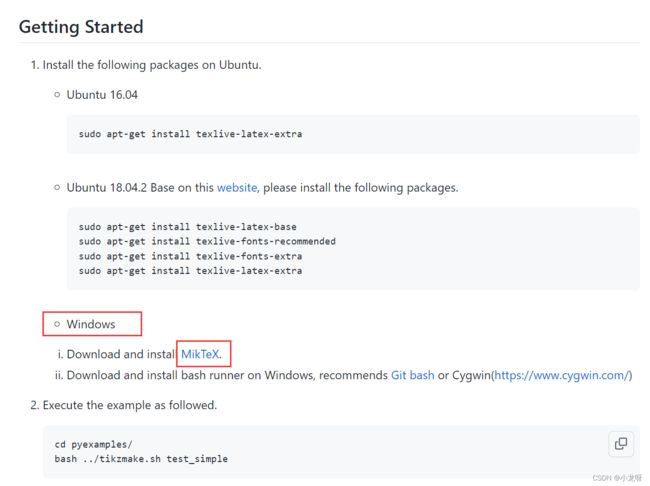
四、使用PlotNeuralNet
我个人建议是将整个源代码放进一个Pycharm项目的,因为我们还需要自己编写python程序,给大家看看我的界面:

1.编写python脚本Unet.py
我们把它存放在个人项目文件夹my_project里面。
import sys
sys.path.append('../')
from pycore.tikzeng import *
from pycore.blocks  import *

arch = [
    # 开头
    to_head('..'),
    to_cor(),
    to_begin(),

    # 添加输入层
    to_input( '../examples/fcn8s/cats.jpg' ),

    #  添加block1包含一个二重卷积接relu
    to_ConvConvRelu( name='ccr_b1', s_filer=500, n_filer=(64,64), offset="(0,0,0)", to="(0,0,0)", width=(2,2), height=40, depth=40  ),
    to_Pool(name="pool_b1", offset="(0,0,0)", to="(ccr_b1-east)", width=1, height=32, depth=32, opacity=0.5),
    #  添加三个block,每个包含三个二卷积加一池化
    *block_2ConvPool( name='b2', botton='pool_b1', top='pool_b2', s_filer=256, n_filer=128, offset="(1,0,0)", size=(32,32,3.5), opacity=0.5 ),
    *block_2ConvPool( name='b3', botton='pool_b2', top='pool_b3', s_filer=128, n_filer=256, offset="(1,0,0)", size=(25,25,4.5), opacity=0.5 ),
    *block_2ConvPool( name='b4', botton='pool_b3', top='pool_b4', s_filer=64,  n_filer=512, offset="(1,0,0)", size=(16,16,5.5), opacity=0.5 ),

    #  瓶颈,为block5
    to_ConvConvRelu( name='ccr_b5', s_filer=32, n_filer=(1024,1024), offset="(2,0,0)", to="(pool_b4-east)", width=(8,8), height=8, depth=8, caption="Bottleneck"  ),
    to_connection( "pool_b4", "ccr_b5"),

    # 解码器
    #  多个block,每个为unconv
    *block_Unconv( name="b6", botton="ccr_b5", top='end_b6', s_filer=64,  n_filer=512, offset="(2.1,0,0)", size=(16,16,5.0), opacity=0.5 ),
    to_skip( of='ccr_b4', to='ccr_res_b6', pos=1.25),
    *block_Unconv( name="b7", botton="end_b6", top='end_b7', s_filer=128, n_filer=256, offset="(2.1,0,0)", size=(25,25,4.5), opacity=0.5 ),
    to_skip( of='ccr_b3', to='ccr_res_b7', pos=1.25),
    *block_Unconv( name="b8", botton="end_b7", top='end_b8', s_filer=256, n_filer=128, offset="(2.1,0,0)", size=(32,32,3.5), opacity=0.5 ),
    to_skip( of='ccr_b2', to='ccr_res_b8', pos=1.25),

    *block_Unconv( name="b9", botton="end_b8", top='end_b9', s_filer=512, n_filer=64,  offset="(2.1,0,0)", size=(40,40,2.5), opacity=0.5 ),
    to_skip( of='ccr_b1', to='ccr_res_b9', pos=1.25),

    to_ConvSoftMax( name="soft1", s_filer=512, offset="(0.75,0,0)", to="(end_b9-east)", width=1, height=40, depth=40, caption="SOFT" ),
    to_connection( "end_b9", "soft1"),
    #  结束
    to_end()
    ]


def main():
    namefile = str(sys.argv[0]).split('.')[0]
    to_generate(arch, namefile + '.tex' )

if __name__ == '__main__':
    main()
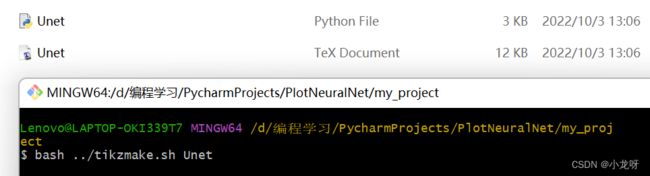
2.执行程序Unet.py
这个执行之后就会生成一个Unet.tex,这个就是这个模型的Latex代码,所以我说你要可以直接写出来建议跳过python脚本步骤:

3.使用Git Bash
我们进入到刚才的文件夹执行bash ../tikzmake.sh Unet,这样就可以解析Unet.tex文件并生成一个模型的PDF啦,好的,大功告成!

这个代码应该不难理解,大家可以在这里查看原作者的源代码,有问题的话看看官方教程或者自己搜索解决吧,这个我也是刚使用,当然也欢迎大家一起交流!

如有错误或者不足之处,欢迎大家留言指正!