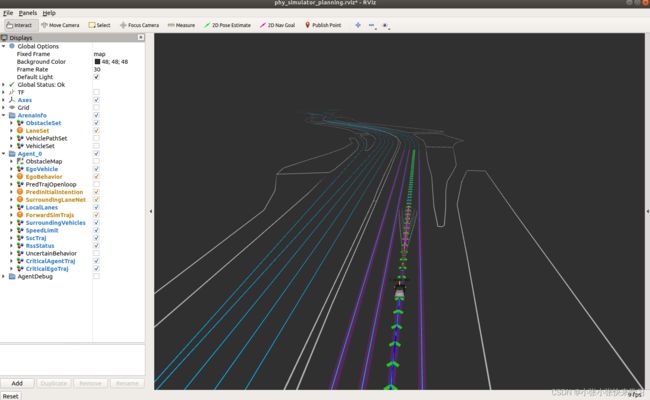
自动驾驶轨迹预测/规划可视化工具
该可视化工具在ubuntu18.04下基于ros实现。该文档基于EPSILON的README操作流程完成。
参考文献:EPSILON: An Efficient Planning System for Automated Vehicles in Highly Interactive Environments
github:GitHub - HKUST-Aerial-Robotics/EPSILON
目录
一、准备工作:
1.安装ros
2. 安装必须的包
3.安装OOQP
1.安装BLAS
2. 安装ma27
3.安装OOQP
4.安装protobuf
5. Build on ROS
二、运行程序
一、准备工作:
1.安装ros
参考:Ubuntu18.04安装ROS Melodic(详细,亲测安装完成,有清晰的截图步骤)_爱跑步的mango的博客-CSDN博客_xubuntu18.04安装ros
如果遇到 rosdep update报错问题,参考:
(成功)ROS安装过程中如何解决 rosdep update 命令出现错误——安装记录_小张小张快来学习的博客-CSDN博客
2. 安装必须的包
sudo apt-get install libgoogle-glog-dev libdw-dev libopenblas-dev gfortran

pip install empy pygame
3.安装OOQP
参考:
ubuntu18.04安装OOQP过程记录_小张小张快来学习的博客-CSDN博客
1.安装BLAS
1.创建QP_lib文件夹。
2.进入QP_lib文件夹。
3.下载并解压blas包
wget http://www.netlib.org/blas/blas.tgz
tar zxf blas.tgz
cd BLAS-3.10.0/    #下载的版本
4.编译
如果是32位系统,使用GNU的g77或gfortran编译器来编译:
g77 -O2 -fno-second-underscore -c *.f
gfortran -O2 -std=legacy -fno-second-underscore -c *.f #(推荐)
如果是64位系统,使用GNU的g77或gfortran编译器来编译:
g77 -O3 -m64 -fno-second-underscore -fPIC -c *.f
gfortran -O3 -std=legacy -m64 -fno-second-underscore -fPIC -c *.f #(推荐)
如果使用的是Intel的Fortran编译器,则:
ifort -FI -w90 -w95 -cm -O3 -unroll -c *.f
注意:
- 请根据情况选择上述5个命令中的一个执行
- 在编译BLAS、LAPACK、NumPy和SciPy的时候,所选择的Fortran编译器必须要保持一致
- 在下述LAPACK的编译安装中,需要使用Fortran 90编译器,因此不应该使用g77来编译BLAS
5、后续工作
ar r libfblas.a *.o
ranlib libfblas.a
rm -rf *.o      # 清理文件
export BLAS=~/src/BLAS-3.5.0/libfblas.a # 导出BLAS环境变量,注意改为自己的路径及版本号
2. 安装ma27
回到QP_lib文件夹下:
git clone https://github.com/HITSZ-LeggedRobotics/ma27.git
cd ma27/ma21-1.0.0/
bash ./configure CPPFLAGS="-fPIC" CFLAGS="-fPIC" FFLAGS="-fPIC"
sudo make install
3.安装OOQP
回到QP_lib文件夹下:
git clone https://github.com/emgertz/OOQP.git
cd OOQP/
./configure
make
sudo make install
注意,在make及sudo make install时会出现如下报错,不用管(见此文章评论区)。
出现上面的内容说明已经安装完成。
4.安装protobuf
参考:Ubuntu 18.04 安装 protobuf 3.2.0 版本_寻墨roy的博客-CSDN博客_ubuntu18.04安装protobuf
1.下载protobuf
protobuf下载地址:https://codeload.github.com/google/protobuf/zip/v3.2.0
2.执行
cd protobuf-3.2.03.执行
./configure如果报错或者没有那个文件或目录,执行
./autogen.sh

./configure
4. 执行
make

sudo make install
5. Build on ROS
1.创建工作空间
mkdir -p ~/EPSILON_WS/src

cd ~/EPSILON_WS/src

catkin_init_workspace
2.编译
cd ~/EPSILON_WS/src

git clone https://github.com/HKUST-Aerial-Robotics/EPSILON.git

cd ..

catkin_make

source devel/setup.bash
至此,可视化工具的所有准备工作已经完成!
3.编译报错
解决方案:【c++ debug】fatal error: google/protobuf/port_def.inc: no such file or directory_shuaixio的博客-CSDN博客
因为安装anaconda的时候,protoc的路径为 anaconda3/bin/protoc,因此要把这个文件删除,重新执行“4.安装protobuf”。
二、运行程序
注意每打开一个终端都要source一下。
1.打开一个终端输入:
roscore2.另外打开一个终端打开rviz:
source devel/setup.bash

roscd phy_simulator/rviz/

rviz -d phy_simulator_planning.rviz
此时rviz只显示一个坐标,不要着急,继续往下操作。
3.打开新终端:
source devel/setup.bash

roslaunch planning_integrated test_ssc_with_eudm_ros.launch
4.打开新终端:
source devel/setup.bash

roslaunch ai_agent_planner onlane_ai_agent.launch
5.打开新终端:
source devel/setup.bash

roslaunch phy_simulator phy_simulator_planning.launch
程序能够运行起来,如下:
6.控制agent
source devel/setup.bash

roscd aux_tools/src/

python terminal_server.py
至此,整个轨迹预测/规划仿真完成!!


