平时学习随笔
一天
- yolo之anchor
- yolov1 只用了backbone,没有加其他的网络。
步长越大,得到的特征图就越小,特征图越小用的锚框就越大,为了更好检测大目标,反之相反。 参照yolo3的anchor分配 - FPN 多尺度特征融合(金字塔特征融合),就是yolo用的那个
- FCN 全连接网络层
- PAnet 参考文章
https://www.cnblogs.com/wzyuan/p/10029830.html - –cfg 是定义为可选参数;required=True,表示必须在命令行输入
- 遇到CUDA报错,cuda runtime error (801) : operation not supported at
试着把 number_work 调成 0(windows环境下)
如果 number_work != 0 可能会报错,例如
RuntimeError:
        An attempt has been made to start a new process before the
        current process has finished its bootstrapping phase.

        This probably means that you are not using fork to start your
        child processes and you have forgotten to use the proper idiom
        in the main module:

            if __name__ == '__main__':
                freeze_support()
                ...

        The "freeze_support()" line can be omitted if the program
        is not going to be frozen to produce an executable.
- yacs 是yaml配置文件库
- eval() 这个函数可就牛了,它将参数执行并将结果以字符串的形式返回,可以用来调用方法。
注意!神经网络里 eval() 代表测试模式的意思,分为 train() 和 eval() 俩模式 - 发现一件事,开着VPN,anaconda 打不开。。。
- 学到一个 getattr() 的用法
getattr() 函数用于返回一个对象属性值,这里的 config[name][‘type’] 是 model 的一个类,getattr() 返回这个类的同时,向这个类的 init() 里传入 *args, **config[name][‘args’] 将它初始化。
def get_instance(module, name, config, *args):
    # GET THE CORRESPONDING CLASS / FCT
    return getattr(module, config[name]['type'])(*args, **config[name]['args'])
二天
- 分割的标签制作
用 labelme 打完标生成json,用 labelme 里面的脚本 json_to_dataset.py 生成 label 图片
labelme 可用 pip install labelme 安装
三天
- 返回数据时可以用 yield 写法
def data_iter(batch_size, features, labels):
    num_examples = len(features)
    indices = list(range(num_examples))
    random.shuffle(indices)  # 样本的读取顺序是随机的
    for i in range(0, num_examples, batch_size):
        j = torch.LongTensor(indices[i: min(i + batch_size, num_examples)]) # 最后一次可能不足一个batch
        yield  features.index_select(0, j), labels.index_select(0, j)
附上一位大佬的 yield 教程
四天
- cifar10的数据读取
import cv2
import numpy as np
import os

def unpickle(file):
    import cPickle
    with open(file, 'rb') as f:
        dict = cPickle.load(f)
    return dict


def main(cifar10_data_dir):
    for i in range(1, 6):
        train_data_file = os.path.join(cifar10_data_dir, 'data_batch_' + str(i))
        print(train_data_file)
        data = unpickle(train_data_file)
        print('unpickle done')
        for j in range(10000):
            img = np.reshape(data['data'][j], (3, 32, 32))
            img = img.transpose(1, 2, 0)
            img_name = 'train/' + str(data['labels'][j]) + '_' + str(j + (i - 1)*10000) + '.jpg'
            cv2.imwrite(os.path.join(cifar10_data_dir, img_name), img)

    test_data_file = os.path.join(cifar10_data_dir, 'test_batch')
    data = unpickle(test_data_file)
    for i in range(10000):
        img = np.reshape(data['data'][i], (3, 32, 32))
        img = img.transpose(1, 2, 0)
        img_name = 'test/' + str(data['labels'][i]) + '_' + str(i) + '.jpg'
        cv2.imwrite(os.path.join(cifar10_data_dir, img_name), img)


if __name__ == "__main__":
    main('cifar-10-batches-py')
复制的别人的代码
- zip() 用法技巧
可以将每一张图片和标签捆绑在一起迭代。
def show_fashion_mnist(images,labels):
    use_svg_display()
    _,figs = plt.subplots(1,len(images),figsize=(12,12))
    for f,img,lbl in zip(figs,images,labels):
        f.imshow(img.view((28,28)).numpy())
        f.set_title(lbl)
        f.axes.get_xaxis().set_visible(False)
        f.axes.get_yaxis().set_visible(False)
    plt.show()
五天
- 坐标转换
- 就是把旋转框 cx,cy,w,h,angle,转换成四点坐标x1,y1,x2,y2,x3,y3,x4,y4
xc,yc	中心点坐标
w,h,angle	宽高、角度
def rotatePoint(xc, yc, xp, yp, theta):
    xoff = xp - xc
    yoff = yp - yc
    cosTheta = math.cos(theta)
    sinTheta = math.sin(theta)
    pResx = cosTheta * xoff + sinTheta * yoff
    pResy = - sinTheta * xoff + cosTheta * yoff
    return str(int(xc + pResx)), str(int(yc + pResy))


x1, y1 = rotatePoint(x, y, x - w / 2, y - h / 2, -angle)
x2, y2 = rotatePoint(x, y, x + w / 2, y - h / 2, -angle)
x3, y3 = rotatePoint(x, y, x + w / 2, y + h / 2, -angle)
x4, y4 = rotatePoint(x, y, x - w / 2, y + h / 2, -angle)
- 想从两个数之间随机取几个数,可以这样
for i in random.sample(range(111,119),3):
	print(i)
六天
遇到了 NotImplementedError 这个东西是啥呢
简单来说,在python中,raise可以实现报出错误的功能,而报出错误的条件是程序员可以自己规定的。在面向对象编程中,如果想在父类中预留一个方法,使该方法在子类中实现。如果子类中没有对该方法进行重写就被调用,则报NotImplementError这个错误
demo如下
class One(object):

    def show(self):
        raise NotImplementedError

class Two(One):

    def show(self):
        print('hello world!')

number = Two()
number.show()
One 里的 show 函数,我想在子类中重写,所以在父类中,我声明一下就好了,如果你写子类时忘了重写了,让他报错 NotImplementedError 告诉你,你忘了在子类中实现啦!
七天
- 训练 segnet 时遇到了报错 Assertion `t 」= 0 && t 「 n_classes failed
是类别设置问题,每个像素对应的类别没有和类别标签对应上。查看 label 图片就知道了 - 训练 segnet 时遇到报错 shape ‘[4, 224, 224]’ is invalid for input of size 100352
这种报错可能是你的 batch_size 设置太大了
八天
- 填一个小坑
parser.add_argument('--num_workers',default=0,type=int)- 这个参数 windows 环境不能用,只能设置 0 ,只有 Linux 环境可以用
第九天
-
torch.argmax的dim维度问题
自己看大神的博客吧,叫我也讲不明白,很抽象
torch.argmax中dim详解 -
x, id1 = F.max_pool2d(x, kernel_size=2, stride=2, return_indices=True)
说下里面的参数 return_indices 指的是,你做 MAX池化 时选择的最大值在原图中的位置(index) -
说说语义分割
他是对每个像素点进行分类,所以一般都是最后输出的是一个0,1的特征图,所以你可能会问,那多分类怎么办,多分类的话,他是每个类别都会输出一个0,1的特征图,也就是每一类都给你分一次。
torch 里的 shape 一般都是(batch,C,W,H),batch 是 batch_size,C是通道数,作为最后一层的输出层,他每个类别会输出一个特征图,所以有几个类别,通道数就是几。 -
python-opencv 的 erode(腐蚀)函数
opencv 更新的真快啊
4.5.4 版的 opencv 用 erode 之前,必须用 cv2.getStructuringElement() 构造他的 kernel,不然报错
九天
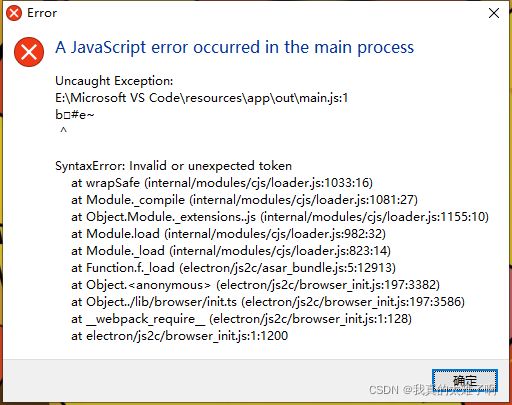
启动vscode 发生错误
十天
发现一个小东西
pytorch 保存 模型时
torch.save(model, './model_para.pth')		#保存完整的模型结构
torch.save(model.state_dict(), './model_para.pth')		#只保存模型的参数
有啥用呢这玩意儿,在你可视化模型结构的时候,最好保存完整结构,不然可视化会很拉跨。
另外推荐一个可视化神器 netron
十一天
-
__call__函数说明
这个函数可以帮助你理解为什么有些类对象没有调用方法就可以执行某些其成员函数。
该方法的功能类似于在类中重载 () 运算符,使得类实例对象可以像调用普通函数那样,以“对象名()”的形式使用。
懂了吧,重载()符号。
在 pytorch 中的__call__里面调用了 forward()函数,所以你在model = VGG16()output = model(x)时,就会自动调用 forward()了
相关博客 -
梳理一下卷积过程的一些细节
一张图片是三通道的,那么对应的卷积核也是三通道的,一个卷积核是三通道,N 个卷积核就是 N*3 通道。一个卷积核对图片的三个通道做完卷积操作后,输出一个单通道的特征图,N 个卷积核做完卷积操作后输出 N 个特征图。 -
关于 torch.nn 和 torch.nn.functional 的用法问题
nn.Xxx和nn.functional.xxx的实际功能是相同的,运行效率也近乎相同。
至于喜欢哪一种方式,是个人口味问题,但PyTorch官方推荐:具有学习参数的(例如,conv2d, linear, batch_norm)采用nn.Xxx方式,没有学习参数的(例如,maxpool, loss func, activation func)等根据个人选择使用nn.functional.xxx或者nn.Xxx方式。但关于dropout,个人强烈推荐使用nn.Xxx方式,因为一般情况下只有训练阶段才进行dropout,在eval阶段都不会进行dropout。使用nn.Xxx方式定义dropout,在调用model.eval()之后,model中所有的dropout layer都关闭,但以nn.function.dropout方式定义dropout,在调用model.eval()之后并不能关闭dropout。
十二天
- 遇到报错
RuntimeError: DataLoader worker (pid(s) 6600, 6601) exited unexpectedly
原因: num_workers 设置问题 - Dataset 中的
__getitem__函数
如果在类中定义了__getitem__()方法,那么他的实例对象(假设为P)就可以这样P[key]取值。当实例对象做P[key]运算时,就会调用类中的__getitem__()方法。
在 Dataset 中定义了__getitem__() 方法,之后用 Dataloader 得到了 train_iter,就可以直接遍历 train_iter(等于train_iter.next()) 得到 img 和 label 信息。
十三天
今天编译 caffe 时遇到问题,先是缺少 protobuf 编译失败,然后开始安装 protobuf,
又遇到 aclocal-1.16: command not found
直接 autoreconf -ivf 这个命令解决,咱也不知道啥原理。
十四天
dim 参数
举个例子
X = torch.arange(12, dtype=torch.float32).reshape((3,4))
Y = torch.tensor([[2.0, 1, 4, 3], [1, 2, 3, 4], [4, 3, 2, 1]])
torch.cat((x,y),dim=0)
torch.cat((x,y),dim=1)

(tensor([[ 0.,  1.,  2.,  3.],
         [ 4.,  5.,  6.,  7.],
         [ 8.,  9., 10., 11.],
         [ 2.,  1.,  4.,  3.],
         [ 1.,  2.,  3.,  4.],
         [ 4.,  3.,  2.,  1.]]),
 tensor([[ 0.,  1.,  2.,  3.,  2.,  1.,  4.,  3.],
         [ 4.,  5.,  6.,  7.,  1.,  2.,  3.,  4.],
         [ 8.,  9., 10., 11.,  4.,  3.,  2.,  1.]]))
dim = 0 是以行为目标进行操作,表现为,两个向量摞在一起。
dim = 1 是以列为目标进行操作,表现为,两个向量并排在一起。
十五天
- 一个python语法糖
y = torch.tensor([0,3])
y_hat = torch.tensor([[0.1,0.3,0.6,0.9],[0.3,0.2,0.5,0.1]])
y_hat[[0,1],y]
输出为
tensor([0.1000, 0.1000])
说下这里的逻辑
y_hat[[0,1],y] 是从 y_hat 里取值,[0,1] 你要取的第几个数,下标从0开始,这里表示要取两个数,
怎么取呢,根据 y 里面的值来取,把 y 里的值当作下标索引,所以 第一个数为,
y_hat 里的第一个数的第一个数(y_hat[0][0]),这样以此类推
十六天
- 关于 pytorch 中 apply() 的用法
- 这个函数一般用来对网络进行一些处理操作
net.apply(Function)
Function是封装的操作函数,apply 可以将 net(网络) 中的每一层放到 Function 中去遍历一遍,就等于每一层都处理一遍。
注:这里指的是 torch 的 apply,python 里也有 apply,好像不太一样。
十七天
- pytorch 中用GPU训练
需要把数据和模型都放入GPU中
image = torch.Tensor(image).to(device)数据
label = torch.Tensor([int(label)]).to(device)标签
net = Net()模型
net.cuda() - pytorch 中 maxpooling 的问题
关于 return_indices Sequential写法为True会报错,不知道为啥
 nn.Sequential 的写法
 nn.MaxPool2d(kernel_size=2,stride=2,return_indices=False)

nn.functional 的写法
output,id1 = F.max_pool2d(output,kernel_size=2,stride=2,return_indices=True)
把一个多维的张量拉平是一个在神经网络中经常要使用的操作,在pytorch中同样也有许多方法来进行拉平
output = torch.flatten(output,start_dim=1)    转 caffe 时支持这种写法
output = output.view(10,-1)
output = output.reshape(10,-1)
第十八天
给大家推荐一个pytorch转caffe的框架
推荐理由是,作者人很厉害,也很nice,并且他的框架一直更新维护到现在,其他框架两年前已经没人维护了。
地址在这,他是ubuntu下的,他有自己的caffe,需要编译
十九天
- caffe训练遇到报错
F0216 14:08:23.464159  4731 blob.cpp:34] Check failed: shape[i] <= 0x7fffffff / count_ (1280 vs. 951) blob size exceeds INT_MAX
*** Check failure stack trace: ***
    @     0x7f173514b5cd  google::LogMessage::Fail()
    @     0x7f173514d433  google::LogMessage::SendToLog()
    @     0x7f173514b15b  google::LogMessage::Flush()
    @     0x7f173514de1e  google::LogMessageFatal::~LogMessageFatal()
    @     0x7f173580379b  caffe::Blob<>::Reshape()
    @     0x7f17358f12a5  caffe::BaseConvolutionLayer<>::Reshape()
    @     0x7f173583f992  caffe::CuDNNConvolutionLayer<>::Reshape()
    @     0x7f17357a2e61  caffe::Net<>::Init()
    @     0x7f17357a46e1  caffe::Net<>::Net()
    @     0x7f17357dec9a  caffe::Solver<>::InitTrainNet()
    @     0x7f17357e0007  caffe::Solver<>::Init()
    @     0x7f17357e03aa  caffe::Solver<>::Solver()
    @     0x7f1735783a53  caffe::Creator_SGDSolver<>()
    @           0x40afb9  train()
    @           0x4077c8  main
    @     0x7f17338e1840  __libc_start_main
    @           0x408099  _start
    @              (nil)  (unknown)
已放弃 (核心已转储)
是因为数据大小超出了caffe的最大范围,需要将数据resize一下
- 导入caffe时遇到报错
    from ._caffe import Net, SGDSolver, NesterovSolver, AdaGradSolver, \
ImportError: dynamic module does not define module export function (PyInit__caffe)
网上说因为是python版本问题
- caffe训练遇到报错
I0216 15:01:55.187206  7881 upsample_layer.cpp:27] Params 'pad_out_{}_' are deprecated. Please declare upsample height and width useing the upsample_h, upsample_w parameters.
F0216 15:01:55.187214  7881 upsample_layer.cpp:59] Check failed: bottom[0]->height() == bottom[1]->height() (46 vs. 45)
原因是:
(1)如果输入图像的高和宽不是32的整数倍,需要指定upsample_h, upsample_w的大小,不然会出现维度不一致的错误,原因是upsample需要借助编码过程中pool层的位置信息,例如: pool前特征图大小为45, pool后为23,如果直接对23 unsample, 其大小为46, 而pool产生的位置图大小为45,造成upsample时大小不一致;
(2)指定upsample_h upsample_w的大小时,需要根据编码过程中对应pool特征图的大小,来设定upsample的大小,例如样例proto中输入图像大小为480*360, 以360分析:360—pool1(180)—pool2 (90)—pool3 (45)—pool4(23)—pool5(12), upsample5需要借助pool4位置信息,需要与pool4大小一致,因此upsamle_h=23 ~
原文链接
二十天
- caffe prototxt里的 data 层的数据格式
有三种:
type: lmdb、hdf5 这俩是caffe的数据库,需要用脚本转换的。
type: ImageData 这个是 train.txt 形式,就是用txt保存数据的路径和标签(平时经常用的那种)
二十一天
- pytorch 的自动调整学习率模块 torch.optim.lr_scheduler
torch.optim.lr_scheduler模块提供了一些根据epoch训练次数来调整学习率(learning rate)的方法。一般情况下我们会设置随着epoch的增大而逐渐减小学习率从而达到更好的训练效果。
用法:放在更新梯度之后
optimizer_1.step()
scheduler_1.step()
二十二天
- 编译 pycaffe 遇到报错
undefined symbol: _ZN5boost6python6detail11init_moduleER11PyModuleDefPFvvE
Google该错误,发现原因是boost_python的版本不匹配,默认python版本为3.5,而boost_python为2.7。
解决方法:
修改 makefile.config 里 72行的
PYTHON_LIBRARIES := boost_python3 python3.6m #改成你自己的python版本
然后你可能会遇到 Cannot find -lboost_python3
请参考这俩链接 链接一
链接二
然后重新编译caffe
二十三天
- 关于 manual_seed(SEED)
设置种子,让每次随机初始化的权重保持一致
torch.manual_seed(SEED)		CPU
torch.cuda.manual_seed(SEED)	GPU
二十四天
- 今天用ubuntu18.04编译GPU的caffe_segnet,遇到了gcc版本问题。
我用的cuda8.0,需要gcc4.8的
但是caffe,需要>=5.0的gcc
最后我找到一篇博客链接地址
这里面讲的是,在 /usr/local/cuda/include/host_config.h 中,有一行配置
是否支持gcc-5以上的开关,把注释掉就好了,很nice。
二十五天
今天安装Visual_Studio2022,运行项目时报错找不到exe文件,而且四百多个头文件不能导入。
找到了解决办法
链接地址
问题原因是:我为了安装双系统,分了一个硬盘出去,那个盘之前是装Visual_Studio的,所以注册表里的地址需要手动修改。
二十六天
最近碰到了caffe训练,不收敛的问题,找到一篇博客救了我。是一个batchnormal层的配置问题
链接地址
二十七天
Pytorch model.load_state_dict()加载模型遇到问题
‘model’ object has no attribute ‘copy’
是因为训练模型时没有用 model.state_dict() 来保存模型
保存和加载方式是对应的
链接地址
二十八天
今天找到一个vscode写C/C++的教程,很好用。
教程一
教程二
基本教程一就能解决
二十九天
还是vscode中写C++
在 tasks.json 这个配置文件中
"args": [
            "${file}",
            "-o",    // 指定输出文件名,不加该参数则默认输出a.exe,Linux下默认a.out
            "${fileDirname}/${fileBasenameNoExtension}.exe",
            "-g",    // 生成和调试有关的信息
            "-m64",  // 不知为何有时会生成16位程序而无法运行,此条可强制生成64位的
            "-Wall", // 开启额外警告
            "-static-libgcc",     // 静态链接libgcc,一般都会加上
            "-fexec-charset=UTF-8", // 生成的程序使用GBK编码,不加这条会导致Win下输出中文乱码;繁体系统改成BIG5
            "-D__USE_MINGW_ANSI_STDIO", // 用MinGW写C时留着,否则不需要,用于支持printf的%zd和%Lf等
            "-DNDEBUG",
        ], // 编译的命令,其实相当于VSC帮你在终端中输了这些东西
这个配置可以相当于gcc的编译参数
当你用 #ifndef NDEBUG 这个东西时,可以在这个配置里修改。
三十天
C++ 内联函数
内联函数一般作用于简单不复杂的函数中,可以减少运行时间。
内联函数一般定义在头文件中。
用 inline 来定义
三十一天
今天想训练下segnet,之前已经配置好caffe的训练环境,好久没用了,大概有一个月,今天训练时突然报错说cuda和cudnn相关的lib没有了,不知道为什么。
报错内容
./build/tools/caffe: error while loading shared libraries: libcudart.so.8.0: cannot open shared object file:  can not open shared object file: No such file or directory
解决链接
三十二天
今天在ubuntu上用微信,屏幕中间一直有个黑色的方块,在微信里发一条666的消息就好了,很奇怪。
解决ubuntu使用百度网盘闪退问题:
sudo apt-get install alien
因为缺少依赖,安装即可
三十三天
今天弄了下在caffe中用 Deconvolution 来替换 upsample ,先了解prototxt中的网络结构的配置含义。
参考链接
三十四天
找到一个关于 python ctypes 包的资料
链接地址
三十五天
找到一个 TensorRt的学习资料,trtpy第三方库,是一个开发好的运行环境
链接地址
三十六天
今天看到了几个语义分割的评价指标,分别是 G,C,Miou,BF
G:global accuracy,测量数据集中所有像素正确分类的百分比
C:class average accuracy,所有类的预测准确度的平均值
mIOU:每一个类的交并比的平均
BF:边界F1测量
三十七天
平时重装系统会发现 Anaconda 快捷方式没有了。
用这个吧
三十八天
- 遇到报错
OMP: Error #15: Initializing libiomp5md.dll, but found libiomp5md.dll already initialized.
#解决办法
import os
os.environ['KMP_DUPLICATE_LIB_OK'] = 'TRUE'
- 平时跑代码时经常会遇到
__all__这个变量
说明链接
a.py
__all__ = ['UNet', 'NestedUNet']
b.py
import archs
ARCH_NAMES = archs.__all__
__all__是一个字符串list,用来定义模块中对于from XXX import *时要对外导出的符号,即要暴露的借口,但它只对import *起作用,对from XXX import XXX不起作用。
__all__ 里面的内容表示对外暴露的内容,其他内容及时你 import 了也找不到。
- vars()
在 parse_args() 中常用
config = vars(parse_args())

vars 会将命令行参数解析成字典
vars() 函数返回对象的 __dic__ 属性。
__dict__ 属性是包含对象的可变属性的字典。
可以直接获得 parse_args() 字典中的值,也就是我们设置的参数
- torch.stack()
可以将几张图片连起来以一张图显示,可用于对比原图,标签,结果。
torch.stack(img,label,result,dim = 0)
三十九天
找了几篇关于parser.add_argument参数的博客
资料
资料
四十天
-
在看UNet中,看到一个参数 deep_supervision 是深监督的意思,就是在网络的某个部位加入一个辅助的分类器作为一种网络分支来对主干网络进行监督的技巧,用来解决深度神经网络训练梯度消失和收敛速度过慢等问题。
链接资料 -
item()
链接资料
作用:取出单元素张量的元素值并返回该值,保持原元素类型不变。,即:原张量元素为整形,则返回整形,原张量元素为浮点型则返回浮点型。(就是取里面的值) -
tqdm 的一些函数
资料链接
资料链接
pbar = tqdm(total=100)
pbar.set_postfix(‘loss’,‘iou’)
在进度条中可显示信息,如 loss,iou等
pbar.update(1)
进度条显示的百分比
四十一天
- yaml.dump()
链接资料
作用:将内容写入你创建的 yaml 文件中 __dict__
资料链接
四十二天
今天尝试了pytorch.prune 的剪枝,但是模型并没有变小,网上查是说只是参数的计算变简单了,并没有减少。
if epoch % 2 == 0:
	name = [SegNet.encoder.conv1_1,SegNet.encoder.conv1_2,SegNet.encoder.conv2_1,SegNet.encoder.conv2_2,SegNet.encoder.conv3_1,SegNet.encoder.conv3_2,SegNet.encoder.conv3_3,
                    SegNet.encoder.conv4_1,SegNet.encoder.conv4_2,SegNet.encoder.conv4_3,SegNet.encoder.conv5_1,SegNet.encoder.conv5_2,SegNet.encoder.conv5_3,SegNet.conv6_1,
                    SegNet.conv6_2,SegNet.conv6_3,SegNet.conv7_1,SegNet.conv7_2,SegNet.conv7_3,SegNet.conv8_1,SegNet.conv8_2,SegNet.conv8_3,SegNet.conv9_1,SegNet.conv9_2,
                    SegNet.conv10_1,SegNet.conv10_2
           ]
    for i in name:
        model_ = i
        prune.ln_structured(i,'weight',amount=0.5,n=2,dim=0)
        prune.remove(i,'weight')
四十三天
from __future__ import print_function
链接资料
有时在代码开头会看到这样一行
from __future__ import print_function
是为了可以兼容不同版本的语言,例如 python2 像 python3 一样使用。
四十四天
资料链接
- 最近在做模型剪枝,发现这里需要一些解析模型结构和参数的操作,所以查了下相关资料,根据你模型设计不同,解析方式有所不同,个人认为,尽量少嵌套,这样便利起来很方便。
四十五天
- 今天突然需要在字典中切片,发现字典并没有切片,找到一个很nice 的方法,还是基础薄弱呀~
资料链接
四十六天
- pytorch: MaxUnpool2d 与 Upsampling
Upsampling:上采样,被nn.functional.interpolate代替
import torch
import torch.nn as nn
import numpy as np
# pool of non-square window
## In the simplest case, the output value of the layer
# with input size (N,C,H,W)(N, C, H, W)(N,C,H,W),
# output (N,C,Hout,Wout)(N, C, H_{out}, W_{out})(N,C,Hout,Wout) and kernel_size (kH,kW)(kH, kW)(kH,kW) can be precisely described as:
data = np.arange(64).reshape((8,8))
A = torch.Tensor(data.reshape(1,1,8,8))
print('A=',A)
## MAX POOL
maxpool = nn.MaxPool2d((2, 2), stride=(2, 2),return_indices=True)
B,indices = maxpool(A)
print('B=',B)
## Upsample
Upsample = nn.Upsample(scale_factor=2, mode='bilinear'
## interpolate
x7 = F.interpolate(x6,scale_factor=2,mode='bilinear')
- pytorch 加载模型、保存模型
链接资料 - pytorch转onnx demo
链接资料 - optimizer.step()和scheduler.step()的区别
optimizer 是梯度下降策略
scheduler 是学习率调整策略
optimizer.step()通常用在每个mini-batch之中,而scheduler.step()通常用在epoch里面,但是不绝对,可以根据具体的需求来做。只有用了optimizer.step(),模型才会更新,而scheduler.step()是对lr进行调整。
optimizer = optim.SGD(model.parameters(), lr = 0.01, momentum = 0.9)
scheduler = lr_scheduler.StepLR(optimizer, step_size = 100, gamma = 0.1)
四十天
- 数据处理时经常看到
[..., None]这种东西。
找了个资料,讲的很不错 链接资料
,是 numpy 的东西,简单来说是给数据增加了一个维度
四十一天
- torch.backends.cudnn.benchmark的用法
总的来说可以让你的模型快一点。
资料链接
四十二天
- 这几天碰到一个很恶心的报错,现在还没有解决
C:\cb\pytorch_1000000000000\work\aten\src\ATen\native\cuda\NLLLoss2d.cu:95: block: [0,0,0], thread: [156,0,0] Assertion `t >=
0 && t < n_classes` failed.
C:\cb\pytorch_1000000000000\work\aten\src\ATen\native\cuda\NLLLoss2d.cu:95: block: [0,0,0], thread: [157,0,0] Assertion `t >=
0 && t < n_classes` failed.
C:\cb\pytorch_1000000000000\work\aten\src\ATen\native\cuda\NLLLoss2d.cu:95: block: [0,0,0], thread: [158,0,0] Assertion `t >=
0 && t < n_classes` failed.
C:\cb\pytorch_1000000000000\work\aten\src\ATen\native\cuda\NLLLoss2d.cu:95: block: [0,0,0], thread: [159,0,0] Assertion `t >=
0 && t < n_classes` failed.
Traceback (most recent call last):
  File "d:/code/Image_Segmentation-master/main.py", line 101, in <module>
    main(config)
  File "d:/code/Image_Segmentation-master/main.py", line 61, in main
    solver.train()
  File "d:\code\Image_Segmentation-master\solver.py", line 155, in train
    loss = self.criterion(SR,GT.long())
  File "E:\Anaconda3\envs\segnet\lib\site-packages\torch\nn\modules\module.py", line 1102, in _call_impl
    return forward_call(*input, **kwargs)
  File "E:\Anaconda3\envs\segnet\lib\site-packages\torch\nn\modules\loss.py", line 1150, in forward
    return F.cross_entropy(input, target, weight=self.weight,
  File "E:\Anaconda3\envs\segnet\lib\site-packages\torch\nn\functional.py", line 2846, in cross_entropy
    return torch._C._nn.cross_entropy_loss(input, target, weight, _Reduction.get_enum(reduction), ignore_index, label_smoothing)
RuntimeError: CUDA error: device-side assert triggered
相关资料先放这里
资料1
资料2
资料3
终于解决了,不太清楚咋解决的,反正有以下几点:
1.类别数量和最后一层输出的数量容易错
2.loss 函数这里,CrossEntropyLoss 的话需要有类别权重这个参数
-
报错 expected scalar type Long but found Float
出错原因:torch._C.nn.nll_loss(input, target)的target是LongTensor格式,也就是分类的标签要是LongTensor格式,不能是FloatTensor。修改的话data.long()就可以了
并且 CrossEntropyLoss 损失函数中是包含 nll_loss 的,所以原因是一样的。
资料链接 -
关于 CrossEntropyLoss
资料链接
四十三天
- 分割知识点:
分割网络最后输出的格式为 (batch_size|,class_num,weights,wides)
这里的 class_num 一定注意,之前一直以为是图片的三通道,并不是一定为3.
四十四天
- 转换为ONNX后,可以用 onnx-simpifier 简化模型。
- onnxruntime.capi.onnxruntime_pybind11_state.InvalidArgument: [ONNXRuntimeError] : 2 : INVALID_ARGUMENT : Invalid rank for input: input Got: 3 Expected: 4 Please fix either the inputs or the model.
这个报错,是因为你的输入shape不符合onnx model的输入shape。
如何解决:
1.使用unsqueeze()来改变shape
2.在导出 model 时使用 dynamic_axes 来使输入、输出维度变为动态。
四十五天
- 今天遇到一个奇葩问题,同一个onnx模型,在板子和pc上结果不一样。
作为尝试,发现 torch.nn.functional.interpolate 这个上采样插值里面有些参数可能会影响结果,比如 里面的 align_corners 参数,插的方式不一样,不管咋说,先试试吧,可怜的我、
资料链接 - 发现一个小东西,在segnet的分割训练中,为了转 onnx,我将 Unmaxpool 层改成了 interpolate 层,在 interpolate 中的参数 align_corrners = True 时,效果会好很多,亲测!!!
- 昨晚又调了个参,我将segnet的maxpool2d的ceil_mode = True,并将输入大小增加到了416,训练了100个epoch,效果又提升了不少,请叫我调参侠。
四十六天
- 找到一篇讲 onnx 非常好的文章
真的非常好
四十七天
- 发现一个有意思的东西
pytorch save 模型时,可以将其从float32转为float16再保存,pytorch默认保存的是float32。
转换也很简单。
model = torch.load("float32模型路径")
torch.save(model.half(),"保存路径")
我用segnet试了下,模型变小了,精度下降了。
四十八天
- opencv 的多边形填充函数
cv2.fillPoly()
做分割时,生成标签数据时会用到,你可以理解为抠图,把你的标注区域抠出来,上色。
资料链接
四十九天
看 MobileNet 涉及到的东西
Depthwise(DW)卷积与Pointwise(PW)卷积,合起来被称作Depthwise Separable Convolution(参见Google的Xception),该结构和常规卷积操作类似,可用来提取特征,但相比于常规卷积操作,其参数量和运算成本较低。所以在一些轻量级网络中会碰到这种结构如MobileNet。
- Pointwise Convolution,俗称叫做 1x1 卷积,简写为 PW,主要用于数据降维,减少参数量。
- Bottleneck结构(沙漏型结构)
五十天
- 训练时遇到的报错
RuntimeError: shape '[2, 416, 416]' is invalid for input of size 173056
刚开始我以为是显存问题,后来仔细一看发现其实是你的数据总量除不尽你的 batch_size ,比如我一共2119张图,batch_size=2,最后一个epoch会剩一个,所以报错,我记得在torch.utils.data.Dataloader 中好像有一个参数,可以忽略除不尽那些,就解决了。但我太懒了,没改,哈哈~
五十一天
-
nn.Module里面关于参数有两个很重要的属性named_parameters()和parameters(),前者给出网络层的名字和参数的迭代器,而后者仅仅是参数的迭代器。
-
os.system('cat A > B')
这个语句的意思是将B文件接到A文件上,os.system() 作用是执行windows的命令语句 cat A > B 在windows中就是将两个文件相连接。 -
np.inf 表示+∞,是没有确切的数值的,类型为浮点型
-
cv2.split() 拆分通道
-
cv2.merge() 合并通道
import cv2

img = cv2.imread('test.jpg')            #opencv读取图像文件
b, g ,r =cv2.split(img)                 #顺序是b,g,r,不是r,g,b
merged = cv2.merge([b,g,r])

cv2.imshow('image',img)
cv2.imshow("Blue 1", b)
cv2.imshow("Green 1", g)
cv2.imshow("Red 1", r)
cv2.imshow("merged 1", merged)
cv2.waitKey(0)                          #一定要加cv2.waitKey(0),要不然会报错
- np.clip() 用于截取数组中小于或者大于某值的部分,并使得被截取部分等于固定值。
np.clip( a, a_min, a_max, out=None):
out:可以指定输出矩阵的对象,shape与a相同
import numpy as np
# 一维矩阵
x= np.arange(12)
print(np.clip(x,3,8))
# 多维矩阵
y= np.arange(12).reshape(3,4)
print(np.clip(y,3,8))
- clamp() 将输入input张量每个元素的值压缩到区间 [min,max],并返回结果到一个新张量。
- 在pytorch中,我们需要注意,对于tensor的操作时候是in-place类型。
in-place类型是指,但在一个tensor上操作了之后,是直接修改了这个tensor,还是返回一个新的tensor,而旧的tensor并不修改。
如果对tensor的一个函数后加上了下划线,则表明这是一个in-place类型,也就是会修改原tensor - pytorch 中的 ceil() / floor() 作用是向 上/下 取整
五十二天
- ubuntu18.04 安装nvidia驱动
在软件与更新里的附加驱动里,找到对应的版本更换就好,它自动安装驱动,装完后开机会有个蓝屏,是 perform mok management廷烦的,看这个链接
这个蓝屏大致意思是让你输入密码确认你的硬件是正常的。
五十三天
- 自动驾驶数据集
- KITTI
- BDD
- CityScapes
- Mapillary
- ApolloScape
五十四天
安装 Scalabel 标签工具
- 在 pip install -U scalabel 时遇到报错
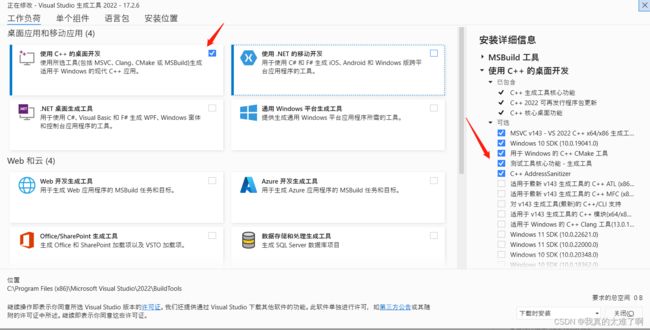
error: Microsoft Visual C++ 14.0 or greater is required. Get it with "Microsoft C++ Build Tools": https://visualstudio.microsoft.com/visual-cpp-build-tools/
原因是因为没有 Microsoft Visual C++ 需要去这里下载安装 https://visualstudio.microsoft.com/visual-cpp-build-tools/
五十五天
-
RLE 格式
RLE,Run-Length Encoding,变动长度编码算法,是一种对于二值图像的编码方法,以不同码字来表示连续的黑、白像素数. RLE 是计算连续出现的资料长度再进行压缩,是一种简单的非破坏性资料压缩法,且压缩和解压缩都非常快.
很多分割数据集为了节省空间,标注文件采用了 RLE 格式,比如 COCO 等. 但在分割类模型学习与训练中,往往采用的是 png 格式的数据作为标注.
资料链接 -
autoware 卸载
sudo apt autoremove
五十六天
平时写代码路径问题会很麻烦,有一个包 Path 可以让你的路径高效、好看
链接地址
五十七天
import torch
a = torch.one([3,3])
a = a[None]
print(a.shape)
# a = a[None]  可以升维,多的维度为1
五十八天
- 遇到报错
ValueError: RGBA values should be within 0-1 range
我在用 matplotlib 库做bdd的分割 to mask 转换时遇到的。
原因:在给类别设置颜色时,rgb的值要在 0 - 1 之间,而不是以前用的 0 - 255
五十九天
- 代码
from pathlib import Path
img_root = Path(cfg.DATASET.DATAROOT)
self.img_root = img_root   /‘train’
self.img_root = self.img_root.iterdir()
这里的 / 的意思是在目录 img_root 后边拼接一个 train
属于 Path 的目录,可以用 iterdir() 遍历目录里的文件
六十天
六十一天
ubuntu中加入 sudo 权限
修改 /etc/sudoers 文件
在 #User privilege specification
下按照 root ALL=(ALL:ALL) ALL 格式写自己的
例:cc ALL=(ALL:ALL) ALL
六十二天
all() 这个函数是,用于判断给定的可迭代参数 iterable 中的所有元素是否都为 TRUE,如果是返回 True,否则返回 False。
一个非常好的 lambda 博客
lambda
一个 @staticmethod 和 @classmethod 的博客
链接资料
六十三天
RGB2BGR
color_seg = color_seg[..., ::-1]
六十四天
训练数据预加载,可提高训练速度
- prefetch_generator
使用 prefetch_generator 库在后台加载下一 batch 的数据。
安装:
pip install prefetch_generator
使用:
- 新建DataLoaderX类
from torch.utils.data import DataLoader
from prefetch_generator import BackgroundGenerator

class DataLoaderX(DataLoader):

    def __iter__(self):
        return BackgroundGenerator(super().__iter__())
然后用 DataLoaderX 替换原本的 DataLoader。
提速原因:
原本 PyTorch 默认的 DataLoader 会创建一些 worker 线程来预读取新的数据,但是除非这些线程的数据全部都被清空,这些线程才会读下一批数据。
使用 prefetch_generator,我们可以保证线程不会等待,每个线程都总有至少一个数据在加载。
六十五天
- 增加 batch_size 有助于模型 loss 收敛
我用batch_size = 1 时,效果很不好,改成 8 后效果翻倍
六十六天
- 今天安装 ROS Melodic 后,执行 rviz 报错,和 Boundingbox 相关。
参考此博客解决 - shell 编程技巧
find . -type f | xargs grep “str”
这句是 在当前路径下的文件里查找包含 “str” 的文件
六十七天
-
今天跑 monodepth2 遇到几个报错
-
1.从 pytorch 官网下载 resnet 遇到 url 报错
解决方案
接着又报错,ImportError: DLL load failed while importing _ssl: 找不到指定的模块。
解决方案 -
2.Error loading “D:\Anaconda3\envs\segnet\lib\site-packages\torch\lib\caffe2_detectron_ops_gpu.dll” or one of its dependencies.
解决方案 将 num_works 改成 0,因为我是windows
六十七天
- 今天学习ros发现一个问题
我在编写python文件时,第一行有个代码#! /usr/bin/env python
这个是电脑去搜索python解释器,不能写成其他样子,他会自动找到你当前所在的python环境。
六十八天
- 立体视觉实现
立体视觉的基本模型是基于双目前向平行,而现实中基本不可能做到这一点,故需要通过算法进行解决。立体标定、矫正以及匹配的大部分就是基于这个目的而采用的方法。
立体标定的目的是获取左右相机的空间转换关系,通过这一步可以获取两种矩阵:本征矩阵(E)以及基础矩阵(F)。
立体矫正的目的是使得原来不平行的图像成为行对准图像,其利用了立体标定的R/T阵,输出行对准图像,为下一步匹配的工作量减少提供了便捷。
立体匹配的目的是输出视差图,输入为经过立体矫正的图像,输出服务于下一步:映射到三维空间坐标。
六十九
- MatLab 标定双目报错,串联的数组维度不一致
因为matlab2020b双目标定工具箱有bug,不支持彩色图输入,只能输入灰度图。
所以要转成灰度图。
七十
- 全局快门与卷帘快门
相机的快门模式分为全局快门和卷帘快门两种,快门模式由相机使用的传感器特性决定。
支持全局快门的相机,每一行同时开始曝光,同时结束曝光,曝光完成后,数据开始逐行读出。
支持卷帘式快门的相机,第一行曝光结束后,立即开始读出数据,数据完全读出后, 下一行开始读出数据。
全局快门同时曝光传感器网格中的所有像素,因此最终数字图像的每个像素都是在同一时刻捕获的。这意味着不会发生由于使用卷帘快门而导致的移动物体/场景的图像失真。全局快门传感器通常比卷帘快门传感器尺寸更大、更感光。然而,全局快门传感器更昂贵,且最大帧率可能低于类似的卷帘快门传感器,特别是具有高分辨率的传感器。
卷帘快门的第一行和最后一行像素的捕获之间存在时间差。这意味着在组装整个图像时,场景中快速移动的对象可能会失真或模糊。
成本上,全局快门相机比卷帘相机更贵。
使用上,全局快门适合高速产线,卷帘快门适合缓慢产线。
————————————————
版权声明:本文为CSDN博主「脆皮茄条」的原创文章,遵循CC 4.0 BY-SA版权协议,转载请附上原文出处链接及本声明。
原文链接:https://blog.csdn.net/weixin_43917589/article/details/125279598
七十一
在做numpy的矩阵操作时,报错
TypeError: ufunc ‘bitwise_and‘ not supported for the input types, and the inputs could not be safely

if语句中&连接符前后的两个条件需用括号括起来。
threeD_mask = (0.55 > threeD[:,:,1]/1000.0) & (threeD[:,:,1]/1000.0 > -1.0)


