Python tkinter GUI界面练习,制作透明电子签名
毕业论文中少不了要添加电子签名,下载ps又很麻烦,所以写了个小的代码,做成了GUI界面,方便使用~
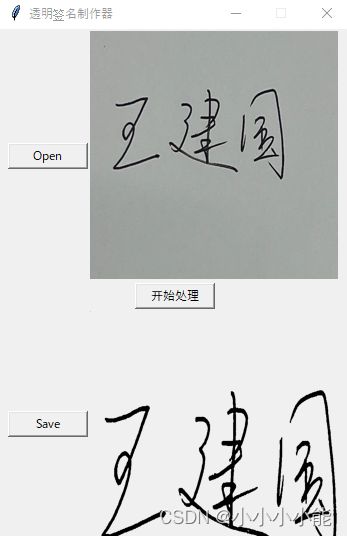
效果如图:
- 首先点击「open」选择要处理的图片,最好是白色干净背景的签名,文件格式支持"JPG","PNG","JPEG"
- 然后点击 「开始处理」
- 最后点击「save」选择保存路径和保存名称,不输入后缀的话默认保存为png格式
代码部分:
1.导入相关包
from tkinter import *
from tkinter.filedialog import askopenfilename, asksaveasfilename
from PIL import Image, ImageTk
import numpy as np
2.定义一个类,以及设置tkinter布局
class Sign(object):
    def __init__(self, win=None):
        self.win = win

    def windows(self):
        self.root = Tk()
        self.root.wm_attributes('-topmost', 1)
        self.root.title("透明签名制作器")
        self.root.geometry("350x510")
        self.root.resizable(False, False)

        f1 = Frame(self.root, width=350, height=250)
        btn_open = Button(f1, text="Open", width=10, height=1, command=self.open_file)
        btn_open.pack(side=LEFT)
        self.canvas_open = Canvas(f1, width=250, height=250)
        self.canvas_open.pack(side=LEFT)
        f1.pack()

        f2 = Frame(self.root, width=350, height=10)
        btn_start = Button(f2, text="开始处理", width=10, height=1, command=self.start_process)
        btn_start.pack(side=LEFT)
        f2.pack()

        f3 = Frame(self.root, width=350, height=250)
        btn_save = Button(f3, text="Save", width=10, height=1, command=self.save_file)
        btn_save.pack(side=LEFT)
        self.canvas_save = Canvas(f3, width=250, height=250)
        self.canvas_save.pack(side=LEFT)
        f3.pack()

        self.root.mainloop()
3.定义open按钮的功能
    def open_file(self):
        global file_open_path
        global image_open
        file_open_path = askopenfilename(
            filetypes=[("Image Files", "*.jpg"), ("Image Files", "*.jpeg"), ("Image Files", "*.PNG"),
                       ("Image Files", "*.png"), ("All Files", "*.*")]
        )
        if not file_open_path:
            return
        image_open = Image.open(file_open_path).resize((250, 250))
        self.image_open = ImageTk.PhotoImage(image_open)
        self.canvas_open.create_image(0, 0, anchor='nw', image=self.image_open)
image.open打开的文件在不用self.image_open的情况下会显示不出来
4.定义开始处理的功能
思路就是在打开image图像后,获取图像的尺寸,转换成numpy array格式的图像,转换之后黑色字体与白色背景的值不同,稍加修正找到签名区域(这里修正x1,y1,x2,y2+-5),重新输出一张图片
    def start_process(self):
        global image_save
        self.canvas_open.create_image(0, 0, anchor='nw', image=self.image_open)
        image = Image.open(file_open_path)
        image = image.convert('RGBA')
        size = image.size
        image = np.array(image)
        points = []
        for j in range(size[0]):
            for i in range(size[1]):
                if image[i][j][0] > 100 and image[i][j][1] > 100 and image[i][j][2] > 100:
                    image[i][j][3] = 0
                else:
                    image[i][j][0], image[i][j][1], image[i][j][2] = 0, 0, 0
                    points.append((i, j))
        points = np.array(points).reshape((-1, 2))
        min_value = np.min(points, axis=0)
        x1, y1 = min_value[0] - 5, min_value[1] - 5
        max_value = np.max(points, axis=0)
        x2, y2 = max_value[0] + 5, max_value[1] + 5
        sign_area = image[x1:x2, y1:y2]
        sign_area = Image.fromarray(sign_area)
        image_save = sign_area.resize((250, 250))
        self.image_save = ImageTk.PhotoImage(image_save)
        self.canvas_save.create_image(0, 0, anchor='nw', image=self.image_save)
5.定义save按钮的功能
    def save_file(self):
        global file_save_path
        file_save_path = asksaveasfilename(
            defaultextension="png",
            filetypes=[("Image Files", "*.jpg"), ("Image Files", "*.jpeg"), ("Image Files", "*.PNG"),
                       ("Image Files", "*.png"), ("All Files", "*.*")]
        )
        if not file_save_path:
            return
        image_save.save(file_save_path)
6.大功告成
if __name__ == "__main__":
    sign = Sign()
    sign.windows()
