【MMPose】Lite-HRNet替换激活函数(hardswish和hardmish)
hardswish和hardmish是两个比ReLu更强的激活函数,在姿态估计网络中使用可以带来一定的涨点,故本篇文章想要在mmpose中替换一下激活函数,测试一下两种新的激活函数的效果。
1.测试环境
python 3.7.6
pytorch 1.13
cuda 11.6
windows 11
2.替换lite-henet.py的激活函数为hardswish
将mmpose\models\backbones\litehrnet.py拷贝一份重新命名为litehrnet_hswish.py同样存放在将mmpose\models\backbones\目录。
在litehrnet_hswish.py注册新的激活函数Hardswish:
from mmcv.cnn.bricks.registry import ACTIVATION_LAYERS
@ACTIVATION_LAYERS.register_module()
class Hardswish(nn.Module):
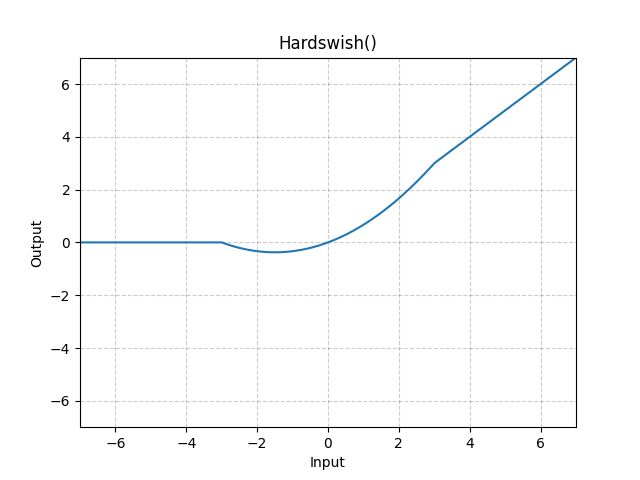
    r"""Applies the Hardswish function, element-wise, as described in the paper:
    `Searching for MobileNetV3 `_.

    Hardswish is defined as:

    .. math::
        \text{Hardswish}(x) = \begin{cases}
            0 & \text{if~} x \le -3, \\
            x & \text{if~} x \ge +3, \\
            x \cdot (x + 3) /6 & \text{otherwise}
        \end{cases}

    Args:
        inplace: can optionally do the operation in-place. Default: ``False``

    Shape:
        - Input: :math:`(*)`, where :math:`*` means any number of dimensions.
        - Output: :math:`(*)`, same shape as the input.

    .. image:: ../scripts/activation_images/Hardswish.png

    Examples::

        >>> m = nn.Hardswish()
        >>> input = torch.randn(2)
        >>> output = m(input)
    """
    __constants__ = ['inplace']

    inplace: bool

    def __init__(self, inplace : bool = False) -> None:
        super(Hardswish, self).__init__()
        self.inplace = inplace

    def forward(self, input: Tensor) -> Tensor:
        return F.hardswish(input, self.inplace)
由于pytorch 1.13版本是有Hardswish激活函数的(而mmcv中没有),故这里直接将源码的版本复制了过来,如果想要使用pytorch中没有的激活函数,只需要自定义一个class激活函数即可(在hardmish部分内容有例子)。
这样我们的hardswish的注册就完成了,下面要做的是替换lite-hrnet中的ReLu激活函数。直接在litehrnet_hswish.py中ctrl+f搜索relu,将所有relu替换为我们定义的Hardswish,例如:
#修改前
def __init__(self,
                 channels,
                 ratio=16,
                 conv_cfg=None,
                 norm_cfg=None,
                 act_cfg=(dict(type='ReLU'), dict(type='Sigmoid'))):
#修改后
def __init__(self,
                 channels,
                 ratio=16,
                 conv_cfg=None,
                 norm_cfg=None,
                 act_cfg=(dict(type='Hardswish'), dict(type='Sigmoid'))):

#修改前
self.conv1 = ConvModule(
            in_channels=in_channels,
            out_channels=stem_channels,
            kernel_size=3,
            stride=2,
            padding=1,
            conv_cfg=self.conv_cfg,
            norm_cfg=self.norm_cfg,
            act_cfg=dict(type='ReLU'))
#修改后
self.conv1 = ConvModule(
            in_channels=in_channels,
            out_channels=stem_channels,
            kernel_size=3,
            stride=2,
            padding=1,
            conv_cfg=self.conv_cfg,
            norm_cfg=self.norm_cfg,
            act_cfg=dict(type='Hardswish'))

#修改前
if self.with_fuse:
            self.fuse_layers = self._make_fuse_layers()
            self.relu = nn.ReLU()
#修改后
if self.with_fuse:
            self.fuse_layers = self._make_fuse_layers()
            self.relu = Hardswish()
最后,修改网络的class类名(一定要改,后面配置文件会调用这个类):
#修改前
@BACKBONES.register_module()
class LiteHRNet(nn.Module):

#修改后
@BACKBONES.register_module()
class LiteHRNet_hswish(nn.Module):
这样网络部分就修改完成了。
3.修改训练的配置文件
这里我们选择lite-hrnet18和mpii数据集进行训练,配置文件位置在configs\body\2d_kpt_sview_rgb_img\topdown_heatmap\mpii\litehrnet_18_mpii_256x256.py
同样拷贝一份重命名为litehrnet_hswish_18_mpii_256x256.py
因为使用了自定义网络,所以在配置文件中加上:
custom_imports = dict(
    imports=['mmpose.models.backbones.litehrnet_hswish'],
    allow_failed_imports=False)
修改model部分内容,将type=’LiteHRNet‘修改为type=’LiteHRNet_hswish‘:
# model settings
model = dict(
    type='TopDown',
    pretrained=None,
    backbone=dict(
        type='LiteHRNet_hswish',
        in_channels=3,
        extra=dict(
            stem=dict(stem_channels=32, out_channels=32, expand_ratio=1),
这样配置文件就修改完成了。
使用修改好的配置文件和网络训练:
python tools/train.py configs\body\2d_kpt_sview_rgb_img\topdown_heatmap\mpii\litehrnet_hswish_18_mpii_256x256.py4.替换lite-henet.py的激活函数为hardmish
这一节与第二节大同小异,只不过这里我们使用自定义的激活函数(因为pytorch1.13版本只有mish激活函数,如果要使用mish,那么操作与hardswish部分一致):
from mmcv.cnn.bricks.registry import ACTIVATION_LAYERS
def hard_mish(x, inplace: bool = False) :
    """Implements the HardMish activation function
    Args:
        x: input tensor
    Returns:
        output tensor
    """

    if inplace:
        return x.mul_(0.5 * (x + 2).clamp(min=0, max=2))
    else:
        return 0.5 * x * (x + 2).clamp(min=0, max=2)

@ACTIVATION_LAYERS.register_module()
class HardMish(nn.Module):
    """Implements the Had Mish activation module from `"H-Mish" `_
    This activation is computed as follows:
    .. math::
        f(x) = \\frac{x}{2} \\cdot \\min(2, \\max(0, x + 2))
    """

    def __init__(self, inplace: bool = False) -> None:
        super().__init__()
        self.inplace = inplace

    def forward(self, x):
        return hard_mish(x, inplace=self.inplace)
之后的操作与前面一样了,这里不再赘述。
注意,使用这个自定义的hardmish显存占用比hardswish要高,注意修改batchsize大小。
5.实验对比
这一部分还没有结果,之后可能会更新...

