yolov5热力图可视化grad-cam踩坑经验分享
最近在做热力图的可视化,网上搜了很多的资料,但是大部分都是需要在原网络结构上进行修改,非常的不方便。最后在网上找到一位博主分享的即插即用的模块,觉得效果还可以,但是中间有些细节,需要注意。
原博文地址:https://blog.csdn.net/qq_37706472/article/details/128714604
源码地址:yolo-gradcam
为了方便,我也把Github上的代码复制在下方了。
import warnings
warnings.filterwarnings('ignore')
warnings.simplefilter('ignore')
import torch, yaml, cv2, os, shutil
import numpy as np
np.random.seed(0)
import matplotlib.pyplot as plt
from tqdm import trange
from PIL import Image
from models.yolo import Model
from utils.general import intersect_dicts
from utils.augmentations import letterbox
from utils.general import xywh2xyxy
from pytorch_grad_cam import GradCAMPlusPlus, GradCAM, XGradCAM
from pytorch_grad_cam.utils.image import show_cam_on_image
from pytorch_grad_cam.activations_and_gradients import ActivationsAndGradients

class yolov5_heatmap:
    def __init__(self, weight, cfg, device, method, layer, backward_type, conf_threshold, ratio):
        device = torch.device(device)
        ckpt = torch.load(weight)
        model_names = ckpt['model'].names
        csd = ckpt['model'].float().state_dict()  # checkpoint state_dict as FP32
        model = Model(cfg, ch=3, nc=len(model_names)).to(device)
        csd = intersect_dicts(csd, model.state_dict(), exclude=['anchor'])  # intersect
        model.load_state_dict(csd, strict=False)  # load
        model.eval()
        print(f'Transferred {len(csd)}/{len(model.state_dict())} items')

        target_layers = [eval(layer)]
        method = eval(method)

        colors = np.random.uniform(0, 255, size=(len(model_names), 3)).astype(np.int)
        self.__dict__.update(locals())

    def post_process(self, result):
        logits_ = result[..., 4:]
        boxes_ = result[..., :4]
        sorted, indices = torch.sort(logits_[..., 0], descending=True)
        return logits_[0][indices[0]], xywh2xyxy(boxes_[0][indices[0]]).cpu().detach().numpy()

    def draw_detections(self, box, color, name, img):
        xmin, ymin, xmax, ymax = list(map(int, list(box)))
        cv2.rectangle(img, (xmin, ymin), (xmax, ymax), tuple(int(x) for x in color), 2)
        cv2.putText(img, str(name), (xmin, ymin - 5), cv2.FONT_HERSHEY_SIMPLEX, 0.8, tuple(int(x) for x in color), 2, lineType=cv2.LINE_AA)
        return img

    def __call__(self, img_path, save_path):
        # remove dir if exist
        if os.path.exists(save_path):
            shutil.rmtree(save_path)
        # make dir if not exist
        os.makedirs(save_path, exist_ok=True)

        # img process
        img = cv2.imread(img_path)
        img = letterbox(img)[0]
        img = cv2.cvtColor(img, cv2.COLOR_BGR2RGB)
        img = np.float32(img) / 255.0
        tensor = torch.from_numpy(np.transpose(img, axes=[2, 0, 1])).unsqueeze(0).to(self.device)

        # init ActivationsAndGradients
        grads = ActivationsAndGradients(self.model, self.target_layers, reshape_transform=None)

        # get ActivationsAndResult
        result = grads(tensor)
        activations = grads.activations[0].cpu().detach().numpy()

        # postprocess to yolo output
        post_result, post_boxes = self.post_process(result[0])
        for i in trange(int(post_result.size(0) * self.ratio)):
            if post_result[i][0] < self.conf_threshold:
                break

            self.model.zero_grad()
            if self.backward_type == 'conf':
                post_result[i, 0].backward(retain_graph=True)
            else:
                # get max probability for this prediction
                score = post_result[i, 1:].max()
                score.backward(retain_graph=True)

            # process heatmap
            gradients = grads.gradients[0]
            b, k, u, v = gradients.size()
            weights = self.method.get_cam_weights(self.method, None, None, None, activations, gradients.detach().numpy())
            weights = weights.reshape((b, k, 1, 1))
            saliency_map = np.sum(weights * activations, axis=1)
            saliency_map = np.squeeze(np.maximum(saliency_map, 0))
            saliency_map = cv2.resize(saliency_map, (tensor.size(3), tensor.size(2)))
            saliency_map_min, saliency_map_max = saliency_map.min(), saliency_map.max()
            if (saliency_map_max - saliency_map_min) == 0:
                continue
            saliency_map = (saliency_map - saliency_map_min) / (saliency_map_max - saliency_map_min)

            # add heatmap and box to image
            cam_image = show_cam_on_image(img.copy(), saliency_map, use_rgb=True)
            cam_image = self.draw_detections(post_boxes[i], self.colors[int(post_result[i, 1:].argmax())], f'{self.model_names[int(post_result[i, 1:].argmax())]} {post_result[i][0]:.2f}', cam_image)
            cam_image = Image.fromarray(cam_image)
            cam_image.save(f'{save_path}/{i}.png')

def get_params():
    params = {
        'weight': 'runs/train/exp/weights/best.pt',
        'cfg': 'models/yolov5m.yaml',
        'device': 'cuda:0',
        'method': 'XGradCAM', # GradCAMPlusPlus, GradCAM, XGradCAM
        'layer': 'model.model[-2]',
        'backward_type': 'class', # class or conf
        'conf_threshold': 0.6, # 0.6
        'ratio': 0.02 # 0.02-0.1
    }
    return params

if __name__ == '__main__':
    model = yolov5_heatmap(**get_params())
    model(r'dataset\images\test\aircraft_1064.jpg', 'result')
需要安装pytorch_grad_cam库,可以直接pip install pytorch-grad-cam或者去 jacobgil/pytorch-grad-cam将源码下载下来,放入项目中
get_params中的参数:
weight:模型权重文件
cfg:模型文件
device:选择使用GPU还是CPU
method:选择grad-cam方法,这里是提供了几种,可能对效果有点不一样,可以都尝试一下
layer: 选择需要可视化的那层
backward_type:反向传播的方式,可以是以conf的loss传播,也可以class的loss传播
conf_threshold置信度
ratio 就是一个参数,用来筛选置信度高的结果,低的就舍弃
报错解决:
1.没有生成任何结果
解决方法:
将model.eval()改为 model.fuse().eval()
2.inplace 出错
解决方法:
将yolo.py文件中,detectionmodel()函数的forward()函数中,true改为false
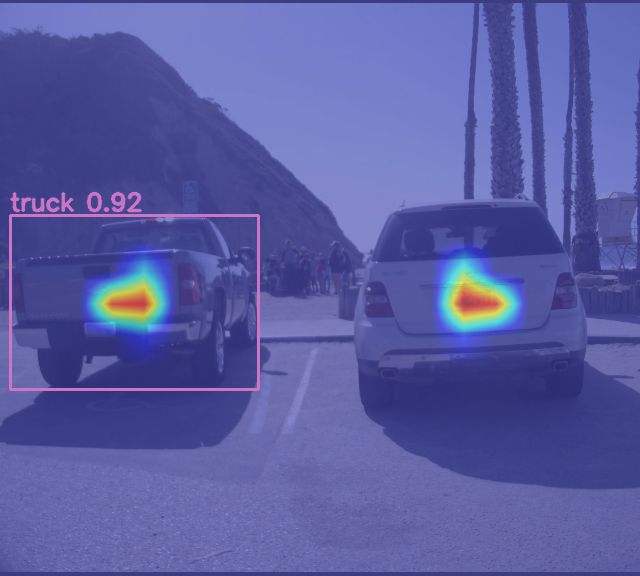
附最后效果图(ps:这个新版编辑器我不知道怎么把两张图放同一排。。。):


