Centos SQL Server保姆级安装教程
文章目录
-
- 0、安装环境
- 一、安装mssql-server2019
-
- 1.1 下载微软官方的SQL Server2019源到本地
- 1.2 镜像下载完成后,执行以下命令安装mssql-server2019(SQL Server软件包)
- 1.3 程序包安装完成后,请运行 mssql-conf setup 命令选择安装版本并按提示进行安装,具体操作如下:
- 二、安装mssql工具包和UnixODBC开发人员软件包
-
- 2.1 下载官方软件包源
- 2.2 安装
- 2.3 添加PATH环境
- 2.4 重新加载环境变量
- 三、连接SQL Server进行测试
-
- 3.1 利用sqlcmd命令进行本地连接
- 3.2 利用DBeaver配置远程连接(在本地机器上)
- 四、测试环境快速安装
-
- 4.1 创建Centos集群安装的VagrantFile文件
- 4.2 启动虚拟机
- 4.3 登录,验证配置是否正确
- 参考资料
0、安装环境
系统版本:CentOS Linux release 7.9.2009
SQL Server版本:mssql-server2019
一、安装mssql-server2019
1.1 下载微软官方的SQL Server2019源到本地
curl https://packages.microsoft.com/config/rhel/7/mssql-server-2019.repo > /etc/yum.repos.d/mssql-server.repo

1.2 镜像下载完成后,执行以下命令安装mssql-server2019(SQL Server软件包)
yum install -y mssql-server
1.3 程序包安装完成后,请运行 mssql-conf setup 命令选择安装版本并按提示进行安装,具体操作如下:
/opt/mssql/bin/mssql-conf setup
1)选择所要安装的版本,输入数字2(本教程安装开发版),各个版本详细介绍见官网介绍

2)然后在出现询问是否接受许可条款时,输入Yes,回车继续下一步。

3)系统会要求用户要求输入sa用户密码(密码长度八位以上,且密码必须包含数字、字母和特殊字符),注意在输入密码的时候,窗口上是不显示任何字符的,所以输入完之后,直接回车,然后再输入一遍,回车确认。

4)配置完成后,请验证服务是否正在运行
systemctl status mssql-server

二、安装mssql工具包和UnixODBC开发人员软件包
2.1 下载官方软件包源
curl https://packages.microsoft.com/config/rhel/7/prod.repo > /etc/yum.repos.d/msprod.repo
2.2 安装
yum install -y mssql-tools unixODBC-devel
2.3 添加PATH环境
echo 'export PATH=$PATH:/opt/mssql-tools/bin' >> /etc/profile
2.4 重新加载环境变量
source /etc/profile
三、连接SQL Server进行测试
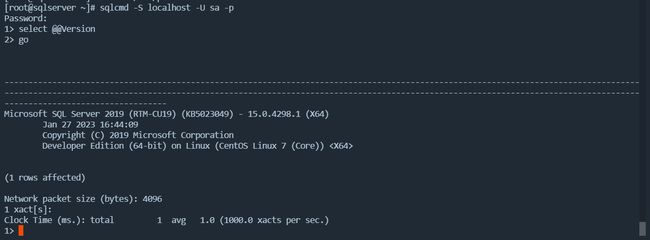
3.1 利用sqlcmd命令进行本地连接
sqlcmd -S localhost -U sa -p
输入之前设置的sa密码,登录成功后,如下图所示
- -S:名称
- -U:用户名
- -p:密码
3.2 利用DBeaver配置远程连接(在本地机器上)
要允许远程连接,请在 Centos 上打开防火墙上的 SQL Server 端口。 默认的 SQL Server 端口为 TCP 1433。 如果对防火墙使用 FirewallD,可以使用以下命令:
firewall-cmd --zone=public --add-port=1433/tcp --permanent
firewall-cmd --reload
# firewall-cmd未启用不需要做此设置
或者直接关闭防火墙
systemctl stop firewalld
其他防火墙常用命令如下:
| 命令 | 说明 |
|---|---|
| systemctl status firewalld | 查看防火墙状态 |
| systemctl stop firewalld | 暂时关闭防火墙 |
| systemctl disable firewalld | 永久关闭防火墙 |
| systemctl start firewalld | 开启防火墙 |
| firewall-cmd --zone=public --add-port=8080/tcp --permanent | 开放指定端口 |
| firewall-cmd --zone=public --remove-port=8080/tcp --permanent | 关闭指定端口 |
| firewall-cmd --reload | 立即生效 |
| firewall-cmd --zone=public --list-ports | 查看所有开放的端口 |
1)新建连接
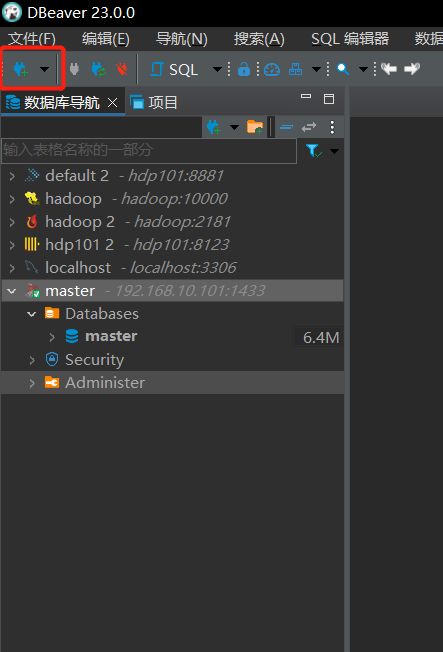
2)选择 SQL Server

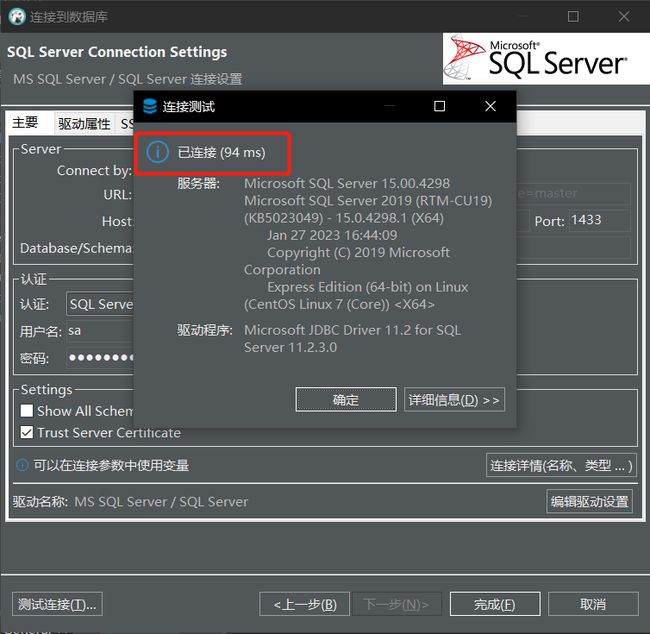
3)设置Host、用户名和密码并测试连接

连接成功,如下图所示
四、测试环境快速安装
安装前提条件:需提前安装virtualbox和vagrant,具体步骤参考:https://blog.csdn.net/yiluohan0307/article/details/129459487
4.1 创建Centos集群安装的VagrantFile文件
创建vagrantfile所在文件夹sql_server,并创建文件 Vagrantfile 和 setup.sh ,其中VagrantFile是vagrant的启动配置文件,setup.sh是SQL Server安装文件。
mkdir /vagrant_centos_cluster
touch VagrantFile
touch setup.sh
编辑VagrantFile文件, 内容如下:
# -*- mode: ruby -*-
# vi: set ft=ruby :

$init_script = <<-SCRIPT
#!/bin/bash

echo "install init"
# Set SSH to allow password login
sed -i 's@^PasswordAuthentication no@PasswordAuthentication yes@g' /etc/ssh/sshd_config
sed -i 's@^#PubkeyAuthentication yes@PubkeyAuthentication yes@g' /etc/ssh/sshd_config
systemctl restart sshd.service

# Install CentOS basic software
yum install -y -q net-tools vim-enhanced sshpass expect wget

# Configure the vagrant user to have root privileges
sed -i "/## Same thing without a password/ivagrant   ALL=(ALL)     NOPASSWD:ALL" /etc/sudoers

# Add ip address to hosts file
sed -i '/^127.0.1.1/'d /etc/hosts
echo "192.168.10.101  sqlserver" >> /etc/hosts

# Modify DNS
sed -i "s@^nameserver.*@nameserver 114.114.114.114@" /etc/resolv.conf
SCRIPT

# Configure SQL Server password, default:123456yY
sql_server_password = "123456yY"

# Configure vm settings
boxes = [
    {
      :name => "sqlserver", :eth1 => "192.168.10.101", :mem => "4096", :cpu => "3"
    }
]

Vagrant.configure(2) do |config|
  config.vm.box = "centos/7"
  config.vm.box_version = "1804.02"
  boxes.each do |opts|
    config.vm.define opts[:name] do |config|
      config.vm.hostname = opts[:name]
      config.ssh.insert_key = false
      config.vm.provider "virtualbox" do |v|
        v.customize ["modifyvm", :id, "--name", opts[:name]]
        v.customize ["modifyvm", :id, "--memory", opts[:mem]]
        v.customize ["modifyvm", :id, "--cpus", opts[:cpu]]
      end
      config.vm.network "private_network", ip: opts[:eth1]
    end
  end

  config.vm.provision "shell", inline: $init_script
  config.vm.provision "shell", path: "setup.sh", args: sql_server_password

end
编辑setup.sh文件, 内容如下:
#!/bin/bash
#set -x

SQL_SERVER_PASSWORD=$1

# 默认密码:123456yY
DEFAULT_SQL_SERVER_PASSWORD=123456yY

SQL_SERVER_PASSWORD=${SQL_SERVER_PASSWORD:-$DEFAULT_SQL_SERVER_PASSWORD}

install_sql_server() {

    # 下载微软官方的SQL Server2019源到本地
    if [ ! -f /etc/yum.repos.d/mssql-server.repo ];then
        curl https://packages.microsoft.com/config/rhel/7/mssql-server-2019.repo > /etc/yum.repos.d/mssql-server.repo
    fi
    # 安装 SQL Server 软件包
    yum install -y mssql-server

    # 安装指定版本(2.Developer)并设置密码
    expect -c "
        spawn /opt/mssql/bin/mssql-conf setup
        expect {
            \"Enter your edition*\" { send \"2\r\"; exp_continue}
            \"Do you accept the license terms*\" { send \"yes\r\" ; exp_continue}
            \"Enter the SQL Server*\" { send \"${SQL_SERVER_PASSWORD}\r\"; exp_continue}
            \"Confirm the SQL Server*\" { send \"${SQL_SERVER_PASSWORD}\r\" ; exp_continue}
        }";

    # 启动并设置开机自启
    systemctl start mssql-server
    systemctl enable mssql-server

    # 安装SQL Server命令行工具
    if [ ! -f /etc/yum.repos.d/msprod.repo ];then
        curl https://packages.microsoft.com/config/rhel/7/prod.repo > /etc/yum.repos.d/msprod.repo
    fi
    expect -c "
        spawn yum install -y mssql-tools unixODBC-devel
        expect {
            \"Do you accept the license terms*\" { send \"YES\r\"; exp_continue}
            \"Do you accept the license terms*\" { send \"YES\r\"; exp_continue}
        }";

    # 添加并更新环境变量
    echo 'export PATH=$PATH:/opt/mssql-tools/bin' >> /etc/profile
    source /etc/profile

}

install_sql_server
4.2 启动虚拟机
vagrant会自动下载 box 并安装 shell 脚本内容进行安装配置。
vagrant up

4.3 登录,验证配置是否正确
正常启动后,我们就可以使用以下命令直接登录到虚拟机或者使用SecureCRT、 Tabby 等终端工具登录查看。
vagrant ssh sqlserver
参考资料
https://zhuanlan.zhihu.com/p/570024665?utm_id=0
https://blog.csdn.net/leonnew/article/details/126662980
https://www.cnblogs.com/YZFHKMS-X/p/15060850.html
https://blog.csdn.net/weixin_44146294/article/details/127360167
https://www.cnblogs.com/ajunyu/p/13297449.html
https://www.ngui.cc/el/2235085.html?action=onClick