框架 day84 涛涛商城项目-订单系统,系统架构梳理及nginx实现虚拟主机
淘淘商城第十二天
讲师:入云龙
1 今天内容
1、订单系统的实现(独立的系统)
2、Taotao-portal调用订单系统服务创建订单。
3、系统架构梳理,初步了解nginx应用及实现虚拟主机
2 订单系统的实现
2.1 系统架构
2.2 订单系统包含的功能
1、下单功能
2、查看订单列表
3、根据订单号查看订单详情。
下单功能一定要使用关系型数据库表,保证数据的一致性。
2.3 订单系统服务说明
订单系统


V1.0


淘淘商城


1	创建订单
用户使用portal创建订单、android、ios、微信商城提交订单时使用。
请求方法	POST
URL	http://order.taotao.com/order/create
参数说明
提交的数据格式:
{
    "payment": 5288,
    "postFee": 0,
    "userId": "3",
    "buyerMessage": null,
    "buyerNick": "zhang123",
    "orderItems": [
        {
            "itemId": "9",
            "num": 1,
            "title": "苹果(Apple)iPhone 6 (A1586) 16GB 金色 移动联通电信4G手机3",
            "price": 5288,
            "totalFee": 5288,
	        "picPath": "http://image.taotao.com/images/2015/03/06/2015030610045320609720.jpg"
        }
    ],
    "orderShipping": {
        "receiverName": "张三",
        "receiverPhone": "",
        "receiverMobile": "15800000000",
        "receiverState": "上海",
        "receiverCity": "上海",
        "receiverDistrict": "闵行区",
        "receiverAddress": "三鲁公路3279号 明浦广场 3号楼 205室",
        "receiverZip": "200000"
    }
}

示例
返回值	{
status: 200 //200 成功
msg: "OK" // 返回信息消息
data: 100544// 返回订单号
}


2	根据订单ID查询订单
请求方法	GET
URL	http://order.taotao.com/order/info/{orderId}
参数说明
orderId:订单编号

示例	http://order.taotao.com/order/info/31414485440695
返回值	{
    "status": 200,
    "msg": "OK",
    "data": {
        "orderId":"100544",
        "payment": 5288,
        "paymentType":1
        "status":1
        "createTime":"2015-01-01 08:22:14"
        "postFee": 0,
        "userId": "3",
        "buyerMessage": null,
        "buyerNick": "zhang123",
        "orderItems": [
            {
                "itemId": "9",
                "num": 1,
                "title": "苹果(Apple)iPhone 6 (A1586) 16GB 金色 移动联通电信4G手机3",
                "price": 5288,
                "totalFee": 5288,
                "picPath": "http://image.taotao.com/images/2015/03/06/2015030610045320609720.jpg"
            }
        ],
        "orderShipping": {
            "receiverName": "张三",
            "receiverPhone": "",
            "receiverMobile": "15800000000",
            "receiverState": "上海",
            "receiverCity": "上海",
            "receiverDistrict": "闵行区",
            "receiverAddress": "三鲁公路3279号 明浦广场 3号楼 205室",
            "receiverZip": "200000"
        }
    }
}

3	根据用户分页查询订单
请求方法	GET
URL	http://order.taotao.com/order/list/{userID}/{page}/{count}
参数说明	userID:用户ID
Page:请求的页码
Count:每页显示的记录数
示例	http://order.taotao.com/order/list/zhang123/1/5
返回值	{
    "status": 200,
    "msg": "OK",
    "data": [{
        "orderId":"100544",
        "payment": 5288,
        "paymentType":1
        "status":1
        "createTime":"2015-01-01 08:22:14"
        "postFee": 0,
        "userId": "3",
        "buyerMessage": null,
        "buyerNick": "zhang123",
    },{
        "orderId":"100545",
        "payment": 5288,
        "paymentType":1
        "status":1
        "createTime":"2015-01-01 08:22:15"
        "postFee": 0,
        "userId": "3",
        "buyerMessage": null,
        "buyerNick": "zhang123",
    },{
        "orderId":"100546",
        "payment": 5288,
        "paymentType":1
        "status":1
        "createTime":"2015-01-01 08:22:16"
        "postFee": 0,
        "userId": "3",
        "buyerMessage": null,
        "buyerNick": "zhang123",
    }]
}

4	修改订单状态
请求方法	POST
URL	http://order.taotao.com/order/changeStatus
参数说明
{
    "orderId": "100544",//订单编号
    "status": 2, //订单状态
    "paymentTime": "1414489420444" //付款时间
}

示例	http://sso.taotao.com/user/check/zhangsan;t=1
返回值	{
status: 200 //200 成功
msg: "OK" // 返回信息消息
data: null // 返回数据
}
2.4 创建订单系统
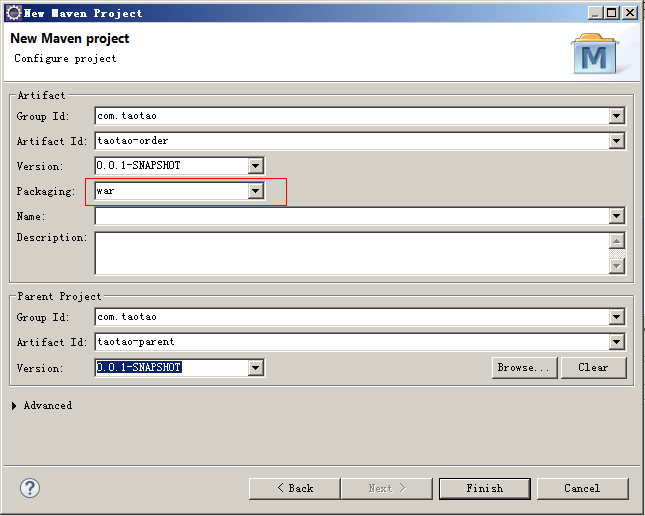
2.5 框架整合
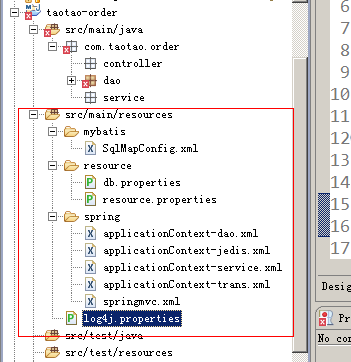
Mybatis
Spring
Springmvc
Jedis
可以参考taotao-rest工程整合
2.5.1 Ssm整合
2.5.2 Pom.xml
| <projectxmlns="http://maven.apache.org/POM/4.0.0"xmlns:xsi="http://www.w3.org/2001/XMLSchema-instance" xsi:schemaLocation="http://maven.apache.org/POM/4.0.0 http://maven.apache.org/xsd/maven-4.0.0.xsd"> <modelVersion>4.0.0modelVersion> <parent> <groupId>com.taotaogroupId> <artifactId>taotao-parentartifactId> <version>0.0.1-SNAPSHOTversion> parent> <groupId>com.taotaogroupId> <artifactId>taotao-orderartifactId> <version>0.0.1-SNAPSHOTversion> <packaging>warpackaging> <dependencies> <dependency> <groupId>com.taotaogroupId> <artifactId>taotao-manager-mapperartifactId> <version>0.0.1-SNAPSHOTversion> dependency>
<dependency> <groupId>org.springframeworkgroupId> <artifactId>spring-contextartifactId> dependency> <dependency> <groupId>org.springframeworkgroupId> <artifactId>spring-beansartifactId> dependency> <dependency> <groupId>org.springframeworkgroupId> <artifactId>spring-webmvcartifactId> dependency> <dependency> <groupId>org.springframeworkgroupId> <artifactId>spring-jdbcartifactId> dependency> <dependency> <groupId>org.springframeworkgroupId> <artifactId>spring-aspectsartifactId> dependency> <dependency> <groupId>javax.servletgroupId> <artifactId>servlet-apiartifactId> <scope>providedscope> dependency> <dependency> <groupId>javax.servletgroupId> <artifactId>jsp-apiartifactId> <scope>providedscope> dependency>
<dependency> <groupId>redis.clientsgroupId> <artifactId>jedisartifactId> dependency> dependencies> <build>
<plugins> <plugin> <groupId>org.apache.tomcat.mavengroupId> <artifactId>tomcat7-maven-pluginartifactId> <configuration> <port>8085port> <path>/path> configuration> plugin> plugins> build> project> |
2.5.3 Web.xml
| xmlversion="1.0"encoding="UTF-8"?> <web-appxmlns:xsi="http://www.w3.org/2001/XMLSchema-instance" xmlns="http://java.sun.com/xml/ns/javaee"xmlns:web="http://java.sun.com/xml/ns/javaee/web-app_2_5.xsd" xsi:schemaLocation="http://java.sun.com/xml/ns/javaee http://java.sun.com/xml/ns/javaee/web-app_2_5.xsd" id="taotao"version="2.5"> <display-name>taotao-orderdisplay-name> <welcome-file-list> <welcome-file>index.htmlwelcome-file> <welcome-file>index.htmwelcome-file> <welcome-file>index.jspwelcome-file> <welcome-file>default.htmlwelcome-file> <welcome-file>default.htmwelcome-file> <welcome-file>default.jspwelcome-file> welcome-file-list>
<context-param> <param-name>contextConfigLocationparam-name> <param-value>classpath:spring/applicationContext-*.xmlparam-value> context-param> <listener> <listener-class>org.springframework.web.context.ContextLoaderListenerlistener-class> listener>
<filter> <filter-name>CharacterEncodingFilterfilter-name> <filter-class>org.springframework.web.filter.CharacterEncodingFilterfilter-class> <init-param> <param-name>encodingparam-name> <param-value>utf-8param-value> init-param> filter> <filter-mapping> <filter-name>CharacterEncodingFilterfilter-name> <url-pattern>/*url-pattern> filter-mapping>
<servlet> <servlet-name>taotao-orderservlet-name> <servlet-class>org.springframework.web.servlet.DispatcherServletservlet-class>
<init-param> <param-name>contextConfigLocationparam-name> <param-value>classpath:spring/springmvc.xmlparam-value> init-param> <load-on-startup>1load-on-startup> servlet> <servlet-mapping> <servlet-name>taotao-orderservlet-name> <url-pattern>/order/*url-pattern> servlet-mapping> web-app> |
2.6 创建订单接口
2.6.1 接口说明
用户使用portal创建订单、android、ios、微信商城提交订单时使用。
| 请求方法 |
POST |
| URL |
http://order.taotao.com/order/create |
| 参数说明 |
提交的数据格式: { "payment": 5288, "postFee": 0, "userId": "3", "buyerMessage": null, "buyerNick": "zhang123", "orderItems": [ { "itemId": "9", "num": 1, "title": "苹果(Apple)iPhone 6 (A1586) 16GB 金色 移动联通电信4G手机3", "price": 5288, "totalFee": 5288, "picPath": "http://image.taotao.com/images/2015/03/06/2015030610045320609720.jpg" } ], "orderShipping": { "receiverName": "张三", "receiverPhone": "", "receiverMobile": "15800000000", "receiverState": "上海", "receiverCity": "上海", "receiverDistrict": "闵行区", "receiverAddress": "三鲁公路3279号 明浦广场 3号楼 205室", "receiverZip": "200000" } }
|
| 示例 |
|
| 返回值 |
{ status: 200 //200 成功 msg: "OK" // 返回信息消息 data: 100544// 返回订单号 }
|
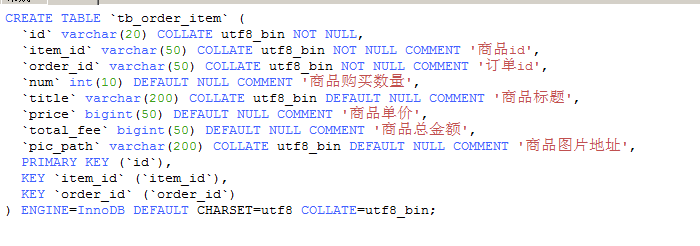
2.6.2 使用到的表
订单表:
订单明细表:
物流表:
2.6.3 Dao层
要对三个表进行操作。都是插入操作。可以使用逆向工程生成的代码。
2.6.4 Service层
功能:接收三个参数,
1、对应订单表的pojo。
2、订单明细表对应的商品列表。每个元素是订单明细表对应的pojo
3、物流表对应的pojo
订单号的生成:
解决方案一(不能使用):
使用mysql的自增长。
优点:不需要我们自己生成订单号,mysql会自动生成。
缺点:如果订单表数量太大时需要分库分表,此时订单号会重复。如果数据备份后再恢复,订单号会变。
方案二:日期+随机数
采用毫秒+随机数。
缺点:仍然有重复的可能。不建议采用此方案。在没有更好的解决方案之前可以使用。
方案三:使用UUID
优点:不会重复。
缺点:长。可读性查。不建议使用。
方案四:可读性好,不能太长。一般订单都是全数字的。可以使用redis的incr命令生成订单号。
优点:可读性好,不会重复
缺点:需要搭建redis服务器。
返回值:TaotaoResult
| @Service public class OrderServiceImpl implements OrderService {
@Autowired private TbOrderMapperorderMapper; @Autowired private TbOrderItemMapperorderItemMapper; @Autowired private TbOrderShippingMapperorderShippingMapper; @Autowired private JedisClientjedisClient;
@Value("${ORDER_GEN_KEY}") private StringORDER_GEN_KEY; @Value("${ORDER_INIT_ID}") private StringORDER_INIT_ID; @Value("${ORDER_DETAIL_GEN_KEY}") private StringORDER_DETAIL_GEN_KEY;
@Override public TaotaoResult createOrder(TbOrderorder, List //向订单表中插入记录 //获得订单号 String string = jedisClient.get(ORDER_GEN_KEY); if (StringUtils.isBlank(string)) { jedisClient.set(ORDER_GEN_KEY,ORDER_INIT_ID); } longorderId = jedisClient.incr(ORDER_GEN_KEY); //补全pojo的属性 order.setOrderId(orderId +""); //状态:1、未付款,2、已付款,3、未发货,4、已发货,5、交易成功,6、交易关闭 order.setStatus(1); Date date = new Date(); order.setCreateTime(date); order.setUpdateTime(date); //0:未评价 1:已评价 order.setBuyerRate(0); //向订单表插入数据 orderMapper.insert(order); //插入订单明细 for (TbOrderItemtbOrderItem : itemList) { //补全订单明细 //取订单明细id longorderDetailId = jedisClient.incr(ORDER_DETAIL_GEN_KEY); tbOrderItem.setId(orderDetailId +""); tbOrderItem.setOrderId(orderId +""); //向订单明细插入记录 orderItemMapper.insert(tbOrderItem); } //插入物流表 //补全物流表的属性 orderShipping.setOrderId(orderId +""); orderShipping.setCreated(date); orderShipping.setUpdated(date); orderShippingMapper.insert(orderShipping);
return TaotaoResult.ok(orderId); }
} |
2.6.5 Controller层
接收一个json格式的字符串作为参数。需要使用@RequestBody注解。需要使用一个pojo接收参数。创建一个对应json格式的pojo。
| package com.taotao.order.pojo;
import java.util.List;
import com.taotao.pojo.TbOrder; import com.taotao.pojo.TbOrderItem; import com.taotao.pojo.TbOrderShipping;
public class Order extends TbOrder {
private List private TbOrderShipping orderShipping; public List returnorderItems; } public void setOrderItems(List this.orderItems =orderItems; } public TbOrderShipping getOrderShipping() { returnorderShipping; } public void setOrderShipping(TbOrderShippingorderShipping) { this.orderShipping =orderShipping; }
}
|
Controller
| @Controller public class OrderController {
@Autowired private OrderServiceorderService;
@RequestMapping("/create") @ResponseBody public TaotaoResult createOrder(@RequestBody Orderorder) { try { TaotaoResult result =orderService.createOrder(order,order.getOrderItems(), order.getOrderShipping()); returnresult; } catch (Exceptione) { e.printStackTrace(); return TaotaoResult.build(500, ExceptionUtil.getStackTrace(e)); } } } |
3 在前台系统生成订单
在taotao-portal系统中添加商品至购物车后,点击提交订单调用taotao-order的服务生成订单。向用户展示订单号。提示创建订单成功。
3.1 点击购物车“去结算”按钮
点击“去结算”按钮跳转到订单确认页面。
展示url:/order/order-cart.html
| @Controller @RequestMapping("/order") public class OrderController {
@RequestMapping("/order-cart") public String showOrderCart() { return"order-cart"; } } |
3.2 订单确认页面
1、要求用户登录。
2、根据用户id查询用户的收货地址列表。
3、在此页面展示购物车的商品列表。
4、需要计算订单的总金额(包括运费)展示给用户。
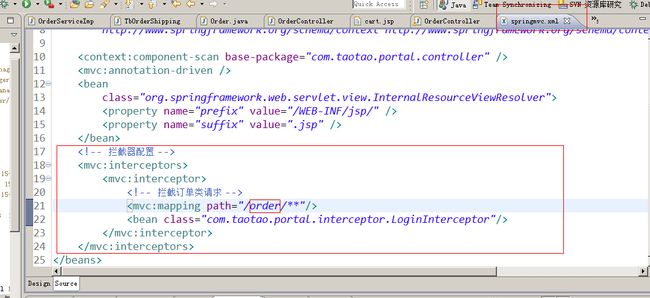
3.2.1 要求用户登录
修改springmvc.xml拦截所有以:/order/**形式的url
3.2.2 根据用户id查询用户的收货地址列表。
在实际的商城中是必须有此功能,需要taotao-rest发布服务,由taotao-portal根据用户查询用户的收货地址列表。
在此,使用静态数据模拟。
3.2.3 展示购物车的商品列表
需要从cookie中把购物车商品列表取出,传递给order-cart.jsp。
可以直接使用购物车服务。
| @Controller @RequestMapping("/order") public class OrderController {
@Autowired private CartServicecartService;
@RequestMapping("/order-cart") public String showOrderCart(HttpServletRequestrequest, HttpServletResponse response, Model model) { //取购物车商品列表 List //传递给页面 model.addAttribute("cartList",list);
return"order-cart"; } } |
3.3 提交订单
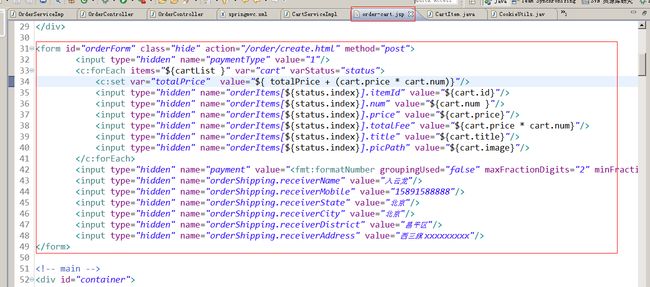
点击“提交订单”按钮把用户已经确认的订单信息,提交给后台。提交一个隐藏的表单,其中包含订单基本信息,订单名称以及配送信息。需要使用一个包装的pojo接收表单中的内容。
请求的url:/order/create.html
参数:表单中的内容。使用Order接收表单的内容。
返回值:返回一个jsp页面。
3.3.1 Service层
接收Order对象,调用taotao-order提供的服务,提交订单。需要把pojo转换成json数据。调用taotao-order提供的服务返回taotaoResult,包含订单号。
参数:Order
返回值:String(订单号)
| @Service public class OrderServiceImpl implements OrderService {
@Value("${ORDER_BASE_URL}") private StringORDER_BASE_URL; @Value("${ORDER_CREATE_URL}") private StringORDER_CREATE_URL;
@Override public String createOrder(Orderorder) { //调用taotao-order的服务提交订单。 String json = HttpClientUtil.doPostJson(ORDER_BASE_URL +ORDER_CREATE_URL, JsonUtils.objectToJson(order)); //把json转换成taotaoResult TaotaoResult taotaoResult = TaotaoResult.format(json); if (taotaoResult.getStatus() == 200) { Long orderId = (Long)taotaoResult.getData(); returnorderId.toString(); } return""; }
} |
3.3.2 Controller层
接收页面提交的表单的内容,调用Service创建订单。返回成功页面。
| @Controller @RequestMapping("/order") public class OrderController {
@Autowired private CartServicecartService;
@Autowired private OrderServiceorderService;
@RequestMapping("/order-cart") public String showOrderCart(HttpServletRequestrequest, HttpServletResponse response, Model model) { //取购物车商品列表 List //传递给页面 model.addAttribute("cartList",list);
return"order-cart"; }
@RequestMapping("/create") public String createOrder(Order order, Model model) { String orderId = orderService.createOrder(order); model.addAttribute("orderId",orderId); model.addAttribute("payment",order.getPayment()); model.addAttribute("date",new DateTime().plusDays(3).toString("yyyy-MM-dd")); return"success"; }
} |
4 框架梳理
Soa:面向服务的架构
Solr集群需要讲。
Mysql的分库分表中间件:MyCat(cobar)提供资料。
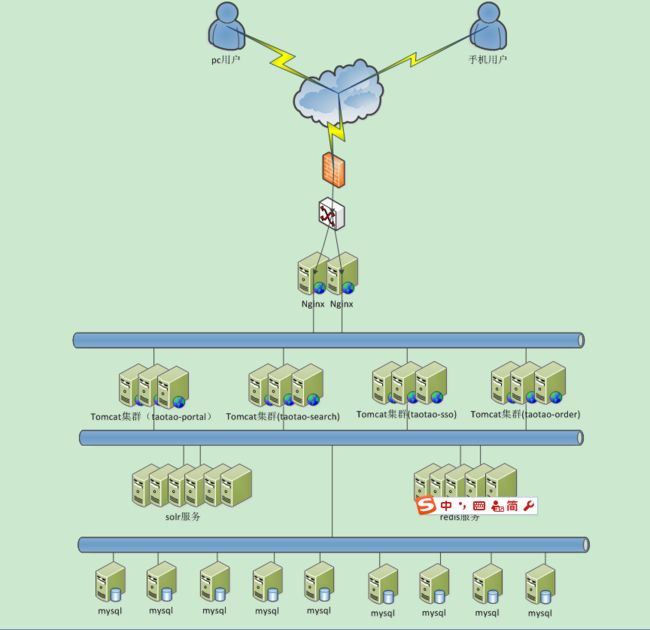
5 网络拓扑图
Nginx:反向代理、负载均衡。
6 Nginx
6.1 什么是nginx
Nginx是一款高性能的http 服务器/反向代理服务器及电子邮件(IMAP/POP3)代理服务器。由俄罗斯的程序设计师Igor Sysoev所开发,官方测试nginx能够支支撑5万并发链接,并且cpu、内存等资源消耗却非常低,运行非常稳定。开源、免费。
6.2 Nginx的应用场景
1、http服务器。Nginx是一个http服务可以独立提供http服务。可以做网页静态服务器。
2、虚拟主机。可以实现在一台服务器虚拟出多个网站。例如个人网站使用的虚拟主机。
3、反向代理,负载均衡。当网站的访问量达到一定程度后,单台服务器不能满足用户的请求时,需要用多台服务器集群可以使用nginx做反向代理。并且多台服务器可以平均分担负载,不会因为某台服务器负载高宕机而某台服务器闲置的情况。
6.3 Nginx的安装步骤
第一步:把nginx的压缩包上传到服务器
第二步:解压。
第三步:创建一个makefile。
参数设置如下:
./configure \
--prefix=/usr/local/nginx \
--pid-path=/var/run/nginx/nginx.pid \
--lock-path=/var/lock/nginx.lock \
--error-log-path=/var/log/nginx/error.log \
--http-log-path=/var/log/nginx/access.log \
--with-http_gzip_static_module \
--http-client-body-temp-path=/var/temp/nginx/client\
--http-proxy-temp-path=/var/temp/nginx/proxy\
--http-fastcgi-temp-path=/var/temp/nginx/fastcgi\
--http-uwsgi-temp-path=/var/temp/nginx/uwsgi\
--http-scgi-temp-path=/var/temp/nginx/scgi
注意:上边将临时文件目录指定为/var/temp/nginx,需要在/var下创建temp及nginx目录
第四步:编译make
第五步:安装make install
6.4 Nginx实现虚拟机
可以实现在同一台服务运行多个网站,而且网站之间互相不干扰。
同一个服务器可能有一个ip,网站需要使用80端口。网站的域名不同。
区分不同的网站有三种方式:
1、ip区分
2、端口区分
3、域名区分
6.4.1 Ip区分虚拟主机
需要一台服务器绑定多个ip地址。
方法一:
使用标准的网络配置工具(比如ifconfig和route命令)添加lP别名:
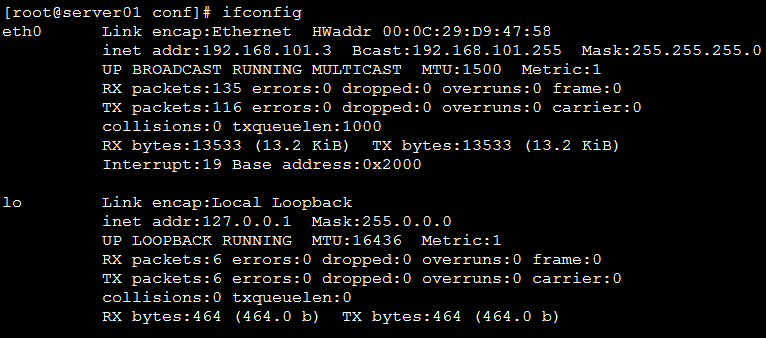
当前ip配置情况:
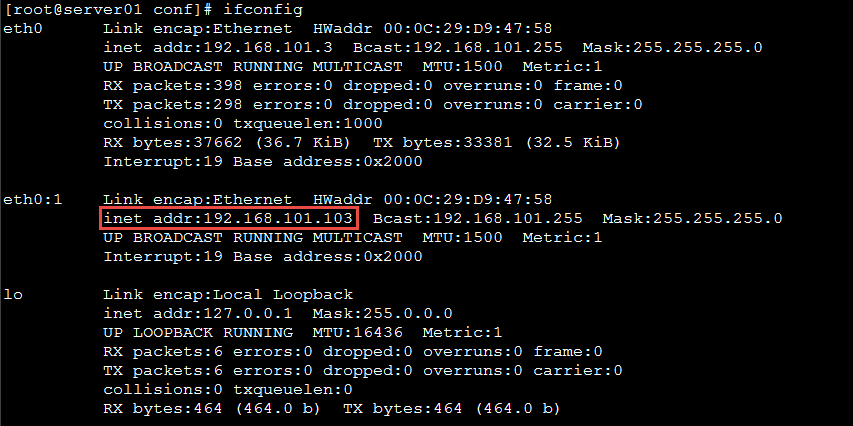
在eth0网卡再绑定一个ip:192.168.101.103
/sbin/ifconfig eth0:1 192.168.101.103broadcast 192.168.101.255 netmask 255.255.255.0 up
/sbin/route add -host 192.168.101.103 deveth0:1
方法二:
1、将/etc/sysconfig/network-scripts/ifcfg-eth0文件复制一份,命名为ifcfg-eth0:1
修改其中内容:
DEVICE=eth0:1
IPADDR=192.168.25.103
其他项不用修改
2、重启系统
6.4.2 配置nginx基于ip地址的虚拟主机
7 #user nobody;
8 worker_processes 1;
9
10 events {
11 worker_connections 1024;
12 }
13
14 http {
15 include mime.types;
16 default_type application/octet-stream;
17
18 sendfile on;
19
20 keepalive_timeout 65;
21 #配置虚拟主机192.168.101.3
22 server {
23 #监听的ip和端口,配置192.168.101.3:80
24 listen 80;
25 #虚拟主机名称这里配置ip地址
26 server_name 192.168.101.3;
27 #所有的请求都以/开始,所有的请求都可以匹配此location
28 location / {
29 #使用root指令指定虚拟主机目录即网页存放目录
30 #比如访问http://ip/test.html将找到/usr/local/html3/test.html
31 #比如访问http://ip/item/test.html将找到/usr/local/html3/item/test.html
32
33 root /usr/local/nginx/html3;
34 #指定欢迎页面,按从左到右顺序查找
35 index index.html index.htm;
36 }
37
38 }
39 #配置虚拟主机192.168.101.103
40 server {
41 listen 80;
42 server_name 192.168.101.103;
43
44 location / {
45 root /usr/local/nginx/html103;
46 index index.html index.htm;
47 }
48
49 }
50
51 }
51.1.1.1 Nginx的配置文件
|
#user nobody; worker_processes 1;
#error_log logs/error.log; #error_log logs/error.log notice; #error_log logs/error.log info;
#pid logs/nginx.pid;
events { worker_connections 1024; }
http { include mime.types; default_type application/octet-stream;
#log_format main '$remote_addr - $remote_user [$time_local] "$request" ' # '$status $body_bytes_sent "$http_referer" ' # '"$http_user_agent" "$http_x_forwarded_for"';
#access_log logs/access.log main;
sendfile on; #tcp_nopush on;
#keepalive_timeout 0; keepalive_timeout 65;
#gzip on;
server { #一个Server就是一个虚拟主机 listen 80; server_name localhost;
#charset koi8-r;
#access_log logs/host.access.log main;
location / { root html; index index.html index.htm; } }
}
|
51.1.1.2 基于ip的虚拟主机配置
| server { listen 80; server_name 192.168.25.141;
#charset koi8-r;
#access_log logs/host.access.log main;
location / { root html-141; index index.html index.htm; }
}
server { listen 80; server_name 192.168.25.100;
#charset koi8-r;
#access_log logs/host.access.log main;
location / { root html-100; index index.html index.htm; }
} |
Nginx重新加载配置文件。
51.1.2 基于端口的虚拟主机
| server { listen 81; server_name 192.168.25.141;
#charset koi8-r;
#access_log logs/host.access.log main;
location / { root html-81; index index.html index.htm; }
} server { listen 82; server_name 192.168.25.141;
#charset koi8-r;
#access_log logs/host.access.log main;
location / { root html-82; index index.html index.htm; }
} |
51.1.3 基于域名的虚拟主机
最有用的虚拟主机配置方式。
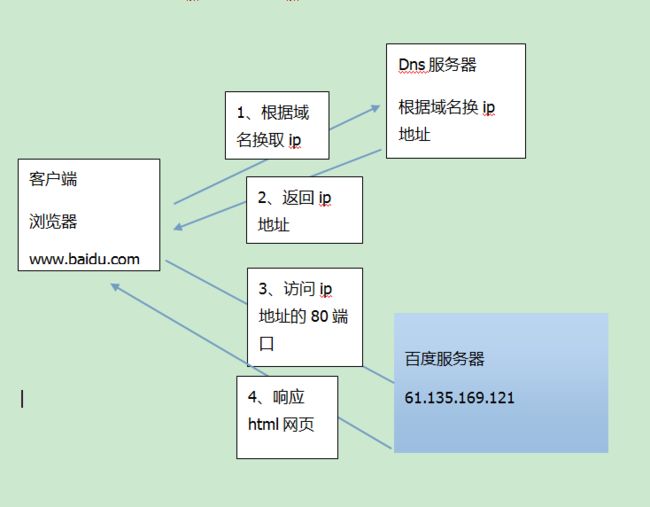
一个域名只能绑定一个ip地址,一个ip地址可以被多个域名绑定。
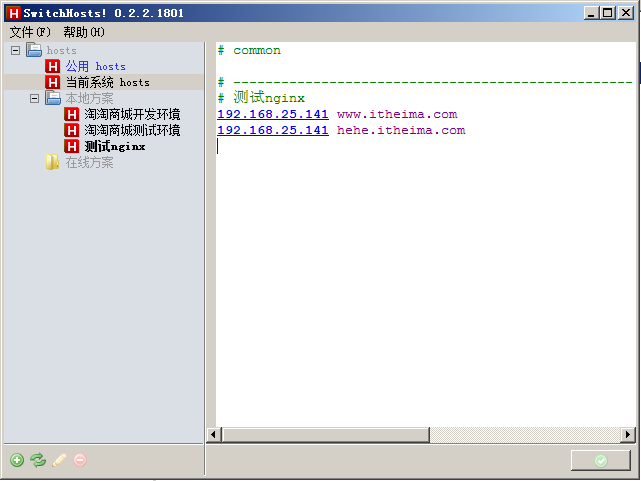
可以修改host文件实现域名访问。
51.1.3.1 设置域名和ip的映射关系
修改window的hosts文件:(C:\Windows\System32\drivers\etc)
51.1.3.2 基于域名的虚拟主机配置
| server { listen 80; server_name www.itheima.com;
#charset koi8-r;
#access_log logs/host.access.log main;
location / { root html-www; index index.html index.htm; }
}
server { listen 80; server_name hehe.itheima.com;
#charset koi8-r;
#access_log logs/host.access.log main;
location / { root html-hehe; index index.html index.htm; }
} |
修改配置文件后,需要nginx重新加载配置文件。

