【图片分割】【深度学习】Windows10下SAM官方代码Pytorch实现
【图片分割】【深度学习】Windows10下SAM官方代码Pytorch实现
提示:最近开始在【图片分割】方面进行研究,记录相关知识点,分享学习中遇到的问题已经解决的方法。
文章目录
- 【图片分割】【深度学习】Windows10下SAM官方代码Pytorch实现
- 前言
- SAM模型运行环境安装
-
- 打开cmd,执行下面的指令查看CUDA版本号
- 2.安装GPU版本的torch:【[官网](https://pytorch.org/)】
- 3.博主安装环境参考
- SAM代码使用
-
- predictor_example
-
- 步骤一:查看测试图片
- 步骤二:显示前景和背景的标记点
- 步骤三:标记点完成前景目标的分割
- 步骤四:标定框完成前景目标的分割
- 步骤五:标定框和标记点联合完成前景目标的分割
- 步骤六:多标定框完成前景目标的分割
- 步骤六:图片批量完成前景目标的分割
- automatic_mask_generator_example
- 步骤一:自动掩码生成
- 步骤一:自动掩码生成参数调整
- 总结
前言
SAM是由谷歌的Kirillov, Alexander等人在《Segment Anything》【论文地址】一文中提出的模型,模块化交互式VOS(MiVOS)框架将交互到掩码和掩码传播分离,从而实现更高的泛化性和更好的性能。
在详细解析SAM网络之前,首要任务是搭建SAM【Pytorch-demo地址】所需的运行环境,并模型完成训练和测试工作,展开后续工作才有意义。
SAM模型运行环境安装

代码运行这里提了要求,python要大于等于3.8,pytorch大于等于1.7,torchvision大于等于0.8。
打开cmd,执行下面的指令查看CUDA版本号
nvidia-smi

2.安装GPU版本的torch:【官网】
博主的cuda版本是12.1,但这里cuda版本最高也是11.8,博主选的11.7也没问题。

其他cuda版本的torch在【以前版本】找对应的安装命令,其他包安装就用githup源码教程给出的方式安装即可:
cd segment-anything; pip install -e .
# 这里是选装包,但是博主还是都装了
pip install opencv-python pycocotools matplotlib onnxruntime onnx
3.博主安装环境参考
根据个人电脑配置环境运行环境,这里博主提供了本人运行环境安装的包,假设你的cuda版本是11.7及其以上,个人觉得可以直接用博主的yaml安装。
# 使用Anaconda导出环境yaml文件(这步是博主导出自己的安装包,可忽略)
conda env export --name SAM >environment.yaml
# 使用yaml创建虚拟环境
conda env create -f environment.yaml
conda下载超时自动断开处理方法
#把连接超时的时间设置成100s,读取超时的时间修改成100s
conda config --set remote_connect_timeout_secs 100
conda config --set remote_read_timeout_secs 100
environment.yml文件内容,注意"name: SAM"是自定义虚拟环境名。假如有些包实现安装不了,单独pip安装,这里只是作为一个参考。
name: SAM
channels:
  - conda-forge
  - https://mirrors.tuna.tsinghua.edu.cn/anaconda/cloud/msys2/
  - https://mirrors.tuna.tsinghua.edu.cn/anaconda/cloud/conda-forge
  - https://mirrors.tuna.tsinghua.edu.cn/anaconda/pkgs/free/
  - defaults
dependencies:
  - bzip2=1.0.8=h8ffe710_4
  - ca-certificates=2022.12.7=h5b45459_0
  - libffi=3.4.2=h8ffe710_5
  - libsqlite=3.40.0=hcfcfb64_0
  - libzlib=1.2.13=hcfcfb64_4
  - openssl=3.1.0=hcfcfb64_0
  - pip=23.0.1=pyhd8ed1ab_0
  - python=3.9.16=h4de0772_0_cpython
  - setuptools=67.6.1=pyhd8ed1ab_0
  - tk=8.6.12=h8ffe710_0
  - tzdata=2023c=h71feb2d_0
  - ucrt=10.0.22621.0=h57928b3_0
  - vc=14.3=hb6edc58_10
  - vs2015_runtime=14.34.31931=h4c5c07a_10
  - wheel=0.40.0=pyhd8ed1ab_0
  - xz=5.2.6=h8d14728_0
  - pip:
    - certifi==2022.12.7
    - charset-normalizer==2.1.1
    - coloredlogs==15.0.1
    - contourpy==1.0.7
    - cycler==0.11.0
    - filelock==3.9.0
    - flatbuffers==23.3.3
    - fonttools==4.39.3
    - humanfriendly==10.0
    - idna==3.4
    - importlib-resources==5.12.0
    - jinja2==3.1.2
    - kiwisolver==1.4.4
    - markupsafe==2.1.2
    - matplotlib==3.7.1
    - mpmath==1.3.0
    - networkx==3.0
    - numpy==1.24.2
    - onnx==1.13.1
    - onnxruntime==1.14.1
    - opencv-python==4.7.0.72
    - packaging==23.0
    - pillow==9.5.0
    - protobuf==3.20.3
    - pycocotools==2.0.6
    - pyparsing==3.0.9
    - pyreadline3==3.4.1
    - python-dateutil==2.8.2
    - requests==2.28.1
    - six==1.16.0
    - sympy==1.11.1
    - torch==2.0.0+cu117
    - torchaudio==2.0.1+cu117
    - torchvision==0.15.1+cu117
    - typing-extensions==4.5.0
    - urllib3==1.26.13
    - zipp==3.15.0
prefix: D:\ProgramData\Anaconda\Miniconda3\envs\SAM
最终的环境安装所有的包与yaml文件一致。
# 查看所有安装的包
pip list
conda list
SAM代码使用
下载githup源码以及所提供的权重文件

predictor_example
源码在notebooks文件内提供了一个Jupyter Notebook的使用教程,博主现在就以官方使用教程为模板,测试自己的数据集。
predictor_example.ipynb源码在notebooks文件目录下,可以本地运行测试或者直接在githup上查看教程。
步骤一:查看测试图片
import cv2
import matplotlib.pyplot as plt
image = cv2.imread('img.png')
image = cv2.cvtColor(image, cv2.COLOR_BGR2RGB)
plt.figure(figsize=(10, 10))
plt.imshow(image)
plt.axis('on')
plt.show()

步骤二:显示前景和背景的标记点
import numpy as np
import matplotlib.pyplot as plt
import cv2

def show_points(coords, labels, ax, marker_size=375):
    # 筛选出前景目标标记点
    pos_points = coords[labels == 1]
    # 筛选出背景目标标记点
    neg_points = coords[labels == 0]
    # x-->pos_points[:, 0] y-->pos_points[:, 1]
    ax.scatter(pos_points[:, 0], pos_points[:, 1], color='green', marker='*', s=marker_size, edgecolor='white',
               linewidth=1.25)  # 前景的标记点显示
    ax.scatter(neg_points[:, 0], neg_points[:, 1], color='red', marker='*', s=marker_size, edgecolor='white',
               linewidth=1.25)  # 背景的标记点显示

image = cv2.imread('img.png')
image = cv2.cvtColor(image, cv2.COLOR_BGR2RGB)

# 鼠标标定(x,y)位置
# 因为可以有多个标定,所以有多个坐标点
input_point = np.array([[230, 194], [182, 63], [339, 279]])
# 1表示前景目标,0表示背景
# input_point和input_label一一对应
input_label = np.array([1, 1, 0])

plt.figure(figsize=(10, 10))
plt.imshow(image)
show_points(input_point, input_label, plt.gca())
plt.axis('on')
plt.show()

这里图片可以用画图软件打开查看像素坐标辅助标定

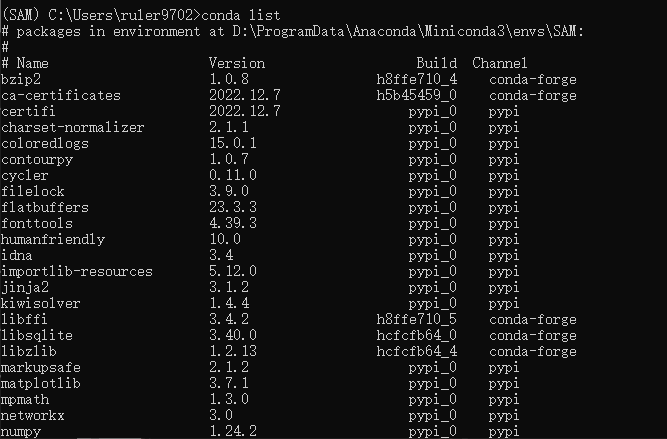
步骤三:标记点完成前景目标的分割
简单的调用源码模型,就能完成前景目标的分割,源码提供了三中不同大小的模型,读者可以自己去尝试不同的模型效果。
博主在阅读源码后,后续会根据自己的理解讲解源码
import numpy as np
import matplotlib.pyplot as plt
import cv2

def show_mask(mask, ax, random_color=False):
    if random_color:    # 掩膜颜色是否随机决定
        color = np.concatenate([np.random.random(3), np.array([0.6])], axis=0)
    else:
        color = np.array([30 / 255, 144 / 255, 255 / 255, 0.6])
    h, w = mask.shape[-2:]
    mask_image = mask.reshape(h, w, 1) * color.reshape(1, 1, -1)
    ax.imshow(mask_image)

def show_points(coords, labels, ax, marker_size=375):
    # 筛选出前景目标标记点
    pos_points = coords[labels == 1]
    # 筛选出背景目标标记点
    neg_points = coords[labels == 0]
    # x-->pos_points[:, 0] y-->pos_points[:, 1]
    ax.scatter(pos_points[:, 0], pos_points[:, 1], color='green', marker='*', s=marker_size, edgecolor='white',
               linewidth=1.25)  # 前景的标记点显示
    ax.scatter(neg_points[:, 0], neg_points[:, 1], color='red', marker='*', s=marker_size, edgecolor='white',
               linewidth=1.25)  # 背景的标记点显示
import sys
sys.path.append("..")
from segment_anything import sam_model_registry, SamPredictor

image = cv2.imread('img.png')
image = cv2.cvtColor(image, cv2.COLOR_BGR2RGB)

#------加载模型
# 权重文件保存地址
sam_checkpoint = "model_save/sam_vit_b_01ec64.pth"
# sam_checkpoint = "model_save/sam_vit_h_4b8939.pth"
# sam_checkpoint = "model_save/sam_vit_l_0b3195.pth"
# 模型类型
model_type = "vit_b"
# model_type = "vit_h"
# model_type = "vit_l"
device = "cuda"
sam = sam_model_registry[model_type](checkpoint=sam_checkpoint)
sam.to(device=device)
predictor = SamPredictor(sam)
predictor.set_image(image)
#------加载模型


# 鼠标标定(x,y)位置
# 因为可以有多个标定,所以有多个坐标点
input_point = np.array([[230, 194], [182, 63], [339, 279]])
# 1表示前景目标,0表示背景
# input_point和input_label一一对应
input_label = np.array([1, 1, 0])


masks, scores, logits = predictor.predict(
    point_coords=input_point,
    point_labels=input_label,
    multimask_output=True,
)
for i, (mask, score) in enumerate(zip(masks, scores)):
    plt.figure(figsize=(10, 10))
    plt.imshow(image)
    show_mask(mask, plt.gca())
    show_points(input_point, input_label, plt.gca())
    plt.title(f"Mask {i + 1}, Score: {score:.3f}", fontsize=18)
    plt.axis('off')
    plt.show()
这里会输出三个结果
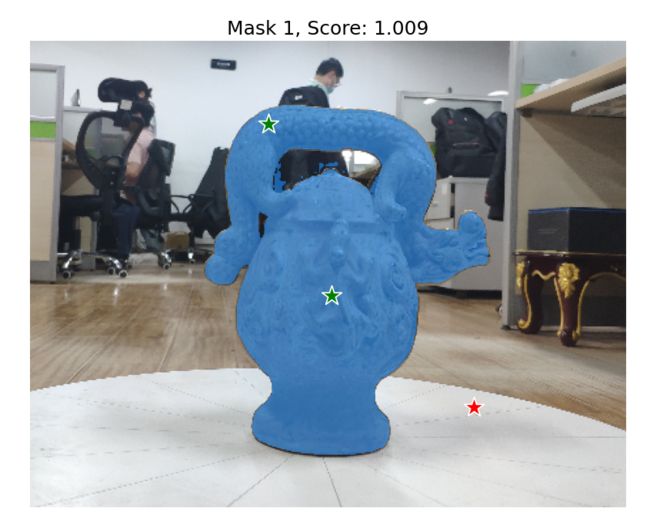


步骤四:标定框完成前景目标的分割
绿色的框是用户自己标定的,根据框选的区域完成前景目标的分割。
import numpy as np
import matplotlib.pyplot as plt
import cv2

def show_mask(mask, ax, random_color=False):
    if random_color:    # 掩膜颜色是否随机决定
        color = np.concatenate([np.random.random(3), np.array([0.6])], axis=0)
    else:
        color = np.array([30 / 255, 144 / 255, 255 / 255, 0.6])
    h, w = mask.shape[-2:]
    mask_image = mask.reshape(h, w, 1) * color.reshape(1, 1, -1)
    ax.imshow(mask_image)

def show_points(coords, labels, ax, marker_size=375):
    # 筛选出前景目标标记点
    pos_points = coords[labels == 1]
    # 筛选出背景目标标记点
    neg_points = coords[labels == 0]
    # x-->pos_points[:, 0] y-->pos_points[:, 1]
    ax.scatter(pos_points[:, 0], pos_points[:, 1], color='green', marker='*', s=marker_size, edgecolor='white',
               linewidth=1.25)  # 前景的标记点显示
    ax.scatter(neg_points[:, 0], neg_points[:, 1], color='red', marker='*', s=marker_size, edgecolor='white',
               linewidth=1.25)  # 背景的标记点显示
def show_box(box, ax):
    # 画出标定框 x0 y0是起始坐标
    x0, y0 = box[0], box[1]
    # w h 是框的尺寸
    w, h = box[2] - box[0], box[3] - box[1]
    ax.add_patch(plt.Rectangle((x0, y0), w, h, edgecolor='green', facecolor=(0, 0, 0, 0), lw=2))

import sys
sys.path.append("..")
from segment_anything import sam_model_registry, SamPredictor
image = cv2.imread('img.png')
image = cv2.cvtColor(image, cv2.COLOR_BGR2RGB)

#------加载模型
# 权重文件保存地址
sam_checkpoint = "model_save/sam_vit_b_01ec64.pth"
# sam_checkpoint = "model_save/sam_vit_h_4b8939.pth"
# sam_checkpoint = "model_save/sam_vit_l_0b3195.pth"
# 模型类型
model_type = "vit_b"
# model_type = "vit_h"
# model_type = "vit_l"
device = "cuda"
sam = sam_model_registry[model_type](checkpoint=sam_checkpoint)
sam.to(device=device)
predictor = SamPredictor(sam)
predictor.set_image(image)
#------加载模型


# 标定框的起始坐标和终点坐标
input_box = np.array([112, 41, 373, 320])

masks, _, _ = predictor.predict(
    point_coords=None,
    point_labels=None,
    box=input_box[None, :],
    multimask_output=False,
)

plt.figure(figsize=(10, 10))
plt.imshow(image)
show_mask(masks[0], plt.gca())
show_box(input_box, plt.gca())
plt.axis('off')
plt.show()
步骤五:标定框和标记点联合完成前景目标的分割
对于一些复杂的目标,可能需要联合使用提高前景目标的分割精度。
import numpy as np
import matplotlib.pyplot as plt
import cv2

def show_mask(mask, ax, random_color=False):
    if random_color:    # 掩膜颜色是否随机决定
        color = np.concatenate([np.random.random(3), np.array([0.6])], axis=0)
    else:
        color = np.array([30 / 255, 144 / 255, 255 / 255, 0.6])
    h, w = mask.shape[-2:]
    mask_image = mask.reshape(h, w, 1) * color.reshape(1, 1, -1)
    ax.imshow(mask_image)

def show_points(coords, labels, ax, marker_size=375):
    # 筛选出前景目标标记点
    pos_points = coords[labels == 1]
    # 筛选出背景目标标记点
    neg_points = coords[labels == 0]
    # x-->pos_points[:, 0] y-->pos_points[:, 1]
    ax.scatter(pos_points[:, 0], pos_points[:, 1], color='green', marker='*', s=marker_size, edgecolor='white',
               linewidth=1.25)  # 前景的标记点显示
    ax.scatter(neg_points[:, 0], neg_points[:, 1], color='red', marker='*', s=marker_size, edgecolor='white',
               linewidth=1.25)  # 背景的标记点显示

def show_box(box, ax):
    # 画出标定框 x0 y0是起始坐标
    x0, y0 = box[0], box[1]
    # w h 是框的尺寸
    w, h = box[2] - box[0], box[3] - box[1]
    ax.add_patch(plt.Rectangle((x0, y0), w, h, edgecolor='green', facecolor=(0, 0, 0, 0), lw=2))

import sys
sys.path.append("..")
from segment_anything import sam_model_registry, SamPredictor

image = cv2.imread('img.png')
image = cv2.cvtColor(image, cv2.COLOR_BGR2RGB)

#------加载模型
# 权重文件保存地址
sam_checkpoint = "model_save/sam_vit_b_01ec64.pth"
# sam_checkpoint = "model_save/sam_vit_h_4b8939.pth"
# sam_checkpoint = "model_save/sam_vit_l_0b3195.pth"
# 模型类型
model_type = "vit_b"
# model_type = "vit_h"
# model_type = "vit_l"
device = "cuda"
sam = sam_model_registry[model_type](checkpoint=sam_checkpoint)
sam.to(device=device)
predictor = SamPredictor(sam)
predictor.set_image(image)
#------加载模型


# 标定框的起始坐标和终点坐标
input_box = np.array([112, 41, 373, 320])
# 鼠标标定(x,y)位置
# 因为可以有多个标定,所以有多个坐标点
input_point = np.array([[230, 194], [182, 63], [339, 279]])
# 1表示前景目标,0表示背景
# input_point和input_label一一对应
input_label = np.array([1, 1, 0])

# 标定框和标记点联合使用
masks, _, _ = predictor.predict(
    point_coords=input_point,
    point_labels=input_label,
    box=input_box,
    multimask_output=False,
)

plt.figure(figsize=(10, 10))
plt.imshow(image)
show_mask(masks[0], plt.gca())
show_box(input_box, plt.gca())
show_points(input_point, input_label, plt.gca())
plt.axis('off')
plt.show()

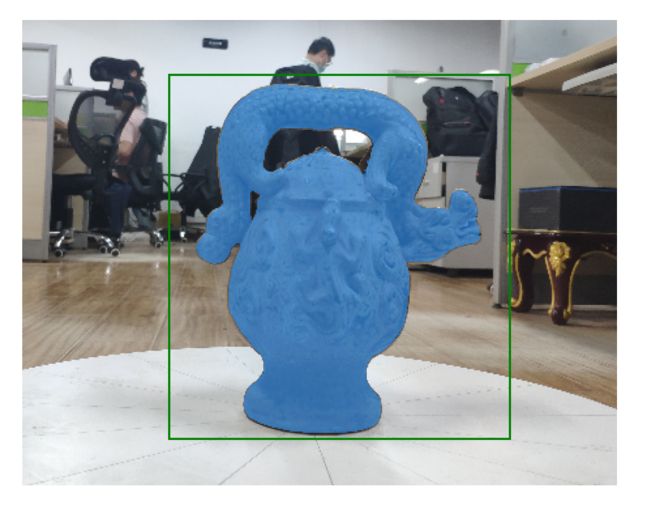
步骤六:多标定框完成前景目标的分割
可以是多标定框对应多个目标,也可以是多标定框对应同一目标的不同部位。
import numpy as np
import matplotlib.pyplot as plt
import torch
import cv2

def show_mask(mask, ax, random_color=False):
    if random_color:    # 掩膜颜色是否随机决定
        color = np.concatenate([np.random.random(3), np.array([0.6])], axis=0)
    else:
        color = np.array([30 / 255, 144 / 255, 255 / 255, 0.6])
    h, w = mask.shape[-2:]
    mask_image = mask.reshape(h, w, 1) * color.reshape(1, 1, -1)
    ax.imshow(mask_image)

def show_points(coords, labels, ax, marker_size=375):
    # 筛选出前景目标标记点
    pos_points = coords[labels == 1]
    # 筛选出背景目标标记点
    neg_points = coords[labels == 0]
    # x-->pos_points[:, 0] y-->pos_points[:, 1]
    ax.scatter(pos_points[:, 0], pos_points[:, 1], color='green', marker='*', s=marker_size, edgecolor='white',
               linewidth=1.25)  # 前景的标记点显示
    ax.scatter(neg_points[:, 0], neg_points[:, 1], color='red', marker='*', s=marker_size, edgecolor='white',
               linewidth=1.25)  # 背景的标记点显示

def show_box(box, ax):
    # 画出标定框 x0 y0是起始坐标
    x0, y0 = box[0], box[1]
    # w h 是框的尺寸
    w, h = box[2] - box[0], box[3] - box[1]
    ax.add_patch(plt.Rectangle((x0, y0), w, h, edgecolor='green', facecolor=(0, 0, 0, 0), lw=2))

import sys
sys.path.append("..")
from segment_anything import sam_model_registry, SamPredictor

image = cv2.imread('img.png')
image = cv2.cvtColor(image, cv2.COLOR_BGR2RGB)

#------加载模型
# 权重文件保存地址
sam_checkpoint = "model_save/sam_vit_b_01ec64.pth"
# sam_checkpoint = "model_save/sam_vit_h_4b8939.pth"
# sam_checkpoint = "model_save/sam_vit_l_0b3195.pth"
# 模型类型
model_type = "vit_b"
# model_type = "vit_h"
# model_type = "vit_l"
device = "cuda"
sam = sam_model_registry[model_type](checkpoint=sam_checkpoint)
sam.to(device=device)
predictor = SamPredictor(sam)
predictor.set_image(image)
#------加载模型


# 存在多个目标标定框
input_boxes = torch.tensor([
    [121, 49, 361, 190],
    [143, 101, 308, 312],
    [366, 116, 451, 233],
], device=predictor.device)

transformed_boxes = predictor.transform.apply_boxes_torch(input_boxes, image.shape[:2])
masks, _, _ = predictor.predict_torch(
    point_coords=None,
    point_labels=None,
    boxes=transformed_boxes,
    multimask_output=False,
)
plt.figure(figsize=(10, 10))
plt.imshow(image)
for mask in masks:
    show_mask(mask.cpu().numpy(), plt.gca(), random_color=True)
for box in input_boxes:
    show_box(box.cpu().numpy(), plt.gca())
plt.axis('off')
plt.show()

步骤六:图片批量完成前景目标的分割
源码支持图片的批量输入,大大提升了分割效率。
import numpy as np
import matplotlib.pyplot as plt
import torch
import cv2

def show_mask(mask, ax, random_color=False):
    if random_color:    # 掩膜颜色是否随机决定
        color = np.concatenate([np.random.random(3), np.array([0.6])], axis=0)
    else:
        color = np.array([30 / 255, 144 / 255, 255 / 255, 0.6])
    h, w = mask.shape[-2:]
    mask_image = mask.reshape(h, w, 1) * color.reshape(1, 1, -1)
    ax.imshow(mask_image)

def show_points(coords, labels, ax, marker_size=375):
    # 筛选出前景目标标记点
    pos_points = coords[labels == 1]
    # 筛选出背景目标标记点
    neg_points = coords[labels == 0]
    # x-->pos_points[:, 0] y-->pos_points[:, 1]
    ax.scatter(pos_points[:, 0], pos_points[:, 1], color='green', marker='*', s=marker_size, edgecolor='white',
               linewidth=1.25)  # 前景的标记点显示
    ax.scatter(neg_points[:, 0], neg_points[:, 1], color='red', marker='*', s=marker_size, edgecolor='white',
               linewidth=1.25)  # 背景的标记点显示

def show_box(box, ax):
    # 画出标定框 x0 y0是起始坐标
    x0, y0 = box[0], box[1]
    # w h 是框的尺寸
    w, h = box[2] - box[0], box[3] - box[1]
    ax.add_patch(plt.Rectangle((x0, y0), w, h, edgecolor='green', facecolor=(0, 0, 0, 0), lw=2))

def prepare_image(image, transform, device):
    image = transform.apply_image(image)
    image = torch.as_tensor(image, device=device.device)
    return image.permute(2, 0, 1).contiguous()


import sys
sys.path.append("..")
from segment_anything import sam_model_registry, SamPredictor

image1 = cv2.imread('img.png')
image1 = cv2.cvtColor(image1, cv2.COLOR_BGR2RGB)
image2 = cv2.imread('img_1.png')
image2 = cv2.cvtColor(image2, cv2.COLOR_BGR2RGB)

#------加载模型
# 权重文件保存地址
sam_checkpoint = "model_save/sam_vit_b_01ec64.pth"
# sam_checkpoint = "model_save/sam_vit_h_4b8939.pth"
# sam_checkpoint = "model_save/sam_vit_l_0b3195.pth"
# 模型类型
model_type = "vit_b"
# model_type = "vit_h"
# model_type = "vit_l"
device = "cuda"
sam = sam_model_registry[model_type](checkpoint=sam_checkpoint)
sam.to(device=device)
from segment_anything.utils.transforms import ResizeLongestSide
resize_transform = ResizeLongestSide(sam.image_encoder.img_size)
#------加载模型

# 存在多个目标标定框
image1_boxes = torch.tensor([
    [121, 49, 361, 190],
    [143, 101, 308, 312],
    [366, 116, 451, 233],
], device=sam.device)

image2_boxes = torch.tensor([
    [24, 4, 333, 265],
], device=sam.device)

# 批量输入
batched_input = [
     {
         'image': prepare_image(image1, resize_transform, sam),
         'boxes': resize_transform.apply_boxes_torch(image1_boxes, image1.shape[:2]),
         'original_size': image1.shape[:2]
     },
     {
         'image': prepare_image(image2, resize_transform, sam),
         'boxes': resize_transform.apply_boxes_torch(image2_boxes, image2.shape[:2]),
         'original_size': image2.shape[:2]
     }
]
batched_output = sam(batched_input, multimask_output=False)

fig, ax = plt.subplots(1, 2, figsize=(20, 20))

# 批量输出
ax[0].imshow(image1)
for mask in batched_output[0]['masks']:
    show_mask(mask.cpu().numpy(), ax[0], random_color=True)
for box in image1_boxes:
    show_box(box.cpu().numpy(), ax[0])
ax[0].axis('off')

ax[1].imshow(image2)
for mask in batched_output[1]['masks']:
    show_mask(mask.cpu().numpy(), ax[1], random_color=True)
for box in image2_boxes:
    show_box(box.cpu().numpy(), ax[1])
ax[1].axis('off')
plt.tight_layout()
plt.show()
automatic_mask_generator_example
源码在notebooks文件内提供了一个Jupyter Notebook的自动分割教程,无需标定点和标定框的。
automatic_mask_generator_example.ipynb源码在notebooks文件目录下,可以本地运行测试或者直接在githup上查看教程。
步骤一:自动掩码生成
import numpy as np
import torch
import matplotlib.pyplot as plt
import cv2

image = cv2.imread('img.png')
image = cv2.cvtColor(image, cv2.COLOR_BGR2RGB)

# 权重文件保存地址
sam_checkpoint = "model_save/sam_vit_b_01ec64.pth"
# sam_checkpoint = "model_save/sam_vit_h_4b8939.pth"
# sam_checkpoint = "model_save/sam_vit_l_0b3195.pth"
# 模型类型
model_type = "vit_b"
# model_type = "vit_h"
# model_type = "vit_l"
device = "cuda"

def show_anns(anns):
    if len(anns) == 0:
        return
    sorted_anns = sorted(anns, key=(lambda x: x['area']), reverse=True)
    ax = plt.gca()
    ax.set_autoscale_on(False)
    polygons = []
    color = []
    for ann in sorted_anns:
        m = ann['segmentation']
        img = np.ones((m.shape[0], m.shape[1], 3))
        color_mask = np.random.random((1, 3)).tolist()[0]   # 产生随机颜色的mask
        for i in range(3):
            img[:, :, i] = color_mask[i]
        ax.imshow(np.dstack((img, m*0.35)))

from segment_anything import sam_model_registry, SamAutomaticMaskGenerator, SamPredictor
sam = sam_model_registry[model_type](checkpoint=sam_checkpoint)
sam.to(device=device)

mask_generator = SamAutomaticMaskGenerator(sam)
masks = mask_generator.generate(image)

plt.figure(figsize=(20, 20))
plt.imshow(image)
show_anns(masks)
plt.axis('off')
plt.show()
步骤一:自动掩码生成参数调整
在自动掩模生成中有几个可调参数,用于控制采样点的密度以及去除低质量或重复掩模的阈值。此外,生成可以在图像的裁剪上自动运行,以提高较小对象的性能,后处理可以去除杂散像素和孔洞。
import numpy as np
import torch
import matplotlib.pyplot as plt
import cv2

image = cv2.imread('img.png')
image = cv2.cvtColor(image, cv2.COLOR_BGR2RGB)

# 权重文件保存地址
sam_checkpoint = "model_save/sam_vit_b_01ec64.pth"
# sam_checkpoint = "model_save/sam_vit_h_4b8939.pth"
# sam_checkpoint = "model_save/sam_vit_l_0b3195.pth"
# 模型类型
model_type = "vit_b"
# model_type = "vit_h"
# model_type = "vit_l"
device = "cuda"

def show_anns(anns):
    if len(anns) == 0:
        return
    sorted_anns = sorted(anns, key=(lambda x: x['area']), reverse=True)
    ax = plt.gca()
    ax.set_autoscale_on(False)
    polygons = []
    color = []
    for ann in sorted_anns:
        m = ann['segmentation']
        img = np.ones((m.shape[0], m.shape[1], 3))
        color_mask = np.random.random((1, 3)).tolist()[0]   # 产生随机颜色的mask
        for i in range(3):
            img[:, :, i] = color_mask[i]
        ax.imshow(np.dstack((img, m*0.35)))

from segment_anything import sam_model_registry, SamAutomaticMaskGenerator, SamPredictor
sam = sam_model_registry[model_type](checkpoint=sam_checkpoint)
sam.to(device=device)

# 默认版本
# mask_generator = SamAutomaticMaskGenerator(sam)
# 自定义参数版本
mask_generator_2 = SamAutomaticMaskGenerator(
    model=sam,
    points_per_side=32,
    pred_iou_thresh=0.86,
    stability_score_thresh=0.92,
    crop_n_layers=1,
    crop_n_points_downscale_factor=2,
    min_mask_region_area=100,  # Requires open-cv to run post-processing
)

masks = mask_generator_2.generate(image)

plt.figure(figsize=(20, 20))
plt.imshow(image)
show_anns(masks)
plt.axis('off')
plt.show()

总结
尽可能简单、详细的介绍了SAM的安装流程以及SAM官方的基本使用方法。后续会根据自己学到的知识结合个人理解讲解SAM的原理和代码,目前只是拙劣的使用。