Cesium 自定义 selectionIndicator以及样式的切换
前言:有这样一个需求,在Cesium中,选中不同的模型,选中框(selectionIndicator)的样子也需要不一样。查看Cesium源码,在下载的cesium包中的cesium/Source/Widgets/SelectionIndicator目录下可以看到三个文件:
- SelectionIndicator.css
- SelectionIndicator.js
- SelectionIndicatorViewModel.js
看过Cesium API的童鞋都知道,SelectionIndicator和SelectionIndicatorViewModel正是和选择框相关的两个类(没看的抓紧去查查)。
在浏览器中打开自己的项目,并选择一个Entity 让选择框出现,在F12中查看选择框的结构和样式:
可以看到,选择框实际上是一个svg.
SVG是什么?简单说,SVG是一种使用xml来描绘2D画面的图像文件,可以理解为xml格式的图片。
什么是SVG?(摘自W3C School)
- SVG 指可伸缩矢量图形 (Scalable Vector Graphics)
- SVG 用来定义用于网络的基于矢量的图形
- SVG 使用 XML 格式定义图形
- SVG 图像在放大或改变尺寸的情况下其图形质量不会有所损失
- SVG 是万维网联盟的标准
- SVG 与诸如 DOM 和 XSL 之类的 W3C 标准是一个整体
打开SelectionIndicator.css文件,可以看到,这几个样式正是上图SelectionIndicator的几个样式,包括 填充颜色,边框颜色,出现和消失的动画,显隐性控制等。
再看看SelectionIndicator.js文件。我们发现里面的SelectionIndicator,正是构造SVG文件的地方。
    /**
     * A widget for displaying an indicator on a selected object.
     *
     * @alias SelectionIndicator
     * @constructor
     *
     * @param {Element|String} container The DOM element or ID that will contain the widget.
     * @param {Scene} scene The Scene instance to use.
     *
     * @exception {DeveloperError} Element with id "container" does not exist in the document.
     */
    function SelectionIndicator(container, scene) {
        //>>includeStart('debug', pragmas.debug);
        if (!defined(container)) {
            throw new DeveloperError('container is required.');
        }
        //>>includeEnd('debug')

        container = getElement(container);

        this._container = container;

        var el = document.createElement('div');
        el.className = 'cesium-selection-wrapper';
        el.setAttribute('data-bind', '\
style: { "top" : _screenPositionY, "left" : _screenPositionX },\
css: { "cesium-selection-wrapper-visible" : isVisible }');
        container.appendChild(el);
        this._element = el;

        var svgNS = 'http://www.w3.org/2000/svg';
        var path = 'M -34 -34 L -34 -11.25 L -30 -15.25 L -30 -30 L -15.25 -30 L -11.25 -34 L -34 -34 z M 11.25 -34 L 15.25 -30 L 30 -30 L 30 -15.25 L 34 -11.25 L 34 -34 L 11.25 -34 z M -34 11.25 L -34 34 L -11.25 34 L -15.25 30 L -30 30 L -30 15.25 L -34 11.25 z M 34 11.25 L 30 15.25 L 30 30 L 15.25 30 L 11.25 34 L 34 34 L 34 11.25 z';
        var svg = document.createElementNS(svgNS, 'svg:svg');
        svg.setAttribute('width', 160);
        svg.setAttribute('height', 160);
        svg.setAttribute('viewBox', '0 0 160 160');

        var group = document.createElementNS(svgNS, 'g');
        group.setAttribute('transform', 'translate(80,80)');
        svg.appendChild(group);

        var pathElement = document.createElementNS(svgNS, 'path');
        pathElement.setAttribute('data-bind', 'attr: { transform: _transform }');
        pathElement.setAttribute('d', path);
        group.appendChild(pathElement);

        el.appendChild(svg);

        var viewModel = new SelectionIndicatorViewModel(scene, this._element, this._container);
        this._viewModel = viewModel;

        knockout.applyBindings(this._viewModel, this._element);
    }
继续看SelectionIndicator.js文件的代码可以发现,最关键的一句代码是:
var path = 'M -34 -34 L -34 -11.25 L -30 -15.25 L -30 -30 L -15.25 -30 L -11.25 -34 L -34 -34 z M 11.25 -34 L 15.25 -30 L 30 -30 L 30 -15.25 L 34 -11.25 L 34 -34 L 11.25 -34 z M -34 11.25 L -34 34 L -11.25 34 L -15.25 30 L -30 30 L -30 15.25 L -34 11.25 z M 34 11.25 L 30 15.25 L 30 30 L 15.25 30 L 11.25 34 L 34 34 L 34 11.25 z';原来,我们看到的选择框是靠这样的一句代码画出来的,这个path里的内容是什么意思呢?百度SVGpath可以知道:
下面的命令可用于路径数据:
- M = moveto
- L = lineto
- H = horizontal lineto
- V = vertical lineto
- C = curveto
- S = smooth curveto
- Q = quadratic Belzier curve
- T = smooth quadratic Belzier curveto
- A = elliptical Arc
- Z = closepath
注释:以上所有命令均允许小写字母。大写表示绝对定位,小写表示相对定位。
M
移动到的点的x轴和y轴的坐标,so,第一个M就是指从这个点开始
L
需要两个参数,分别是一个点的x轴和y轴坐标,L命令将会在当前位置和新位置(L前面画笔所在的点)之间画一条线段。
H
绘制平行线
V
绘制垂直线
Z
从当前点画一条直线到路径的起点
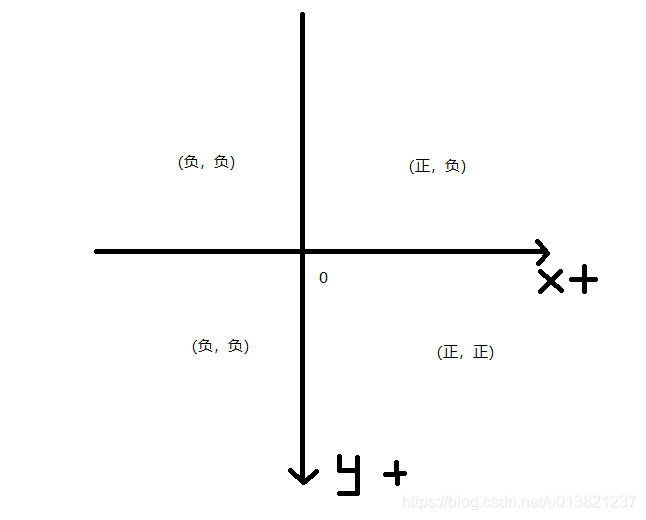
svg的坐标原点在左上角,也就是这样的:
结合坐标系,和指令,我们在纸上按照SelectionIndicator.js里的path的值,画下他的样子,如果画出来正是它应有的样子,那么恭喜你,SVG的路径用法,你已经差不多可以实战了。
现在知道自定义SelectionIndicator可以通过修改path实现,但是,并不建议直接在cesium源码里修改,下次包升级,你做的修改就消失了。
所以我们在自己的js里修改:
在创建完viewer之后,我们作如下操作:
let svg = this.viewer._selectionIndicator.viewModel.selectionIndicatorElement.getElementsByTagName('svg:svg')[0];
svg.innerHTML = "这样,你的选择器将会是自定义的样子:

