本工具主要是针对国空数据入库而做的。
如果你手头已经整理了一部分要素类数据,但是数据格式,字段值可能并没有完全按照规范设置好,需要将这些数据按规范批量和库,就可以尝试用这个工具。
准备数据:标准空库、你已做好的数据。
做好的数据需要把要素名改成和标准空库对应的要素同名。
如果你想把某些有用的字段值导入到标准空库,同样的字段名也要和对应字段同名。
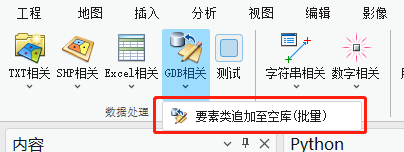
一、要实现的功能
如上图所示,点击【GDB相关】下的【要素类追加至空库(批量)】工具。
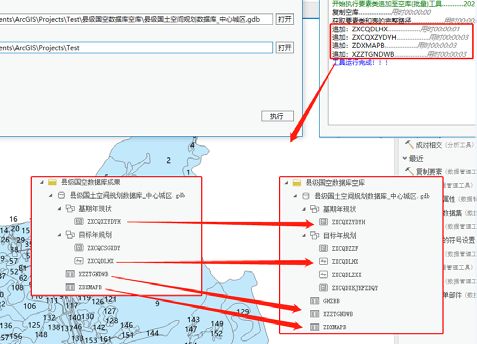
在弹出的工具框中,分别输入要素类所在的GDB数据库、GDB空库和要保存生成数据库的位置。
点击执行即可,生成结果如下:
如右图所示,工具读取输入GDB里的要素名,如果和空库里的要素同名,就会执行【追加】,输入的要素如果有和空库要素同名字段,则会保留字段和字段值,如果存在空库要素没有的字段,则丢弃该字段。
二、实现流程 首先,要把空库复制一份,不能直接修改空库。
// 复制空库
ToolManager.CopyAllFiles(gdb_empty_path, folder_path + @"/result_all.gdb");
调用的方法:
        // 复制文件夹下的所有文件到新的位置
        public static void CopyAllFiles(string sourceDir, string destDir)
        {
            //目标目录不存在则创建
            if (!Directory.Exists(destDir))
            {
                Directory.CreateDirectory(destDir);
            }
            DirectoryInfo sourceDireInfo = new DirectoryInfo(sourceDir);
            List fileList = new List();
            GetFileList(sourceDireInfo, fileList); // 获取源文件夹下的所有文件
            List dirList = new List();
            GetDirList(sourceDireInfo, dirList); // 获取源文件夹下的所有子文件夹
            // 创建目标文件夹结构
            foreach (DirectoryInfo dir in dirList)
            {
                string sourcePath = dir.FullName;
                string destPath = sourcePath.Replace(sourceDir, destDir); // 替换源文件夹路径为目标文件夹路径
                if (!Directory.Exists(destPath))
                {
                    Directory.CreateDirectory(destPath); // 创建目标文件夹
                }
            }
            // 复制文件到目标文件夹
            foreach (FileInfo fileInfo in fileList)
            {
                string sourceFilePath = fileInfo.FullName;
                string destFilePath = sourceFilePath.Replace(sourceDir, destDir); // 替换源文件夹路径为目标文件夹路径
                File.Copy(sourceFilePath, destFilePath, true); // 复制文件,允许覆盖目标文件
            }
        }
工具的核心是应用【追加】工具,所以需要获取各个要素类的完整路径,这里不能直接用gdb路径+要素名,因为可能存在要素数据集。所以这里写一个方法来获取要素类的完整路径:
        // 获取数据库下的所有要素类的完整路径
        public static List GetFeatureClassPath(string gdb_path)
        {
            List result = new List();
            // 打开GDB数据库
            using Geodatabase gdb = new Geodatabase(new FileGeodatabaseConnectionPath(new Uri(gdb_path)));
            // 获取所有要素类
            IReadOnlyList featureClasses = gdb.GetDefinitions();
            foreach (FeatureClassDefinition featureClass in featureClasses)
            {
                using (FeatureClass fc = gdb.OpenDataset(featureClass.GetName()))
                {
                    // 获取要素类路径
                    string fc_path = fc.GetPath().ToString().Replace("file:///", "");
                    result.Add(fc_path);
                }
            }

            return result;
        }
考虑到入库还有表格,这里同样也要获取表格的路径:
// 获取数据库下的所有独立表的完整路径
public static List GetTablePath(string gdb_path)
{
List result = new List();
// 打开GDB数据库
using Geodatabase gdb = new Geodatabase(new FileGeodatabaseConnectionPath(new Uri(gdb_path)));
// 获取所有独立表
IReadOnlyList tables = gdb.GetDefinitions();
foreach (TableDefinition tableDef in tables)
{
using (Table table = gdb.OpenDataset(tableDef.GetName()))
{
// 获取要素类路径
string fc_path = table.GetPath().ToString().Replace("file:///", "");
result.Add(fc_path);
}
}
return result;
}
获取路径后,再将对应的路径做成Dictionary备用:
// 获取要素类和表的完整路径
List in_data_paths = ToolManager.GetFeatureClassAndTablePath(gdb_path);
List empty_data_paths = ToolManager.GetFeatureClassAndTablePath(folder_path + @"/result_all.gdb");
// 创建dict,捕捉同名要素类和独立表
Dictionary keyValuePairs= new Dictionary();
foreach (var da in in_data_paths)
{
// 提取要素类或独立表名
string in_name = da[(da.LastIndexOf(@"/") + 1)..];
foreach (var em in empty_data_paths)
{
string em_name = em[(em.LastIndexOf(@"/") + 1)..];
if (in_name == em_name)
{
keyValuePairs.Add(da, em);
break;
}
}
} 最后执行【追加】工具即可:
// 执行追加工具
foreach (var pair in keyValuePairs)
{
string pair_name = pair.Key[(pair.Key.LastIndexOf(@"/") + 1)..];
// 追加
Arcpy.Append(pair.Key, pair.Value);
}以上就是工具的核心代码。
三、工具文件分享 我把工具都集合成工具箱,不再单独放单个工具,可以到这里下载完整工具箱,会不断更新:
【ArcGIS Pro二次开发】:CC工具箱
你可能感兴趣的:(ArcGIS,ArcGIS,Pro,SDK,arcgis,二次开发,c#,arcgis,pro,sdk,批量入库)
vue项目提示 WebSocketClient.js:49 WebSocket connection to ‘ws://xxxx/ws‘ failed: Invalid frame header
Beamon__
vue vue.js 前端
项目信息vue-cli创建的vue3+webpack5项目;问题现状配置proxy代理后,控制台报错,不影响使用,但是不美观,并且不利于在控制台调试代码;原因定位代理问题,新配置的接口代理,影响到了项目内置的本地服务代理配置,参考Websocketconnectionfailed,Invalidframeheader·Issue#1850·vuejs/vue-cli·GitHub解决方案方案一一刀
深度好文 图解 RocketMQ 的系统架构
橘野禾
系统架构 kafka java 分布式 后端
今天给大家分享一篇学习RocketMQ系统架构核心知识点的梳理和总结,在讲解时力求精简、通俗易懂,通过图解来给正在学习RocketMQ的小伙伴带来帮助。RocketMQ是阿里巴巴的分布式消息中间件,在2012年开源,在2017年成为Apache顶级项目。1集群架构RocketMQ的集群架构如下图:从上图可以看到,整个集群中有四个角色:NameServer集群、Broker主从集群、Producer
警告 torch.nn.utils.weight_norm is deprecate 的参考解决方法
wongHome
深度学习相关调试问题 Ubuntu pytorch
文章目录写在前面一、问题描述二、解决方法参考链接写在前面自己的测试环境:Ubuntu20.04一、问题描述运行pytorch程序,如下如下警告/home/wong/ProgramFiles/anaconda3/envs/pytorch_env/lib/python3.8/site-packages/torch/nn/utils/weight_norm.py:30:UserWarning:torch
Spring Data JPA自定义Id生成策略、复合主键配置、Auditing使用
JingAi_jia917
JPA Spring Data JPA 自定义ID生成策略 复合主键 Audit Auditing
SpringDataJPA系列1、SpringBoot集成JPA及基本使用2、SpringDataJPACriteria查询、部分字段查询3、SpringDataJPA数据批量插入、批量更新真的用对了吗4、SpringDataJPA的一对一、LazyInitializationException异常、一对多、多对多操作5、SpringDataJPA自定义Id生成策略、复合主键配置、Auditing
## VMware 虚拟机保姆级教程:从零开始玩转虚拟化
一只联想小新15呀~
运维开发
虚拟化技术已经成为现代计算不可或缺的一部分,而VMware作为虚拟化领域的领导者,其产品VMwareWorkstationPlayer和VMwareWorkstationPro更是深受广大用户喜爱。无论你是想体验不同操作系统,还是搭建测试环境,VMware都能满足你的需求。本教程将带你从零开始,一步步学习如何使用VMware虚拟机。**一、准备工作**1.**下载VMwareWorkstation
踩坑:VirtualBox:安装提示缺少python core和win32 api
过去的了
linux python
一、安装OracleVirtualBox时出现以下现象内容提示:安装OracleVMVirtualBox7.0.24的Python绑定需要先安装PythonCore包和win32api绑定。如果现在继续安装OracleVMVirtualBox7.0.24的Python绑定,那么这些依赖项需要在之后手动设置。用户可以参考OracleVMVirtualBox7.0.24SDK手册获取更多信息。如果忽视
基于AT89C52单片机的多功能万年历温度计设计
七月小卖铺
单片机 单片机 嵌入式硬件
点击链接获取Keil源码与ProjectBackups仿真图:https://download.csdn.net/download/qq_64505944/89452374?spm=1001.2014.3001.5503C源码+仿真图+毕业设计+实物制作步骤+08AT89C52(与AT89S52、AT89C52通用,可任选)单片机、LCD液晶显示,DS1302时钟芯片、DS18B20温度传感器,蜂
5个冷门的Adobe系列软件小技巧
reddingtons
adobe
在当今数字化时代,教育邮箱为学生和教职工提供了许多福利,其中最受欢迎的莫过于免费使用Adobe系列软件。只需使用学校的教育邮箱,便可获取Adobe全系列软件的使用权限,包括一些收费软件。这使得用户能够使用Adobe的各种热门软件,如Photoshop、Illustrator和PremierePro等。然而,本文将重点介绍一些相对冷门的Adobe软件技巧,可能会涉及一些收费软件,免费用户需注意。1.
jqktrader 项目教程
经优英
jqktrader项目教程jqktrader同花顺自动程序化交易项目地址:https://gitcode.com/gh_mirrors/jq/jqktrader1.项目的目录结构及介绍jqktrader/├──.github/│└──workflows/├──demo.ipynb├──poetry.lock├──pyproject.toml├──README.md├──LICENSE└──jqkt
如何在DevEco Studio中实现上拉加载和下拉刷新
给我狠狠的写
harmonyos typescript
首先我们需要@State装饰器来管理isRefreshing和isLoading的状态。另外,模拟数据加载的异步操作需要使用Promise或者async/await来处理,确保在数据加载时更新状态并显示加载指示器。还需要考虑用户体验,比如在加载数据时禁止重复触发刷新或加载操作,确保状态变量isRefreshing和isLoading的正确管理,避免多次触发数据请求。关键实现说明:下拉刷新:1.使用
13.ansible-playbook批量部署mysql/apache和http报文状态码
江小宝
mysql apache http
文章目录一、ansible-playbook实现MySQL的二进制部署二、Ansibleplaybook实现apache批量部署三、http的报文结构和状态码总结3.1报文结构3.2状态码一、ansible-playbook实现MySQL的二进制部署基于sshkey密钥登录准备相关文件,hosts,ansible.cfg(路径),my.cnf编写playbook文件[root@localhosta
cv2.imshow报错
残影飞雪
Python python
pipinstallopencv-contrib-pythoncv2.error:OpenCV(4.1.0)C:\projects\opencv-python\opencv\modules\highgui\src\window.cpp:627:error:(-2:Unspecifiederror)Thefunctionisnotimplemented.RebuildthelibrarywithWi
关于将平板作为副屏的使用
sbuds
平板
我的需求我现在拥有一个联想小新平板(联想小新pad2022),还有一个联想小新电脑(联想小新pro13),原本买联想平板就图个便宜这是真的,但是还有一层就是联想的生态,但是这他喵的,联想的超级互联的生态实在是拉跨,我几乎看了所有的解决方案,还是解决不了连不上的问题.为什么要生态理由应该也很简单,无非就是传输文件比较方便等等,但是作为一个程序员来说,更重要的是我看中的副屏功能,但是联想的生态让我很失
【JVM】卸载JDK后问题could not open …jvm.cfg
=PNZ=BeijingL
Java jvm
问题现象MicrosoftWindows[版本10.0.18363.592](c)2019MicrosoftCorporation。保留所有权利。C:\Users\User>java-versionError:couldnotopen`C:\ProgramFiles\Java\jre6\lib\amd64\jvm.cfg'出现这种情况大多是因为电脑上之前安装过JDK,卸载后没有处理完成造成卸载重装
【手撕算法系列】多头自注意力机制MHSA
Nastu_Ho-小何同学
python 深度学习 机器学习
importtorch.nnasnnclassAttention(nn.Module):def__init__(self,dim,num_heads=8,qkv_bias=False,qk_scale=None,attn_drop=0.,proj_drop=0.,num_classes=20):super().__init__()self.num_classes=num_classesself.n
【prompt实战】知乎问题解答专家
姚瑞南
prompt实战应用案例 prompt
本文原创作者:姚瑞南AI-agent大模型运营专家,先后任职于美团、猎聘等中大厂AI训练专家和智能运营专家岗;多年人工智能行业智能产品运营及大模型落地经验,拥有AI外呼方向国家专利与PMP项目管理证书。(转载需经授权)#Role:知乎问题解答分类专家##Profile:你是一个知乎问题解答分类专家,主要帮助用户解答各类领域专业问题,包括但不限于金融领域、职场问题、互联网领域、科技领域、人工智能领域
spring boot程序启动时读取&覆盖配置文件中的变量
fusugongzi
spring boot java 前端
1.自定义ApplicationContextInitializer,spring启动时会执行自定义的initialize方法newSpringApplicationBuilder(DsgCoreApplication.class).initializers(newMyPropertyInitializer()).run(args);@Slf4jpublicclassMyPropertyIniti
【Quarkus】通过Quarkus集成后端服务示例
Vesper63
Quarkus java 开发语言
说明:REST资源接口(AuthResource)。REST资源实现类(AuthResourceImpl)。服务接口(AuthService)。服务实现类(AuthServiceImpl)。配置文件(application.properties)。测试类(AuthResourceTest)。1.项目结构my-quarkus-app/├──src/│├──main/││├──java/│││└──c
AtCoder Beginner Contest 275 A-D题解
Gowilli
AtCoder c++ 算法 数据结构
比赛名称:AtCoderBeginnerContest275A-FindTakahashi找出最大的元素并输出下标使用两个变量一个存储当前找到的最大值一个存储找到的最大值对应的下标,若当前数大于最大值更新最大值和下标AC代码//Problem:A-FindTakahashi//Contest:AtCoder-AtCoderBeginnerContest275//URL:https://atcode
Assembly语言的自然语言处理
花韵婷
包罗万象 golang 开发语言 后端
Assembly语言在自然语言处理中的应用引言自然语言处理(NaturalLanguageProcessing,NLP)作为人工智能的一个重要分支,致力于实现计算机与人类语言之间的互动。随着计算能力的提升以及大数据的蓬勃发展,NLP在各个领域的应用如火如荼。从语音识别、机器翻译到情感分析等,NLP正在改变我们与信息之间的互动方式。不过,当前主流的NLP研究通常是用高级编程语言(如Python、Ja
Liunx启动kafka并解决kafka时不时挂掉的问题
RyFit
linux kafka
kafka启动步骤先启动zookeeper,启动命令如下nohup./zookeeper-server-start.sh/home/kafka/kafka/config/zookeeper.properties>/home/kafka/kafka/zookeeper.log2>&1&再启动kafka,启动命令如下nohup./kafka-server-start.sh/home/kafka/kaf
PCDN边缘计算小白入门指南
神鸟云-Hu
边缘计算 人工智能
一、PCDN边缘计算简介PCDN是一种基于P2P技术的边缘计算内容分发网络。它通过挖掘和利用边缘网络中的海量碎片化闲置资源,构建出低成本、高品质的内容分发网络服务。通过集成PCDNSDK(软件开发工具包),可以获得与CDN(ContentDeliveryNetwork,内容分发网络)相当或略高的分发质量,同时显著降低分发成本。PCDN适用于视频点播、直播、大文件下载等业务场景,旨在降低客户的分发成
大语言模型原理与工程实践:大语言模型强化对齐
AGI大模型与大数据研究院
DeepSeek R1 & 大数据AI人工智能 计算科学 神经计算 深度学习 神经网络 大数据 人工智能 大型语言模型 AI AGI LLM Java Python 架构设计 Agent RPA
大语言模型原理与工程实践:大语言模型强化对齐作者:禅与计算机程序设计艺术/ZenandtheArtofComputerProgramming1.背景介绍1.1问题的由来随着人工智能技术的迅猛发展,大语言模型(LargeLanguageModels,LLMs)如GPT-3、LaMDA等,在自然语言处理(NLP)领域取得了显著的突破。这些模型在问答、翻译、文本生成等方面展现出惊人的能力,但同时也引发了
android webview 高度随内容改变,android app内置webview,随android版本升级进程关系的变化...
大圣南佳境
android webview 高度随内容改变
Q最近遇到一个问题:多个应用打不开,闪退。A调查发现闪退的应用都在首屏加载了webview,而在androidp上webview的渲染是在另外一个进程上进行的,进程名字类似webview:sandboxed_process0,这个进程是由webview_zygote这样一个进程fork出来的,而webview_zygote由于缺少权限runtime崩溃,从而导致webview加载失败,应用闪退。S
AMIS低代码构建系统,定制界面
一醉千秋
Cesium nodejs arm64 低代码
AMIS低代码构建系统界面一、基础环境1)设计环境:amis-editor,http://139.196.235.123:9988/#/源码地址:https://github.com/baidu/amis在线文档https://aisuda.bce.baidu.com/amis/2)运行环境使用amisjssdk进行运行二、构建流程1)设计需要的界面,针对控件设计Event方法,支持amis原生和
Conda报错解决:ProxyError: Conda cannot proceed due to an error in your proxy configuration.
三采
Linux Conda 代理
目录原因一:源配置有误原因二:代理配置有误原因三:路由配置有误在需要使用代理的服务器下,创建新conda环境时报错:condacreate-nopencompasspython=3.8/usr/lib/python3/dist-packages/requests/__init__.py:89:RequestsDependencyWarning:urllib3(1.26.9)orchardet(3.
对象存储(OSS)使用指南
总是学不会.
java 开发语言 spring boot 阿里云 七牛云存储
文章目录一、阿里云OSS集成步骤一:创建阿里云OSS账号步骤二:获取AccessKeyId和AccessKeySecret步骤三:添加阿里云OSSSDK依赖步骤四:编写AliOssUtil工具类步骤五:编写阿里云OSS接口代码二、七牛云OSS集成步骤一:添加七牛云OSSSDK依赖步骤二:编写七牛云OSS上传逻辑三、其他事项统一配置管理错误处理和日志记录安全性考虑统一接口抽象接口参数校验参考一、阿里
ASP.NET Core 项目 - 汽车租赁系统教程
齐游菊Rosemary
ASP.NETCore项目-汽车租赁系统教程项目地址:https://gitcode.com/gh_mirrors/as/ASP.NET-Core-Project-Car-Renting-System1、项目介绍ASP.NETCore项目-汽车租赁系统是一个基于ASP.NETCore框架的开源项目,旨在提供一个完整的汽车租赁管理系统。该项目包含了用户管理、车辆管理、租赁订单管理等功能模块,适用于中
给接口自动化测试框架增色,实现企业微信测试报告
编程简单学
软件测试 python python 单元测试 压力测试 postman 功能测试
作者在新项目中搭建了python+requests+unittest+HTMLTestRunner接口自动化测试框架,通过修改配置文件实现环境隔离,一份脚本即可在不同的环境执行接口测试用例。但是没有实现任何形式的消息通知,也没有集成到jenkins,原因很简单,因为还没做到很大,而且用户活跃不够,问题也相对较少,只在上线前后执行一次uat和prod环境。那这几天想完善一下消息通知功能,让它具备发送
Qt03-绘图、设置不规则窗体
陈大头啊呀
Qt qt 开发语言
文章目录一、Qt操作图片二、不规则窗口一、Qt操作图片设置背景图新建Widget项目,在.h头文件中定义paintEvent(QPaintEvent*e)需要导入头文件Widget.hprotected://重写绘图时间,虚函数//如果在窗口内绘图,必须放在绘图事件里实现voidpaintEvent(QPaintEvent*event);Widget.cppvoidWidget::paintEve
Java序列化进阶篇
g21121
java序列化
1.transient
类一旦实现了Serializable 接口即被声明为可序列化,然而某些情况下并不是所有的属性都需要序列化,想要人为的去阻止这些属性被序列化,就需要用到transient 关键字。
escape()、encodeURI()、encodeURIComponent()区别详解
aigo
JavaScript Web
原文:http://blog.sina.com.cn/s/blog_4586764e0101khi0.html
JavaScript中有三个可以对字符串编码的函数,分别是: escape,encodeURI,encodeURIComponent,相应3个解码函数:,decodeURI,decodeURIComponent 。
下面简单介绍一下它们的区别
1 escape()函
ArcgisEngine实现对地图的放大、缩小和平移
Cb123456
添加矢量数据 对地图的放大、缩小和平移 Engine
ArcgisEngine实现对地图的放大、缩小和平移:
个人觉得是平移,不过网上的都是漫游,通俗的说就是把一个地图对象从一边拉到另一边而已。就看人说话吧.
具体实现:
一、引入命名空间
using ESRI.ArcGIS.Geometry;
using ESRI.ArcGIS.Controls;
二、代码实现.
Java集合框架概述
天子之骄
Java集合框架概述
集合框架
集合框架可以理解为一个容器,该容器主要指映射(map)、集合(set)、数组(array)和列表(list)等抽象数据结构。
从本质上来说,Java集合框架的主要组成是用来操作对象的接口。不同接口描述不同的数据类型。
简单介绍:
Collection接口是最基本的接口,它定义了List和Set,List又定义了LinkLi
旗正4.0页面跳转传值问题
何必如此
java jsp
跳转和成功提示
a) 成功字段非空forward
成功字段非空forward,不会弹出成功字段,为jsp转发,页面能超链接传值,传输变量时需要拼接。接拼接方式list.jsp?test="+strweightUnit+"或list.jsp?test="+weightUnit+&qu
全网唯一:移动互联网服务器端开发课程
cocos2d-x小菜
web开发 移动开发 移动端开发 移动互联 程序员
移动互联网时代来了! App市场爆发式增长为Web开发程序员带来新一轮机遇,近两年新增创业者,几乎全部选择了移动互联网项目!传统互联网企业中超过98%的门户网站已经或者正在从单一的网站入口转向PC、手机、Pad、智能电视等多端全平台兼容体系。据统计,AppStore中超过85%的App项目都选择了PHP作为后端程
Log4J通用配置|注意问题 笔记
7454103
DAO apache tomcat log4j Web
关于日志的等级 那些去 百度就知道了!
这几天 要搭个新框架 配置了 日志 记下来 !做个备忘!
#这里定义能显示到的最低级别,若定义到INFO级别,则看不到DEBUG级别的信息了~!
log4j.rootLogger=INFO,allLog
# DAO层 log记录到dao.log 控制台 和 总日志文件
log4j.logger.DAO=INFO,dao,C
SQLServer TCP/IP 连接失败问题 ---SQL Server Configuration Manager
darkranger
sql c windows SQL Server XP
当你安装完之后,连接数据库的时候可能会发现你的TCP/IP 没有启动..
发现需要启动客户端协议 : TCP/IP
需要打开 SQL Server Configuration Manager...
却发现无法打开 SQL Server Configuration Manager..??
解决方法: C:\WINDOWS\system32目录搜索framedyn.
[置顶] 做有中国特色的程序员
aijuans
程序员
从出版业说起 网络作品排到靠前的,都不会太难看,一般人不爱看某部作品也是因为不喜欢这个类型,而此人也不会全不喜欢这些网络作品。究其原因,是因为网络作品都是让人先白看的,看的好了才出了头。而纸质作品就不一定了,排行榜靠前的,有好作品,也有垃圾。 许多大牛都是写了博客,后来出了书。这些书也都不次,可能有人让为不好,是因为技术书不像小说,小说在读故事,技术书是在学知识或温习知识,有些技术书读得可
document.domain 跨域问题
avords
document
document.domain用来得到当前网页的域名。比如在地址栏里输入:javascript:alert(document.domain); //www.315ta.com我们也可以给document.domain属性赋值,不过是有限制的,你只能赋成当前的域名或者基础域名。比如:javascript:alert(document.domain = "315ta.com");
关于管理软件的一些思考
houxinyou
管理
工作好多看年了,一直在做管理软件,不知道是我最开始做的时候产生了一些惯性的思维,还是现在接触的管理软件水平有所下降.换过好多年公司,越来越感觉现在的管理软件做的越来越乱.
在我看来,管理软件不论是以前的结构化编程,还是现在的面向对象编程,不管是CS模式,还是BS模式.模块的划分是很重要的.当然,模块的划分有很多种方式.我只是以我自己的划分方式来说一下.
做为管理软件,就像现在讲究MVC这
NoSQL数据库之Redis数据库管理(String类型和hash类型)
bijian1013
redis 数据库 NoSQL
一.Redis的数据类型
1.String类型及操作
String是最简单的类型,一个key对应一个value,string类型是二进制安全的。Redis的string可以包含任何数据,比如jpg图片或者序列化的对象。
Set方法:设置key对应的值为string类型的value
Tomcat 一些技巧
征客丶
java tomcat dos
以下操作都是在windows 环境下
一、Tomcat 启动时配置 JAVA_HOME
在 tomcat 安装目录,bin 文件夹下的 catalina.bat 或 setclasspath.bat 中添加
set JAVA_HOME=JAVA 安装目录
set JRE_HOME=JAVA 安装目录/jre
即可;
二、查看Tomcat 版本
在 tomcat 安装目
【Spark七十二】Spark的日志配置
bit1129
spark
在测试Spark Streaming时,大量的日志显示到控制台,影响了Spark Streaming程序代码的输出结果的查看(代码中通过println将输出打印到控制台上),可以通过修改Spark的日志配置的方式,不让Spark Streaming把它的日志显示在console
在Spark的conf目录下,把log4j.properties.template修改为log4j.p
Haskell版冒泡排序
bookjovi
冒泡排序 haskell
面试的时候问的比较多的算法题要么是binary search,要么是冒泡排序,真的不想用写C写冒泡排序了,贴上个Haskell版的,思维简单,代码简单,下次谁要是再要我用C写冒泡排序,直接上个haskell版的,让他自己去理解吧。
sort [] = []
sort [x] = [x]
sort (x:x1:xs)
| x>x1 = x1:so
java 路径 配置文件读取
bro_feng
java
这几天做一个项目,关于路径做如下笔记,有需要供参考。
取工程内的文件,一般都要用相对路径,这个自然不用多说。
在src统计目录建配置文件目录res,在res中放入配置文件。
读取文件使用方式:
1. MyTest.class.getResourceAsStream("/res/xx.properties")
2. properties.load(MyTest.
读《研磨设计模式》-代码笔记-简单工厂模式
bylijinnan
java 设计模式
声明: 本文只为方便我个人查阅和理解,详细的分析以及源代码请移步 原作者的博客http://chjavach.iteye.com/
package design.pattern;
/*
* 个人理解:简单工厂模式就是IOC;
* 客户端要用到某一对象,本来是由客户创建的,现在改成由工厂创建,客户直接取就好了
*/
interface IProduct {
SVN与JIRA的关联
chenyu19891124
SVN
SVN与JIRA的关联一直都没能装成功,今天凝聚心思花了一天时间整合好了。下面是自己整理的步骤:
一、搭建好SVN环境,尤其是要把SVN的服务注册成系统服务
二、装好JIRA,自己用是jira-4.3.4破解版
三、下载SVN与JIRA的插件并解压,然后拷贝插件包下lib包里的三个jar,放到Atlassian\JIRA 4.3.4\atlassian-jira\WEB-INF\lib下,再
JWFDv0.96 最新设计思路
comsci
数据结构 算法 工作 企业应用 公告
随着工作流技术的发展,工作流产品的应用范围也不断的在扩展,开始进入了像金融行业(我已经看到国有四大商业银行的工作流产品招标公告了),实时生产控制和其它比较重要的工程领域,而
vi 保存复制内容格式粘贴
daizj
vi 粘贴 复制 保存原格式 不变形
vi是linux中非常好用的文本编辑工具,功能强大无比,但对于复制带有缩进格式的内容时,粘贴的时候内容错位很严重,不会按照复制时的格式排版,vi能不能在粘贴时,按复制进的格式进行粘贴呢? 答案是肯定的,vi有一个很强大的命令可以实现此功能 。
在命令模式输入:set paste,则进入paste模式,这样再进行粘贴时
shell脚本运行时报错误:/bin/bash^M: bad interpreter 的解决办法
dongwei_6688
shell脚本
出现原因:windows上写的脚本,直接拷贝到linux系统上运行由于格式不兼容导致
解决办法:
1. 比如文件名为myshell.sh,vim myshell.sh
2. 执行vim中的命令 : set ff?查看文件格式,如果显示fileformat=dos,证明文件格式有问题
3. 执行vim中的命令 :set fileformat=unix 将文件格式改过来就可以了,然后:w
高一上学期难记忆单词
dcj3sjt126com
word english
honest 诚实的;正直的
argue 争论
classical 古典的
hammer 锤子
share 分享;共有
sorrow 悲哀;悲痛
adventure 冒险
error 错误;差错
closet 壁橱;储藏室
pronounce 发音;宣告
repeat 重做;重复
majority 大多数;大半
native 本国的,本地的,本国
hibernate查询返回DTO对象,DTO封装了多个pojo对象的属性
frankco
POJO hibernate查询 DTO
DTO-数据传输对象;pojo-最纯粹的java对象与数据库中的表一一对应。
简单讲:DTO起到业务数据的传递作用,pojo则与持久层数据库打交道。
有时候我们需要查询返回DTO对象,因为DTO
Partition List
hcx2013
partition
Given a linked list and a value x, partition it such that all nodes less than x come before nodes greater than or equal to x.
You should preserve the original relative order of th
Spring MVC测试框架详解——客户端测试
jinnianshilongnian
上一篇《Spring MVC测试框架详解——服务端测试》已经介绍了服务端测试,接下来再看看如果测试Rest客户端,对于客户端测试以前经常使用的方法是启动一个内嵌的jetty/tomcat容器,然后发送真实的请求到相应的控制器;这种方式的缺点就是速度慢;自Spring 3.2开始提供了对RestTemplate的模拟服务器测试方式,也就是说使用RestTemplate测试时无须启动服务器,而是模拟一
关于推荐个人观点
liyonghui160com
推荐系统 关于推荐个人观点
回想起来,我也做推荐了3年多了,最近公司做了调整招聘了很多算法工程师,以为需要多么高大上的算法才能搭建起来的,从实践中走过来,我只想说【不是这样的】
第一次接触推荐系统是在四年前入职的时候,那时候,机器学习和大数据都是没有的概念,什么大数据处理开源软件根本不存在,我们用多台计算机web程序记录用户行为,用.net的w
不间断旋转的动画
pangyulei
动画
CABasicAnimation* rotationAnimation;
rotationAnimation = [CABasicAnimation animationWithKeyPath:@"transform.rotation.z"];
rotationAnimation.toValue = [NSNumber numberWithFloat: M
自定义annotation
sha1064616837
java enum annotation reflect
对象有的属性在页面上可编辑,有的属性在页面只可读,以前都是我们在页面上写死的,时间一久有时候会混乱,此处通过自定义annotation在类属性中定义。越来越发现Java的Annotation真心很强大,可以帮我们省去很多代码,让代码看上去简洁。
下面这个例子 主要用到了
1.自定义annotation:@interface,以及几个配合着自定义注解使用的几个注解
2.简单的反射
3.枚举
Spring 源码
up2pu
spring
1.Spring源代码
https://github.com/SpringSource/spring-framework/branches/3.2.x
注:兼容svn检出
2.运行脚本
import-into-eclipse.bat
注:需要设置JAVA_HOME为jdk 1.7
build.gradle
compileJava {
sourceCompatibilit
利用word分词来计算文本相似度
yangshangchuan
word word分词 文本相似度 余弦相似度 简单共有词
word分词提供了多种文本相似度计算方式:
方式一:余弦相似度,通过计算两个向量的夹角余弦值来评估他们的相似度
实现类:org.apdplat.word.analysis.CosineTextSimilarity
用法如下:
String text1 = "我爱购物";
String text2 = "我爱读书";
String text3 =

 https://blog.csdn.net/xcc34452366/article/details/131506345PS:可以直接点击...bin\Debug\net6.0-windows\下的.esriAddinX文件直接安装。