Android自定义View03-实现弧形进度条效果
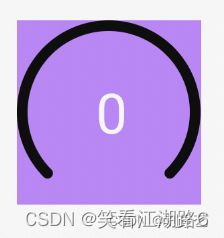
先看效果
初始状态
中间动画状态

最终状态

类似一个仪表盘,进度条从0增长到3000。
分析图像,我们需要如下属性:
外圈颜色、内圈颜色、弧宽度、数字文本大小、数字文本颜色
<?xml version="1.0" encoding="utf-8"?>
<resources>
    <declare-styleable name="QQStepView">
        <attr name="outerColor" format="color"/>
        <attr name="innerColor" format="color"/>
        <attr name="borderWidth" format="dimension"/>
        <attr name="stepTextSize" format="dimension"/>
        <attr name="stepTextColor" format="color"/>
    </declare-styleable>
</resources>
1.创建一个自定义View : QQStepView,让所有的构造方法都执行到同一个,并且在这个构造方法中去获取xml里设置的属性。
package com.example.view03;

import android.content.Context;
import android.content.res.TypedArray;
import android.graphics.Canvas;
import android.graphics.Color;
import android.graphics.Paint;
import android.graphics.Rect;
import android.graphics.RectF;
import android.util.AttributeSet;
import android.view.View;

import androidx.annotation.Nullable;

public class QQStepView extends View {
    private int mOuterColor = Color.BLACK;
    private int mInnerColor = Color.BLUE;
    private int mBorderSize = 20;//20px
    private int mStepTextColor;
    private int mStepTextSize;
    private Paint mOuterPaint;

    private Paint mInnerPaint;
    private Paint mTextPaint;
    //总共的步数
    private int mStepMax = 0;
    //当前的步数
    private int mCurrentStep = 0;
    public QQStepView(Context context) {
        this(context, null);
    }

    public QQStepView(Context context, @Nullable @org.jetbrains.annotations.Nullable AttributeSet attrs) {
        this(context, attrs, 0);
    }

    public QQStepView(Context context, @Nullable @org.jetbrains.annotations.Nullable AttributeSet attrs, int defStyleAttr) {
        super(context, attrs, defStyleAttr);
        //1.分析效果
        //2.确定自定义属性,编译attrs.xml
        //3.在布局中使用
        //4.在自定义view中获取
        TypedArray array = context.obtainStyledAttributes(attrs,R.styleable.QQStepView);
        mOuterColor = array.getColor(R.styleable.QQStepView_outerColor, mOuterColor);
        mInnerColor = array.getColor(R.styleable.QQStepView_innerColor, mInnerColor);
        mBorderSize = (int)array.getDimension(R.styleable.QQStepView_borderWidth,mBorderSize);
        mStepTextColor = array.getColor(R.styleable.QQStepView_stepTextColor,mStepTextColor);
        mStepTextSize = (int)array.getDimension(R.styleable.QQStepView_stepTextSize,mStepTextSize);
        mOuterPaint = new Paint();
        mOuterPaint.setAntiAlias(true);
        //设置描边的宽度,也就是控制画笔的粗细
        mOuterPaint.setStrokeWidth(mBorderSize);
        mOuterPaint.setColor(mOuterColor);
        //Fill画笔实心,Stroke描边
        mOuterPaint.setStyle(Paint.Style.STROKE);
        mOuterPaint.setStrokeCap(Paint.Cap.ROUND);//线条尾部设置成圆角

        //内部画笔,画黑色圆弧的部分
        mInnerPaint = new Paint();
        mInnerPaint.setAntiAlias(true);
        //设置描边的宽度,也就是控制画笔的粗细
        mInnerPaint.setStrokeWidth(mBorderSize);
        mInnerPaint.setColor(mInnerColor);
        //Fill画笔实心,Stroke描边
        mInnerPaint.setStyle(Paint.Style.STROKE);
        mInnerPaint.setStrokeCap(Paint.Cap.ROUND);//线条尾部设置成圆角

        //画文字的画笔
        mTextPaint = new Paint();
        mTextPaint.setAntiAlias(true);
        mTextPaint.setColor(mStepTextColor);
        mTextPaint.setTextSize(mStepTextSize);
        array.recycle();
    }
2.重写onMeasure()方法,确定view的宽高,保证是个正方形
protected void onMeasure(int widthMeasureSpec, int heightMeasureSpec) {
        super.onMeasure(widthMeasureSpec, heightMeasureSpec);
        //5.onMeasure
        //宽高不一致,取小的,保证是个正方形
        int width = MeasureSpec.getSize(widthMeasureSpec);
        int height = MeasureSpec.getSize(heightMeasureSpec);
        setMeasuredDimension(width > height ? height : width, width > height ? height : width);
    }
3.重写绘制方法onDraw(Canvas canvas)
绘制就是用Paint在一定区域内Rect绘制到Canvas上
想画什么样的图形就调用Canvas.drawxxx方法
开始画之前,要在构造方法里先初始化画笔
protected void onDraw(Canvas canvas) {
        super.onDraw(canvas);
        //6.画外圆弧,内圆弧,文字
        int center = getWidth()/2;
        int radius = center - mBorderSize;
        RectF rectF = new RectF(center-radius, center-radius, center+radius,center+radius);
        canvas.drawArc(rectF,135,270,false,mOuterPaint);

        //画内圆弧,百分比,肯定不能写死,使用者从外面传
        if (mStepMax == 0) {
            return;
        }
        float sweepAngle = (float)mCurrentStep/mStepMax;
        canvas.drawArc(rectF, 135, sweepAngle * 270,false,mInnerPaint);

        //画文字
        String stepText = mCurrentStep + "";
        Rect textBounds = new Rect();
        mTextPaint.getTextBounds(stepText, 0, stepText.length(),textBounds);
        int dx = getWidth()/2 - textBounds.width()/2;
        //基线 baseline
        Paint.FontMetrics fontMetrics = mTextPaint.getFontMetrics();
        int dy = (int) ((fontMetrics.bottom -  fontMetrics.top)/2 - fontMetrics.bottom);
        int baseLine = getHeight()/2 + dy;
        canvas.drawText(stepText,dx,baseLine,mTextPaint);
    }
写到这里,就能绘制出初始图形了。
设置好如下属性
<com.example.view03.QQStepView
        android:id="@+id/step_view"
        android:layout_width="180dp"
        android:layout_height="180dp"
        app:borderWidth="10dp"
        app:innerColor="@color/black"
        app:outerColor="@color/purple_200"
        app:stepTextColor="@color/teal_200"
        app:stepTextSize="30sp" />
4.让图形动起来
想让内圈弧形动起来,就要修改不断的内圈圆弧的绘制角度,提供两个设置方法,去设置最大值和当前值。
//7.其他,写几个方法要它动起来
    public void setStepMax(int stepMax) {
        this.mStepMax = stepMax;
    }

    public void setCurrentStep(int currentStep) {
        this.mCurrentStep = currentStep;
        //不断的绘制
        invalidate();
    }
在外部调用这两个方法
package com.example.view03;

import androidx.appcompat.app.AppCompatActivity;

import android.animation.ObjectAnimator;
import android.animation.ValueAnimator;
import android.os.Bundle;
import android.view.animation.DecelerateInterpolator;

public class MainActivity extends AppCompatActivity {

    @Override
    protected void onCreate(Bundle savedInstanceState) {
        super.onCreate(savedInstanceState);
        setContentView(R.layout.activity_main);
        QQStepView qqStepView = findViewById(R.id.step_view);
        qqStepView.setStepMax(4000);

        //属性动画
        ValueAnimator valueAnimator = ObjectAnimator.ofFloat(0, 3000);
        //先快后慢的效果
        valueAnimator.setInterpolator(new DecelerateInterpolator());
        valueAnimator.setDuration(1000);
        valueAnimator.addUpdateListener(new ValueAnimator.AnimatorUpdateListener() {
            @Override
            public void onAnimationUpdate(ValueAnimator animation) {
                float animatedValue = (float)animation.getAnimatedValue();
                qqStepView.setCurrentStep((int)animatedValue);
            }
        });
        qqStepView.postDelayed(new Runnable() {
            @Override
            public void run() {
                valueAnimator.start();
            }
        }, 5000);//这里延时5s便于人眼观察
    }
}
使用了属性动画来生成当前值(2s内从0增长到3000),生成设置给QQStepView。
Invalidate源码分析
invalidate()方法的使用,就是重新触发一次View的绘制流程。
入口在view类中
public void invalidate() {
    invalidate(true);
}

public void invalidate(boolean invalidateCache) {
    invalidateInternal(0, 0, mRight - mLeft, mBottom - mTop, invalidateCache, true);
}
在 invalidateInternal(…) 中 ,调用
p.invalidateChild(this, damage); //p为ViewParent
ViewGroup继承View,实现了 ViewParent
public final void invalidateChild(View child, final Rect dirty) {
    ...
            do {
                View view = null;
                if (parent instanceof View) {
                    view = (View) parent;
                }

                if (drawAnimation) {
                    if (view != null) {
                        view.mPrivateFlags |= PFLAG_DRAW_ANIMATION;
                    } else if (parent instanceof ViewRootImpl) {
                        ((ViewRootImpl) parent).mIsAnimating = true;
                    }
                }
                ...
                parent = parent.invalidateChildInParent(location, dirty);
                ...
            } while (parent != null);

}

ViewRootImpl实现了ViewParent,在ViewRootImpl中
@Override
public ViewParent invalidateChildInParent(int[] location, Rect dirty) {
    checkThread();
    if (DEBUG_DRAW) Log.v(mTag, "Invalidate child: " + dirty);
    ...

    invalidateRectOnScreen(dirty);

    return null;
}

private void invalidateRectOnScreen(Rect dirty) {
    final Rect localDirty = mDirty;
    if (!localDirty.isEmpty() && !localDirty.contains(dirty)) {
        mAttachInfo.mSetIgnoreDirtyState = true;
        mAttachInfo.mIgnoreDirtyState = true;
    }

    // Add the new dirty rect to the current one
    localDirty.union(dirty.left, dirty.top, dirty.right, dirty.bottom);
    // Intersect with the bounds of the window to skip
    // updates that lie outside of the visible region
    final float appScale = mAttachInfo.mApplicationScale;
    final boolean intersected = localDirty.intersect(0, 0,
            (int) (mWidth * appScale + 0.5f), (int) (mHeight * appScale + 0.5f));
    if (!intersected) {
        localDirty.setEmpty();
    }
    if (!mWillDrawSoon && (intersected || mIsAnimating)) {
        scheduleTraversals();
    }
}

void scheduleTraversals() {
        if (!mTraversalScheduled) {
            mTraversalScheduled = true;
            mTraversalBarrier = mHandler.getLooper().getQueue().postSyncBarrier();
            //final TraversalRunnable mTraversalRunnable = new TraversalRunnable();
            mChoreographer.postCallback(
                    Choreographer.CALLBACK_TRAVERSAL, mTraversalRunnable, null);
            notifyRendererOfFramePending();
            pokeDrawLockIfNeeded();
        }
    }

final class TraversalRunnable implements Runnable {
        @Override
        public void run() {
            doTraversal();
        }
    }

void doTraversal() {
        if (mTraversalScheduled) {
            mTraversalScheduled = false;
            mHandler.getLooper().getQueue().removeSyncBarrier(mTraversalBarrier);

            if (mProfile) {
                Debug.startMethodTracing("ViewAncestor");
            }

            performTraversals();

            if (mProfile) {
                Debug.stopMethodTracing();
                mProfile = false;
            }
        }
    }
performTraversals()主要做三件事:
-
performMeasure(childWidthMeasureSpec, childHeightMeasureSpec);
-
performLayout(lp, mWidth, mHeight);
-
performDraw();
invalidate流程是否会触发performMeasure和performLayout姑且不论,因为这里需要经过繁琐的标志位的判断,但是会执行performDraw。而performMeasure和performLayout分别是measure过程和layout过程,是由View.requestLayout()或者WindowManagerImpl.addView调用WindowManagerGlobal.addView这个两种情况最终调用了ViewRootImpl.requestLayout来触发调用performMeasure和performLayout。
    private void performDraw() {
        ...
        try {
            boolean canUseAsync = draw(fullRedrawNeeded);
            if (usingAsyncReport && !canUseAsync) {
                mAttachInfo.mThreadedRenderer.setFrameCompleteCallback(null);
                usingAsyncReport = false;
            }
        } finally {
            mIsDrawing = false;
            Trace.traceEnd(Trace.TRACE_TAG_VIEW);
        }
        ...
    }
在这里调用了ViewRootImpl.draw()
    private boolean draw(boolean fullRedrawNeeded) {
        Surface surface = mSurface;
        if (!surface.isValid()) {
            return false;
        }

        if (DEBUG_FPS) {
            trackFPS();
        }

        if (!sFirstDrawComplete) {
            synchronized (sFirstDrawHandlers) {
                sFirstDrawComplete = true;
                final int count = sFirstDrawHandlers.size();
                for (int i = 0; i< count; i++) {
                    mHandler.post(sFirstDrawHandlers.get(i));
                }
            }
        }

        scrollToRectOrFocus(null, false);

        if (mAttachInfo.mViewScrollChanged) {
            mAttachInfo.mViewScrollChanged = false;
            mAttachInfo.mTreeObserver.dispatchOnScrollChanged();
        }

        boolean animating = mScroller != null && mScroller.computeScrollOffset();
        final int curScrollY;
        if (animating) {
            curScrollY = mScroller.getCurrY();
        } else {
            curScrollY = mScrollY;
        }
        if (mCurScrollY != curScrollY) {
            mCurScrollY = curScrollY;
            fullRedrawNeeded = true;
            if (mView instanceof RootViewSurfaceTaker) {
                ((RootViewSurfaceTaker) mView).onRootViewScrollYChanged(mCurScrollY);
            }
        }

        final float appScale = mAttachInfo.mApplicationScale;
        final boolean scalingRequired = mAttachInfo.mScalingRequired;

        final Rect dirty = mDirty;
        if (mSurfaceHolder != null) {
            // The app owns the surface, we won't draw.
            dirty.setEmpty();
            if (animating && mScroller != null) {
                mScroller.abortAnimation();
            }
            return false;
        }

        if (fullRedrawNeeded) {
            dirty.set(0, 0, (int) (mWidth * appScale + 0.5f), (int) (mHeight * appScale + 0.5f));
        }

        if (DEBUG_ORIENTATION || DEBUG_DRAW) {
            Log.v(mTag, "Draw " + mView + "/"
                    + mWindowAttributes.getTitle()
                    + ": dirty={" + dirty.left + "," + dirty.top
                    + "," + dirty.right + "," + dirty.bottom + "} surface="
                    + surface + " surface.isValid()=" + surface.isValid() + ", appScale:" +
                    appScale + ", width=" + mWidth + ", height=" + mHeight);
        }

        mAttachInfo.mTreeObserver.dispatchOnDraw();

        int xOffset = -mCanvasOffsetX;
        int yOffset = -mCanvasOffsetY + curScrollY;
        final WindowManager.LayoutParams params = mWindowAttributes;
        final Rect surfaceInsets = params != null ? params.surfaceInsets : null;
        if (surfaceInsets != null) {
            xOffset -= surfaceInsets.left;
            yOffset -= surfaceInsets.top;

            // Offset dirty rect for surface insets.
            dirty.offset(surfaceInsets.left, surfaceInsets.right);
        }

        boolean accessibilityFocusDirty = false;
        final Drawable drawable = mAttachInfo.mAccessibilityFocusDrawable;
        if (drawable != null) {
            final Rect bounds = mAttachInfo.mTmpInvalRect;
            final boolean hasFocus = getAccessibilityFocusedRect(bounds);
            if (!hasFocus) {
                bounds.setEmpty();
            }
            if (!bounds.equals(drawable.getBounds())) {
                accessibilityFocusDirty = true;
            }
        }

        mAttachInfo.mDrawingTime =
                mChoreographer.getFrameTimeNanos() / TimeUtils.NANOS_PER_MS;

        boolean useAsyncReport = false;
        if (!dirty.isEmpty() || mIsAnimating || accessibilityFocusDirty) {
            if (mAttachInfo.mThreadedRenderer != null && mAttachInfo.mThreadedRenderer.isEnabled()) {
                ...
            } else {
                ...

                if (!drawSoftware(surface, mAttachInfo, xOffset, yOffset,
                        scalingRequired, dirty, surfaceInsets)) {
                    return false;
                }
            }
        }

        if (animating) {
            mFullRedrawNeeded = true;
            scheduleTraversals();
        }
        return useAsyncReport;
    }
ViewRootImpl.drawSoftWare()
    private boolean drawSoftware(Surface surface, AttachInfo attachInfo, int xoff, int yoff,
            boolean scalingRequired, Rect dirty, Rect surfaceInsets) {

        ...

        try {
            ...

            mView.draw(canvas);

            drawAccessibilityFocusedDrawableIfNeeded(canvas);
        } finally {
            ...
        }
        return true;
    }
mView.draw(canvas)会走到View.java中draw(Canvas canvas)方法。
public void draw(Canvas canvas)
{
            ...
            // Step 3,绘制自己
            onDraw(canvas);

            // Step 4, 绘制孩子
            dispatchDraw(canvas);
			...
从这里可以看出,最终是调用了View.draw()方法。
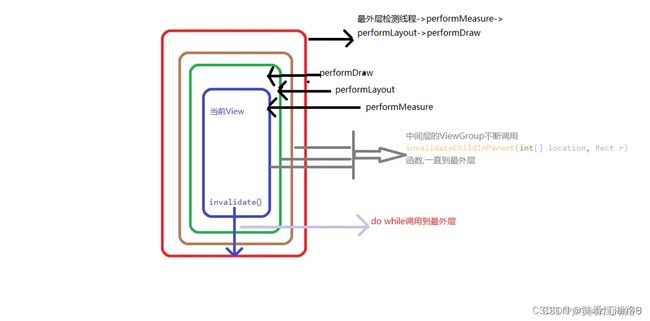
其实invalidate()方法的使用,就是重新触发一次draw流程,进行绘制。通过View.invalidate()方法在ViewGroup的invalidateChild()方法中执行一个do-while循环,一路往上跑,跑到最外层。然后一路往下画,最终调用到view的ondraw流程。
整个invalidate()流程结束,贯穿着一个布局或View的所有子view,以下是流程图:
注意:这里有个方法checkThread,可以解释为什么不能在子线程中更新UI?
如果开辟线程,更新UI,一般会调用setText(),setImageView()调回到这里来,viewRootImpl中checkThread()方法用来检测线程。其中mThread 是在viewRootImpl构造函数中赋值的,表示主线程,而 Thread.currentThread()表示当前线程,如果当前线程不等于主线程就会抛异常。
void checkThread() {
        if (mThread != Thread.currentThread()) {
            throw new CalledFromWrongThreadException(
                    "Only the original thread that created a view hierarchy can touch its views.");
        }
    }