1. 卷积原理
① 卷积核不停的在原图上进行滑动,对应元素相乘再相加。
② 下图为每次滑动移动1格,然后再利用原图与卷积核上的数值进行计算得到缩略图矩阵的数据,如下图右所示。

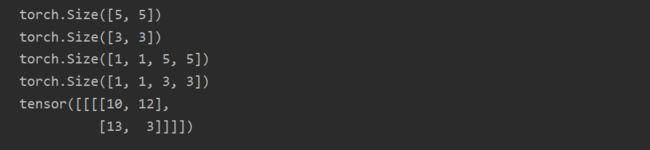
import torch
import torch.nn.functional as F

input = torch.tensor([[1, 2, 0, 3, 1],
                      [0, 1, 2, 3, 1],
                      [1, 2, 1, 0, 0],
                      [5, 2, 3, 1, 1],
                      [2, 1, 0, 1, 1]])

kernel = torch.tensor([[1, 2, 1],
                       [0, 1, 0],
                       [2, 1, 0]])

print(input.shape)
print(kernel.shape)
input = torch.reshape(input, (1,1,5,5))
kernel = torch.reshape(kernel, (1,1,3,3))
print(input.shape)
print(kernel.shape)

output = F.conv2d(input, kernel, stride=1)
print(output)
结果:

效果:

import torch
import torch.nn.functional as F

input = torch.tensor([[1, 2, 0, 3, 1],
                      [0, 1, 2, 3, 1],
                      [1, 2, 1, 0, 0],
                      [5, 2, 3, 1, 1],
                      [2, 1, 0, 1, 1]])

kernel = torch.tensor([[1, 2, 1],
                       [0, 1, 0],
                       [2, 1, 0]])

print(input.shape)
print(kernel.shape)
input = torch.reshape(input, (1,1,5,5))
kernel = torch.reshape(kernel, (1,1,3,3))
print(input.shape)
print(kernel.shape)

output2 = F.conv2d(input, kernel, stride=2)  # 步伐为2
print(output2)
结果 :
import torch
import torch.nn.functional as F

input = torch.tensor([[1, 2, 0, 3, 1],
                      [0, 1, 2, 3, 1],
                      [1, 2, 1, 0, 0],
                      [5, 2, 3, 1, 1],
                      [2, 1, 0, 1, 1]])

kernel = torch.tensor([[1, 2, 1],
                       [0, 1, 0],
                       [2, 1, 0]])

print(input.shape)
print(kernel.shape)
input = torch.reshape(input, (1,1,5,5))
kernel = torch.reshape(kernel, (1,1,3,3))
print(input.shape)
print(kernel.shape)

output3 = F.conv2d(input, kernel, stride=1, padding=1)  # 周围只填充一层
print(output3)
效果:
