Spring学习笔记:AOP
学习内容:AOP
文章目录
- 学习内容:AOP
-
- 一、什么是AOP
- 二、AOP中的相关概念
- 三、使用Spring实现AOP
-
- 1、使用原生Spring API接口
- 2、自定义类来实现AOP
- 3、使用注解实现
- 四、AOP中的五类通知
一、什么是AOP

当我们操作某些数据的时候,一般检验用户的权限,并且操作完数据后记录日志,按照正常的逻辑,我们可以这么做:

但是对数据的每一个操作都得检验权限和记录日志,不仅代码重复,而且也是非常的麻烦。我们可以把这些公共部分写入一个方法,每次操作数据需要检验和记录日志的时候,调用这个方法就行了:
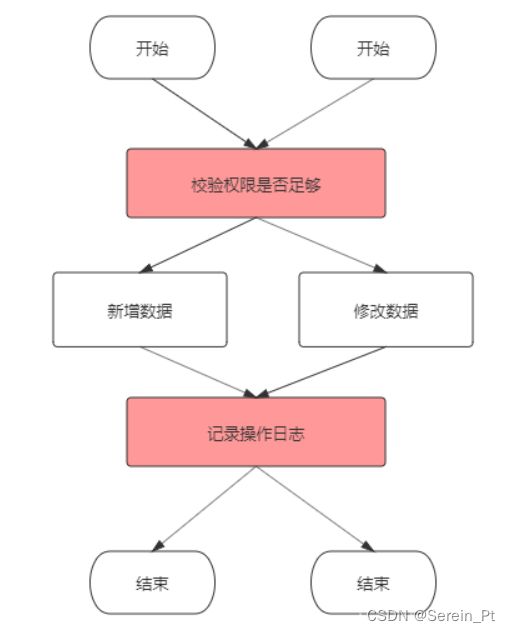
虽然代码重复的问题解决了,但是,每个用户操作数据总得要调用这个方法吧。于是就有了切面的概念,我将方法注入到调用的某个地方(切点)。

二、AOP中的相关概念
| 术语 | 概念 |
|---|---|
| Aspect(切面) | Aspect 声明类似于 Java 中的类声明,在 Aspect 中会包含着一些 Pointcut 以及相应的 Advice。 |
| Joint point (连接点) | 表示在程序中明确定义的点,典型的包括方法调用,对类成员的访问以及异常处理程序块的执行等等,它自身还可以嵌套其它 joint point。 |
| Pointcut (切点) | 表示一组 joint point,这些 joint point 或是通过逻辑关系组合起来,或是通过通配、正则表达式等方式集中起来,它定义了相应的 Advice 将要发生的地方。 |
| Advice (增强) | Advice 定义了在 Pointcut 里面定义的程序点具体要做的操作,它通过 before、after 和 around 来区别是在每个 joint point 之前、之后还是代替执行的代码。 |
| Target (目标对象) | 织入 Advice 的目标对象。 |
| Weaving (织入) | 将 Aspect 和其他对象连接起来, 并创建 Adviced object 的过程 |
三、使用Spring实现AOP
首先要导入依赖
<dependency>
    <groupId>org.aspectjgroupId>
    <artifactId>aspectjweaverartifactId>
    <version>1.9.4version>
dependency>
1、使用原生Spring API接口
首先编写业务接口和实现类
UserService.java
public interface UserService {
    public void add();
    public void delete();
    public void update();
    public void select();
}
UserServiceImpl.java
public class UserServiceImpl implements UserService{
    @Override
    public void add() {
        System.out.println("增加了一个用户");
    }

    @Override
    public void delete() {
        System.out.println("删除了一个用户");
    }

    @Override
    public void update() {
        System.out.println("修改了一个用户");
    }

    @Override
    public void select() {
        System.out.println("查询了一个用户");
    }
}
然后去写我们的增强类 , 我们编写两个 , 一个前置增强 一个后置增强
Log.java
public class Log implements MethodBeforeAdvice {
    //method:要执行的目标对象方法
    //args:参数
    //target:目标对象
    @Override
    public void before(Method method, Object[] args, Object target) throws Throwable {
        System.out.println(target.getClass().getName()+"的"+method.getName()+"被执行了");
    }
}
AfterLog.java
public class AfterLog implements AfterReturningAdvice {
    //returnValue:返回值
    @Override
    public void afterReturning(Object returnValue, Method method, Object[] args, Object target) throws Throwable {
        System.out.println("执行了"+method.getName()+"方法,返回结果为:"+returnValue);
    }
}
最后去spring的文件中注册 , 并实现aop切入实现 , 注意导入约束
applicationContext.xml
<beans xmlns="http://www.springframework.org/schema/beans"
       xmlns:xsi="http://www.w3.org/2001/XMLSchema-instance"
       xmlns:aop="http://www.springframework.org/schema/aop"
       xsi:schemaLocation="http://www.springframework.org/schema/beans
        https://www.springframework.org/schema/beans/spring-beans.xsd
        http://www.springframework.org/schema/aop
        https://www.springframework.org/schema/aop/spring-aop.xsd">


    <bean id="userService" class="service.UserServiceImpl"/>
    <bean id="log" class="log.Log"/>
    <bean id="afterLog" class="log.AfterLog"/>


    <aop:config>

        <aop:pointcut id="pointcut" expression="execution(* service.UserServiceImpl.*(..))"/>


        <aop:advisor advice-ref="log" pointcut-ref="pointcut"/>
        <aop:advisor advice-ref="afterLog" pointcut-ref="pointcut"/>
    aop:config>

beans>
MyTest.java
public class MyTest {
    public static void main(String[] args) {
        ApplicationContext context = new ClassPathXmlApplicationContext("applicationContext.xml");
        //动态代理代理的是接口
        UserService userService = context.getBean("userService", UserService.class);

        userService.add();
    }
}
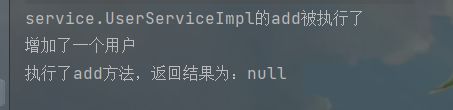
结果:
2、自定义类来实现AOP
(目标业务类不变依旧是userServiceImpl)
写我们自己的一个切入类
MyAspect.java
/**
 * 切面类,此面写通知
 */
public class MyAspect {
    //前置通知
    /*
        参数:joinPoint 表示连接点(业务方法)
            连接点是切入点中的一个方法
     */
    public void myBefore(JoinPoint joinPoint){
        System.out.println("前置通知:模拟执行权限检查");
        System.out.println("目标类"+joinPoint.getTarget());
        System.out.println("被植入的强处理的目标方法为"+joinPoint.getSignature().getName());
    }
    //后置通知
    public void myAfterReturning(JoinPoint joinPoint){
        System.out.println("后置通知:模拟记录日志");
        System.out.println("被植入强处理的目标方法为"+joinPoint.getSignature().getName());
    }
    /**
     * 环绕通知
     * proceedingJoinPoint 是 JoinPoint的子接口,表示可执行目标方法
     * 1.必须是Object类型的返回值
     * 2.必须接受一个参数,类型为ProceedingJoinPoint
     * 3.必须是throws Throwable
     */
    public Object myAround(ProceedingJoinPoint proceedingJoinPoint) throws Throwable{
        //开始
        System.out.println("环绕开始:执行目标方法之前,模拟开启事务");
        //执行当前目标方法
        Object obj = proceedingJoinPoint.proceed();
        //结束
        System.out.println("环绕结束:执行目标方法之后,模拟关闭事务");
        return obj;
    }
    //异常通知
    public void myAfterThrowing(JoinPoint joinPoint,Throwable e){
        System.out.println("异常通知:出现错误"+e.getMessage());
    }
    //最终通知
    public void myAfter(){
        System.out.println("最终通知:模拟方法结束后释放资源");
    }
}
去spring中配置
applicationContext.xml
<beans xmlns="http://www.springframework.org/schema/beans"
       xmlns:xsi="http://www.w3.org/2001/XMLSchema-instance"
       xmlns:aop="http://www.springframework.org/schema/aop"
       xsi:schemaLocation="http://www.springframework.org/schema/beans
        https://www.springframework.org/schema/beans/spring-beans.xsd
        http://www.springframework.org/schema/aop
        https://www.springframework.org/schema/aop/spring-aop.xsd">


    <bean id="userService" class="service.UserServiceImpl"/>


    <bean id="diy" class="diy.DiyPointCut"/>

    <bean id="myAspectj" class="diy.MyAspect"/>
    <aop:config>

        <aop:aspect id="aspect" ref="myAspectj">

            <aop:pointcut id="myPointCut" expression="execution(* service.UserServiceImpl.*(..))"/>


            <aop:before method="myBefore" pointcut-ref="myPointCut"/>


            <aop:after-returning method="myAfterReturning" pointcut-ref="myPointCut" returning="joinPoint"/>

            <aop:around method="myAround" pointcut-ref="myPointCut"/>

            <aop:after-throwing method="myAfterThrowing" pointcut-ref="myPointCut" throwing="e"/>

            <aop:after method="myAfter" pointcut-ref="myPointCut" />
        aop:aspect>
    aop:config>

beans>
MyTest.java
public class MyTest {
    public static void main(String[] args) {
        ApplicationContext context = new ClassPathXmlApplicationContext("applicationContext.xml");
        //动态代理代理的是接口
        UserService userService = context.getBean("userService", UserService.class);

        userService.add();
    }
}
结果:

3、使用注解实现
第一步:编写一个注解实现的增强类
AnnotationPointCut.java
@Aspect//标注这个类是一个切面
public class AnnotationPointCut {

    @Before("execution(* service.UserServiceImpl.*(..))")
    public void before(){
        System.out.println("=====方式执行前=====");
    }

    @After("execution(* service.UserServiceImpl.*(..))")
    public void after(){
        System.out.println("=====方式执行后=====");
    }

    //在环绕增强中,我们可以给定一个参数,代表我们要获取处理切入的点
    @Around("execution(* service.UserServiceImpl.*(..))")
    public void around(ProceedingJoinPoint joinPoint) throws Throwable {
        System.out.println("环绕前");

        //执行方法
        Object proceed = joinPoint.proceed();

        System.out.println("环绕后");
    }
}
第二步:在Spring配置文件中,注册bean,并增加支持注解的配置
applicationContext.xml
<beans xmlns="http://www.springframework.org/schema/beans"
       xmlns:xsi="http://www.w3.org/2001/XMLSchema-instance"
       xmlns:aop="http://www.springframework.org/schema/aop"
       xsi:schemaLocation="http://www.springframework.org/schema/beans
        https://www.springframework.org/schema/beans/spring-beans.xsd
        http://www.springframework.org/schema/aop
        https://www.springframework.org/schema/aop/spring-aop.xsd">


    <bean id="userService" class="service.UserServiceImpl"/>


    <bean id="annotationPointCut" class="diy.AnnotationPointCut"/>

    <aop:aspectj-autoproxy/>
beans>
MyTest.java
public class MyTest {
    public static void main(String[] args) {
        ApplicationContext context = new ClassPathXmlApplicationContext("applicationContext.xml");
        //动态代理代理的是接口
        UserService userService = context.getBean("userService", UserService.class);

        userService.add();
    }
}
结果:

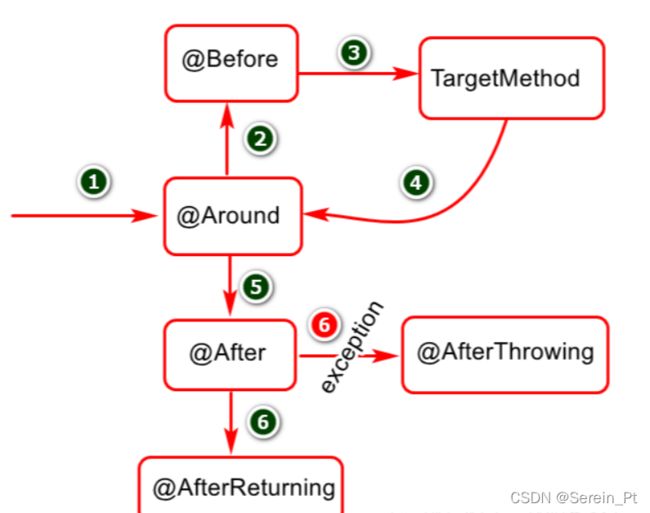
四、AOP中的五类通知
1.前置通知:在连接点前面执行,前置通知不会影响连接点的执行,除非此处抛出异常。
<aop:before method="myBefore" pointcut-ref="myPointCut"/>
2.后置通知:在连接点正常执行完成后执行,如果连接点抛出异常,则不会执行。
<aop:after-returning method="myAfterReturning" pointcut-ref="myPointCut" returning="joinPoint"/>
3.最终通知:在连接点执行完成后执行,不管是正常执行完成,还是抛出异常,都会执行返回通知中的内容。
<aop:after method="myAfter" pointcut-ref="myPointCut" />
4.异常通知:在连接点抛出异常后执行。
<aop:after-throwing method="myAfterThrowing" pointcut-ref="myPointCut" throwing="e"/>
5.环绕通知:环绕通知围绕在连接点前后,比如一个方法调用的前后。这是最强大的通知类型,能在方法调用前后自定义一些操作。环绕通知还需要负责决定是继续处理join point(调用ProceedingJoinPoint的proceed方法)还是中断执行。
<aop:around method="myAround" pointcut-ref="myPointCut"/>
五种通知的执行顺序: