Making a Scaleable Cliff Generator in Houdini & UE4
原文:Making a Scaleable Cliff Generator in Houdini & UE4

Introduction
Hi, my name is Lucas, and I will soon graduate from my Technical Art Cursus at ArtFX, Montpellier, France. During the last 2 years, I really focused on learning Houdini and its application with the hope to become a Technical Artist / Houdini Artist for a video game studio in the near future. Since the last article, I also did different weapons to try and grow my modeling and texturing skills.
My initial plan was to create a simple procedural setup that would create a cliff from an input file. Once I was satisfied with the setup, I would go on and work on the texturing phase. The last thing was to create the setup to automatically import and export the cliffs and the data I needed automatically.
For the references, we did some hiking with my teammates since we live in the south of France and there is a lot of garrigue. We brought cameras to do some photogrammetry and reference gathering at the beginning of the project so it was fairly straightforward.
After my first tests, we found out that the cliffs were going to be too large to keep enough detail for an FPS view, so we planned to add a handmade cliff that was placed at key points inside the level to add nice details for the player to look, while the large role of my cliffs was, essentially, to be seen from a bit farther away and act as big structure that would guide the player inside the level
Features
Initially, I made a quite complex setup involving a lot of computation and VDB nodes. It yielded good results in terms of shape and realism, but in the context of our game, we decided to make our cliff less complex in terms of shape to better fit the blocking geometry and allow us to get a more uniform result once the handmade cliffs were added.
In the end, the actual cliff generator was the simplest part of the project. Everything around it was a bit more complicated.
The Cliff Generator itself is composed of 3 HDAs. The first one converts your input geometry into a denser mesh while pushing the geometry inwards to gain a little space for later displacement.
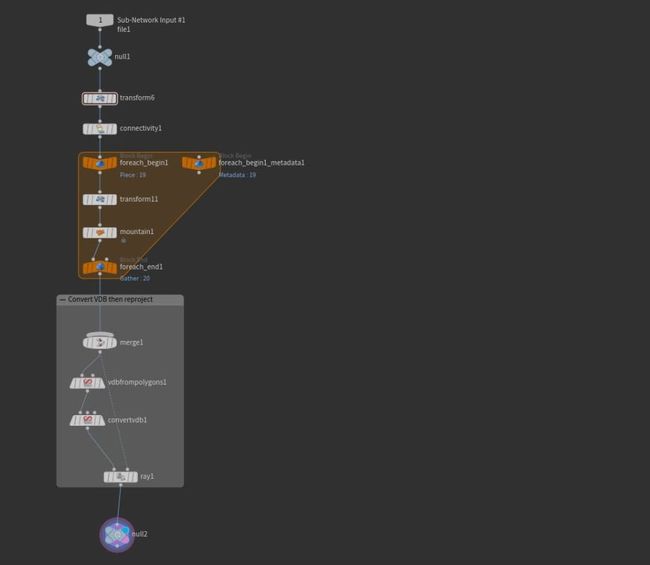
The second one creates the high poly by displacing the geometry based on different triplanar projections mixed with noise in a VOP network.

The third one creates the low poly as well as the UV while cleaning the geometry of any extra attribute to prepare it for export. I use a custom node made by Adrien Lambert which helps to create masks on your geometry the same way the Mask by Feature node works on height fields.

Here is the actual cliff generator HDA :

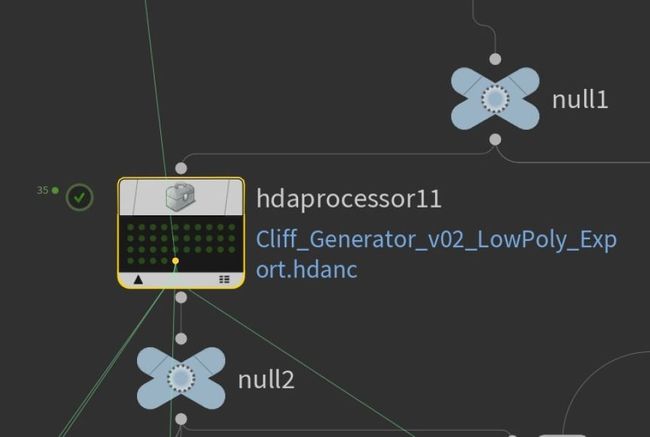
I will explain what each node does but the TOP Network is where all the magic happens. If you are not familiar with PDG/TOPs you can read the introduction to the context made by SideFX here. Essentially, PDG (Procedural Dependency Graph) is where you use TOP (Task Operator).
Here is an image that will help you understand how to read a TOP node :

I feel that the concept is important to grasp for the good comprehension of the rest of the breakdown so I will quote cgwiki about what exactly you can do with it:
"Tops is a node graph for tasks and processes. It's similar to Rops in that it lets you chain operations together and control execution order. A major difference between Rops and Tops is fine-grain control. Layering analogies, Rops compared to Tops is like /obj compared to Sops.
- /obj is a container-based view of things, you don't see what's going on inside the nodes, and it has a limited set of nodes
- Rops is a container-based view of rendering, you don't see what's going on inside the nodes, it has a limited set of nodes
vs
- Sops is an atomic view of things, you can get right down to the points, it's much more general in scope
- Tops is an atomic view of tasks and processing, you can get right down to the frames/individual processes, it's much more general in scope.
Because Tops has more awareness of what each node is doing, it can do things that would be difficult with Rops or standard render farm software. For example:
- ensure things are run in parallel as much as possible
- never have tasks waiting unnecessarily
- use as many CPU cores as you have
- detect when tasks don't need to be re-run, skip over them
- when connected to a farm, allow complex control over many machines doing many tasks
- put a simple GUI on simple operations
- provide a full Python API for complex operations
- has built-in support to control other apps like Maya, Nuke, FFmpeg
- has built-in support to talk to asset management systems like shotgun
- has built-in support to work with tractor, deadline, hqueue"


Rock Generation
This is the first part of the network and it is where the cliffs are being created. It automatically gets every input geometry in a specific folder and processes it through the different HDAs.
As you can see I have 2 methods of creation so I can toggle a parameter to shift between one or another. There is nothing fancy going on here, it’s just some basic processing. You take each file and run them through the HDA I made previously.
This part of the network is tasked to make the low poly by processing the high poly previously created with the third HDA I made.
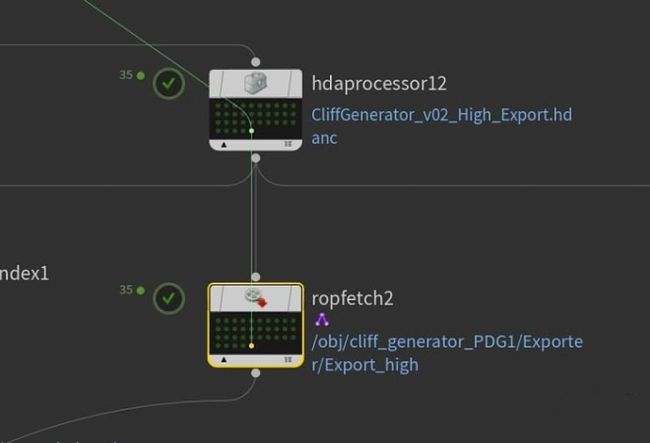
After that, I got a Rop fetch that points to the Geo node outside of the PDG.
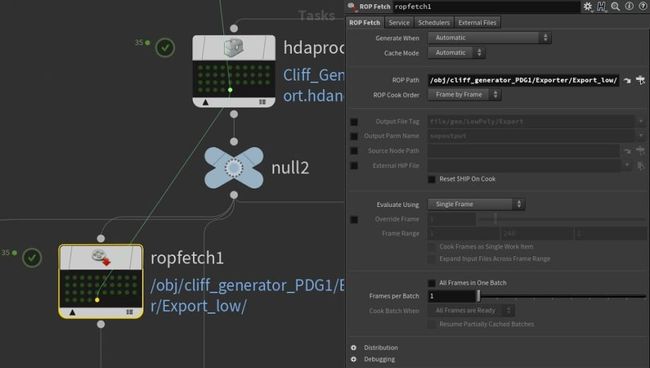
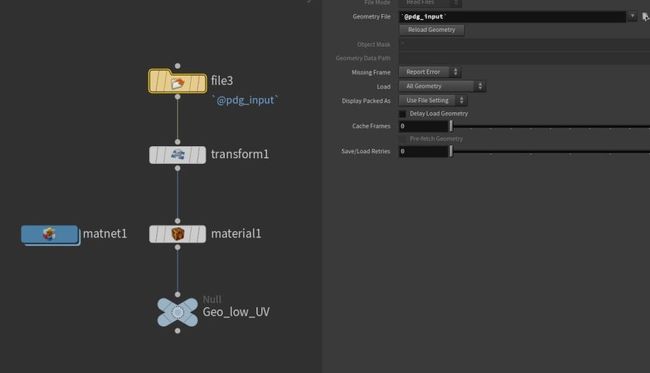
Inside this node, I have a file with the attribute `@pdg_input` in the geometry file parameter . What this does is that It fetches the input of the node in use, so when I call my ROP Fetch to export from the ROP FBX Output in this network, the file node will get the reference of the input of said ROP Fetch which is the low poly model. I wanted to have an organized folder with all my output data sorted, so you can see that I use the `@pdg_index` function which calls the index (or the id of the work item if you prefer) of the item currently cooking. This way for the first cliff the folder will be named “Cliff_00”, then “Cliff_01” and so on.

I have the same setup to export the high, except I have another HDA that cleans everything for the export instead of the low poly HDA.

The next part of the network does a lot of things. The partition by index allows me to partition the low poly and the high poly into the same work item. Once that is done, I can send them into another ROP Fetch that points to a Map Baker.
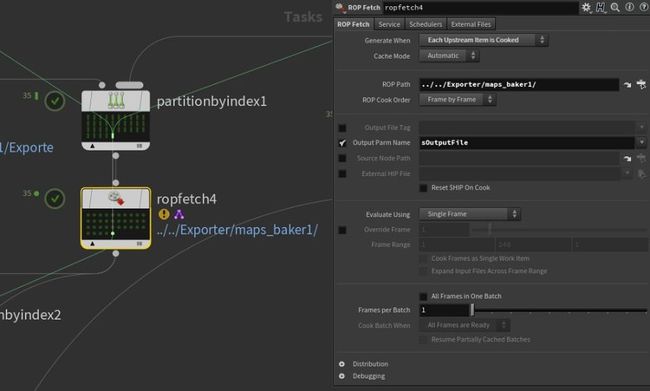

In order to bake the maps, I have to input a low poly and a high poly. Fortunately, since I partition both into one work item, I can use the @pdg_input attribute and specify which input I want, 0 for the low poly and 1 for the high poly. This way I can fetch both models and bake them.
Once my bake is done, I partition the low poly with the maps I just baked. Then I have an ROP Mantra which goal is to render my low poly with the AO and the normal from the bake. To do that I make it point to a camera I set up and a specific Geo node.
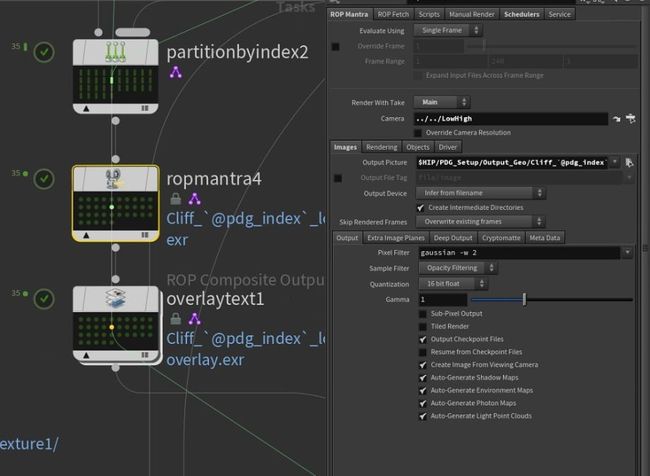
Inside the geo node I have a file like before, but this time I specify a bit more which input I want by using the Tag, a string value that can be added to work item after it is processed in any node. Since I use the Geo Tag, I can only fetch geometry and the only geometry I have partitioned into these work items are the low poly.

The material that I add to it is a classic Principle Shader. I link the maps I just baked by using the same expression but this time using the image tag. The index of the image is the order in which they are generated in the map baker, so normal = 0, AO = 1, etc.
So when I call the ROP Mantra, it makes a render of my low poly with the AO and Normal Maps on it.

Once that is done, I add some text on the picture with the Overlay Text node.

It’s essentially the same process for the high poly except I the material is a standard Principle Shader without any modification.

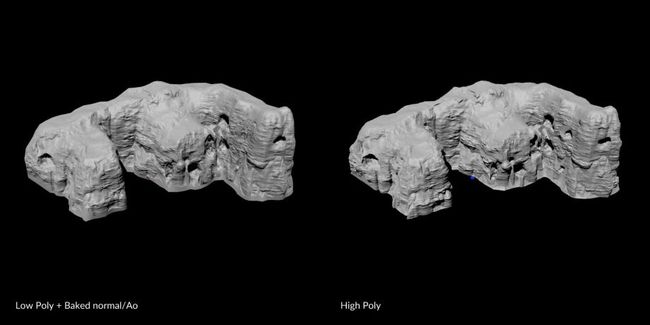
Once both of my models are rendered, I use a pretty nifty node called ImageMagick which requires the ImageMagick software to work. It’s free and you just have to put the path of the .exe for it to work. It allows for simple image montage, and it’s perfect for what I want to do.
Both images are partitioned into the same work item, and with the ImageMagick node set to Concatenate, it assembles them into 1 picture. This way I can compare with one picture if the low is good and if the bake went well.

Example of the output of the ImageMagick node:
The next part of the PDG handles the export of the RGB masks. I used an ROP Fetch but this time it points to an ROP network and not the Geo node.
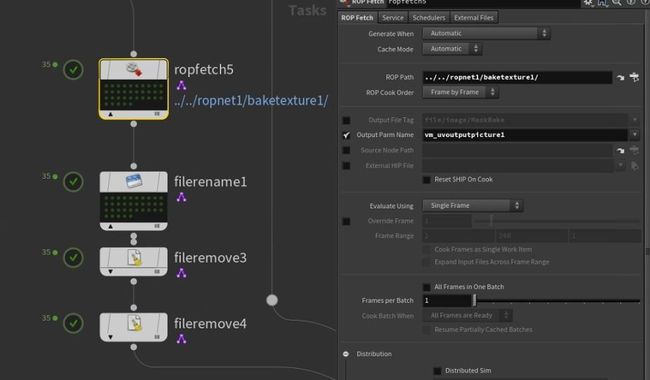
Inside the ROP Network is a Bake Texture node that points to a Geo node. This node allows you to bake any texture you have on your mesh. I bake the diffuse color down in order to use it later as a texturing mask for UE4.

The geo node itself is similar to the ones I explained earlier, the particularity lies in the mat network which houses all the shaders for the RGB masks.
I will make a little digression and talk about the concept and why I made the shader this way.
In my early tests, the bake and texture part was handled inside Substance Painter. I quickly realized that it would be too much trouble to take each cliff and go through the entire texturing process one by one. So I used the smart material I made as a base that I would reproduce inside Houdini. In order to do that I analyzed each layer, what it does, and how to get the same result inside Houdini.
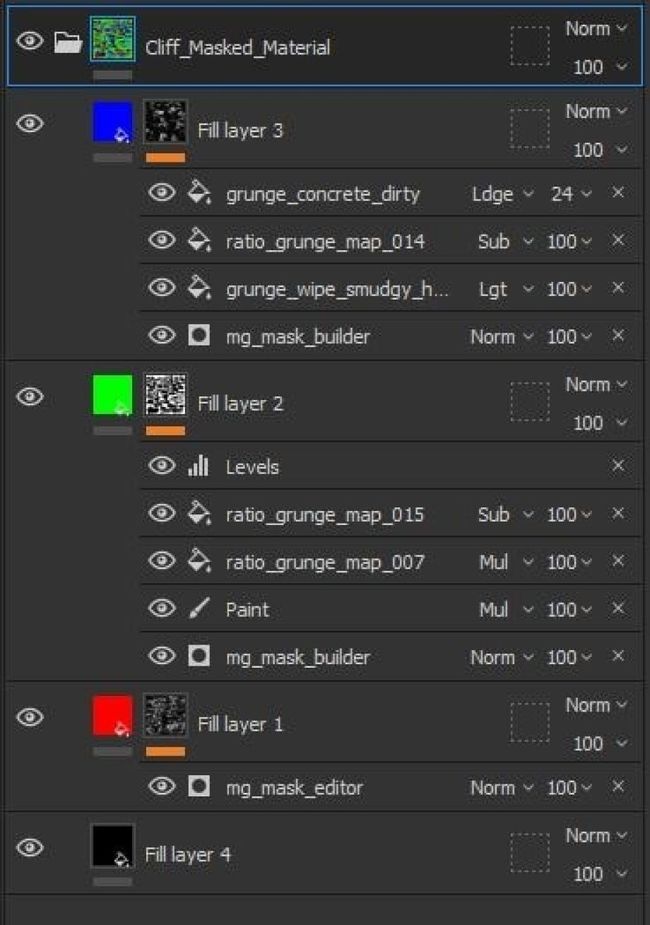
The first thing I had to do was to reproduce the blending modes used in Substance Painter.
I knew that the simple ones like Addition, Subtraction, Multiplication, and Divide were just simple operations so they were easy to make. For the others such as Screen or Overlay, I had no idea how to make them. A quick google search led me to this page where each blending mode is explained in terms of a mathematical formula. It is relatively simple so here are the different blending modes made in VOP inside Houdini.
Simple operation blending modes:

Overlay:

Screen:

Note that I added a mix node in order to control the opacity of the blending mode much like in Substance Painter.
Once this was done, it was only a question of redoing the different layers and mask by hand. Here is the correspondence of the red mask with the mask generator I made in SP.
In order to access the AO, Position, and all the map needed for each work item, I used the same method I explained previously with the @pdg_input and the tag.

The other masks are pretty much created the same way. I just blended different masks and remade the necessary parts of a mask generator.

The resulting mask is combined into a vector 3 and put into the base color of a Principled Shader.
The last part of the PDG that is left to cover is pretty straightforward since it's just Render nodes to render each mask individually to preview if everything is okay without having to import the model into the engine.

Each ROP Mantra points to a different Geo node. Each Geo node assigns a material with the corresponding mask.

Inside each Geo node, is the same setup I already presented with a file and a material node.
Once all the models with the masks are rendered, I have another ImageMagick that makes a montage. Here is an example of the output:
To conclude, with only a blocking exported from UE4 as an FBX file, the PDG will:
- Create a low poly with UV
- Export the low poly
- Create a High Poly
- Bake the High onto the Low Poly
- Export a comparison picture of the low poly with the AO/Normal maps, and the High Poly
- Create an RGB Texturing Mask
- Export the RGB Texturing Mask
- Create a montage picture of a preview of each mask onto the low poly
Scalability
The scalability of this resides inside the power of PDGs. In fact, since each work item is run in parallel it’s very efficient and can execute multiples tasks at once. Moreover, PDGs are made to work with render farms and it even has some nodes made for specific render farms called schedulers. The number of items it can process in a given time is only limited by the amount of CPU dedicated to the PDG, making this solution not only scalable but suitable for large world areas.
Limitations
As you saw the tools create everything from an input file and export the data. The things I did not have the time to automate were the import/export in UE4. Our Level Designer has to export his blocking from UE4 and I have to import the result into UE4. To mitigate the time spent importing, the cliff keeps its original export position, to be at the right place with a simple drag and drop into the scene. The next big challenge for me would be to create some Python script to automatically export the selected cliffs, and automatically import and place them into the level while deleting the old ones. Unfortunately, time is a big constraint for us so it was quicker to do it by hand than to create the scripts. We also didn’t want to lose some of this precious time because of bugs resulting from the BETA Python Plugin. However, I will definitely dig deeper into it in the future. Creating seamless interaction between software and tool thus reducing the friction for artists is a big problem of mine.
Texturing in UE4
As I explained previously, I generated an RGB Mask texture for each cliff. Inside UE4 I made a texture that blends between different tileable textures based on said mask.
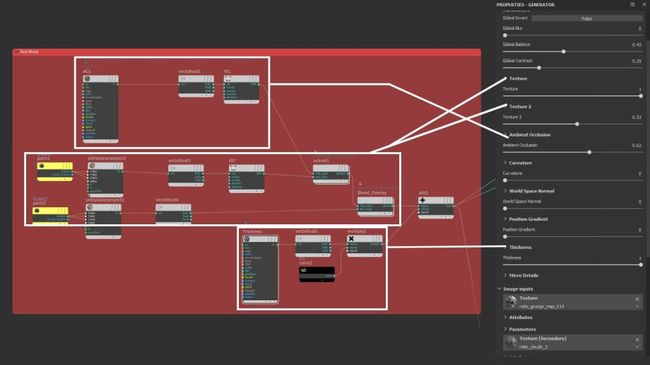
Here is an overview of the shader. I will explain what I think are the key points since a lot of resources cover the creation of shaders in UE4.

The first part is pretty straightforward, I add the 3 values of scale and divide them by 3 to get the median value. This value is then multiplied by a parameter to provide a different scaling value for each texture.
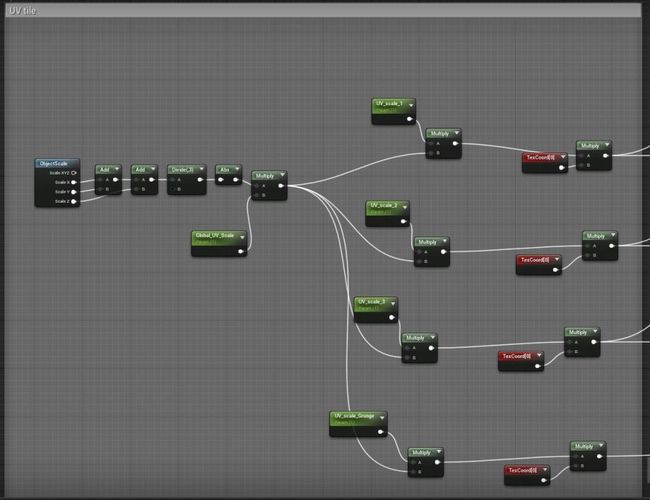
These UV values are plugged into different texture samples. Here is the section that handles the base color of the different layers.
As you can see, the RGB Mask drives the blending between the 3 textures. The tint of each texture can be modified as well as the global tint of all the textures.

The next part is essentially the same thing but this time with the normal maps.
Since I knew this shader was made only for the rocks, it would not have metallic values. Knowing that I optimized the textures by packing the Roughness into the blue channel of each normal map, this way each tileable material only uses 2 texture instead of 3. I used the DeriveNormalZ node to recreate the normal map from the R and G channel. The Flatten Normal node allows me to modify the intensity of the normal. The same setup is used for the roughness blend.

The last thing I had to do was to blend the Macro normal, the normal map I baked from the high poly in Houdini.

As well as blending materials, I wanted to add a few options to the shader. The first one is the UP Vector Blending. This allows me to blend a texture on the top of an asset regardless of its size and rotation. It’s very useful for things like moss, snow, and dust.
The World Aligned Blend takes into account the normal of the asset as well as the normal from the material to blend and gives a very good result. I added a function to control the blend with the Red color of the vertex.

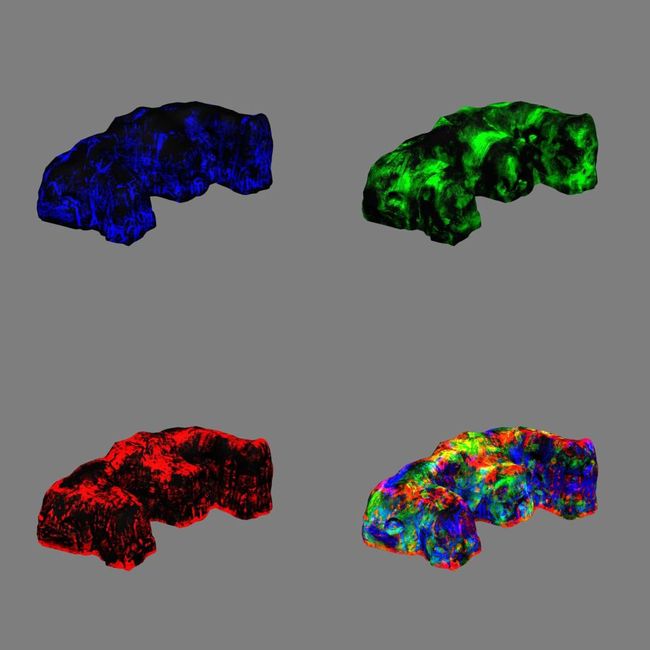
Another option I added was to overlay some color and roughness with a grunge texture, to break up the tiling effect. Since now the B channel of my RGB mask was not used (Black was texture 1, Red was texture 2 and Green was texture 3) so I used it to drive a dirt mask.
Inside Houdini, my blue mask is generated with the AO mask as a base, this allows me to place dirt into the crevices of the mesh if I want. As you can see I have a lot of switches to toggle each option independently. The result of all these computations is linked to Make Material Attribute, which will allow me to blend this material with others later on.

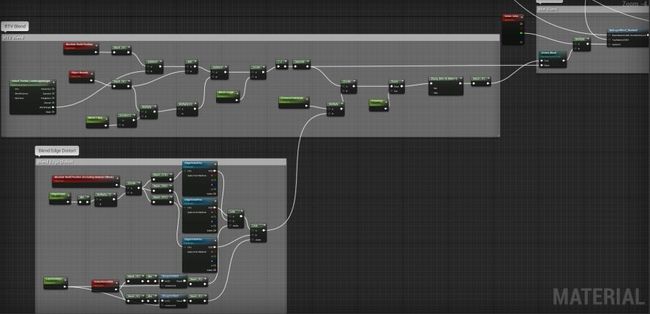
The next big option is blending with the landscape. To achieve that I went with the RVT blending. There is a very good blog from Quixel that explains the different types of blending possible into UE4 and how to do them.
The RVT Blend is very good but one of its downsides is that the blend gradient is straight and not very realistic. To solve this problem, I made a little function that distorts the edge of the gradient with a texture. I also linked the Green channel of the vertex color to the RVT blend to get better control and potentially add/erase weird artifacts.
Starting with Houdini
Houdini much like Blender, has a very dedicated community of users that are very open about sharing tips and tutorials with others. It is further emphasized by SideFX themselves with the tutorial section on their website.
The very first tutorial I watched was this one. It was made in an older version of Houdini but it really helps you to grasp the concepts of Houdini and what it can do. The author made a more recent version but I did not go through it so feel free to do both.
Entagma is also a good source of tutorials, they often take math papers and implement them in Houdini.
Tokeru/CGwiki is THE bible of Houdini, really this guy is a beast and helped me so much with some core concepts that were not very well documented.
My absolute favorite tutorial maker is Junichiro Horikawa, this guy is a very great teacher with a great video setup where he explains in depth the concepts before implementing it into Houdini, I can never get enough of what he does, he is a really inspiring person.
And of course the one and only Simon Verstraete who does tutorials and blog posts about Houdini on Artstation. He has a lot of tips and tricks that helped me a lot through my Houdini journey which only just begun.
Like everything you have to invest time and energy into what you do, and Houdini is no exception, there are no shortcuts. Houdini is so wide that you can’t really become a master of everything in the snap of a finger. Take it easy and start small, each project, even if it’s a failure will teach you something.
I would also like to credit my graduation Project team. You can see their work in some of the gifs: Jonas Felix, Jorys Abadie, Morgan Camenen, Loic Lecomte, Paul Artige, Arthur James, Camille Carliez, and Victor Giroux.
Lucas DZIURA, Technical Artist
Interview conducted by Arti Sergeev