自学SLAM(5)《第三讲:李群和李代数》作业

前言

自学SLAM(5)《第三讲:李群和李代数》作业_第1张图片

小编研究生的研究方向是视觉SLAM,目前在自学,本篇文章为初学高翔老师课的第三次作业。

文章目录

  • 前言
  • 1.群的性质
  • 2.验证向量叉乘的李代数性质
  • 3.推导 SE(3) 的指数映射
  • 4.伴随
  • 5.轨迹的描绘
  • 6.* 轨迹的误差(附加题)


1.群的性质

课上我们讲解了什么是群。请根据群定义,求解以下问题:

  1. {Z, +} 是否为群?若是,验证其满⾜群定义;若不是,说明理由。
  2. {N, +} 是否为群?若是,验证其满⾜群定义;若不是,说明理由。
    其中 Z 为整数集, N 为⾃然数集。

在这里我再写一下群的定义,满足“凤姐咬你”的就是群,也就是四个性质,如图:
注意:
图中吧集合记作A,运算记作·(·不代表乘法),群可以记作G=(A,·)
对于整数的逆,进行的是乘法它的逆就是它的倒数 进行的是加法,它的逆就是它的相反数
自学SLAM(5)《第三讲:李群和李代数》作业_第2张图片
对于 {Z, +} ,设a1∈Z,a2∈Z,a3∈Z
①封闭性:对于任意的a1∈Z,a2∈Z都有a1+a2∈Z,满足封闭性。
②结合性:对于任意的a1∈Z,a2∈Z,a3∈Z,都有(a1+a2)+a3=a1+(a2+a3),满足结合性。
③幺元:Z中存在0∈Z,对于任意的a∈Z,有a+0=a+0=a,因此满足幺元。
④逆:对于任意的a∈Z,有-a∈Z,a+(-a)=0,任何整数加上它的相反数等于幺元0,所以逆元素是其相反数,因此满足逆。

对于 {N, +}
①封闭性:两个自然数相加依然是自然数,封闭性成立。
②结合性:两个自然数相加可以互换位置,结合性成立。
③幺元:任何自然数与0相加仍然是自然数本身,幺元成立。
④逆: 自然数都是非负数(加法中,自然数的逆已经不属于自然数了),所以两个大于等于0的数相加不可能为0,逆不成立。

2.验证向量叉乘的李代数性质

我们说向量和叉乘运算构成了李代数,现在请你验证它。书中对李代数的定义为:李代数由⼀个集合V,⼀个数域 F 和⼀个⼆元运算 [,]组成。如果它们满⾜以下⼏条性质,称 (V, F, [, ]) 为⼀个李代数,记作g。
注意:自反性是指自己与自己的运算为零。
自学SLAM(5)《第三讲:李群和李代数》作业_第3张图片

解题过程如下:

3.推导 SE(3) 的指数映射

课上给出了 SO(3) 的指数映射推导,但对于 SE(3),仅介绍了结论,没有给出详细推导。请你完成 SE(3)指数映射部分,有关左雅可⽐的详细推导。
自学SLAM(5)《第三讲:李群和李代数》作业_第4张图片

解题过程如下:

4.伴随

在 SO(3) 和 SE(3) 上,有⼀个东西称为伴随(Adjoint)。下⾯请你证明 SO(3)伴随的性质。自学SLAM(5)《第三讲:李群和李代数》作业_第5张图片

解题过程如下:

完整的 SO(3) 和 SE(3) 性质见下图
自学SLAM(5)《第三讲:李群和李代数》作业_第6张图片
自学SLAM(5)《第三讲:李群和李代数》作业_第7张图片

5.轨迹的描绘

我们通常会记录机器⼈的运动轨迹,来观察它的运动是否符合预期。⼤部分数据集都会提供标准轨迹以供参考,如 kitti、 TUM-RGBD 等。这些⽂件会有各⾃的格式,但⾸先你要理解它的内容。记世界坐标系为 W,机器⼈坐标系为 C,那么机器⼈的运动可以⽤ TWC 或TCW来描述。现在,我们希望画出机器⼈在世界当中的运动轨迹,请回答以下问题:
自学SLAM(5)《第三讲:李群和李代数》作业_第8张图片

解题过程如下:
世界坐标系W(world),机器人坐标系也就是相机坐标系C(camera)

①Twc指的是从世界坐标系原点到相机中心的平移向量,(机器人(相机)坐标系的原点在世界坐标系中的坐标)
世界坐标系是不随相机运动变化的,因此可以认为Twc是机器人相对于原点坐标在移动, 移动可视化在观察者眼中就是机器人的运动轨迹。

如果我们假设机器人坐标系的原点为Oc,此时的Ow就是这个原点在世界坐标系下的坐标:
Ow=TwcOc=twc
这正是Twc的平移部分。因此,可以从Twc中直接看到相机在何处,这也就是我们所说的Twc更为直观。因此在可视化程序里,轨迹文件储存的是Twc而不是Tcw

我想这也是第一问问我们Twc而不是问·Tcw的原因。


首先我们需要安装Sophus

    git clone https://github.com/strasdat/Sophus.git
    cd Sophus
    git checkout a621ff
    mkdir build
    cd build
    cmake ..
    make
    sudo make install

但是我们会编译失败,按照如下操作修改后,重新编译即可。
解决方法:打开 Sophus/sophus/so2.cpp文件修改报错内容

//将
SO2::SO2() 
{ 
 unit_complex_.real() = 1.; 
 unit_complex_.imag() = 0.; 
 }
//改为
SO2::SO2() 
{ 
   unit_complex_.real(1.); 
   unit_complex_.imag(0.); 
 }

这时候我们就可以安装成功Sophus了
自学SLAM(5)《第三讲:李群和李代数》作业_第9张图片

draw_trajectory.cpp对应代码如下:

#include "sophus/so3.h"
#include "sophus/se3.h"
#include 
#include 
#include 
#include 
#include 
// need pangolin for plotting trajectory
#include 
using namespace std;
// path to trajectory file
string trajectory_file = "/home/zhe/1/lianxi/3/plotTrajectory/trajectory.txt";
class SE3d;
void DrawTrajectory(vector<Sophus::SE3, Eigen::aligned_allocator<Sophus::SE3>>);
int main(int argc, char **argv) {
    vector<Sophus::SE3, Eigen::aligned_allocator<Sophus::SE3>> poses;
    //文件读取器
    ifstream fin(trajectory_file);
    if (!fin) {
        cerr << "trajectory " << trajectory_file << " not found." << endl;
    }
    //如果eof()返回0,就没读完
    while (!fin.eof()) {
        //按照时间  平移 四元素的顺序定义并读取
        double time, tx, ty, tz, qx, qy, qz, qw;
        fin >> time >> tx >> ty >> tz >> qx >> qy >> qz >> qw;
        Sophus::SE3 p1(Eigen::Quaterniond(qw, qx, qy, qz), Eigen::Vector3d(tx, ty, tz));
        poses.push_back(p1);
    }
    fin.close();
    // end your code here
    // draw trajectory in pangolin
    DrawTrajectory(poses);
    return 0;
}
/************************************************************************/
void DrawTrajectory(vector<Sophus::SE3, Eigen::aligned_allocator<Sophus::SE3>> poses) {
    if (poses.empty()) {
        cerr << "Trajectory is empty!" << endl;
        return;
    }
    // create pangolin window and plot the trajectory
    pangolin::CreateWindowAndBind("Trajectory Viewer", 1024, 768);
    glEnable(GL_DEPTH_TEST);
    glEnable(GL_BLEND);
    glBlendFunc(GL_SRC_ALPHA, GL_ONE_MINUS_SRC_ALPHA);
    pangolin::OpenGlRenderState s_cam(
            pangolin::ProjectionMatrix(1024, 768, 500, 500, 512, 389, 0.1, 1000),
            pangolin::ModelViewLookAt(0, -0.1, -1.8, 0, 0, 0, 0.0, -1.0, 0.0)
    );
    pangolin::View &d_cam = pangolin::CreateDisplay()
            .SetBounds(0.0, 1.0, pangolin::Attach::Pix(175), 1.0, -1024.0f / 768.0f)
            .SetHandler(new pangolin::Handler3D(s_cam));
    while (pangolin::ShouldQuit() == false) {
        glClear(GL_COLOR_BUFFER_BIT | GL_DEPTH_BUFFER_BIT);
        d_cam.Activate(s_cam);
        glClearColor(1.0f, 1.0f, 1.0f, 1.0f);
        glLineWidth(2);
        for (size_t i = 0; i < poses.size() - 1; i++) {
            glColor3f(1 - (float) i / poses.size(), 0.0f, (float) i / poses.size());
            glBegin(GL_LINES);
            auto p1 = poses[i], p2 = poses[i + 1];
            glVertex3d(p1.translation()[0], p1.translation()[1], p1.translation()[2]);
            glVertex3d(p2.translation()[0], p2.translation()[1], p2.translation()[2]);
            glEnd();
        }
        pangolin::FinishFrame();
        usleep(5000);   // sleep 5 ms
    }
}

CmakeLists.txt对应代码如下:

cmake_minimum_required(VERSION 2.8)
project(draw_trajectory)
set( CMAKE_BUILD_TYPE "Release" )
set( CMAKE_CXX_FLAGS "-std=c++11 -O3" )
set( CMAKE_BUILD_TYPE "Debug" )

find_package(Pangolin REQUIRED)
find_package(Sophus REQUIRED)
include_directories("/usr/include/eigen3")
include_directories(
        ${Pangolin_INCLUDE_DIRS}
        ${Sophus_INCLUDE_DIR}
)
add_executable(trajectory draw_trajectory.cpp)
target_link_libraries(trajectory
        ${Pangolin_LIBRARIES}
        ${Sophus_LIBRARIES}
        )

然后

cd  SLAM4track//自己建的文件夹
cat CMakeLists.txt
cd build
cmake ..
make
./trajectory
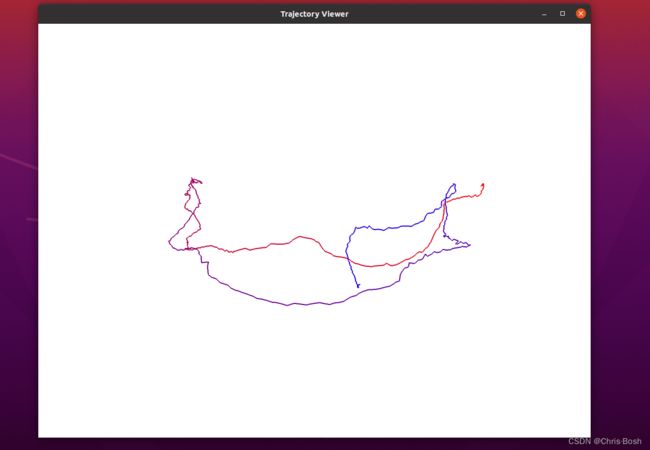
自学SLAM(5)《第三讲:李群和李代数》作业_第10张图片
该图中:轨迹首尾颜色不一样,通过观察,发现是着色函数设置的颜色随位置变化.

6.* 轨迹的误差(附加题)

本题为附加题。 除了画出真实轨迹以外,我们经常需要把 SLAM 估计的轨迹与真实轨迹相⽐较。下⾯说明⽐较的原理,请你完成⽐较部分的代码实现。
自学SLAM(5)《第三讲:李群和李代数》作业_第11张图片

CMakeLists.txt对应代码

cmake_minimum_required(VERSION 2.8)
project(wucha)

set(CMAKE_CXX_FLAGS "${CMAKE_CXX_FLAGS} -std=c++11")

#set(CMAKE_CXX_STANDARD 11)
#set(CMAKE_BUILD_TYPE "Release")
#set(CMAKE_RUNTIME_OUTPUT_DIRECTORY ${PROJECT_SOURCE_DIR}/bin)
#set(CMAKE_LIBRARY_OUTPUT_DIRECTORY ${PROJECT_SOURCE_DIR}/lib)
#添加库
#sophus
#  为使用 sophus,需要使用find_package命令找到它并赋给Sophus_INCLUDE_DIRS
find_package(Sophus REQUIRED)
include_directories(${Sophus_INCLUDE_DIRS})
#Pangolin生成一个libPangolin动态链接库
find_package(Pangolin REQUIRED)
include_directories(${Pangolin_INCLUDE_DIRS})

include_directories("/usr/include/eigen3")
#编译
add_executable(plotError compare_tra.cpp)
#链接
#target_link_libraries(plotError Sophus::Sophus)
target_link_libraries(plotError ${Sophus_LIBRARIES} )

target_link_libraries(plotError ${Pangolin_LIBRARIES})

compare_tra.cpp对应代码:

#include "sophus/so3.h"
#include "sophus/se3.h"
#include 
#include 
#include 
#include 
#include 
#include 
// need pangolin for plotting trajectory
#include 
using namespace std;
// path to trajectory file
string gt_file = "../groundtruth.txt";
string est_file = "../estimated.txt";
vector<Sophus::SE3, Eigen::aligned_allocator<Sophus::SE3>> gt_poses,est_poses;
// function for plotting trajectory, don't edit this code
// start point is red and end point is blue
void DrawTrajectory(vector<Sophus::SE3, Eigen::aligned_allocator<Sophus::SE3>> gt_poses,
                    vector<Sophus::SE3, Eigen::aligned_allocator<Sophus::SE3>> est_poses);
void readData(string filepath);
void ErrorTrajectory();
int main(int argc, char **argv) {
    readData(gt_file);
    readData(est_file);
    ErrorTrajectory();
    // draw trajectory in pangolin
    DrawTrajectory(gt_poses,est_poses);//打印两条轨迹
    return 0;
    /// implement pose reading code
    // start your code here (5~10 lines)
}
/*******************************************************************************************/
void readData(string filepath){
    vector<Sophus::SE3, Eigen::aligned_allocator<Sophus::SE3>> poses;
    ifstream infile(filepath);
    double t1,tx,ty,tz,qx,qy,qz,qw;
    string line;
    if(infile)
    {
        while(getline(infile,line))
        {
            stringstream record(line);    //从string读取数据
            record>>t1>>tx>>ty>>tz>>qx>>qy>>qz>>qw;
            Eigen::Vector3d t(tx,ty,tz);
            Eigen::Quaterniond q = Eigen::Quaterniond(qw,qx,qy,qz).normalized();  //四元数的顺序要注意
            Sophus::SE3 SE3_qt(q,t);
            poses.push_back(SE3_qt);
        }
    }
    else
    {
        cout<<"没找到这个文件"<<endl;
    }
    if(filepath==gt_file){
        gt_poses = poses;
    }else if( filepath==est_file ){
        est_poses = poses;
    }else{ cout<<"读文件出错"<<endl;}
    infile.close();
}
/*******************************************************************************************/
void ErrorTrajectory()
{
    double RMSE = 0;
    Eigen::Matrix<double ,6,1> se3;
    vector<double> error;
    for(int i=0;i<gt_poses.size();i++){
        se3=(gt_poses[i].inverse()*est_poses[i]).log();  //这里的se3为向量形式,求log之后是向量形式
        //cout<
        error.push_back( se3.squaredNorm() );  //二范数
        // cout<
    }
    for(int i=0; i<gt_poses.size();i++){
        RMSE += error[i];
    }
    RMSE /= double(error.size());
    RMSE = sqrt(RMSE);
    cout<<RMSE<<endl;
}
/*******************************************************************************************/
void DrawTrajectory(vector<Sophus::SE3, Eigen::aligned_allocator<Sophus::SE3>> gt_poses,
                    vector<Sophus::SE3, Eigen::aligned_allocator<Sophus::SE3>> est_poses) {
    if (gt_poses.empty()) {
        cerr << "groundtruth is empty!" << endl;
        return;
    }
    if (est_poses.empty()) {
        cerr << "estimated is empty!" << endl;
        return;
    }
    // create pangolin window and plot the trajectory
    pangolin::CreateWindowAndBind("Trajectory Viewer", 1024, 768);
    glEnable(GL_DEPTH_TEST);
    glEnable(GL_BLEND);
    glBlendFunc(GL_SRC_ALPHA, GL_ONE_MINUS_SRC_ALPHA);
    pangolin::OpenGlRenderState s_cam(
            pangolin::ProjectionMatrix(1024, 768, 500, 500, 512, 389, 0.1, 1000),
            pangolin::ModelViewLookAt(0, -0.1, -1.8, 0, 0, 0, 0.0, -1.0, 0.0)
    );
    pangolin::View &d_cam = pangolin::CreateDisplay()
            .SetBounds(0.0, 1.0, pangolin::Attach::Pix(175), 1.0, -1024.0f / 768.0f)
            .SetHandler(new pangolin::Handler3D(s_cam));
    while (pangolin::ShouldQuit() == false) {
        glClear(GL_COLOR_BUFFER_BIT | GL_DEPTH_BUFFER_BIT);
        d_cam.Activate(s_cam);
        glClearColor(1.0f, 1.0f, 1.0f, 1.0f);//窗口,rgba
        glLineWidth(2);
        for (size_t i = 0; i < est_poses.size() - 1; i++) {
            glColor3f(1 - (float) i / est_poses.size(), 0.0f, (float) i / est_poses.size());
            glBegin(GL_LINES);
            auto p1 = est_poses[i], p2 = est_poses[i + 1];
            glVertex3d(p1.translation()[0], p1.translation()[1], p1.translation()[2]);
            glVertex3d(p2.translation()[0], p2.translation()[1], p2.translation()[2]);
            glEnd();
        }
        for (size_t i = 0; i < gt_poses.size() - 2; i++) {
            glColor3f(0.f, 0.8f, 0.f);//绿色
            glBegin(GL_LINES);
            auto p3 = gt_poses[i], p4 = gt_poses[i + 1];//只显示tx,ty,tz
            glVertex3d(p3.translation()[0], p3.translation()[1], p3.translation()[2]);
            glVertex3d(p4.translation()[0], p4.translation()[1], p4.translation()[2]);
            glEnd();
        }
        pangolin::FinishFrame();
        usleep(5000);   // sleep 5 ms
    }
}

然后运行,运行命令如下:

cd track_compare
cd build
cmake ..
make
./plotError

自学SLAM(5)《第三讲:李群和李代数》作业_第12张图片
本人自学SLAM,如果错误,还请见谅留言提醒
希望的我的博客对你有帮助!

自学SLAM(5)《第三讲:李群和李代数》作业_第13张图片

你可能感兴趣的:(视觉SLAM,机器学习,人工智能,视觉SLAM)