基于SC-LeGO-LOAM的建图和ndt_localizer的定位
link
基于SC-LeGO-LOAM的建图和ndt_localizer的定位
链接: link. SC-LeGO-LOAM
链接: link. ndt_localizer
将建图和定位两部分分开,利用SC-LeGO-LOAM进行建图,相比于LeGO-LOAM,其采用了Scan Context方法,对点云地图进行闭环检测和姿态图优化后闭环效果更好。后续采用ndt进行定位。
一、利用SC-LeGO-LOAM建图
- 下载源码包
git clone https://github.com/AbangLZU/SC-LeGO-LOAM.git
// 编译
cd ..
catkin_make
- 原作者使用的是Ouster OS1-64雷达,本文采用velodyne 16线激光雷达,对utility.h文件要做以下修改
首先是pointCloudTopic和imuTopic
 # 将原本的这两行注释或者直接修改
// extern const string pointCloudTopic = "/os1_points";
// extern const string imuTopic = "/imu/data";
 # 修改为对应的雷达和IMU的Topic
extern const string pointCloudTopic = "/velodyne_points";
extern const string imuTopic = "/imu/data";
再将原本的这行注释掉,添加以下代码
# 注释
// Ouster OS1-64
//extern const int N_SCAN = 64;
//extern const int Horizon_SCAN = 1024;
//extern const float ang_res_x = 360.0/float(Horizon_SCAN);
//extern const float ang_res_y = 33.2/float(N_SCAN-1);
//extern const float ang_bottom = 16.6+0.1;
//extern const int groundScanInd = 15;
添加
// VLP-16
extern const int N_SCAN = 16;
extern const int Horizon_SCAN = 1800;
extern const float ang_res_x = 0.2;
extern const float ang_res_y = 2.0;
extern const float ang_bottom = 15.0+0.1;
extern const int groundScanInd = 7;
对于64线的VLP雷达,添加:
extern const int N_SCAN = 64;
extern const int Horizon_SCAN = 2083;
extern const float ang_res_x = 360.0/float(Horizon_SCAN);
extern const float ang_res_y = 26.8/float(N_SCAN-1);
extern const float ang_bottom = 24.8;
extern const int groundScanInd = 55;

- 运行
roslaunch lego-loam run.launch
#播放bag包
rosbag play --clock ***.bag
#如果bag的雷达话题不是/velodyne_points,可在播放的时候添加话题映射,例如原话题为/rslidar_points
rosbag play --clock ***.bag /rslidar_points:=/velodyne_points
在SC-LeGO-LOAM中,imu起着去除运动畸变的作用,但在实际运行中发现,添加了imu话题之后,建图会产生漂移。所以,在播放bag包的时候为加入imu话题,建图效果也还好。
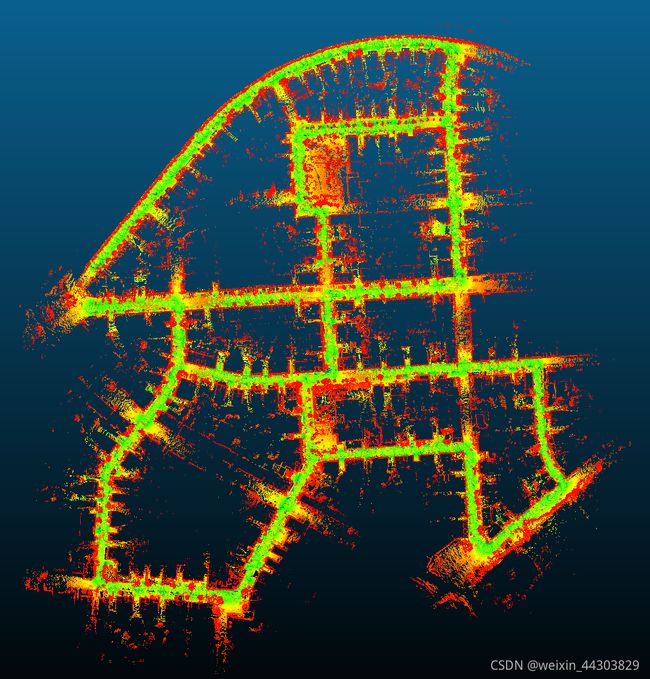
SC-LeGO-LOAM中添加了自动保存地图功能,bag包播放结束后,Ctrl+C结束,即可在map文件夹下生成pcd文件。建图过程到此完成,下面是实现NDT定位。
二、利用ndt_localizer进行定位
- 下载源码包
cd /catkin_ws/src
git clone https://github.com/AbangLZU/ndt_localizer.git
cd ..
catkin_make
- 1
- 2
- 3
- 4
- 将之前生成的***.pcd文件复制到ndt_localizer文件下的map文件夹里,对launch文件进行修改
map_loader.launch
将***.pcd 修改为map文件下的名称
ndt_localizer.launch
将urdf模型注释
- 1
pointsdownsample.launch
将雷达话题改为/velodyne_points;leaf_size改为1.0(如果采用的是16线的激光雷达,那么降采样的 leaf_size 控制在1 - 2 m 较为合适,当采用的激光雷达为 32 线及以上 , 可以将 leaf size 设置为 2 - 3 m )
- 1
- 2
- 3
- 4
- 运行
cd /catkin_ws
catkin_make
source devel/setup.bash
roslaunch ndt_localizer ndt_localizer.launch
- 1
- 2
- 3
- 4
此时,地图会在rviz里面加载出来

-
再选择rviz里面的 2D Pose Estimate,选定车辆的初始姿态(一切使用预先构建的地图进行配准定位的方法都需要提供初始姿态,在工业界的实践中,这一初始姿态通常是通过 gnss 获得,本文中我们简化这一步,在 Rviz 中手动指定初始姿态, Rviz 中设定的初始姿态通常会被默认发送至 /initialpose topic 上)
-
然后另起终端,播放bag包,即可看到定位的实现过程。

问题记录:
换成Ubuntu20.04后运行lego-loam出现rviz不显示点云的现象;
# rviz提示错误:
failed to transform from frame /camera_init to frame map
failed to transform from frame /camera to frame map
- 1
- 2
- 3
解决: 将***.cpp文件中的/camera_init替换为camera_init;/camera替换为camera;launch文件同理;
参考文献
- https://github.com/AbangLZU/SC-LeGO-LOAM.git
- https://github.com/AbangLZU/ndt_localizer.git