Windows+anaconda3搭建tensorflow-cpu+keras环境
windows+anaconda3搭建tensorflow-cpu+keras环境
- 下载安装anaconda3
-
- anaconda常用命令
-
- conda install安装换清华源
- pip install 换清华源
- anconda常用命令
- anaconda搭建tensorflow+keras环境
-
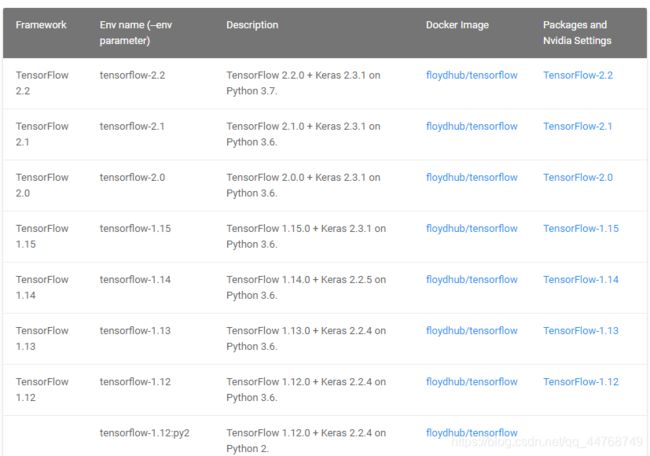
- 了解anaconda和keras对应版本
- 搭建环境
-
- 创建python虚拟
- 安装tensorflow包
- 测试是否安装成功
- 如果遇到以下情况
- 安装keras包
- jupyter-notebook的相关配置
-
- 可能遇到的问题
-
- 切换jupyter-notebook运行tensorflow虚拟环境,提示找不到指定模块
下载安装anaconda3
推荐去清华大学开源软件镜像站下载,官网下载速度比较慢
链接: 直达下载.

推荐下载最新版本,相对而言功能更全面
安装过程比较简单
你好! 这是你第一次使用 Markdown编辑器 所展示的欢迎页。如果你想学习如何使用Markdown编辑器, 可以仔细阅读这篇文章,了解一下Markdown的基本语法知识。
anaconda常用命令
conda install安装换清华源
通过修改用户目录下的 .condarc 文件。Windows 用户无法直接创建名为 .condarc 的文件,可先执行 conda config --set show_channel_urls yes 生成该文件之后再修改。
修改内容如下
channels:
  - defaults
show_channel_urls: true
channel_alias: https://mirrors.tuna.tsinghua.edu.cn/anaconda
default_channels:
  - https://mirrors.tuna.tsinghua.edu.cn/anaconda/pkgs/main
  - https://mirrors.tuna.tsinghua.edu.cn/anaconda/pkgs/free
  - https://mirrors.tuna.tsinghua.edu.cn/anaconda/pkgs/r
  - https://mirrors.tuna.tsinghua.edu.cn/anaconda/pkgs/pro
  - https://mirrors.tuna.tsinghua.edu.cn/anaconda/pkgs/msys2
custom_channels:
  conda-forge: https://mirrors.tuna.tsinghua.edu.cn/anaconda/cloud
  msys2: https://mirrors.tuna.tsinghua.edu.cn/anaconda/cloud
  bioconda: https://mirrors.tuna.tsinghua.edu.cn/anaconda/cloud
  menpo: https://mirrors.tuna.tsinghua.edu.cn/anaconda/cloud
  pytorch: https://mirrors.tuna.tsinghua.edu.cn/anaconda/cloud
  simpleitk: https://mirrors.tuna.tsinghua.edu.cn/anaconda/cloud
即可添加 Anaconda Python 免费仓库。
运行 conda clean -i 清除索引缓存,保证用的是镜像站提供的索引。
运行 conda create -n myenv numpy 测试一下吧。
pip install 换清华源
windows下,直接在user目录中创建一个pip目录,如:C:\Users\xx\pip,新建文件pip.ini,内容如下
 [global]
 index-url = https://pypi.tuna.tsinghua.edu.cn/simple
anconda常用命令
-
查看安装了哪些包
conda list -
安装包
conda install 包名 -
卸载包
conda uninstall 包名 -
查看存在哪些虚拟环境
conda env list 或 conda info -e -
检查更新当前conda
conda update conda -
创建虚拟环境
conda create -n tensorflow python=3.7 -
进入虚拟环境
conda activate tensorflow -
退出虚拟环境
conda deactivate tensorflow -
删除虚拟环境
conda remove -n tensorflow --all
anaconda搭建tensorflow+keras环境
了解anaconda和keras对应版本
如果tensorflow和kersa版本不对会导入库时很可能会报错
搭建环境
以 python3.6 、tensorflow1.4.0、keras2.0.8为例
创建python虚拟
conda create -n tensorflow
安装tensorflow包
pip install tensorflow==1.4.0
测试是否安装成功
import tensorflow as tf
如果遇到以下情况
FutureWarning: Passing (type, 1) or '1type' as a synonym of type is deprecated; in a future version of numpy, it will be understood as (type, (1,)) / '(1,)type'.
说明安装的numpy版本过高
卸载当前环境下的numpy
pip uninstall numpy
安装numpy1.16版本
pip install numpy==1.16
注意:并不是所有tensorflow版本都需要将numpy降级到1.16,其他tensorflow版本就不清楚选用哪个版本的numpy
安装keras包
pip install keras==2.0.8
jupyter-notebook的相关配置
写深度学习代码,通常都会用jupyter-notebook,便于调试代码
-
激活对应环境
conda activate "虚拟环境名" -
将环境写入jupyter-notebook的kernel中
python -m ipykernel install --user --name "环境名称" --display-name "显示的名称" -
安装ipykernel
conda install ipykernel -
切换到base环境打开jupyter-notebook
jupyter-notebook.exe
可能遇到的问题
切换jupyter-notebook运行tensorflow虚拟环境,提示找不到指定模块
问题原因: pyzmq包是用于连接的,若出现问题,会导致连接不上服务器。我的问题是版本不匹配。
解决方法: 切换到对应虚拟环境,pip uninstall pyzmq卸载当前pyzmq包,pip install pyzmq重新安装pyzmq
以上是我自己搭建环境的总结和遇到的问题及解决方案,希望能够有所帮助。


