从零开始的RISC-V模拟器开发(一)环境搭建
前言
博主这系列文章是跟随中科院吴伟老师的b站公开课:[完结]从零开始的RISC-V模拟器开发·第一季·2021春季_哔哩哔哩_bilibili 记录的笔记。仅供学习使用,侵删!
苦逼的博主现在自己毕设也是要设计类似的东西。哎。我需要做的是给一个现成的 RISC-V 模拟器作 RVF 扩展。还是挺没有体系的,决定还是来看看课学习一下。
介绍
模拟器:在计算机上模拟真实环境或者假想的运行场景来学习系统工作的方式。比如虚拟开发板。
Spike, Qemu 是 RISC-V 比较成熟的模拟器。本次课程也是围绕这两种主流方式进行模拟。
课程需要的环境是 RISCV GNU toolchain 和 Nuclei RISC-V toolchain。测试环境比如 riscv tools,nuclei SDK 等。
交叉工具链中 Build 是程序构建时的系统(本机),Host 是程序要运行的系统,Target 是要构建的程序的输出的对应架构。
riscv 工具链可以跟随汪辰老师操作系统课程安装,步骤非常清晰。
nuclei 工具链我在安装过程中出了一些问题,我也不能保证说帮读者一定能解决这些问题。我说一下我个人和官方老师沟通后的一些安装建议吧……
| 需要安装的软件 | 下载链接 | 说明 | 安装建议 | 检验成功安装 |
|---|---|---|---|---|
| riscv-gnu-toolchain | riscv-collab/riscv-gnu-toolchain: GNU toolchain for RISC-V, including GCC (github.com) | 编译 riscv 架构可运行程序 | 不要 --recursive 克隆,会变得不幸。每个外链仓库分别手动克隆 | riscv64-unknown-linux-gnu-gcc -v |
| riscv-tools | riscv-collab/riscv-gnu-toolchain: GNU toolchain for RISC-V, including GCC (github.com) | 执行 riscv 架构可执行程序 | 同上. 编译安装 fevsr 和 spike |
spike -h |
| nuclei-riscv-toolchain | 芯来工具链_专业RISC-V处理器IP及解决方案公司 (nucleisys.com) | 芯来的工具链 | 2023 以后版本程序名称改为和 riscv-gnu-toolchain 里一样的 riscv64-unknown-elf-gcc,而之前版本的工具链名称为 riscv-nuclei-elf-gcc。我建议学习此课程使用 2022.10 版本工具链, 下载速度有些慢,可以使用我下载下来的工具链: 链接:https://pan.baidu.com/s/1jIZvawmb4Oz7PsOXBclOFw?pwd=4lye 提取码:4lye |
riscv-nuclei-elf-gcc -v |
| nuclei sdk | Nuclei-Software/nuclei-sdk: Nuclei RISC-V Software Development Kit (github.com) | 用于评估开发板/软件 | riscv-nuclei-elf-gcc 相应的 sdk 使用 9369a3a 版本。如果使用23年以后的芯来工具链,就不用切换版本。 | make CORE=n600 PROGRAM=baremetal/demo_eclic all |
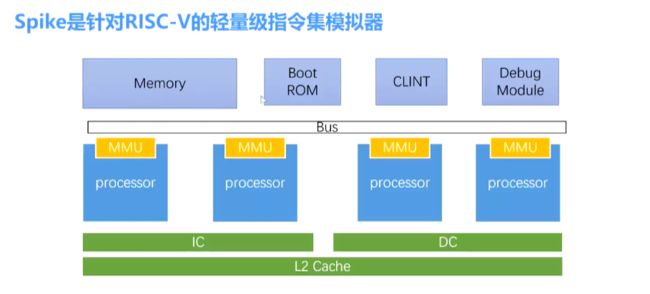
Spike
针对 RV 的轻量级 ISA 模拟器。其代码包含在 riscv-tools/riscv-ism-sim 中。
processor 是核心硬件。
cache 只是统计功能使用,统计命中率,并不会真正加速(毕竟这是模拟器)。
spike 对于新扩展支持比较全面,MDFV 都有。
查看 spike 使用帮助:
$ spike -h
Spike RISC-V ISA Simulator 1.1.1-dev
usage: spike [host options] <target program> [target options]
Host Options:
-p<n> Simulate <n> processors [default 1]
-m<n> Provide <n> MiB of target memory [default 2048]
-m<a:m,b:n,...> Provide memory regions of size m and n bytes
at base addresses a and b (with 4 KiB alignment)
-d Interactive debug mode
-g Track histogram of PCs
-l Generate a log of execution
-s Command I/O via socket (use with -d)
-h, --help Print this help message
-H Start halted, allowing a debugger to connect
--log=<name> File name for option -l
--debug-cmd=<name> Read commands from file (use with -d)
--isa=<name> RISC-V ISA string [default RV64IMAFDC_zicntr_zihpm]
--pmpregions=<n> Number of PMP regions [default 16]
--pmpgranularity=<n> PMP Granularity in bytes [default 4]
--priv=<m|mu|msu> RISC-V privilege modes supported [default MSU]
--varch=<name> RISC-V Vector uArch string [default vlen:128,elen:64]
--pc=<address> Override ELF entry point
--hartids=<a,b,...> Explicitly specify hartids, default is 0,1,...
--ic=<S>:<W>:<B> Instantiate a cache model with S sets,
--dc=<S>:<W>:<B> W ways, and B-byte blocks (with S and
--l2=<S>:<W>:<B> B both powers of 2).
--big-endian Use a big-endian memory system.
--misaligned Support misaligned memory accesses
--device=<name> Attach MMIO plugin device from an --extlib library
--log-cache-miss Generate a log of cache miss
--log-commits Generate a log of commits info
--extension=<name> Specify RoCC Extension
This flag can be used multiple times.
--extlib=<name> Shared library to load
This flag can be used multiple times.
--rbb-port=<port> Listen on <port> for remote bitbang connection
--dump-dts Print device tree string and exit
--dtb=<path> Use specified device tree blob [default: auto-generate]
--disable-dtb Don't write the device tree blob into memory
--kernel= Load kernel flat image into memory
--initrd= Load kernel initrd into memory
--bootargs= Provide custom bootargs for kernel [default: console=ttyS0 earlycon]
--real-time-clint Increment clint time at real-time rate
--triggers= Number of supported triggers [default 4]
--dm-progsize= Progsize for the debug module [default 2]
--dm-sba= Debug system bus access supports up to wide accesses [default 0]
--dm-auth Debug module requires debugger to authenticate
--dmi-rti= Number of Run-Test/Idle cycles required for a DMI access [default 0]
--dm-abstract-rti= Number of Run-Test/Idle cycles required for an abstract command to execute [default 0]
--dm-no-hasel Debug module supports hasel
--dm-no-abstract-csr Debug module won' t support abstract CSR access
--dm-no-abstract-fpr Debug module won't support abstract FPR access
--dm-no-halt-groups Debug module won't support halt groups
--dm-no-impebreak Debug module won't support implicit ebreak in program buffer
--blocksz=<size> Cache block size (B) for CMO operations(powers of 2) [default 64]
比较重要的:
p:处理器个数。
m:内存空间大小。
isa:指定指令集(rv32 rv64)。
pc:入口地址。
varch:向量长度。
ic id l2:设置缓存信息,当然起不到加速作用。
extension:扩展。
extlib:添加链接外部库的扩展。添加后 isa 选项可以添加外部库中包含的新指令集。
device:从 extlib 库中附加MMIO插件设备。
-l:生成日志文件。
log-cache-miss:生成缓存命中日志文件。
dump-dts:输出设备树字符串。
g:pc 的跟踪直方图。
d:交互式调试。
rbb-port=
qemu
spike 是轻量级 CPU,重点在于模拟不同 CPU 如何运行这个程序,针对目标文件;qemu 重点在于模拟不同 CPU,比如 IO 总线 等模拟。
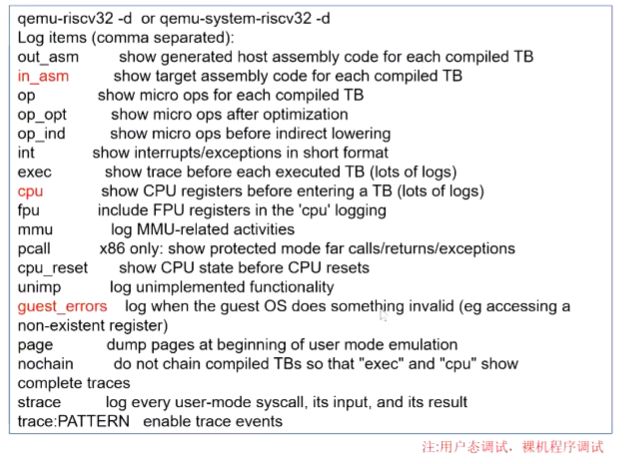
qemu 主要包含两种模式,用户模式类似 spike,即用特定架构去模拟运行程序。系统模式则是模拟出一整个架构硬件环境。
其代码包含在 riscv-gnu-toolchain 中。编译构建推荐大家看这篇博主文章:
Ubuntu20.04搭建RISC-V和qemu环境-CSDN博客
# 查看用户态支持的 CPU 和系统态支持的机器
$ qemu-riscv32 -cpu help
any
lowrisc-ibex
rv32
sifive-e31
sifive-e34
sifive-u34
$ qemu-system-riscv32 -M ?
Supported machines are:
none                 empty machine
opentitan            RISC-V Board compatible with OpenTitan
sifive_e             RISC-V Board compatible with SiFive E SDK
sifive_u             RISC-V Board compatible with SiFive U SDK
spike                RISC-V Spike board (default)
virt                 RISC-V VirtIO board
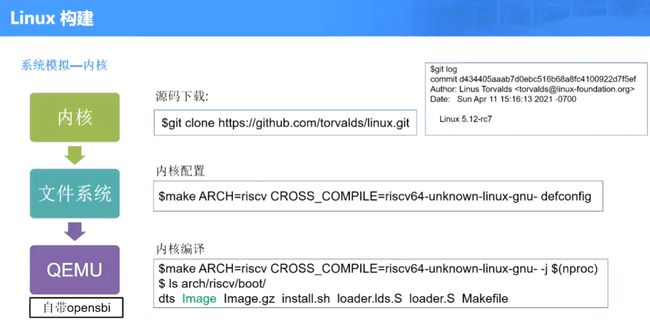
后面对于 linux 构建,还需要 nuclei-linux-sdk 和 linux 的下载,这里我就先不弄了,环境也忒麻烦了。
下节课先学一下 Spike 的 CPU 模拟吧。


