opencv+C++实现SSD目标检测
1.环境搭建
- 安装tensorflow或keras环境,直接pip或者conda即可。
- 安装pillow、Jupyter、matplotlib、lxml,打开cmd或者anaconda prompt输入以下命令,并安装成功。
	pip install pillow
	pip install jupyter
	pip install matplotlib
	pip install lxml
- 下载tensorflow的model模块地址如下。
model模块下载. - 下载mobilenet-ssd预训练模型,下面的链接中包含多个预训练模型,本次选择ssd_mobilenet_v1_coco。
预训练模型下载. - 下载并编译protobuf,也可以在anaconda下直接搭建,具体搭建流程参考下面链接。
protobuf安装教程.
其中可能会有两处问题,第一处,在执行
protoc object_detection/protos/*.proto --python_out=.
时,会出现找不到文件的问题。这时需要将每一个文件逐个转换,代码为(根据文件夹内实际文件名进行转换):
protoc --python_out=. .\object_detection\protos\anchor_generator.proto
protoc --python_out=. .\object_detection\protos\argmax_matcher.proto
protoc --python_out=. .\object_detection\protos\bipartite_matcher.proto
protoc --python_out=. .\object_detection\protos\box_coder.proto
protoc --python_out=. .\object_detection\protos\box_predictor.proto
protoc --python_out=. .\object_detection\protos\eval.proto
protoc --python_out=. .\object_detection\protos\faster_rcnn.proto
protoc --python_out=. .\object_detection\protos\faster_rcnn_box_coder.proto
protoc --python_out=. .\object_detection\protos\grid_anchor_generator.proto
protoc --python_out=. .\object_detection\protos\hyperparams.proto
protoc --python_out=. .\object_detection\protos\image_resizer.proto
protoc --python_out=. .\object_detection\protos\input_reader.proto
protoc --python_out=. .\object_detection\protos\losses.proto
protoc --python_out=. .\object_detection\protos\matcher.proto
protoc --python_out=. .\object_detection\protos\mean_stddev_box_coder.proto
protoc --python_out=. .\object_detection\protos\model.proto
protoc --python_out=. .\object_detection\protos\optimizer.proto
protoc --python_out=. .\object_detection\protos\pipeline.proto
protoc --python_out=. .\object_detection\protos\post_processing.proto
protoc --python_out=. .\object_detection\protos\preprocessor.proto
protoc --python_out=. .\object_detection\protos\region_similarity_calculator.proto
protoc --python_out=. .\object_detection\protos\square_box_coder.proto
protoc --python_out=. .\object_detection\protos\ssd.proto
protoc --python_out=. .\object_detection\protos\ssd_anchor_generator.proto
protoc --python_out=. .\object_detection\protos\string_int_label_map.proto
protoc --python_out=. .\object_detection\protos\train.proto
protoc --python_out=. .\object_detection\protos\keypoint_box_coder.proto
protoc --python_out=. .\object_detection\protos\multiscale_anchor_generator.proto
若出现
ModuleNotFoundError: No module named 'object_detection'
则cd到tensorflow的models/research/文件夹下,执行
python setup.py install
若出现
ModuleNotFoundError: No module named 'pycocotools'
则执行
conda install pycocotools
若出现
ImportError: No module named 'nets'
则在models/research/slim文件夹下执行
python setup.py install
这时可能会报build文件已存在问题,将models/research/slim文件夹下的BUILD文件改名或移动到其他文件夹下,再次执行上述代码即可。
- 安装tensorflow的model模块,将model文件夹拷贝到相应环境的site-packages/tensorflow文件夹下即可,在site-packages\tensorflow\models\ tutorials\image\imagent文件夹下执行下面代码,测试是否安装成功。
python classify_image.py --model_dir E:\Image --image_file E:\Image\timg.jpg(其中--model_dir表示模型将要下载的地址。 --image_file表示模型将要识别的图片)
2.数据标注及格式转换
- 下载labelImg,并标注自己收集的图片样本,标注的标签自动保存为xml格式,可参考如下链接。
链接: labelImg使用示例.

- 假设当前工程文件夹为E:/ssd-test/,在工程文件夹下新建两个文件夹images和xmls,images文件夹中放入全部原图像,xmls文件夹中放入全部的xml标记文件。
- 在工程文件夹下新建train_test_split.py把xml数据集分为了train 、test、 validation三部分,并存储在annotations文件夹中,train为训练集占76.5%,test为测试集10%,validation为验证集13.5%,train_test_split.py代码如下:
import os
import random
import time
import shutil

xmlfilepath=r'merged_xml'
saveBasePath=r"./annotations"

trainval_percent=0.9
train_percent=0.85
total_xml = os.listdir(xmlfilepath)
num=len(total_xml)
list=range(num)
tv=int(num*trainval_percent)
tr=int(tv*train_percent)
trainval= random.sample(list,tv)
train=random.sample(trainval,tr)
print("train and val size",tv)
print("train size",tr)
# print(total_xml[1])
start = time.time()
# print(trainval)
# print(train)
test_num=0
val_num=0
train_num=0
# for directory in ['train','test',"val"]:
#         xml_path = os.path.join(os.getcwd(), 'annotations/{}'.format(directory))
#         if(not os.path.exists(xml_path)):
#             os.mkdir(xml_path)
#         # shutil.copyfile(filePath, newfile)
#         print(xml_path)
for i  in list:
    name=total_xml[i]
            # print(i)
    if i in trainval:  #train and val set
    # ftrainval.write(name)
        if i in train:
            # ftrain.write(name)
            # print("train")
            # print(name)
            # print("train: "+name+" "+str(train_num))
            directory="train"
            train_num+=1
            xml_path = os.path.join(os.getcwd(), 'annotations/{}'.format(directory))
            if(not os.path.exists(xml_path)):
                os.mkdir(xml_path)
            filePath=os.path.join(xmlfilepath,name)
            newfile=os.path.join(saveBasePath,os.path.join(directory,name))
            shutil.copyfile(filePath, newfile)

        else:
            # fval.write(name)
            # print("val")
            # print("val: "+name+" "+str(val_num))
            directory="validation"
            xml_path = os.path.join(os.getcwd(), 'annotations/{}'.format(directory))
            if(not os.path.exists(xml_path)):
                os.mkdir(xml_path)
            val_num+=1
            filePath=os.path.join(xmlfilepath,name)
            newfile=os.path.join(saveBasePath,os.path.join(directory,name))
            shutil.copyfile(filePath, newfile)
            # print(name)
    else:  #test set
        # ftest.write(name)
        # print("test")
        # print("test: "+name+" "+str(test_num))
        directory="test"
        xml_path = os.path.join(os.getcwd(), 'annotations/{}'.format(directory))
        if(not os.path.exists(xml_path)):
            os.mkdir(xml_path)
        test_num+=1
        filePath=os.path.join(xmlfilepath,name)
        newfile=os.path.join(saveBasePath,os.path.join(directory,name))
        shutil.copyfile(filePath, newfile)
            # print(name)

# End time
end = time.time()
seconds=end-start
print("train total : "+str(train_num))
print("validation total : "+str(val_num))
print("test total : "+str(test_num))
total_num=train_num+val_num+test_num
print("total number : "+str(total_num))
print( "Time taken : {0} seconds".format(seconds))
- 在工程文件夹下新建data文件夹和xml_to_csv.py,将xml转换成csv文件,代码如下,运行后出现Successfully converted xml to csv即表示转换成功:
import os
import glob
import pandas as pd
import xml.etree.ElementTree as ET


def xml_to_csv(path):
    xml_list = []
    for xml_file in glob.glob(path + '/*.xml'):
        tree = ET.parse(xml_file)
        root = tree.getroot()
        # print(root)
        print(root.find('filename').text)
        for member in root.findall('object'):
            value = (root.find('filename').text,
                     int(root.find('size')[0].text),   #width
                     int(root.find('size')[1].text),   #height
                     member[0].text,
                     int(member[4][0].text),
                     int(float(member[4][1].text)),
                     int(member[4][2].text),
                     int(member[4][3].text)
                     )
            xml_list.append(value)
    column_name = ['filename', 'width', 'height', 'class', 'xmin', 'ymin', 'xmax', 'ymax']
    xml_df = pd.DataFrame(xml_list, columns=column_name)
    return xml_df


def main():
    for directory in ['train','test','validation']:
        xml_path = os.path.join(os.getcwd(), 'annotations/{}'.format(directory))
    # image_path = os.path.join(os.getcwd(), 'merged_xml')
        xml_df = xml_to_csv(xml_path)
        # xml_df.to_csv('whsyxt.csv', index=None)
        xml_df.to_csv('data/whsyxt_{}_labels.csv'.format(directory), index=None)
        print('Successfully converted xml to csv.')


main()

- 在工程 文件夹下新建generate_tfrecord.py,用于生成tfrecords文件,代码如下,其中的类别换为自己数据集的类别。
from __future__ import division
from __future__ import print_function
from __future__ import absolute_import

import os
import io
import pandas as pd
import tensorflow as tf

from PIL import Image
from object_detection.utils import dataset_util
from collections import namedtuple, OrderedDict

flags = tf.app.flags
flags.DEFINE_string('csv_input', '', 'Path to the CSV input')
flags.DEFINE_string('output_path', '', 'Path to output TFRecord')
FLAGS = flags.FLAGS


# TO-DO replace this with label map
def class_text_to_int(row_label, filename):
    if row_label == 'aeroplane':
        return 1
    elif row_label == 'bicycle':
        return 2
    elif row_label == 'bird':
        return 3
    elif row_label == 'boat':
        return 4
    elif row_label == 'bottle':
        return 5
    elif row_label == 'bus':
        return 6
    elif row_label == 'car':
        return 7
    elif row_label == 'cat':
        return 8
    elif row_label == 'chair':
        return 9
    elif row_label == 'cow':
        return 10
    elif row_label == 'diningtable':
        return 11
    elif row_label == 'dog':
        return 12
    elif row_label == 'horse':
        return 13
    elif row_label == 'motorbike':
        return 14
    elif row_label == 'person':
        return 15
    elif row_label == 'pottedplant':
        return 16
    elif row_label == 'sheep':
        return 17
    elif row_label == 'sofa':
        return 18
    elif row_label == 'train':
        return 19
    elif row_label == 'tvmonitor':
        return 20
    else:
        print("------------------nonetype:", filename)
        None


def split(df, group):
    data = namedtuple('data', ['filename', 'object'])
    gb = df.groupby(group)
    return [data(filename, gb.get_group(x)) for filename, x in zip(gb.groups.keys(), gb.groups)]


def create_tf_example(group, path):
    with tf.gfile.GFile(os.path.join(path, '{}'.format(group.filename)), 'rb') as fid:
        encoded_jpg = fid.read()
    encoded_jpg_io = io.BytesIO(encoded_jpg)
    image = Image.open(encoded_jpg_io)
    width, height = image.size

    filename = group.filename.encode('utf8')
    image_format = b'png'
    xmins = []
    xmaxs = []
    ymins = []
    ymaxs = []
    classes_text = []
    classes = []

    for index, row in group.object.iterrows():
        xmins.append(row['xmin'] / width)
        xmaxs.append(row['xmax'] / width)
        ymins.append(row['ymin'] / height)
        ymaxs.append(row['ymax'] / height)
        classes_text.append(row['class'].encode('utf8'))
        classes.append(class_text_to_int(row['class'], group.filename))

    tf_example = tf.train.Example(features=tf.train.Features(feature={
        'image/height': dataset_util.int64_feature(height),
        'image/width': dataset_util.int64_feature(width),
        'image/filename': dataset_util.bytes_feature(filename),
        'image/source_id': dataset_util.bytes_feature(filename),
        'image/encoded': dataset_util.bytes_feature(encoded_jpg),
        'image/format': dataset_util.bytes_feature(image_format),
        'image/object/bbox/xmin': dataset_util.float_list_feature(xmins),
        'image/object/bbox/xmax': dataset_util.float_list_feature(xmaxs),
        'image/object/bbox/ymin': dataset_util.float_list_feature(ymins),
        'image/object/bbox/ymax': dataset_util.float_list_feature(ymaxs),
        'image/object/class/text': dataset_util.bytes_list_feature(classes_text),
        'image/object/class/label': dataset_util.int64_list_feature(classes),
    }))
    return tf_example


def main(_):
    writer = tf.python_io.TFRecordWriter(FLAGS.output_path)
    path = os.path.join(os.getcwd(), 'images')
    examples = pd.read_csv(FLAGS.csv_input)
    grouped = split(examples, 'filename')
    num = 0
    for group in grouped:
        num += 1
        tf_example = create_tf_example(group, path)
        writer.write(tf_example.SerializeToString())
        if (num % 100 == 0):  # 每完成100个转换,打印一次
            print(num)

    writer.close()
    output_path = os.path.join(os.getcwd(), FLAGS.output_path)
    print('Successfully created the TFRecords: {}'.format(output_path))


if __name__ == '__main__':
    tf.app.run()
执行下面代码实现的调用generate_tfrecord.py。
python generate_tfrecord.py --csv_input=data/whsyxt_train_labels.csv --output_path=data/whsyxt_train.tfrecord
同样对验证集和测试集同样进行转换。
python generate_tfrecord.py --csv_input=data/whsyxt_validation_labels.csv --output_path=data/whsyxt_validation.tfrecord
python generate_tfrecord.py --csv_input=data/whsyxt_test_labels.csv --output_path=data/whsyxt_test.tfrecord
转换完毕后如下图所示,至此数据准备完毕。

3.训练模型
- 将models\research\object_detection\data文件夹下的pascal_label_map.pbtxt复制到data文件夹下,对其进行修改,其中name对应标注的名称。

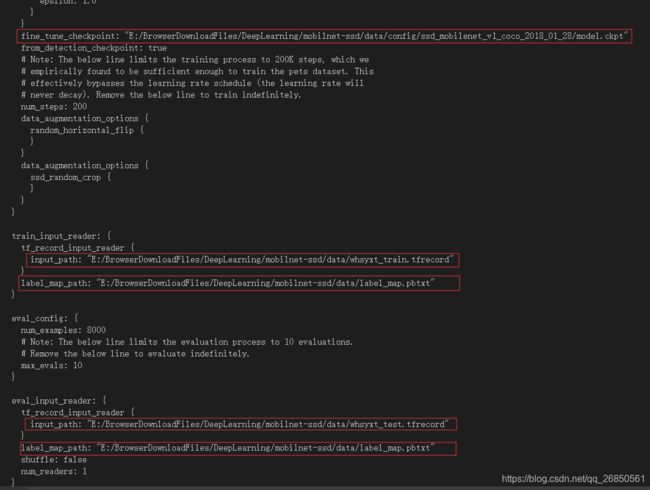
- 在data文件夹下新建config文件夹,将下载好的ssd_mobilenet_v1_coco模型放到其中并解压。复制models/research/object_detection/samples/configs 下的ssd_mobilenet_v1_coco.config 到data/config/下,重命名为并做如下修改,首先修改类别数,然后下拉到config文件尾部,将其中框内部分改为自己的路径:
num_classes: 90 --改为自己类数
3. 工程目录下新建model文件夹,model文件夹中新建train文件夹。然后cd到Tensorflow的 models/research/object_detection文件夹下,执行下面的命令进行训练。
python model_main.py --model_dir=工程目录/model/train/
--pipeline_config_path=工程目录/data/config/ssd_mobilenet_v1.config
若提示 No module named ‘pycocotools’,则执行。
pip install git+https://github.com/philferriere/cocoapi.git#subdirectory=PythonAPI
至此模型训练过程结束。
4.模型调用
- 训练过程中将在data/train目录下生成很多model.ckpt-*的文件,如下图。

- opencv无法读取ckpt格式的模型,因此将ckpt格式冻结为pb模式,cd到models/research/object_detection文件夹下,执行下面命令,生成frozen_inference_graph.pb文件。
python export_inference_graph.py --pipeline_config_path=工程目录/data/config/ssd_mobilenet_v1_coco.config --trained_checkpoint_prefix 工程目录/model/train/model.ckpt-100 --output_directory 工程目录/model/
- 调用的pb文件要和pbtxt对应起来,不然会报错,opencv_extra提供了一些已经做好的.pbtxt文件,下载链接如下。
opencv_extra. - 若调用报错,可以自己生成pbtxt文件,需要pb文件和对应的config文件,找到opencv/sources/samples/dnn文件夹下,执行下面命令,生成对应的pbtxt文件。
python tf_text_graph_ssd.py --input /home/zhangxinyao/DeepLearning/mobilnet-ssd/data/model/frozen_inference_graph.pb --config 工程文件夹/data/config/ssd_mobilenet_v1.config --output 工程文件夹/data/model/ssd-v1.pbtxt
直接转换可能会报错,先使用下面的代码对frozen_inference_graph.pb文件进行转换,再生成pbtxt文件。
import tensorflow as tf
from tensorflow.tools.graph_transforms import TransformGraph

with tf.gfile.FastGFile('工程文件夹/model/frozen_inference_graph.pb', 'rb') as f:
    graph_def = tf.GraphDef()
    graph_def.ParseFromString(f.read())
    graph_def = TransformGraph(graph_def, ['image_tensor'], ['detection_boxes', 'detection_classes', 'detection_scores', 'num_detections'], ['sort_by_execution_order'])
    with tf.gfile.FastGFile('工程文件夹/model/frozen_inference_graph_new.pb', 'wb') as f:
        f.write(graph_def.SerializeToString())
此时pb文件和pbtxt文件都有了,可以进行调用了。
- ssd检测图片
#include
#include
#include
using namespace std;
using namespace cv;
const size_t inWidth = 300;
const size_t inHeight = 300;
const float WHRatio = inWidth / (float)inHeight;
const char* classNames[] = { "background",
"aeroplane", "bicycle", "bird", "boat",
"bottle", "bus", "car", "cat", "chair",
"cow", "diningtable", "dog", "horse",
"motorbike", "person", "pottedplant",
"sheep", "sofa", "train", "tvmonitor" };//这个需要根据训练的类别定义
int main() {
	Mat frame = cv::imread("000002.jpg");
	Size frame_size = frame.size();
	String weights = "myssd/frozen_inference_graph.pb";
	String prototxt = "myssd/ssd-v1.pbtxt";
	dnn::Net net = cv::dnn::readNetFromTensorflow(weights, prototxt);
	Size cropSize;
	if (frame_size.width / (float)frame_size.height > WHRatio)
	{
		cropSize = Size(static_cast(frame_size.height * WHRatio),
			frame_size.height);
	}
	else
	{
		cropSize = Size(frame_size.width,
			static_cast(frame_size.width / WHRatio));
	}
	Rect crop(Point((frame_size.width - cropSize.width) / 2,
		(frame_size.height - cropSize.height) / 2),
		cropSize);
	cv::Mat blob = cv::dnn::blobFromImage(frame, 1. / 255, Size(300, 300));
	//cout << "blob size: " << blob.size << endl;
	net.setInput(blob);
	Mat output = net.forward();
	//cout << "output size: " << output.size << endl;
	Mat detectionMat(output.size[2], output.size[3], CV_32F, output.ptr());
	frame = frame(crop);
	float confidenceThreshold = 0.7;
	for (int i = 0; i < detectionMat.rows; i++)
	{
		float confidence = detectionMat.at(i, 2);
		if (confidence > confidenceThreshold)
		{
			size_t objectClass = (size_t)(detectionMat.at(i, 1));
			int xLeftBottom = static_cast(detectionMat.at(i, 3) * frame.cols);
			int yLeftBottom = static_cast(detectionMat.at(i, 4) * frame.rows);
			int xRightTop = static_cast(detectionMat.at(i, 5) * frame.cols);
			int yRightTop = static_cast(detectionMat.at(i, 6) * frame.rows);
			ostringstream ss;
			ss << confidence;
			String conf(ss.str());
			Rect object((int)xLeftBottom, (int)yLeftBottom,
				(int)(xRightTop - xLeftBottom),
				(int)(yRightTop - yLeftBottom));
			rectangle(frame, object, Scalar(0, 0, 255), 2);
			String label = String(classNames[objectClass]) + ": " + conf;
			int baseLine = 0;

			Size labelSize = getTextSize(label, FONT_HERSHEY_SIMPLEX, 0.5, 1, &baseLine);

			rectangle(frame, Rect(Point(xLeftBottom, yLeftBottom - labelSize.height),

				Size(labelSize.width, labelSize.height + baseLine)),

				Scalar(0, 255, 255), CV_FILLED);

			putText(frame, label, Point(xLeftBottom, yLeftBottom),

				FONT_HERSHEY_SIMPLEX, 0.5, Scalar(0, 0, 0));

		}

	}

	imshow("image", frame);

	waitKey(0);

	return 0;

}
- ssd调用摄像头检测
#include
#include
#include
#include 参考文章
Tensorflow训练自己的SSD目标检测器.
训练自己的数据–基于ssd_mobilenet模型实现目标检测.
[TensorFlow]基于ssd_mobilenet模型实现目标检测.