LSTM ——作业
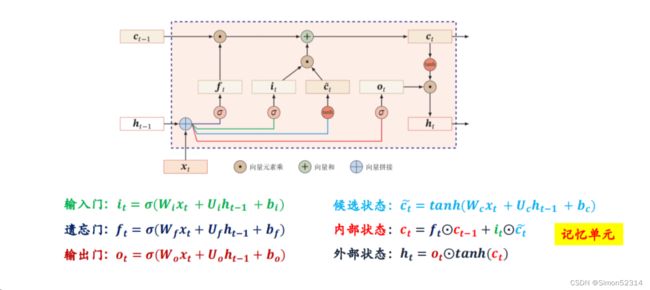
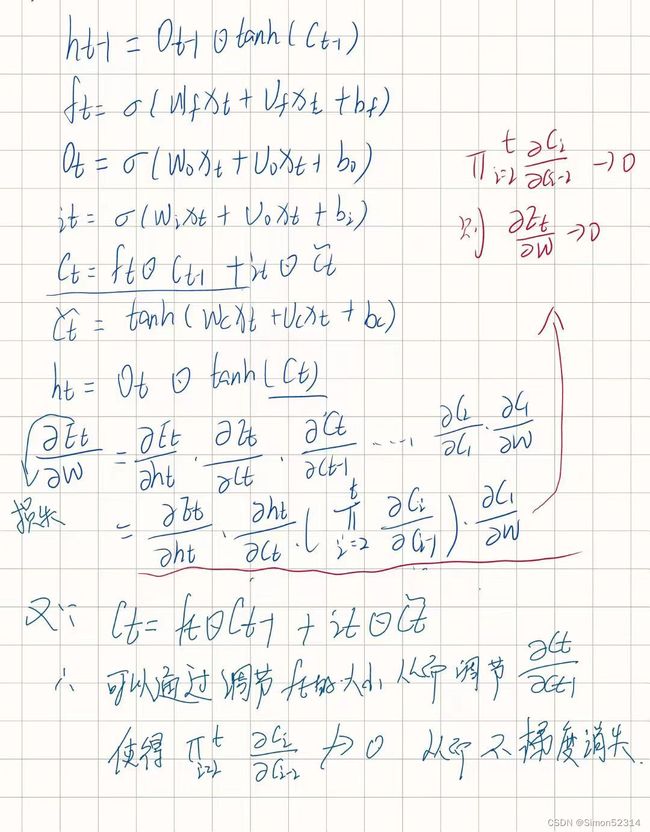
习题6-4 推导LSTM网络中参数的梯度, 并分析其避免梯度消失的效果
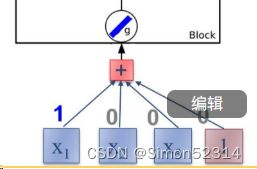
习题6-3P 编程实现下图LSTM运行过程
1. 使用Numpy实现LSTM算子
import numpy as np
# 创建一个numpy数组x,它是一个4x4的矩阵,包含9个元素
x = np.array([[1, 0, 0, 1],
              [3, 1, 0, 1],
              [2, 0, 0, 1],
              [4, 1, 0, 1],
              [2, 0, 0, 1],
              [1, 0, 1, 1],
              [3, -1, 0, 1],
              [6, 1, 0, 1],
              [1, 0, 1, 1]])

# 创建i_w数组,它是一个权重向量,用于计算输入门
i_w = np.array([0, 100, 0, -10])

# 创建o_w数组,它是一个权重向量,用于计算输出门
o_w = np.array([0, 0, 100, -10])

# 创建f_w数组,它是一个权重向量,用于计算忘记门
f_w = np.array([0, 100, 0, 10])

# 创建c_w数组,它是一个权重向量,用于计算候选细胞状态
c_w = np.array([1, 0, 0, 0])


# 定义sigmoid函数,它是一个激活函数,用于将输入映射到[0, 1]范围内
def sigmoid(x):
    y = 1 / (1 + np.exp(-x))
    if y >= 0.5:
        return 1
    else:
        return 0

    # 初始化变量temp为0,它是用来存储临时结果的
temp = 0

# 初始化空列表y和c,分别用来存储每个时间步的输出和细胞状态
y = []
c = []
# 对于x中的每个元素i进行循环处理
for i in x:
    c.append(temp)  # 将当前细胞状态添加到列表c中
    temp_c = np.sum(np.multiply(i, c_w))  # 计算候选细胞状态,它是通过将输入i与权重向量c_w相乘然后求和得到的
    temp_i = sigmoid(np.sum(np.multiply(i, i_w)))  # 计算输入门,它是通过将输入i与权重向量i_w相乘然后求和,然后应用sigmoid函数得到的
    temp_f = sigmoid(np.sum(np.multiply(i, f_w)))  # 计算忘记门,它是通过将输入i与权重向量f_w相乘然后求和,然后应用sigmoid函数得到的
    temp_o = sigmoid(np.sum(np.multiply(i, o_w)))  # 计算输出门,它是通过将输入i与权重向量o_w相乘然后求和,然后应用sigmoid函数得到的
    temp = temp_c * temp_i + temp_f * temp  # 更新细胞状态,它是基于候选细胞状态、输入门和忘记门的计算结果得到的
    y.append(temp_o * temp)  # 计算LSTM的输出,它是基于输出门和新的细胞状态的乘积得到的,并将结果添加到列表y中

# 打印细胞状态列表c和输出列表y
print("memory", c)
print("y     ", y)
这段代码参考了同学的代码,在这段代码中,我自己跟着敲了一遍,但是结果不对
经过自己勘察发现是激活函数那块代码写错了
然后此外发现
def tanh(x):
   return np.tanh(x)
并且 修改了一丢丢
temp = tanh(temp_c )* temp_i + temp_f * tempy.append(temp_o *np.tanh(temp))结果是这样的
再修改代码
# 打印细胞状态列表c和输出列表y
print("memory", [round(cell) for cell in c])
print("y     ", [round(output) for output in y])
2. 使用nn.LSTMCell实现
import torch
import torch.nn as nn

x = torch.tensor([[1, 0, 0, 1],
                  [3, 1, 0, 1],
                  [2, 0, 0, 1],
                  [4, 1, 0, 1],
                  [2, 0, 0, 1],
                  [1, 0, 1, 1],
                  [3, -1, 0, 1],
                  [6, 1, 0, 1],
                  [1, 0, 1, 1]], dtype=torch.float)
# 在x的第二个维度上增加一个维度,这通常用于处理批次中的单个样本
x = x.unsqueeze(1)

# 设置输入和隐藏状态的尺寸
i_size = 4
h_size = 1

# 创建一个LSTMCell,这是一个基本的LSTM单元,用于处理时间序列数据
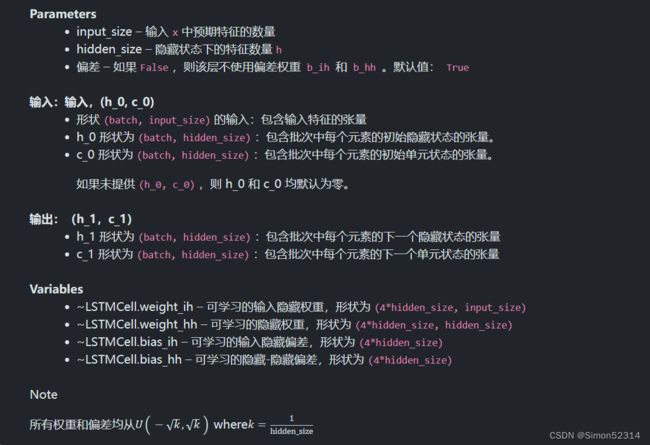
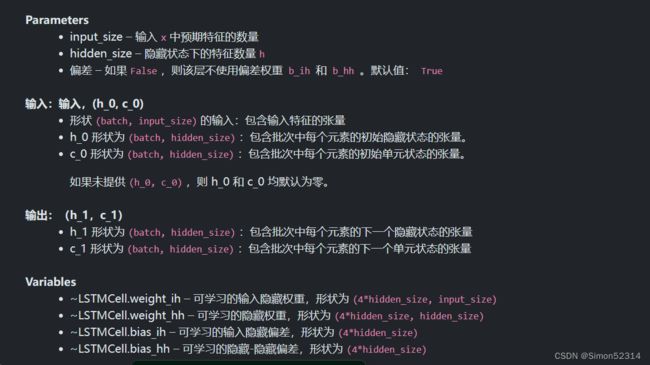
lstm_cell = nn.LSTMCell(input_size=i_size, hidden_size=h_size, bias=False)

# 为LSTM单元设置权重。这里的权重是硬编码的,通常这些权重是从训练过程中学习得到的。
lstm_cell.weight_ih.data = torch.tensor([[0, 100, 0, 10],
                                         [0, 100, 0, -10],
                                         [1, 0, 0, 0],
                                         [0, 0, 100, -10]]).float()
# 设置隐层到隐层的权重,初始为零
lstm_cell.weight_hh.data = torch.zeros([4 * h_size, h_size])

# 初始化隐层和细胞状态为零张量
hx = torch.zeros(1, h_size)
cx = torch.zeros(1, h_size)

# 用于存储每个时间步的输出
outputs = []

# 在x的每个元素上运行LSTM单元
for i in range(len(x)):
    # 使用LSTM单元处理输入和当前状态,返回下一个隐层状态和细胞状态
    hx, cx = lstm_cell(x[i], (hx, cx))
    # 将输出添加到outputs列表中
    outputs.append(hx.detach().numpy()[0][0])

# 将outputs列表中的每个元素四舍五入到最近的整数,并存储到新的列表中
outputs_rounded = [round(x) for x in outputs]

# 打印四舍五入后的输出列表
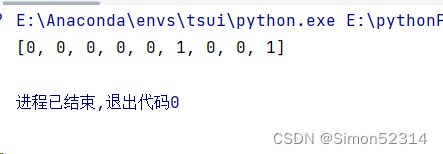
print(outputs_rounded)
结果一致,所以答案正确。
3. 使用nn.LSTM实现
import torch
import torch.nn as nn

x = torch.tensor([[1, 0, 0, 1],
                  [3, 1, 0, 1],
                  [2, 0, 0, 1],
                  [4, 1, 0, 1],
                  [2, 0, 0, 1],
                  [1, 0, 1, 1],
                  [3, -1, 0, 1],
                  [6, 1, 0, 1],
                  [1, 0, 1, 1]], dtype=torch.float)
# 在x的第二个维度上增加一个维度,这通常用于处理批次中的单个样本
x = x.unsqueeze(1)

# 设置输入和隐藏状态的尺寸
i_size = 4
h_size = 1

# 创建一个LSTMCell,这是一个基本的LSTM单元,用于处理时间序列数据
lstm= nn.LSTM(input_size=i_size, hidden_size=h_size, bias=False)

# 为LSTM单元设置权重。这里的权重是硬编码的,通常这些权重是从训练过程中学习得到的。

# 设置 LSTM 的权重矩阵
lstm.weight_ih_l0.data = torch.tensor([[0, 100, 0, 10],
                                        [0, 100, 0, -10],
                                        [1, 0, 0, 0],
                                        [0, 0, 100, -10]]).float()
# 设置隐层到隐层的权重,初始为零
lstm.weight_hh_l0.data = torch.zeros([4 * h_size, h_size])
# 初始化隐层和细胞状态为零张量
hx = torch.zeros(1,1, h_size)
cx = torch.zeros(1,1, h_size)
# 前向传播
outputs, (hx, cx) = lstm(x, (hx, cx))
outputs = outputs.squeeze().tolist()
# 将outputs列表中的每个元素四舍五入到最近的整数,并存储到新的列表中
outputs_rounded = [round(x) for x in outputs]
# 打印四舍五入后的输出列表
print(outputs_rounded)
总结:
1、推导还是那样先把流程中用到的所有式子写出来,然后倒着找相关的往后推导
2、代码看的熬夜患者的,跟着打了一遍,其实第二个第三个很相似,3使用了封装的nn.LSTM来定义和计算LSTM模型的前向传播,而2代码使用nn.LSTMCell来手动计算LSTM的前向传播。
参考链接:
PyTorch - torch.nn.LSTMCell (runebook.dev)
DL Homework 11-CSDN博客
【23-24 秋学期】NNDL 作业11 LSTM-CSDN博客
