Vue.js 3.0 学习笔记(十一)Vue Router路由
一、使用Vue Router
1、HTML页面使用路由
<!DOCTYPE html>
<html>
<head>
    <meta charset="UTF-8">
    <title>在HTML页面中使用路由</title>
</head>
<body>
<style>
        #app{
            text-align: center;
        }
        .container {
            background-color: #73ffd6;
            margin-top: 20px;
            height: 100px;
        }
    </style>
<div id="app">
    <router-link to="/home">首页</router-link>
    <router-link to="/list"  custom v-slot="{navigate}">
               <button @click="navigate" @keypress.enter="navigate"> 古诗欣赏</button></router-link>
    <router-link to="/about" >联系我们</router-link>
    <div  class="container">
        <router-view ></router-view>
    </div>
</div>
<!--引入vue文件-->
<script src="https://unpkg.com/vue@next"></script>
<!--引入Vue Router-->
<script src="https://unpkg.com/vue-router@next"></script>
<script>
    const home={template:'主页内容'};
    const list={template:'我不践斯境,岁月好已积。晨夕看山川,事事悉如昔。'};
    const about={template:'需要技术支持请联系作者微信codehome6'};
    const routes=[
        {path:'/home',component:home},
        {path:'/list',component:list},
        {path:'/about',component:about},
    ];
    const router= VueRouter.createRouter({
        //提供要实现的history实现。为了方便起见,这里使用hash history
        history:VueRouter.createWebHashHistory(),
        routes//简写,相当于routes:routes
    });
    const vm= Vue.createApp({});
    //使用路由器实例,从而让整个应用都有路由功能
    vm.use(router);
    vm.mount('#app');
</script>
</body>
</html>
2、嵌套路由
<!DOCTYPE html>
<html>
<head>
    <meta charset="UTF-8">
    <title>嵌套路由</title>
<style>
        #app{
            text-align: center;
        }
        .container {
            background-color: #73ffd6;
            margin-top: 20px;
            height: 100px;
        }
    </style>
</head>
<body>
<div id="app">
    <!-- 通过 router-link 标签来生成导航链接 -->
    <router-link to="/home">首页</router-link>
    <router-link to="/list"  custom v-slot="{navigate}">
               <button @click="navigate" @keypress.enter="navigate"> 古诗欣赏</button></router-link>
    <router-link to="/about">关于我们</router-link>
    <div class="container">
        <!-- 将选中的路由渲染到 router-view 下-->
        <router-view></router-view>
    </div>
</div>
<template id="tmpl">
    <div>
        <h3>列表内容</h3>
        <!-- 生成嵌套子路由地址 -->
        <router-link to="/list/poetry1">古诗1</router-link>
        <router-link to="/list/poetry2">古诗2</router-link>
        <div class="sty">
            <!-- 生成嵌套子路由渲染节点 -->
            <router-view></router-view>
        </div>
    </div>
</template>
<!--引入vue文件-->
<script src="https://unpkg.com/vue@next"></script>
<!--引入Vue Router-->
<script src="https://unpkg.com/vue-router@next"></script>
<script>
    const home={template:'主页内容'};
    const list={template:'#tmpl'};
    const about={template:'需要技术支持请联系作者微信codehome6'};
    const poetry1 = {
        template: ' 红颜弃轩冕,白首卧松云。'
    };
    const poetry2 = {
        template: '为问门前客,今朝几个来。'
    };
    // 2.定义路由信息
    const routes = [
        // 路由重定向:当路径为/时,重定向到/list路径
        {
            path: '/',
            redirect: '/list'
        },
        {
            path: '/home',
            component: home,
        },
        {
            path: '/list',
            component: list,
            //嵌套路由
            children: [
                {
                    path: 'poetry1',
                    component: poetry1
                },
                {
                    path: 'poetry2',
                    component: poetry2
                },
            ]
        },
        {
            path: '/about',
            component:about,
        }
    ];
    const router= VueRouter.createRouter({
        //提供要实现的history实现。为了方便起见,这里使用hash history
        history:VueRouter.createWebHashHistory(),
        routes  //简写,相当于routes:routes
    });
    const vm= Vue.createApp({});
    //使用路由器实例,从而让整个应用都有路由功能
    vm.use(router);
    vm.mount('#app');
</script>
</body>
</html>
二、命名路由
<!DOCTYPE html>
<html>
<head>
    <meta charset="UTF-8">
    <title>命名路由</title>
</head>
<body>
<style>
        #app{
            text-align: center;
        }
        .container {
            background-color: #73ffd6;
            margin-top: 20px;
            height: 100px;
        }
    </style>
<div id="app">
    <router-link :to="{name:'router1'}">首页</router-link>
    <router-link to="/list"  custom v-slot="{navigate}">
               <button @click="navigate" @keypress.enter="navigate"> 古诗欣赏</button></router-link>

    <router-link :to="{name:'router3'}" >联系我们</router-link>
    <!—路由匹配到的组件将在这里渲染 -->
    <div  class="container">
        <router-view ></router-view>
    </div>
</div>
<!--引入vue文件-->
<script src="https://unpkg.com/vue@next"></script>
<!--引入Vue Router-->
<script src="https://unpkg.com/vue-router@next"></script>
<script>
    //定义路由组件
    const home={template:'home组件的内容'};
    const list={template:'红颜弃轩冕,白首卧松云。'};
    const details={template:'需要技术支持请联系作者微信codehome6'};
    const routes=[
        {path:'/home',component:home,name: 'router1',},
        {path:'/list',component:list,name: 'router2',},
        {path:'/details',component:details,name: 'router3',},
    ];
    const router= VueRouter.createRouter({
        //提供要实现的history实现。为了方便起见,这里使用hash history
        history:VueRouter.createWebHashHistory(),
        routes//简写,相当于routes:routes
    });
    const vm= Vue.createApp({});
    //使用路由器实例,从而让整个应用都有路由功能
    vm.use(router);
    vm.mount('#app');
</script>
</body>
</html>
还可以使用params属性设置参数
或者router.push()
三、命名视图
<!DOCTYPE html>
<html>
<head>
    <meta charset="UTF-8">
    <title>命名路由</title>
</head>
<body>
<style>
        .style1{
            height: 20vh;
            background: #0BB20C;
            color: white;
        }
        .style2{
            background: #9e8158;
            float: left;
            width: 30%;
            height: 70vh;
            color: white;
        }
        .style3{
            background: #2d309e;
            float: left;
            width: 70%;
            height: 70vh;
            color: white;
        }
    </style>
<div id="app">
    <div class="style1">
        <router-view></router-view>
    </div>
    <div class="container">
        <div class="style2">
            <router-view name="sidebar"></router-view>
        </div>
        <div class="style3">
            <router-view name="main"></router-view>
        </div>
    </div>
</div>
<template id="sidebar">
    <div class="sidebar">
        侧边栏导航内容
    </div>
</template>
<!--引入vue文件-->
<script src="https://unpkg.com/vue@next"></script>
<!--引入Vue Router-->
<script src="https://unpkg.com/vue-router@next"></script>
<script>
    // 1.定义路由跳转的组件模板
    const header = {
        template: ' 头部内容 '
    }
    const sidebar = {
        template: '#sidebar'
    }
    const main = {
        template: '正文部分'
    }
    // 2.定义路由信息
    const routes = [{
        //不能分开定义path为'/'
        path: '/',
        components: {
            default: header,
            sidebar: sidebar,
            main: main
        }
    }];
    const router= VueRouter.createRouter({
        //提供要实现的history实现。为了方便起见,这里使用hash history
        history:VueRouter.createWebHashHistory(),
        routes   //简写,相当于routes:routes
    });
    const vm= Vue.createApp({});
    //使用路由器实例,从而让整个应用都有路由功能
    vm.use(router);
    vm.mount('#app');
</script>
</body>
</html>

四、路由传参
param传参
<!DOCTYPE html>
<html>
<head>
    <meta charset="UTF-8">
    <title>param传参</title>
</head>
<body>
<style>
        .style1{
            background: #0BB20C;
            color: white;
            padding: 15px;
            margin: 15px 0;
        }
        .main{
            padding: 10px;
        }
    </style>
<body>
<div id="app">
    <div>
        <div class="style1">
            <router-view></router-view>
        </div>
    </div>
    <div class="main">
        <router-view name="main"></router-view>
    </div>
</div>
<template id="sidebar">
    <div>
        <ul>
            <router-link v-for="(item,index) in menu" :key="index" :to="item.url" tag="li">{{item.name}}
            </router-link>
        </ul>
    </div>
</template>

<template id="main">
    <div>
        <router-view></router-view>
    </div>
</template>
<template id="form">
    <div>
        <form>
            <div>
                <label for="exampleInputEmail1">邮箱</label>
                <input type="email" id="exampleInputEmail1" placeholder="输入电子邮件" v-model="email">
            </div>
            <div>
                <label for="exampleInputPassword1">密码</label>
                <input type="password" id="exampleInputPassword1" placeholder="输入密码" v-model="password">
            </div>
            <button type="submit" @click="submit">提交</button>
        </form>
    </div>
</template>
<template id="info">
    <div>
        <div>
            输入的信息
        </div>
        <div>
            <blockquote>
                <p>邮箱:{{ $route.params.email }} </p>
                <p>密码:{{ $route.params.password }}</p>
            </blockquote>
        </div>
    </div>
</template>
<!--引入vue文件-->
<script src="https://unpkg.com/vue@next"></script>
<!--引入Vue Router-->
<script src="https://unpkg.com/vue-router@next"></script>
<script>
    // 1.定义路由跳转的组件模板
    const header = {
        template: '头部'
    }
    const sidebar = {
        template: '#sidebar',
        data:function() {
            return {
                menu: [{
                    displayName: 'Form',
                    routeName: 'form'
                }, {
                    displayName: 'Info',
                    routeName: 'info'
                }]
            }
        },
    }
    const main = {
        template: '#main'
    }
    const form = {
        template: '#form',
        data:function() {
            return {
                email: '',
                password: ''
            }
        },
        methods: {
            submit:function() {
                // 方式1
                this.$router.push({
                    name: 'info',
                    params: {
                        email: this.email,
                        password: this.password
                    }
                })
            }
        },
    }
    const info = {
        template: '#info'
    }
    // 2.定义路由信息
    const routes = [{
        path: '/',
        components: {
            default: header,
            sidebar: sidebar,
            main: main
        },
        children: [{
            path: '',
            redirect: 'form'
        }, {
            path: 'form',
            name: 'form',
            component: form
        }, {
            path: 'info/:email/:password',
            name: 'info',
            component: info
        }]
    }];
    const router= VueRouter.createRouter({
        //提供要实现的history实现。为了方便起见,这里使用hash history
        history:VueRouter.createWebHashHistory(),
        routes   //简写,相当于routes:routes
    });
    const vm= Vue.createApp({
        data(){
           return{
           }
        },
        methods:{},
    });
    //使用路由器实例,从而让整个应用都有路由功能
    vm.use(router);
    vm.mount('#app');
</script>
</body>
</html>
五、编程式导航
- push方法:添加history记录
- go方法:前进或后退多少步
- replace方法:不会向history添加记录,而是替换当前记录
<!DOCTYPE html>
<html>
<head>
<meta charset="UTF-8">
<title>实现路由间的切换</title>
</head>
<body>
<style>
.style1{
background: #0BB20C;
color: white;
height: 100px;
}
</style>
<body>
<div id="app">
<div class="main">
<div >
<button @click="next">前进</button>
<button @click="goFirst">第1页</button>
<button @click="goSecond">第2页</button>
<button @click="goThird">第3页</button>
<button @click="goFourth">第4页</button>
<button @click="pre">后退</button>
<button @click="replace">替换当前页为特殊页</button>
</div>
<div class="style1">
<router-view></router-view>
</div>
</div>
</div>
<!--引入vue文件-->
<script src="https://unpkg.com/vue@next"></script>
<!--引入Vue Router-->
<script src="https://unpkg.com/vue-router@next"></script>
<script>
const first = {
template: '花时同醉破春愁,醉折花枝作酒筹。
'
};;
const second = {
template: '忽忆故人天际去,计程今日到梁州。
'
};
const third = {
template: '圭峰霁色新,送此草堂人。
'
};
const fourth = {
template: '终有烟霞约,天台作近邻。
'
};
const special = {
template: '特殊页面的内容
'
};
// 2.定义路由信息
const routes = [
{
path: '/first',
component: first
},
{
path: '/second',
component: second
},
{
path: '/third',
component: third
},
{
path: '/fourth',
component: fourth
},
{
path: '/special',
component: special
}
];
const router= VueRouter.createRouter({
//提供要实现的history实现。为了方便起见,这里使用hash history
history:VueRouter.createWebHashHistory(),
routes //简写,相当于routes:routes
});
const vm= Vue.createApp({
data(){
return{
}
},
methods: {
goFirst:function() {
this.$router.push({
path: '/first'
})
},
goSecond:function() {
this.$router.push({
path: '/second'
})
},
goThird:function() {
this.$router.push({
path: '/third'
})
},
goFourth:function() {
this.$router.push({
path: '/fourth'
})
},
next:function() {
this.$router.go(1)
},
pre:function() {
this.$router.go(-1)
},
replace:function() {
this.$router.replace({
path: '/special'
})
}
},
router: router
});
//使用路由器实例,从而让整个应用都有路由功能
vm.use(router);
vm.mount('#app');
</script>
</body>
</html>
六、组件与Vue Router间解耦
1、布尔模式
<!DOCTYPE html>
<html>
<head>
<meta charset="UTF-8">
<title>布尔模式</title>
</head>
<body>
<style>
.style1{
background: #0BB20C;
color: white;
}
</style>
<body>
<div id="app">
<div class="main">
<div >
<button @click="next">前进</button>
<button @click="goFirst">第1页</button>
<button @click="goSecond">第2页</button>
<button @click="goThird">第3页</button>
<button @click="goFourth">第4页</button>
<button @click="pre">后退</button>
<button @click="replace">替换当前页为特殊页</button>
</div>
<div class="style1">
<router-view></router-view>
</div>
</div>
</div>
<!--引入vue文件-->
<script src="https://unpkg.com/vue@next"></script>
<!--引入Vue Router-->
<script src="https://unpkg.com/vue-router@next"></script>
<script>
const first = {
template: '花时同醉破春愁,醉折花枝作酒筹。
'
};
const second = {
template: '忽忆故人天际去,计程今日到梁州。
'
};
const third = {
//注意这里
props: ['id'],
template: '圭峰霁色新,送此草堂人。---{{id}}
'
};
const fourth = {
template: '终有烟霞约,天台作近邻。
'
};
const special = {
template: '特殊页面的内容
'
};
// 2.定义路由信息
const routes = [
{
path: '/first',
component: first
},
{
path: '/second',
component: second
},
{
path: '/third/:id',
component: third,
//还有这里
props: true
},
{
path: '/fourth',
component: fourth
},
{
path: '/special',
component: special
}
];
const router= VueRouter.createRouter({
//提供要实现的history实现。为了方便起见,这里使用hash history
history:VueRouter.createWebHashHistory(),
routes //简写,相当于routes:routes
});
const vm= Vue.createApp({
data(){
return{
}
},
methods: {
goFirst:function() {
this.$router.push({
path: '/first'
})
},
goSecond:function() {
this.$router.push({
path: '/second'
})
},
goThird:function() {
this.$router.push({
path: '/third'
})
},
goFourth:function() {
this.$router.push({
path: '/fourth'
})
},
next:function() {
this.$router.go(1)
},
pre:function() {
this.$router.go(-1)
},
replace:function() {
this.$router.replace({
path: '/special'
})
}
},
router: router
});
//使用路由器实例,从而让整个应用都有路由功能
vm.use(router);
vm.mount('#app');
</script>
</body>
</html>
点击第三页,然后在URL路径后添加/abc即可完成跳转

而这次跳转并未建立对应的Vue Router,所以说实现了组件与Router的解耦
其本质其实就是该组件需要提供参数才可以跳转,然而Router中的path并未提供Router,所以不会通过Router进行跳转
2、对象模式
props中的值是静态的
<!DOCTYPE html>
<html>
<head>
<meta charset="UTF-8">
<title>对象模式</title>
</head>
<body>
<style>
.style1{
background: #0BB20C;
color: white;
}
</style>
<body>
<div id="app">
<div class="main">
<div >
<button @click="next">前进</button>
<button @click="goFirst">第1页</button>
<button @click="goSecond">第2页</button>
<button @click="goThird">第3页</button>
<button @click="goFourth">第4页</button>
<button @click="pre">后退</button>
<button @click="replace">替换当前页为特殊页</button>
</div>
<div class="style1">
<router-view></router-view>
</div>
</div>
</div>
<!--引入vue文件-->
<script src="https://unpkg.com/vue@next"></script>
<!--引入Vue Router-->
<script src="https://unpkg.com/vue-router@next"></script>
<script>
const first = {
template: '花时同醉破春愁,醉折花枝作酒筹。
'
};
const second = {
template: '忽忆故人天际去,计程今日到梁州。
'
};
const third = {
props: ['name'],
template: '圭峰霁色新,送此草堂人。---{{name}}
'
};
const fourth = {
template: '终有烟霞约,天台作近邻。
'
};
const special = {
template: '特殊页面的内容
'
};
// 2.定义路由信息
const routes = [
{
path: '/first',
component: first
},
{
path: '/second',
component: second
},
{
path: '/third/:name',
component: third,
props: {
name: 'gushi'
},
},
{
path: '/fourth',
component: fourth
},
{
path: '/special',
component: special
}
];
const router= VueRouter.createRouter({
//提供要实现的history实现。为了方便起见,这里使用hash history
history:VueRouter.createWebHashHistory(),
routes //简写,相当于routes:routes
});
const vm= Vue.createApp({
data(){
return{
}
},
methods: {
goFirst:function() {
this.$router.push({
path: '/first'
})
},
goSecond:function() {
this.$router.push({
path: '/second'
})
},
goThird:function() {
this.$router.push({
path: '/third'
})
},
goFourth:function() {
this.$router.push({
path: '/fourth'
})
},
next:function() {
this.$router.go(1)
},
pre:function() {
this.$router.go(-1)
},
replace:function() {
this.$router.replace({
path: '/special'
})
}
},
router: router
});
//使用路由器实例,从而让整个应用都有路由功能
vm.use(router);
vm.mount('#app');
</script>
</body>
</html>
不管传入的是什么参数,最终props获取到的值都是’gushi’
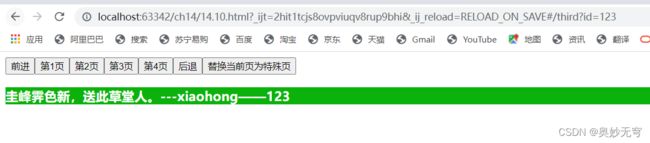
3、函数模式
<!DOCTYPE html>
<html>
<head>
<meta charset="UTF-8">
<title>函数模式</title>
</head>
<body>
<style>
.style1{
background: #0BB20C;
color: white;
}
</style>
<body>
<div id="app">
<div class="main">
<div >
<button @click="next">前进</button>
<button @click="goFirst">第1页</button>
<button @click="goSecond">第2页</button>
<button @click="goThird">第3页</button>
<button @click="goFourth">第4页</button>
<button @click="pre">后退</button>
<button @click="replace">替换当前页为特殊页</button>
</div>
<div class="style1">
<router-view></router-view>
</div>
</div>
</div>
<!--引入vue文件-->
<script src="https://unpkg.com/vue@next"></script>
<!--引入Vue Router-->
<script src="https://unpkg.com/vue-router@next"></script>
<script>
const first = {
template: '花时同醉破春愁,醉折花枝作酒筹。
'
};
const second = {
template: '忽忆故人天际去,计程今日到梁州。
'
};
const third = {
props: ['name',"id"],
template: '圭峰霁色新,送此草堂人。---{{name}}——{{id}}
'
};
const fourth = {
template: '终有烟霞约,天台作近邻。
'
};
const special = {
template: '特殊页面的内容
'
};
// 2.定义路由信息
const routes = [
{
path: '/first',
component: first
},
{
path: '/second',
component: second
},
{
path: '/third',
component: third,
props: (route)=>({
id:route.query.id,
name:"xiaohong"
})
},
{
path: '/fourth',
component: fourth
},
{
path: '/special',
component: special
}
];
const router= VueRouter.createRouter({
//提供要实现的history实现。为了方便起见,这里使用hash history
history:VueRouter.createWebHashHistory(),
routes //简写,相当于routes:routes
});
const vm= Vue.createApp({
data(){
return{
}
},
methods: {
goFirst:function() {
this.$router.push({
path: '/first'
})
},
goSecond:function() {
this.$router.push({
path: '/second'
})
},
goThird:function() {
this.$router.push({
path: '/third'
})
},
goFourth:function() {
this.$router.push({
path: '/fourth'
})
},
next:function() {
this.$router.go(1)
},
pre:function() {
this.$router.go(-1)
},
replace:function() {
this.$router.replace({
path: '/special'
})
}
},
router: router
});
//使用路由器实例,从而让整个应用都有路由功能
vm.use(router);
vm.mount('#app');
</script>
</body>
</html>
在URL路径中输入?id=123