7、多重纹理和纹理混合
Copyright © MikeFeng QQ: 76848502
多重纹理MultiTexture:使用多张纹理来渲染一个场景,只调用一次(DrawPrimitive)
纹理混合TextureBlending:按要求混合在同一个位置的像素点上色彩或透明度
在多重纹理(multitexturing)出现之前,DirectX支持的是多次渲染(multipass rendering)。但是因为OnFrameRender中要进行多次渲染(即Draw*的调用),效率很低。自从显卡开始支持多重纹理之后,游戏的性能得到了很大的提升:因为多重纹理只渲染一次,而在渲染之前通过调用SetTexture和SetTextureStageState函数来对不同的纹理进行混合,这个过程就叫做纹理混合(texture blending)。
多重纹理在pixel shader出现之前有着广泛的应用,主要可以用在以下方面:
① 黑暗映射:将两张纹理颜色相乘,模拟弱光照射
② 纹理和材质漫反射的混合:模拟强光照射
③ ①②效果累加:(光的颜色*墙壁纹理)*黑暗贴图
④ 发光映射:将两张纹理颜色相加
⑤ 细节映射
⑥ Alpha操作,分为材质alpha和贴图alpha操作
在执行多纹理操作之前必须对显卡能力进行检查,Caps中与纹理和alpha操作有关的是:
l
MaxSimultaneousTextures
多纹理最大支持数
l
DestBlendCaps alpha
混合
l
SrcBlendCaps
对于源色彩混合的支持
l
TextureOpCaps
对于各种纹理映射的支持
l
TextureAddressCaps
对于寻址模式的支持
Example 1
Multipass Rendering + Material Alpha Blending
D3DX系列函数中有些是内建生成mesh的,例如D3DXCreateTeapot,就可以生成一个茶壶的mesh。Mesh俗称网格,在D3D中就是很多顶点定义的集合。D3DXCreateTeapot就可以生成一个茶壶顶点的集合。在以后的章节中会详细讲到mesh。在这里这样使用mesh就行了:
IDirect3DDevice9
* m_device;
ID3DXMesh
* m_teapot
V_RETURN
( D3DXCreateTeapot( m_device, &m_teapot, NULL) );
m_teapot
->DrawSubset(NULL);
这个例子中调用了两次Draw*,分别画背景和茶壶。背景类是一张纹理,渲染过程和以前类似。茶壶类如下:
class
Teapot
{
public
:
Teapot
(IDirect3DDevice9* device);
HRESULT
OnResetDevice
();
VOID
OnLostDevice
();
VOID
Create
();
VOID
OnFrameRender
( D3DMATERIAL9* mtrl, IDirect3DTexture9* tex );
~
Teapot
();
private
:
D3DMATERIAL9
m_mtrl
;
IDirect3DDevice9
* m_device;
ID3DXMesh
* m_teapot;
};
Teapot
::Teapot(IDirect3DDevice9* device)
{
m_device
=
device
;
}
Teapot
::~Teapot()
{
}
inline
VOID
Teapot
::Create()
{
m_mtrl
.Ambient = D3DXCOLOR(1,0,0,0);
m_mtrl
.Diffuse = D3DXCOLOR(1,0,0,0.3f);
m_mtrl
.Specular = D3DXCOLOR(1,0,0,0);
m_mtrl
.Emissive = D3DXCOLOR(1,0,0,0);
m_mtrl
.Power = 1.0f;
}
inline
HRESULT
Teapot
::OnResetDevice()
{
HRESULT
hr
;
Create
();
V_RETURN
( D3DXCreateTeapot( m_device, &m_teapot, NULL) );
// Set alpha blending only for diffuse material
m_device
->SetTextureStageState(0, D3DTSS_ALPHAARG1, D3DTA_DIFFUSE);
// Set alpha operation
m_device->SetTextureStageState(0, D3DTSS_ALPHAOP, D3DTOP_SELECTARG1);
// Set alpha blend equation. This is transparent equation
m_device
->SetRenderState(D3DRS_SRCBLEND, D3DBLEND_SRCALPHA);
m_device
->SetRenderState(D3DRS_DESTBLEND, D3DBLEND_INVSRCALPHA);
return
S_OK
;
}
inline
VOID
Teapot
::OnLostDevice()
{
SAFE_RELEASE
( m_teapot );
}
inline
VOID
Teapot
::OnFrameRender( D3DMATERIAL9* mtrl, IDirect3DTexture9* tex)
{
if
( mtrl )
m_device
->SetMaterial(mtrl);
else
if
(&
m_mtrl
)
m_device
->SetMaterial(&m_mtrl);
if
( tex )
m_device
->SetTexture(0, tex);
else
m_device
->SetTexture(0, 0);
m_device
->SetRenderState(D3DRS_ALPHABLENDENABLE, true);
m_teapot
->DrawSubset(NULL);
m_device
->SetRenderState(D3DRS_ALPHABLENDENABLE, false);
}
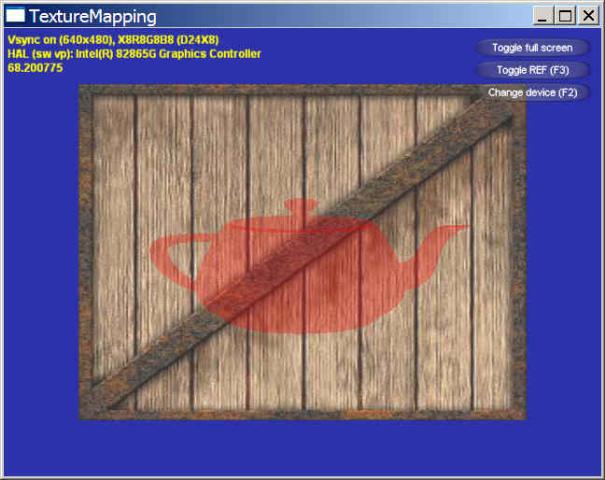
Create函数中漫反射材质的alpha值改成了0.3,反射颜色为只反射红色。这个是材质alpha混合的核心思想。在OnResetDevice中有两个SetTextureState和SetRenderState函数调用,是用来设定如何进行alpha计算的,具体用法参见代码注释。
茶壶的
DrawSubset
调用似乎默认是中心画在
( 0,0,0 )
的,因此要特别注意背景必须画在茶壶的后面。如果观察矩阵设置的是从
z
负半轴向原点看去的,那么必须将背景画在
z
正半轴,否则背景会将茶壶覆盖,效果就像没有画茶壶一样。
①背景的原点定义是这样的:
// x, y, z, nx, ny, nz, tu, tv
{ -3.0f, -3.0f, 1.0f, 0.0f, 0.0f, -1.0f, 0.0f, 1.0f, },
{ -3.0f, 3.0f, 1.0f, 0.0f, 0.0f, -1.0f, 0.0f, 0.0f, },
{ 3.0f, 3.0f, 1.0f, 0.0f, 0.0f, -1.0f, 1.0f, 0.0f, },
{ 3.0f, -3.0f, 1.0f, 0.0f, 0.0f, -1.0f, 1.0f, 1.0f, },
只有4个定点,可以看出来使用了index buffer。
②背景的材质是这样的
m_mtrl.Ambient = D3DXCOLOR(255,255,255,255);
m_mtrl.Diffuse = D3DXCOLOR(255,255,255,255);
m_mtrl.Specular = D3DXCOLOR(255,255,255,255);
m_mtrl.Emissive = D3DXCOLOR(0,0,0,0);
m_mtrl.Power = 2.0f;
在漫反射上不透明。最后背景调用DrawPrimitive完成渲染。
③光源设置是这样的:
D3DLIGHT9
dir
;
::
ZeroMemory
(&dir, sizeof(dir));
dir
.Type = D3DLIGHT_DIRECTIONAL;
dir
.Diffuse = D3DXCOLOR(255,255,255,255);
dir
.Specular = D3DXCOLOR(255* 0.2,255* 0.2,255* 0.2,255* 0.6) ;
dir
.Ambient = D3DXCOLOR(255* 0.6,255* 0.6,255* 0.6,255* 0.6);
dir
.Direction = D3DXVECTOR3(0.
0
f, 0.0f, -2.
0
f);
pd3dDevice
->SetLight(0, &dir);
pd3dDevice
->LightEnable(0, true);
采用的是平行光,其中漫反射是白光。
④OnFrameMove主回调函数是这样的:
D3DXVECTOR3 vEyePt( 0.0f, 0.0f, -3.0f );
D3DXVECTOR3 vLookatPt( 0.0f, 0.0f, 0.0f );
D3DXVECTOR3 vUpVec( 0.0f, 1.0f, 0.0f );
D3DXMATRIXA16 matView;
D3DXMatrixLookAtLH( &matView, &vEyePt, &vLookatPt, &vUpVec );
pd3dDevice->SetTransform( D3DTS_VIEW, &matView );
D3DXMATRIXA16 matProj;
D3DXMatrixPerspectiveFovLH( &matProj, D3DX_PI/2, 1.0f, 1.0f, 1000.0f );
pd3dDevice->SetTransform( D3DTS_PROJECTION, &matProj );
这里设置了观察矩阵和投影矩阵。由vEyePt和vLookatPt可以看到观察矩阵式由z负半轴向原点看的。
⑤光照设置放在OnResetDevice中,以避免窗口大小改变之后的光源丢失,是这样的:
D3DLIGHT9
dir
;
::
ZeroMemory
(&dir, sizeof(dir));
dir
.Type = D3DLIGHT_DIRECTIONAL;
dir
.Diffuse = D3DXCOLOR(1,1,1,1);
dir
.Specular = D3DXCOLOR(1,1,1,1)*0.2f ;
dir
.Ambient = D3DXCOLOR(1,1,1,1)*0.6f;
dir
.Direction = D3DXVECTOR3(0.0, 0.0f, -2.0f);
pd3dDevice
->SetLight(0, &dir);
pd3dDevice
->LightEnable(0, true);
注意:如果禁用背面剔出(culling)的话将会发现茶壶颜色呈深浅红色状。
效果如下:
Example 2
Rotate the teapot based on Example 1
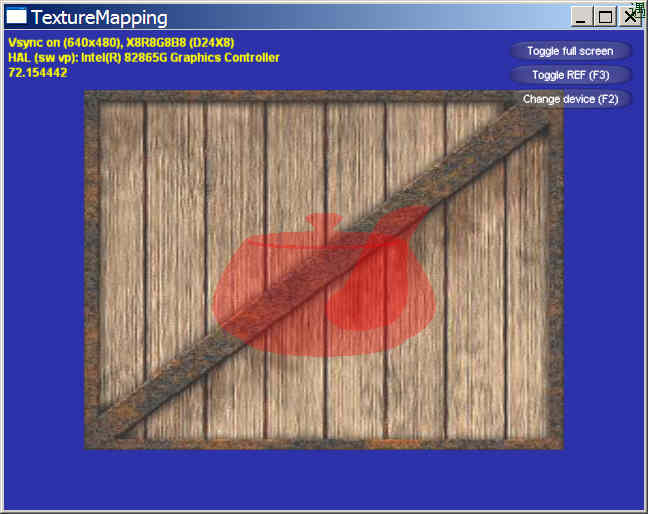
要使茶壶旋转,但是背景不旋转很简单,就是不要在OnFrameMove主回调函数中设置世界矩阵,而是要在Draw*调用之前设置世界矩阵。每一次调用Draw*只响应最近一次世界矩阵变换的操作。
具体来说,我们可以在Teapot类和BackGround类中添加OnFrameMove函数,以便在各自的OnFrameRender中调用(也可以在主回调函数中调用)。代码如下:
// Things to do when frame move for this
background
inline
bool
BackGround
::OnFrameMove()
{
D3DXMATRIX
W
;
D3DXMatrixIdentity
(&W);
m_device
->SetTransform(D3DTS_WORLD, &W);
return
true
;
}
// Things to do when frame move for this
teapot
inline
VOID
Teapot
::OnFrameMove()
{
D3DXMATRIXA16
matWorld
;
UINT
iTime
=
timeGetTime
() % 5000;
FLOAT
fAngle
=
iTime
* (2.0f *
D3DX_PI
) / 5000.0f;
const
D3DXVECTOR3
*
v
=
new
D3DXVECTOR3
(0.0f,1.0f,0.0f);
D3DXMatrixRotationAxis
( &matWorld, v, fAngle );
m_device
->SetTransform( D3DTS_WORLD, &matWorld );
}
效果就是背景不转而茶壶转,如图:
Example 3
Texture Alpha Blending
和例一和例二类似,也要实现透明效果,但是不使用材质alpha混合,而是使用缓冲帧中的纹理和现有纹理进行混合。在第一和第二例中是将材质的漫反射alpha属性设为小于0xFF的值,打开alpha渲染,调用如下代码,然后禁用alpha渲染,最后还需要设置光照等的信息。
// Set alpha blending only for diffuse material
m_device
->SetTextureStageState(0, D3DTSS_ALPHAARG1, D3DTA_DIFFUSE);
// Set alpha operation
m_device->SetTextureStageState(0, D3DTSS_ALPHAOP, D3DTOP_SELECTARG1);
// Set alpha blend equation. This is transparent equation
m_device
->SetRenderState(D3DRS_SRCBLEND, D3DBLEND_SRCALPHA);
m_device
->SetRenderState(D3DRS_DESTBLEND, D3DBLEND_INVSRCALPHA);
现在讲材质改为纹理,可以省去材质和光照的设置。另外将上面的代码改为:
// use alpha channel in texture for alpha
m_device
->SetTextureStageState(0, D3DTSS_ALPHAARG2, D3DTA_TEXTURE);
m_device
->SetTextureStageState(0, D3DTSS_ALPHAOP, D3DTOP_SELECTARG2);
// set blending factors so that alpha component determines transparency
m_device
->SetRenderState(D3DRS_SRCBLEND, D3DBLEND_SRCCOLOR);
m_device
->SetRenderState(D3DRS_DESTBLEND, D3DBLEND_INVSRCCOLOR);
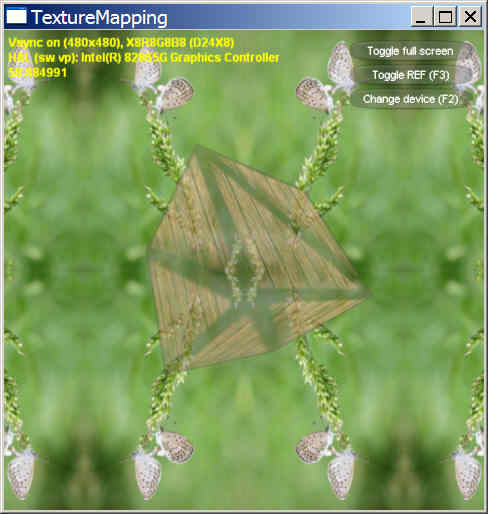
表示使用纹理alpha混合,混合公式就是景点的透明算法公式
FinalColor = SourceColor * SourceFactor + DestColor * (1
- SourceFactor)
不要忘记在适当的时候启用和关闭alpha混合,以及关闭光照。效果如下:
Example 4
Blending Texture Color And Material Diffuse Color
混合材质的漫反射颜色和纹理颜色可以使物体看起来有被强光照射的效果。它的原理是将上述两种颜色值相加。这种混合很简单,因为它只需要一次渲染,一重纹理,但是必须给物体设置好材质,并且需要有恰当的灯光。
①给想要使用这种效果的物体设置漫反射材质:
m_mtrl
->Diffuse = D3DXCOLOR(1,1,1,1)*0.5f;
m_mtrl
->Ambient = D3DXCOLOR(0,0,0,0);
m_mtrl
->Specular = D3DXCOLOR(0,0,0,0);
m_mtrl
->Emissive = D3DXCOLOR(0,0,0,0);
m_mtrl
->Power = 0.3f;
D3DXCOLOR重载了乘法操作,可以用*0.5f来设置漫反射的强度。
②设置全局的光源。定向光一定要注意光源的方向,点光源要注意光源的位置,否则设置不当还是白忙一场,看到的只是黑色的图像。
VOID
SetLights
(IDirect3DDevice9* pd3dDevice)
{
// Turn off
ambient light
pd3dDevice
->SetRenderState( D3DRS_AMBIENT, 0);
// Enable the light effect
pd3dDevice
->SetRenderState( D3DRS_LIGHTING, TRUE );
D3DLIGHT9
dir
;
::
ZeroMemory
(&dir, sizeof(dir));
dir
.Type = D3DLIGHT_DIRECTIONAL;
dir
.Diffuse = D3DXCOLOR(1,1,1,1);
dir
.Specular = D3DXCOLOR(1,1,1,1);
dir
.Ambient = D3DXCOLOR(1,1,1,1);
dir
.Direction = D3DXVECTOR3(0.0, 0.0f, 2.0f);
pd3dDevice
->SetLight(0, &dir);
pd3dDevice
->LightEnable(0, true);
pd3dDevice
->SetRenderState(D3DRS_NORMALIZENORMALS, true);
pd3dDevice
->SetRenderState(D3DRS_SPECULARENABLE, true);
}
这里设置的是定向光,dir.Direction设置的是方向朝z正半轴的,即朝屏幕里面的。
③给想要应用强光照射效果的物体设置色彩混合。可以在Draw*函数前调用。
m_device
->SetTextureStageState( 0, D3DTSS_COLORARG1, D3DTA_TEXTURE);
m_device
->SetTextureStageState( 0, D3DTSS_COLORARG2, D3DTA_DIFFUSE);
m_device
->SetTextureStageState( 0, D3DTSS_COLOROP, D3DTOP_ADD);
④给不想要强光照射效果的物体设置TextureStateState
m_device
->SetTextureStageState( 0, D3DTSS_COLORARG1, D3DTA_TEXTURE);
m_device
->SetTextureStageState( 0, D3DTSS_COLOROP, D3DTOP_SELECTARG1);
上面代码告诉D3D只使用纹理颜色。
最终效果如下:

Example 5
Multi Texture and Glow Mapping
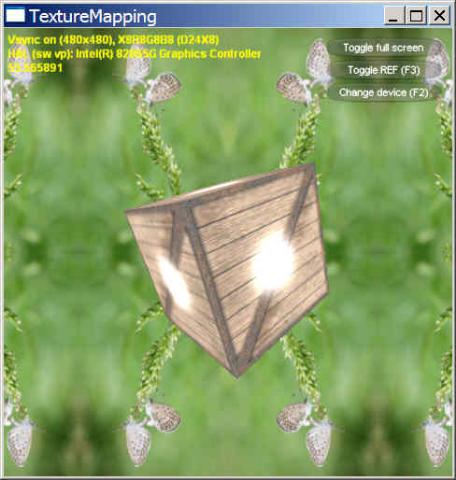
终于见到多纹理了。这次要实现的效果是发光映射,就是使物体的某一部分自己发光。这种效果不是材质的Emissive,因为Emissive只能是整个物体看起来都在发光。实现这个效果需要有以下步骤:
①准备一张这样的贴图,高亮部分将映射到物体的发光部分。
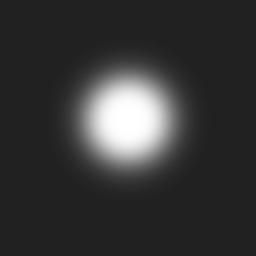
②这个效果不需要光源和材质,但是需要在不应用该效果的物体渲染之前禁用两个纹理阶段的色彩操作,代码如下:
m_device
->SetTextureStageState( 0, D3DTSS_COLOROP, D3DTOP_DISABLE );
m_device
->SetTextureStageState( 1, D3DTSS_COLOROP, D3DTOP_DISABLE );
然后对于不应用该效果的物体,还应指定它的默认纹理:
m_device
->SetTextureStageState( 0, D3DTSS_COLORARG1, D3DTA_TEXTURE);
m_device
->SetTextureStageState( 0, D3DTSS_COLOROP, D3DTOP_SELECTARG1);
③对于应用该效果的物体,添加以下代码:
m_device
->SetTexture(
0
, m_
texture
);
m_device
->SetTextureStageState( 0, D3DTSS_TEXCOORDINDEX, 0 );
m_device
->SetTextureStageState( 0, D3DTSS_COLORARG1, D3DTA_TEXTURE );
m_device
->SetTextureStageState( 0, D3DTSS_COLOROP, D3DTOP_SELECTARG1 );
m_device
->SetTexture( 1, m_envTex );
m_device
->SetTextureStageState( 1, D3DTSS_TEXCOORDINDEX, 0 );
m_device
->SetTextureStageState( 1, D3DTSS_COLORARG1, D3DTA_TEXTURE );
m_device
->SetTextureStageState( 1, D3DTSS_COLORARG2, D3DTA_CURRENT );
m_device
->SetTextureStageState( 1, D3DTSS_COLOROP, D3DTOP_ADD );
这里使用了两个纹理阶段,第一个纹理阶段使用纹理本身色彩,第二个纹理阶段接收到之后混合上面的那张中间高亮的纹理。最后在进行Draw*函数的调用。注意在设定完纹理之后必须调用SetTextureStageState( 1, D3DTSS_TEXCOORDINDEX, 0 ),否则第二张纹理将不知道如何进行纹理坐标寻址。效果图是这样的:
