设计模式研究
设计模式研究(一)实例比较TemplateMethod与Strategy
本文要讨论的是代理和适配器模式。
两种模式理念上的差别
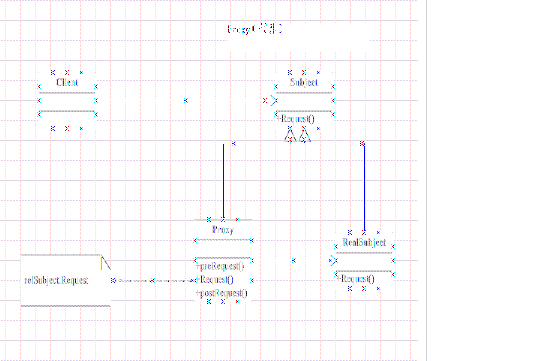
代理(Proxy)模式给某一个对象提供一个代理,并由代理对象控制对原对象的引用。
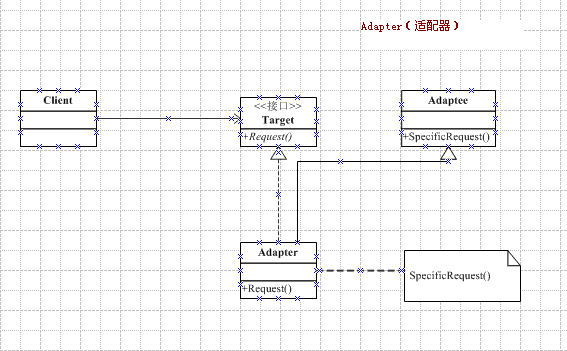
适配器模式(Adapter)把一个类的接口变换成客户端所期待的另一种接口,从而使原本接口不匹配而无法在一起工作的两个类能够在一起工作。
Proxy的关注点是职能转移,引入代理层代替目标端与调用端进行沟通,而且代理层和目标端具有相同的服务结构(继承同一个接口)。
Adapter的关注点是接口变换,引入一个符合调用端要求的“转化器”实现目标端与调用端的沟通,而且转化器和目标端的服务结构式是不一样的。
实例说明
对于外出打工或外出求学的游子们,大多都有过年回家买车票的经历。下面用代理模式还原一下独具特色的买车票经历。
先抽象一个火车票接口
public interface ITicket
{
string Buy( int price); // 车票不紧张的情况下适用
string Buy( int price, EnumIdentity identity); // 车票紧张或购票需求量大的情况下适用
}
// 购票人身份
public enum EnumIdentity
{
外出务工人员 = 0 ,
黄牛 = 1 ,
}
下面是火车站售票系统
public class RailwayStation : ITicket
{
public string Buy( int price)
{
string result = string .Empty;
result = " 票价: " + price;
return result;
}
public string Buy( int price, EnumIdentity identity)
{
string result = string .Empty;
if (identity == EnumIdentity.黄牛)
result = " 票价: " + price;
if (identity == EnumIdentity.外出务工人员)
result = " 车票已售完 " ;
return result;
}
}
看来“外出务工人员”在车票紧张的情况下从火车站是拿不到车票的,职能上作为火车站售票窗口代理的“黄牛”应用而生了!
public class Scalper:ITicket
{
ITicket Ticket = new RailwayStation();
public string Buy( int price)
{
string result = string .Empty;
result = " 暂不受理 " ;
return result;
}
public string Buy( int price, EnumIdentity identity)
{
string result = " 手续费: " + price * 0.2 ;
result += Ticket.Buy(price, EnumIdentity.黄牛);
return result;
}
}
下面是买票场景重现:
public class ProxyClient
{
public static void Call()
{
// 票价
int price = 100 ;
string result = string .Empty;
ITicket Ticket1 = new RailwayStation();
result = Ticket1.Buy(price, EnumIdentity.外出务工人员);
Console.WriteLine( " 去火车站买票: " + result);
ITicket Ticket2 = new Scalper();
result = Ticket2.Buy(price, EnumIdentity.外出务工人员);
Console.WriteLine( " 和黄牛买票: " + result);
}
}
再说一个我的亲身经历,很久以前,笔记本的键盘出现串键现象,于是想外接一个键盘来用。一天,正好看到京东上一款非常便宜而且评价很不错的键盘在做促销。似乎没有太多考虑就下了订单,键盘送到家以后,想起了漩涡鸣人常说的一个词 “纳尼?”,是PS/2口的!
public interface IPS2
{
void PS2Connect();
}
// PS/2接口的键盘
public class keyboard:IPS2
{
public void PS2Connect()
{
Console.WriteLine( " PS/2接口类型的键盘已经连接到电脑 " );
}
}
我的笔记本只能用USB口的。
public interface IUSB
{
void USBConnect();
}
怎么办?幸好有这种东西:PS/2 to USB converter 。
public class Adapter : keyboard, IUSB
{
public void USBConnect()
{
this .PS2Connect();
}
}
现在可以享用新键盘了!
public class AdapterClient
{
public static void Call()
{
// 主机与转化器连接
IUSB usb = new Adapter();
usb.USBConnect();
}
}
![]()
本篇先讨论单件 Singleton,单件的目标是保证一个类型只有一个实例,那么由谁来保证实例的唯一性呢?可能的方案有:
a)调用端保证。
调用端调用一个类时,他是不需要也不会去考虑这个类是否已经被实例化的。而且把这样的监管工作交给调用端是很不负责的做法。
b)类型内部保证。
类型内部如何保证?
将实例创建工作放到类型内部,这样类型就可以将实例创建工作监管起来。类型可以知道内部的实例有没有被创建,甚至可以知道创建实例的工作被执行了多少次。
所以个人认为理解单件需要分为两步:
1、 监管工作谁来做?实例的监管工作需要类型自己去做。
2、 监管工作如何做?类型如何保证实例唯一就是技术实现问题了,可以看到的版本有 线程安全的、双重锁定的、延迟初始化的等。
下面使用伪代码逐步分析实例化工作放到类型内部的做法。
调用我,实例我给你
{
Singleton Instance = null ;
// 实例化类型 Singleton
Singleton GetInstance()
{
Instance = new Singleton();
return Instance;
}
}
你只管调用,我保证唯一
{
Singleton Instance = null ;
// 实例化类型 Singleton
Singleton GetInstance()
{
Instance = new Singleton();
return Instance;
}
// 实例化类型 Singleton,实例化时判断类型有没有被创建过,这样就保证了实例的唯一
Singleton GetInstance()
{
if (Instance == null )
{
Instance = new Singleton();
}
return Instance;
}
}
你们都可以调用,我需要统计调用次数
{
Singleton Instance = null ;
public int Count { get ; set ; }
// 实例化类型 Singleton
Singleton GetInstance()
{
Instance = new Singleton();
return Instance;
}
// 实例化类型 Singleton,实例化时判断类型有没有被创建过,这样就保证了实例的唯一
Singleton GetInstance()
{
if (Instance == null )
{
Instance = new Singleton();
}
return Instance;
}
// 实例化类型 Singleton,并且加入一个计数器,这样能知道实例化工作被执行了多少次
Singleton GetInstance()
{
Count ++ ;
if (Instance == null )
{
Instance = new Singleton();
}
return Instance;
}
}
想使用实例?请出示合法证件
{
Singleton Instance = null ;
public int Count { get ; set ; }
// 实例化类型 Singleton
Singleton GetInstance()
{
Instance = new Singleton();
return Instance;
}
// 实例化类型 Singleton,实例化时判断类型有没有被创建过,这样就保证了实例的唯一
Singleton GetInstance()
{
if (Instance == null )
{
Instance = new Singleton();
}
return Instance;
}
// 实例化类型 Singleton,并且加入一个计数器,这样能知道实例化工作被执行了多少次
Singleton GetInstance()
{
Count ++ ;
if (Instance == null )
{
Instance = new Singleton();
}
return Instance;
}
// 实例化类型 Singleton,并且接收一个合法的授权,这样可以知道每个授权方的调用次数,使用频率
Singleton GetInstance( string caller)
{
// Check 调用方合法性验证
if (Check(caller))
{
CallerCount(caller);
if (Instance == null )
{
Instance = new Singleton();
}
return Instance;
}
else
return null ;
}
// 记录调用方调用次数
public void CallerCount( string caller)
{
// caller Count++
}
public bool Check( string caller)
{
return true ;
}
}
欢迎一起讨论!
--------------------------补充-------------------------------
我把几种流行的 Singleton 写法发出来,省的大家再去查资料。
{
static MySingleton instance = null ;
MySingleton() { }
// 简单写法
public static MySingleton Istance
{
get
{
if (instance == null )
{
instance = new MySingleton();
}
return instance;
}
}
// 线程安全
static readonly object obj = new object ();
public static MySingleton SafeInstance
{
get
{
lock (obj)
{
if (instance == null )
instance = new MySingleton();
return instance;
}
}
}
// 双重锁定 节约开销
public static MySingleton LockInstance
{
get
{
if (instance == null )
{
lock (obj)
{
if (instance == null )
instance = new MySingleton();
}
}
return instance;
}
}
// 静态初始化
static MySingleton() { }
static readonly MySingleton staticinstance = new MySingleton();
public static MySingleton StaticInstance
{
get
{
return staticinstance;
}
}
// 延迟初始化
public static MySingleton lazyInstance
{
get
{
return Lazy.staticinstance;
}
}
class Lazy
{
internal static readonly MySingleton staticinstance = new MySingleton();
static Lazy() { }
}
}
1、模板方法
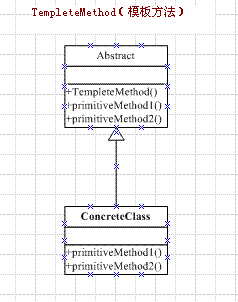
用意:准备一个抽象类,将部分逻辑以具体方法以及具体构造子的形式实现,然后声明一些抽象方法来迫使子类实现剩余的逻辑。不同的子类可以以不同的方式实现这些抽象方法,从而对剩余的逻辑有不同的实现。
2、策略
用意:针对一组算法,将每一个算法封装到具有共同接口的独立的类中,从而使得它们可以相互替换 。
二、实例比较
Template Method模式和Strategy模式都可以分离通用的算法和具体的上下文。
Template Method模式通过继承解决,Strategy通过委托解决。
分别用以上两个模式来实现冒泡排序。
1、 Template Method
{
private int operations = 0 ;
protected int length = 0 ;
protected int DoSort()
{
operations = 0 ;
if (length < 1 )
return operations;
for ( int nextToLast = length - 1 ; nextToLast >= 0 ; nextToLast -- )
{
for ( int index = 0 ; index < nextToLast; index ++ )
{
if (OutOfOrder(index))
Swap(index);
operations ++ ;
}
}
return operations;
}
protected abstract void Swap( int index);
protected abstract Boolean OutOfOrder( int index);
}
public class DoubleBubblerSorter:BubbleSorter
{
private double [] array = null ;
public int Sort( double [] a)
{
array = a;
length = a.Length;
return DoSort();
}
protected override void Swap( int index)
{
double t = array[index];
array[index] = array[index + 1 ];
array[index + 1 ] = t;
}
protected override Boolean OutOfOrder( int index)
{
return (array[index] > array[index + 1 ]);
}
public void PrintArray()
{
foreach (var a in array)
{
Console.WriteLine(a);
}
}
}
通用算法Swap(交换数据),OutOfOrder(是否该交换)被放置在基类中,通过继承,DoubleBubblerSorter实现了针对Double Array的BubblerSorter。
继承关系是强耦合的,BubbleSorter中包含了冒泡排序的算法DoSort。 DoubleBubblerSorter依赖于BubbleSorter。
运行一下
bs.Sort( new double [] { 1 , 2.2 , 3 , 4 , 2.1 , 3.5 , 3.8 , 4.5 , 1.6 });
bs.PrintArray();
2、Strategy
{
private int operations = 0 ;
private int length = 0 ;
private SortHandle sorthandle = null ;
public BubbleSorter(SortHandle sh)
{
sorthandle = sh;
}
public int Sort( object array)
{
sorthandle.SetArray(array);
length = sorthandle.Length();
operations = 0 ;
if (length < 1 )
return operations;
for ( int nextToLast = length - 1 ; nextToLast >= 0 ; nextToLast -- )
{
for ( int index = 0 ; index < nextToLast; index ++ )
{
if (sorthandle.OutOfOrder(index))
sorthandle.Swap(index);
operations ++ ;
}
}
return operations;
}
}
public interface SortHandle
{
void Swap( int index);
Boolean OutOfOrder( int index);
int Length();
void SetArray( object array);
}
public class IntSortHandle : SortHandle
{
private int [] array = null ;
public void Swap( int index)
{
int t = array[index];
array[index] = array[index + 1 ];
array[index + 1 ] = t;
}
public Boolean OutOfOrder( int index)
{
return (array[index] > array[index + 1 ]);
}
public void SetArray( object array)
{
this .array = ( int [])array;
}
public int Length()
{
return array.Length;
}
public void PrintArray()
{
foreach (var a in array)
{
Console.WriteLine(a);
}
}
}
上面,扮演Strategy中Context角色的BubbleSorter,包含了冒泡的具体算法。
IntSortHandle 对BubbleSorter却是一无所知的,它不需要依赖于实现了冒泡排序算法的BubbleSorter。
在TemplateMethod中,Swap和OutOfOrder的实现依赖于冒泡排序算法(DoubleBubblerSorter依赖于BubbleSorter)。
而在 Strategy中,IntSortHandle 不需要依赖于BubbleSorter,所以我们可以在其他的排序中使用IntSortHandle 。
同样,运行如下:
BubbleSorter2 bs2 = new BubbleSorter2(ibs);
bs2.Sort( new int [] { 8 , 2 , 3 , 1 , 5 });
ibs.PrintArray();
通过上面的例子我们可以看到Strategy模式的好处, 因为Strategy模式完全的遵守DIP原则,所以每个具体实现都可以被多个不同的通用算法操作。
三、补充说明
依赖倒置原则(DIP)
DIP解释:
1、高层模块不应该依赖于低层模块,二者都应该依赖于抽象。
2、抽象不应该依赖于细节。细节应该依赖于抽象。
DIP中依赖于抽象的把握:
1、任何变量都不应该持有一个指向具体来的引用。
2、任何类都不应该从具体来派生。
3、任何方法都不应该覆写它的任何基类中的已经实现的方法。
我们在项目中的做法:
每个较高层次都为它所需要的服务声明一个抽象接口,较低的层次实现了这些抽象接口。
每个高层类都通过该抽象接口使用下一层,这样高层就不依赖于低层。低层反而依赖于高层中声明的抽象服务接口。
可以参考我之前写的一篇文章:谈谈我对DI的 理解 。
四、参考资料


