Java并发编程J.U.C之Condition
在上一篇中,我们了解了下J.U.C的锁的获取与释放的过程,这个过程主要通过在A.Q.S中维持一个等待队列来实现,其中我们也提到了,在A.Q.S中除了一个等待队列之外,还有一个Condition队列,在了解Condition队列之前,先来看一下Condition是怎么回事:
The synchronizer framework provides a ConditionObject class for use by synchronizers that maintain exclusive synchronization and conform to the Lock interface. Any number of condition objects may be attached to a lock object, providing classic monitor-style await, signal, and signalAll operations, including those with timeouts, along with some inspection and monitoring methods.
上面的这一段内容摘自Doug Lea的AQS论文,从上面这一段话可以看出,Condition主要是为了在J.U.C框架中提供和Java传统的监视器风格的wait,notify和notifyAll方法类似的功能,那么先来解释一下这三个方法的作用:
- Object.wait()方法:使当前线程释放Object上的监视器并且挂起,直到有另外的线程调用Object.notify()方法或者Object.notifyAll()方法唤醒当前线程,当被唤醒后,Object.wait()方法会尝试重新获取监视器,成功获取后继续往下执行。注意Object.wait()方法只有在当前线程持有Object的监视器的时候才能够调用,不然会抛出异常。
- Object.notify()方法:用于唤醒另外一个调用了Object.wait()方法的线程,如果有多个都调用了Object.wait()方法,那么就会选择一个线程去notify(),具体选择哪一个和具体的实现有关,当前线程在调用Object.notify()方法以后会就释放Object的监视器,和wait()方法一样,Object.notify()方法只有在当前线程只有Object的监视器的时候才能够调用,不然就会抛出异常。
- Object.notifyAll()方法:唤醒所有调用了Object.wait()方法的线程,如果有多个线程调用了Object.wait()方法,那么就会引发这些线程之间的竞争,最后谁成功获取到Object的监视器和具体的实现有关,当前线程在调用Object.notifyAll()方法以后会就释放Object的监视器,和wait()方法一样,Object.notifyAll()方法只有在当前线程只有Object的监视器的时候才能够调用,不然就会抛出异常。
那么Condition是如何实现wait,notify和notifyAll方法的功能呢?我们接下来看:
在Condition中,wait,notify和notifyAll方法分别对应了await,signal和signalAll方法,当然Condition也提供了超时的、不可被中断的await()方法,不过我们主要还是看一看await,notify和notifyAll的实现,先看await:
await方法:
|
1
2
3
4
5
6
7
8
9
10
11
12
13
14
15
16
17
18
|
publicfinalvoidawait()throwsInterruptedException {
if(Thread.interrupted())
thrownewInterruptedException();
Node node = addConditionWaiter();
intsavedState = fullyRelease(node);
intinterruptMode =0;
while(!isOnSyncQueue(node)) {
LockSupport.park(this);
if((interruptMode = checkInterruptWhileWaiting(node)) !=0)
break;
}
if(acquireQueued(node, savedState) && interruptMode != THROW_IE)
interruptMode = REINTERRUPT;
if(node.nextWaiter !=null)
unlinkCancelledWaiters();
if(interruptMode !=0)
reportInterruptAfterWait(interruptMode);
}
|
整个await的过程如下:
- 在第2行处,如果当前线程被中断,则抛出中断异常。
- 在第4行处,将节点加入到Condition队列中去,这里如果lastWaiter是cancel状态,那么会把它踢出Condition队列。
- 在第5行处,调用tryRelease,释放当前线程的锁
- 在第7行处,判断节点是否在等待队列中(signal操作会将Node从Condition队列中拿出并且放入到等待队列中去),如果不在等待队列中了,就park当前线程,如果在,就退出循环,这个时候如果被中断,那么就退出循环
- 在第12行处,这个时候线程已经被signal()或者signalAll()操作给唤醒了,退出了4中的while循环,尝试再次获取锁,调用acquireQueued方法。
可以看到,这个await的操作过程和Object.wait()方法是一样,只不过await()采用了Condition队列的方式实现了Object.wait()的功能。
signal和signalAll方法:
在了解了await方法的实现以后,signal和signalAll方法的实现就相对简单了,先看看signal方法:
|
1
2
3
4
5
6
7
|
publicfinalvoidsignal() {
if(!isHeldExclusively())
thrownewIllegalMonitorStateException();
Node first = firstWaiter;
if(first !=null)
doSignal(first);
}
|
这里先判断当前线程是否持有锁,如果没有持有,则抛出异常,然后判断整个condition队列是否为空,不为空则调用doSignal方法来唤醒线程,看看doSignal方法都干了一些什么:
|
1
2
3
4
5
6
7
8
|
privatevoiddoSignal(Node first) {
do{
if( (firstWaiter = first.nextWaiter) ==null)
lastWaiter =null;
first.nextWaiter =null;
}while(!transferForSignal(first) &&
(first = firstWaiter) !=null);
}
|
这个while循环的作用就是将firstWaiter往Condition队列的后面移一位,并且唤醒first,看看while循环中tranferForSignal:
|
1
2
3
4
5
6
7
8
9
10
11
12
13
14
15
16
17
18
19
|
finalbooleantransferForSignal(Node node) {
/*
* If cannot change waitStatus, the node has been cancelled.
*/
if (!compareAndSetWaitStatus(node, Node.CONDITION, 0))
return false;
/*
* Splice onto queue and try to set waitStatus of predecessor to
* indicate that thread is (probably) waiting. If cancelled or
* attempt to set waitStatus fails, wake up to resync (in which
* case the waitStatus can be transiently and harmlessly wrong).
*/
Node p = enq(node);
intc = p.waitStatus;
if(c >0|| !compareAndSetWaitStatus(p, c, Node.SIGNAL))
LockSupport.unpark(node.thread);
returntrue;
}
|
这段代码的作用就是修改Node的waitStatus为0,然后将Node插入到等待队列中,并且唤醒Node。
signalAll和signal方法类似,主要的不同在于它不是调用doSignal方法,而是调用doSignalAll方法:
|
1
2
3
4
5
6
7
8
9
|
privatevoiddoSignalAll(Node first) {
lastWaiter = firstWaiter =null;
do{
Node next = first.nextWaiter;
first.nextWaiter =null;
transferForSignal(first);
first = next;
}while(first !=null);
}
|
这个方法就相当于把Condition队列中的所有Node全部取出插入到等待队列中去。
总结:
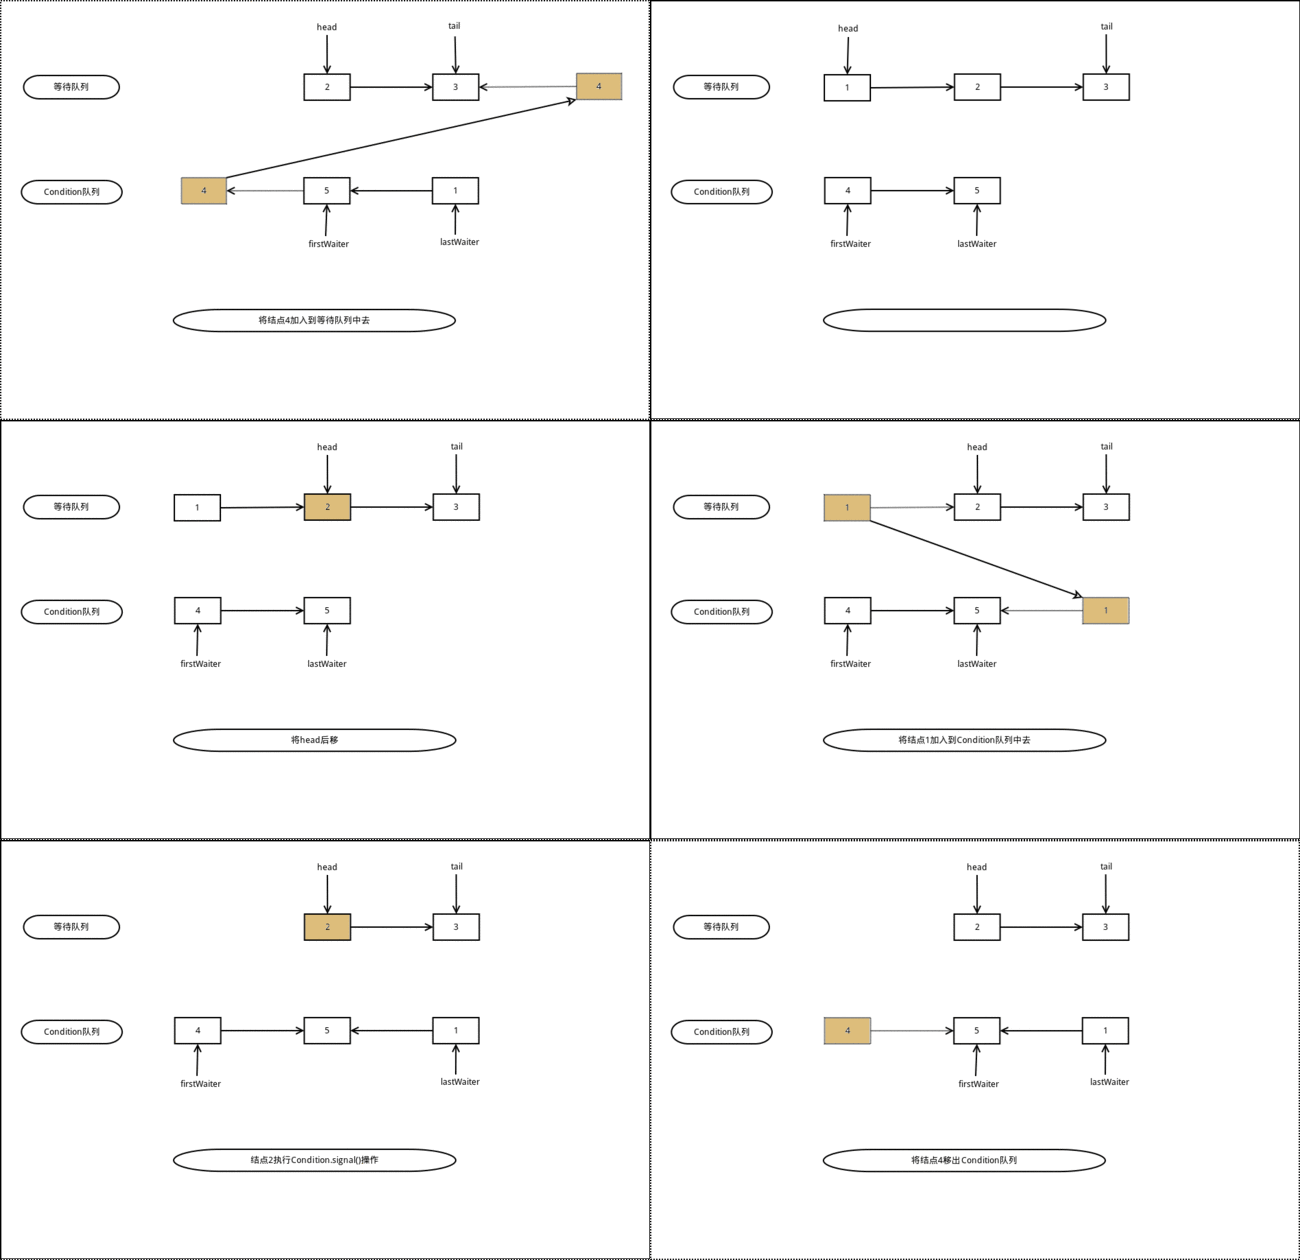
在了解了await(),signal()和signalAll方法的实现以后,我们再来通过一副gif动画来看一看这一个整体的过程:
