Jboss-eap-5.1 starting up note
Jboss enterprise platform 5 have some big change compared with platform 4(Jboss-eap-4.3), to explore this changes, so we started our Jboss-eap-5.1 studying, this section we just point to platform 5's starting up.
Step 1: Pre-installation-Requisites
From Jboss-eap-5.1 documents, there do not need some special requisite, compare with platform 4, the biggest change is JBoss Enterprise Application Platform 5 requires Java JDK1.6. this is very easy to accomplish, I installed jdk-6u21 to my pc as document decribed.
Step 2: Jboss-eap-5.1 installation
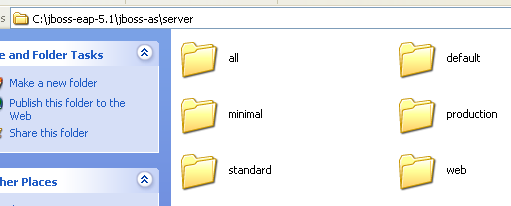
The same operation like old version jboss installation, use green installing, just need unzip the zip file on you Disk, and its done. I am really care server folder structure, so navigate to this folder, this folder has been expended in platform 5 version 2 new folder has been added like bellow figure show:
Step 3 : pre-Starting up
The same action like platform 4 jboss, we should do some Security Configure before we start up our jboss.
1> Edit the file $JBOSS_HOME/server/$PROFILE/conf/props/jmx-consoleusers.properties;
2> Create a username = password pair, use commended 'admin=admin', we just need remove '#'
3> If need someother configure we can do more, but in this test is enough.
Step 4: Starting up
The same script 'run.bat' can be found under $JBOSS_HOME/bin, so triger the run.bat starting up jboss, unfortunately jboss crushed in the begining of start, the error as follow:
Error occurred during initialization of VM
Could not reserve enough space for object heap
Could not create the Java virtual machine.
Press any key to continue . . .
this is a very simple error:memory is not big enough, but intersting is there isn't any infomation about JVM starting Option in 'run.bat', check more careful find another difference with Jboss platform 4, 'run.conf.bat' can be found under $JBOSS_HOME/bin, open this batch file contains a series of configurable selections of JVM params, quickly I found the following line configuration:
JAVA_OPTS=-Xms1303m -Xmx1303m -XX:MaxPermSize=256m
Obviously, this is for high performance Server machine, we need change this as the nexy line:
JAVA_OPTS=-Xms128m -Xmx512m -XX:MaxPermSize=128m
exexute 'run.bat' again, and this time on the right way.
Step 5: Starting production
In order to see more output info in jboss console, so before start production, we modify log4j.xml file where under $JBOSS_HOME/server/production/conf first.
then exexute 'run.bat' with params like start platform 4 Jboss, like following:
run.bat -c production -b 0.0.0.0
absolutlely, this times also on the right way, start production spend 40 minutes from concole output we can know.
Step 6: Test the installation
Open http://192.168.1.103:8080/ in a web browser on the server machine, and the result The JBoss Enterprise Application Platform server homepage is displayed. the server homepage also has some differrence with eap-4.3: diffrerence interface layout, color decorated word, etc.
Step 7: View JMX-console
Using http://192.168.1.103:8080/jmx-console/ can view new version Jboss JMX-console, By default, the JMX console is secured and will prompt you for a username and password, Use the username and password we defined in Step 3. The JMX Console is the JBoss Management Console which provides a raw view of the JMX MBeans which make up the server. They can provide a lot of information about the running server and allow you to modify its configuration, start and stop components and so on.
Step 8: Hot deployment service
One of the Highlight features in Jboss is Hot-deployment service, Jboss plamtform 5 use absolute JMX Mbean control the Hot-deployment service, Hot deployment of services in the server is controlled by the HDScanner MC bean configured in JBOSS_HOME\server\production\deploy\hdscanner-jboss-beans.xml as following:
<bean name="HDScanner" class="org.jboss.system.server.profileservice.hotdeploy.HDScanner">
        <property name="deployer"><inject bean="ProfileServiceDeployer"/></property>
        <property name="profileService"><inject bean="ProfileService"/></property>
        <property name="scanPeriod">60000</property>
        <property name="scanThreadName">HDScanner</property>
</bean>
the default scanPeriod is set to 6 seconds.
Step 9: Add a local trasaction Datasource for Oracle DB
Create a text file in the deploy directory named oracle-ds.xml with the following datasource descriptor:
<datasources>
  <local-tx-datasource>
    <jndi-name>HomeTestOracleDS</jndi-name>
    <connection-url>jdbc:oracle:thin:@192.168.1.105:1521:orcl</connection-url>
    <driver-class>oracle.jdbc.driver.OracleDriver</driver-class>
    <user-name>IPCUSER</user-name>
    <password>tibco</password>
    <exception-sorter-class-name>org.jboss.resource.adapter.jdbc.vendor.OracleExceptionSorter</exception-sorter-class-name>
      <metadata>
         <type-mapping>Oracle10g</type-mapping>
      </metadata>
  </local-tx-datasource>
</datasources>
Add this file to JBOSS_HOME\server\production\deploy folder restart server, and so far configuring datasource for Oracle DS has completed. to check added datasource we can through:
1. JMX-console jboss.jca module
2. JNDI View -> List -> java: Namespace![]()
Step 10: Deploy an Web appliation to Jboss-eap-5.1
1. copy Oracle JBDC jar 'ojdbc14.jar' to JBOSS_HOME\server\production\lib
2. create homeTest-eap-5.1.war only contain a file 'index.jsp' as following:
 <%@page contentType="text/html"
import="java.util.*,javax.naming.*,javax.sql.DataSource,java.sql.*" %> <%

  DataSource ds = null;
  Connection con = null;
  PreparedStatement pr = null;
  InitialContext ic;
  try {
  ic = new InitialContext();
  ds = (DataSource)ic.lookup( "java:/HomeTestOracleDS" );
  con = ds.getConnection();
  out.println("<br> " + con);
  }catch(Exception e){
  out.println("Exception thrown " +e);
  }finally{
  if(con != null){
  con.close();
 }
 } %>
3. deploy homeTest-eap-5.1.war to JBOSS_HOME\server\production\deply, deploy successful info will be output from server console![]()
4. Test deploy result through http://192.168.1.103:8080/homeTest-eap-5.1/index.jsp
the following will turn out:
