Lvs+keepalived实现负载均衡、故障剔除(DR模式)

Node1: 192.168.1.253
Node2: 192.168.1.254
VIP: 192.168.1.250
环境
centos5.2
(我这里是用两台机实现的)
1
、安装
ipvsadm
yum -y install ipvsadm
2
、安装
keepalived
[root@node1 ~]# wget http://www.keepalived.org/software/keepalived- 1.1.15 .tar.gz
[root@node1 ~]# tar zxvf keepalived- 1.1.15 .tar.gz
[root@node1 ~]# cd keepalived- 1.1.15
[root@node1 keepalived-1.1.15]# ./configure --prefix=/ --mandir=/usr/local/share/man/ --with-kernel-dir=/usr/src/kernels/2.6.18-92.el5-i686/
configure
后会输入这结果为正确
Keepalived configuration
------------------------
Keepalived version : 1.1.15
Compiler : gcc
Compiler flags : -g -O2
Extra Lib : -lpopt -lssl -lcrypto
Use IPVS Framework : Yes #
支持
lvs
IPVS sync daemon support : Yes
Use VRRP Framework : Yes
Use LinkWatch : No
Use Debug flags : No
[root@node1 keepalived-1.1.15]# make && make install
到此,
lvs+keepalived
安装完成。但是还不能使用
lvs
功能,接下来以
dr
模式配置
lvs+keepalived
3、
[root@node1 ~]#
cd /etc/keepalived/
[root@node1 keepalived]# vim keepalived.conf
! Configuration File for keepalived
global_defs {
notification_email {
}
notification_email_from [email protected]
smtp_server 127.0.0.1
smtp_connect_timeout 30
router_id LVS_DEVEL
}
vrrp_instance VI_1 {
state MASTER ##
主
lvs
设置成
master
interface eth0
virtual_router_id 51
priority 102 ##
从
lvs
设置成
99
advert_int 1
authentication {
auth_type PASS
auth_pass 1111
}
virtual_ipaddress {
192.168.1.250 ##
如多个
vip
,
继续换行填写。
}
}
virtual_server 192.168.1.250 80 {
delay_loop 6
lb_algo wlc
lb_kind DR
persistence_timeout 50
protocol TCP
real_server 192.168.1.253 80 {
weight 3
TCP_CHECK {
connect_port 80
connect_timeout 30
}
}
real_server 192.168.1.254 80 {
weight 1
TCP_CHECK {
connect_port 80
connect_timeout 30
}
}
好了,
keepalived
配置完成了。
启动keepalived
[root@node1 ~]# /etc/init.d/keepalived start
如果要随系统启动,执行chkconfig --add keepalived
chkconfig keepalived on
[root@node1 ~]# /etc/init.d/keepalived start
如果要随系统启动,执行chkconfig --add keepalived
chkconfig keepalived on
4
、接着配置真实服务器,这里通过脚本来实现吧
(
这个脚本只在
WEB
机上执行,我现在是用两台机。服务器既充当
lvs
、也充当
web
机
)
[root@node1 keepalived]# vim realserver
#!/bin/bash
#description : start realserver
VIP=192.168.1.250
/etc/rc.d/init.d/functions
case "$1" in
start)
echo " start LVS of REALServer"
/sbin/ifconfig lo:0 $VIP broadcast $VIP netmask 255.255.255.255 up
echo "1" >/proc/sys/net/ipv4/conf/lo/arp_ignore
echo "2" >/proc/sys/net/ipv4/conf/lo/arp_announce
echo "1" >/proc/sys/net/ipv4/conf/all/arp_ignore
echo "2" >/proc/sys/net/ipv4/conf/all/arp_announce
;;
stop)
/sbin/ifconfig lo:0 down
echo "close LVS Directorserver"
echo "0" >/proc/sys/net/ipv4/conf/lo/arp_ignore
echo "0" >/proc/sys/net/ipv4/conf/lo/arp_announce
echo "0" >/proc/sys/net/ipv4/conf/all/arp_ignore
echo "0" >/proc/sys/net/ipv4/conf/all/arp_announce
;;
*)
echo "Usage: $0 {start|stop}"
exit 1
esac
[root@node1 keepalived]# chmod +x realserver
[root@node1 keepalived]# ./realserver start
5
、启动
keepalived (
附启动日志
)
[root@node1 ~]# /etc/init.d/keepalived start (
主
LVS)
Oct 15 13:59:36 vmtest Keepalived: Starting Keepalived v 1.1.15 (10/15,2009)
Oct 15 13:59:36 vmtest Keepalived_healthcheckers: Using MII-BMSR NIC polling thread...
Oct 15 13:59:36 vmtest Keepalived_healthcheckers: Netlink reflector reports IP 192.168.1.253 added
Oct 15 13:59:36 vmtest Keepalived_healthcheckers: Netlink reflector reports I P 10.0.0 .253 added
Oct 15 13:59:36 vmtest Keepalived_healthcheckers: Registering Kernel netlink reflector
Oct 15 13:59:36 vmtest Keepalived_healthcheckers: Registering Kernel netlink command channel
Oct 15 13:59:36 vmtest Keepalived_healthcheckers: Opening file '/etc/keepalived/keepalived.conf'.
Oct 15 13:59:36 vmtest Keepalived_healthcheckers: Configuration is using : 11891 Bytes
Oct 15 13:59:36 vmtest Keepalived_healthcheckers: Activating healtchecker for service [192.168.1.253:80]
Oct 15 13:59:36 vmtest Keepalived_healthcheckers: Activating healtchecker for service [192.168.1.254:80]
Oct 15 13:59:36 vmtest Keepalived: Starting Healthcheck child process, pid=28419
Oct 15 13:59:36 vmtest Keepalived_vrrp: Using MII-BMSR NIC polling thread...
Oct 15 13:59:36 vmtest Keepalived_vrrp: Netlink reflector reports IP 192.168.1.253 added
Oct 15 13:59:36 vmtest Keepalived: Starting VRRP child process, pid=28420
Oct 15 13:59:36 vmtest Keepalived_vrrp: Netlink reflector reports I P 10.0.0 .253 added
Oct 15 13:59:36 vmtest Keepalived_vrrp: Registering Kernel netlink reflector
Oct 15 13:59:36 vmtest Keepalived_vrrp: Registering Kernel netlink command channel
Oct 15 13:59:36 vmtest Keepalived_vrrp: Registering gratutious ARP shared channel
Oct 15 13:59:36 vmtest Keepalived_vrrp: Opening file '/etc/keepalived/keepalived.conf'.
Oct 15 13:59:36 vmtest Keepalived_vrrp: Configuration is using : 36278 Bytes
Oct 15 13:59:36 vmtest Keepalived_vrrp: VRRP sockpool: [ifindex(2), proto(112), fd(8,9)]
Oct 15 13:59:37 vmtest Keepalived_vrrp: VRRP_Instance(VI_1) Transition to MASTER STATE
Oct 15 13:59:38 vmtest Keepalived_vrrp: VRRP_Instance(VI_1) Entering MASTER STATE
Oct 15 13:59:38 vmtest Keepalived_vrrp: VRRP_Instance(VI_1) setting protocol VIPs.
Oct 15 13:59:38 vmtest Keepalived_vrrp: VRRP_Instance(VI_1) Sending gratuitous ARPs on eth0 for 192.168.1.250
Oct 15 13:59:38 vmtest Keepalived_healthcheckers: Netlink reflector reports IP 192.168.1.250 added
Oct 15 13:59:38 vmtest avahi-daemon[2580]: Registering new address record for 192.168.1.250 on eth0.
Oct 15 13:59:38 vmtest Keepalived_vrrp: Netlink reflector reports IP 192.168.1.250 added
Oct 15 13:59:43 vmtest Keepalived_vrrp: VRRP_Instance(VI_1) Sending gratuitous ARPs on eth0 for 192.168.1.250
[root@node1 ~]# /etc/init.d/keepalived start (
从
LVS)
Oct 15 15:40:26 node1 Keepalived: Starting Keepalived v 1.1.15 (10/12,2009)
Oct 15 15:40:26 node1 Keepalived_healthcheckers: Using MII-BMSR NIC polling thread...
Oct 15 15:40:26 node1 Keepalived: Starting Healthcheck child process, pid=11157
Oct 15 15:40:26 node1 Keepalived: Starting VRRP child process, pid=11159
Oct 15 15:40:26 node1 Keepalived_vrrp: Using MII-BMSR NIC polling thread...
Oct 15 15:40:26 node1 Keepalived_vrrp: Registering Kernel netlink reflector
Oct 15 15:40:26 node1 Keepalived_vrrp: Registering Kernel netlink command channel
Oct 15 15:40:26 node1 Keepalived_vrrp: Registering gratutious ARP shared channel
Oct 15 15:40:26 node1 Keepalived_vrrp: Opening file '/etc/keepalived/keepalived.conf'.
Oct 15 15:40:26 node1 Keepalived_vrrp: Configuration is using : 36712 Bytes
Oct 15 15:40:26 node1 Keepalived_vrrp: VRRP_Instance(VI_1) Entering BACKUP STATE
Oct 15 15:40:26 node1 Keepalived_vrrp: VRRP sockpool: [ifindex(2), proto(112), fd(7,8)]
Oct 15 15:40:26 node1 Keepalived_healthcheckers: Registering Kernel netlink reflector
Oct 15 15:40:26 node1 Keepalived_healthcheckers: Registering Kernel netlink command channel
Oct 15 15:40:26 node1 Keepalived_healthcheckers: Opening file '/etc/keepalived/keepalived.conf'.
Oct 15 15:40:26 node1 Keepalived_healthcheckers: Configuration is using : 12417 Bytes
Oct 15 15:40:26 node1 Keepalived_healthcheckers: Activating healtchecker for service [192.168.1.253:80]
Oct 15 15:40:26 node1 Keepalived_healthcheckers: Activating healtchecker for service [192.168.1.254:80]
绿色字体表示启动成功
6
、测试,我现在停掉主
lvs
上面的
keepalived
,从
lvs
会出现以下日志,表示从
lvs
能正常接管主的
lvs
,从而实现
lvs
主从互备功能,当主
lvs
的
keepalived
启动后。会自动切换回来
[root@node1 ~]# tali -f /var/log/messages
Oct 15 15:43:18 node1 Keepalived_vrrp: VRRP_Instance(VI_1) Transition to MASTER STATE
Oct 15 15:43:19 node1 Keepalived_vrrp: VRRP_Instance(VI_1) Entering MASTER STATE
Oct 15 15:43:19 node1 Keepalived_vrrp: VRRP_Instance(VI_1) setting protocol VIPs.
Oct 15 15:43:19 node1 Keepalived_vrrp: VRRP_Instance(VI_1) Sending gratuitous ARPs on eth0 for 192.168.1.250
Oct 15 15:43:19 node1 avahi-daemon[3087]: Registering new address record for 192.168.1.250 on eth0.
Oct 15 15:43:24 node1 Keepalived_vrrp: VRRP_Instance(VI_1) Sending gratuitous ARPs on eth0 for 192.168.1.250
7
、测试
down
机,比如我这机跑的是
web
服务,我现在停止
apache
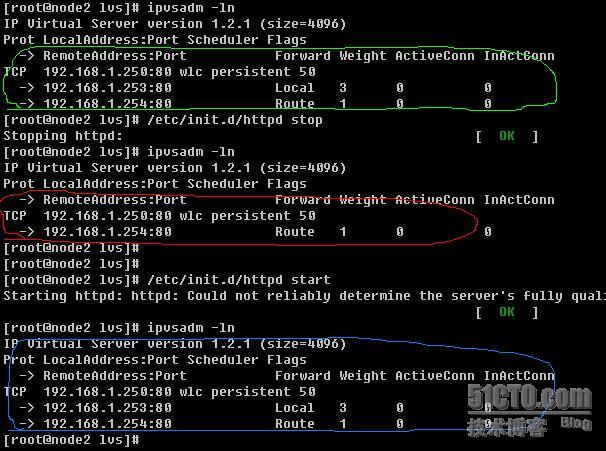
,出现以下现像

绿线画的是
lvs
正常,当我停止
httpd
的时候,再看
lvs
时,
192.168.1.253
这个
IP
已不在
lvs
表中(画红线处),因为我停掉了
httpd
服务。
我再启动
httpd
服务时,再查看
lvs
,
192.168.1.253
又自动加进表中(画蓝线处),此时已实现了负载均衡、故障剔除功能。
8、心得
这个配置只需要两个软件就可以了,ipvsadm、keepalived,再加上一个脚本,这个脚本只在
web机上执行
web机上执行
还有keepalived的配置文件,在一台机上配置好了之后,直接拷到另一台机去,拷到另一台
机只需要改动两个地方
vrrp_instanceVI_1{
机只需要改动两个地方
vrrp_instanceVI_1{
stateMASTER ##主lvs设置成master
interfaceeth0
virtual_router_id51
interfaceeth0
virtual_router_id51
priority102 ##从lvs设置成 99
stateMASTER 如果是从lvs,则改成BACKUP,priority102 改为小于100.
stateMASTER 如果是从lvs,则改成BACKUP,priority102 改为小于100.