Django Form表单对象
Django 表单
#创建一个新项目以及一个APP
django-admin.py startproject csvt07
cd csvt07
django-admin.py startapp blog
#修改配置文件
vim blog/settings.py
#数据库配置
MANAGERS = ADMINS
DATABASES = {
    'default': {
        'ENGINE': 'django.db.backends.sqlite3', # Add 'postgresql_psycopg2', 'mysql', 'sqlite3' or 'oracle'.
        'NAME': 'mydb.db',                      # Or path to database file if using sqlite3.
        # The following settings are not used with sqlite3:
        'USER': '',
        'PASSWORD': '',
        'HOST': '',                      # Empty for localhost through domain sockets or '127.0.0.1' for localhost through TCP.
        'PORT': '',                      # Set to empty string for default.
    }
}
#增加blogAPP
INSTALLED_APPS = (
    'django.contrib.auth',
    'django.contrib.contenttypes',
    'django.contrib.sessions',
    'django.contrib.sites',
    'django.contrib.messages',
    'django.contrib.staticfiles',
    'blog',
    # Uncomment the next line to enable the admin:
    # 'django.contrib.admin',
    # Uncomment the next line to enable admin documentation:
    # 'django.contrib.admindocs',
)
#修改链接对应的处理视图
vim blog/urls.py
from django.conf.urls import patterns, include, url
# Uncomment the next two lines to enable the admin:
# from django.contrib import admin
# admin.autodiscover()
urlpatterns = patterns('',
    # Examples:
    # url(r'^$', 'csvt07.views.home', name='home'),
    # url(r'^csvt07/', include('csvt07.foo.urls')),
    # Uncomment the admin/doc line below to enable admin documentation:
    # url(r'^admin/doc/', include('django.contrib.admindocs.urls')),
    # Uncomment the next line to enable the admin:
    # url(r'^admin/', include(admin.site.urls)),
    url(r'^blog/register$','blog.views.register'),
)
#创建模板目录和模板文件register.html
mkdir blog/templates && vim blog/templates/register.html
<?xml version="1.0" encoding="UTF-8"?>
<!DOCTYPE html PUBLIC "-//W3C//DTD XHTML 1.0 Strict//EN" "http://www.w3.org/TR/xhtml1/OTD/xhtml1-strict.dtd">
<html xmlns="http://www.w3.org/1999/xhtml" xml:lang="en" lang="en">
<head>
<meta http-equiv="Content-TYpe" content="text/html; charset=UTF-8" />
<title></title>
</head>
<body>
<form method="post">
{{form}}
<input type="submit" value="ok"/>
</form>
</body>
#创建对应的视图处理
vim blog/views.py
# Create your views here.
from django import forms
from django.http import HttpResponse
from django.shortcuts import render_to_response
class UserForm(forms.Form):
    name = forms.CharField()
def register(req):
    if req.method == 'POST':
        form = UserForm(req.POST)
        if form.is_valid():
            print form.cleaned_data
            return HttpResponse('ok')
    else:
        form = UserForm()
    return render_to_response('register.html',{'form':form})
#启动开发服务器
python manage.py runserver
#浏览器中访问开发服务器
http://127.0.0.1:8000/blog/register
pic[form_1]

#点击ok提交表单的时候会提示如下错误,CSRF攻击。
#官方的的说明
csrf_token
This tag is used for CSRF protection, as described in the documentation for Cross Site Request Forgeries.
pic[form_2]

#解决这个办法就在settings.py中注视掉CSRF的类
vim blog/settings.py
MIDDLEWARE_CLASSES = (
    'django.middleware.common.CommonMiddleware',
    'django.contrib.sessions.middleware.SessionMiddleware',
#    'django.middleware.csrf.CsrfViewMiddleware',
    'django.contrib.auth.middleware.AuthenticationMiddleware',
    'django.contrib.messages.middleware.MessageMiddleware',
    # Uncomment the next line for simple clickjacking protection:
    # 'django.middleware.clickjacking.XFrameOptionsMiddleware',
)
#再次点击ok提交返回如下,证明成功提交表单数据。
pic[form_3]

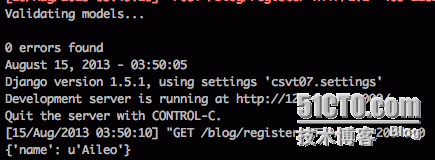
#开发服务器会显示一个字典的数据,因为我们这没有对数据做处理只是简单的输出
pic[form_4]

#如果提交的表单数据是空的话会提示如下信息
pic[form_5]
