OSPF实验virtual-link
OSPF
实验
virtual-link
一、实验目标:
OSPF
的虚链路,
Virtual-link
的效果
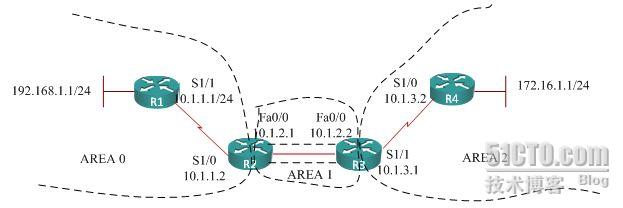
二、实验拓朴:
三、实验步骤:
1
.环境搭建
:
!===R1
enable
conf t
host R1
line c 0
exec-t 0
inter lo 0
ip add 192.168.1.1 255.255.255.0
ip ospf network point-to-p
inter s 1/1
ip add 10.1.1 .1 255.255.255.0
no sh
exit
!===R2
enable
conf t
host R2
line c 0
exec-t 0
inter s1/0
ip add 10.1.1 .2 255.255.255.0
no sh
exit
inter fa0/0
ip add 10.1.2 .1 255.255.255.0
no sh
exit
!===R3
enable
conf t
host R3
line c 0
exec-t 0
inter fa 0/0
ip add 10.1.2 .2 255.255.255.0
no sh
exit
inter s 1/1
ip add 10.1.3 .1 255.255.255.0
no sh
exit
!===R4
enable
conf t
host R4
line c 0
exec-t 0
inter s1/0
ip add 10.1.3 .2 255.255.255.0
no sh
exit
inter lo 0
ip add 172.16.1.1 255.255.255.0
ip ospf network point-to-p
exit
end
2
.
OSPF
网络宣告:
!---R1
R1(config)#router ospf 1
R1(config-router)#network 192.168.1.0 0.0.0 .255 a 0
R1(config-router)#network 10.1.1 .0 0.0. 0.255 a 0
!---R2
R2(config)#router ospf 1
R2(config-router)#network 10.1.1 .0 0.0. 0.255 a 0
R2(config-router)#network 10.1.2 .0 0.0. 0.255 a 1
!---R3
R3(config)#router ospf 1
R3(config-router)#network 10.1.2 .0 0.0. 0.255 a 1
R3(config-router)#network 10.1.3 .0 0.0. 0.255 a 2
!---R4
R4(config)#router ospf 1
R4(config-router)#network 10.1.3 .0 0.0. 0.255 a 2
R4(config-router)#network 172.16.1.0 0.0.0 .255 a 2
此时
OSPF
三个区域的邻居建立正常,但是
R1
学不到
AREA2
的路由,
R4
学不到
AREA0
和
AREA1
的路由,
R2
学不到
R4
的路由,
R3
能学到所有的路由。
3
.建立虚链路:
R2
如下配置:
R2(config)#router ospf 1
R2(config-router)#area 1 virtual-link 10.1.3 .1
R3
如下配置:
R3(config)#router ospf 1
R3(config-router)#area 1 virtual-link 10.1.2 .1
这时所有路由正常,
R4
能
ping
能
192.168.1.1
。
注:虚链路在配置的时候要宣告对端的
RouterID
,如果只宣告一端会出如下提示,
02:54:53: %OSPF-4-ERRRCV: Received invalid packet: mismatch area ID, from backbone area must be virtual-link but not found from 10.1.2 .1, FastEthernet0/0
如果两端宣告成功,会建立一个虚拟的邻居,
02:55:13: %OSPF-5-ADJCHG: Process 1, Nbr 10.1.2 .1 on OSPF_VL1 from LOADING to FULL, Loading Done
