学习制作iOS程序第三天:创建全局变量,预编译函数等、优化TabBarController、加入Bugly崩溃日志、解决键盘覆盖文本框的问题(11~14)
十一:创建Define定义文件和pch预处理文件
1、在Define目录里创建Const.h文件,用于保存一些常用的宏命令
#define CURRENT_APPID @""
#define IS_IPAD (UI_USER_INTERFACE_IDIOM() == UIUserInterfaceIdiomPad)
#define IS_IPHONE (UI_USER_INTERFACE_IDIOM() == UIUserInterfaceIdiomPhone)
#define IS_RETINA ([[UIScreen mainScreen] scale] >= 2.0)
#define IS_IOS8_AND_UP ([[UIDevice currentDevice].systemVersion floatValue] >= 8.0)

#define SCREEN_WIDTH ([[UIScreen mainScreen] bounds].size.width)
#define SCREEN_HEIGHT ([[UIScreen mainScreen] bounds].size.height)
#define SCREEN_MAX_LENGTH (MAX(SCREEN_WIDTH, SCREEN_HEIGHT))
#define SCREEN_MIN_LENGTH (MIN(SCREEN_WIDTH, SCREEN_HEIGHT))

#define IS_IPHONE_4_OR_LESS (IS_IPHONE && SCREEN_MAX_LENGTH < 568.0)
#define IS_IPHONE_5 (IS_IPHONE && SCREEN_MAX_LENGTH == 568.0)
#define IS_IPHONE_6 (IS_IPHONE && SCREEN_MAX_LENGTH == 667.0)
#define IS_IPHONE_6P (IS_IPHONE && SCREEN_MAX_LENGTH == 736.0)

// View 坐标(x,y)和宽高(width,height)
#define X(v)                    (v).frame.origin.x
#define Y(v)                    (v).frame.origin.y
#define WIDTH(v)                (v).frame.size.width
#define HEIGHT(v)               (v).frame.size.height

//定义部分常用颜色
#define COLOR(R, G, B, A) [UIColor colorWithRed:R/255.0 green:G/255.0 blue:B/255.0 alpha:A]

//默认的文字大小
#define BASE_FONT_SIZE 15
#define BASE_TABLEVIEWCELL_HEIGHT 46
#define BASE_COLOR_MAIN COLOR(105,175,0,1)
#define BASE_COLOR_TOPBAR COLOR(57,172,105,1)
#define BASE_STATUSBAR_HEIGHT [[UIApplication sharedApplication] statusBarFrame].size.height
2、在Define目录里创建UrlDefine.h文件,用于保存一些网络请求的地址
#define BASE_URL @"http://192.168.1.117:2002"

#define BASE_URL_MAIN_RECOMMAND @"/house.ashx?action=recommand"
#define BASE_URL_SALE @"/house.ashx?action=list&housetype=1"
#define BASE_URL_RENT @"/house.ashx?action=list&housetype=2"
#define BASE_URL_PROJECT @"/project.ashx"
3、在Define目录里创建PrefixMain.pch文件,用于包含一些预处理文件(默认不会启用pch,所以需要一些设置)
#define ISDEBUG

//定义变量
#import "Const.h"
#import "UrlDefine.h"

//第三方组件
#import "AFNetworking.h"
#import "UIView+Toast.h"
#import "SVProgressHUD.h"
#import "Bugly/CrashReporter.h"
#import "UIImageView+WebCache.h"
#import "MJRefresh.h"
#import "IQKeyboardManager.h"

//实用工具
#import "ToolsHelper.h"
#import "HttpHelper.h"

//正式环境不输出日志
#ifndef __OPTIMIZE__
#define NSLog(...) NSLog(__VA_ARGS__)
#else
#define NSLog(...) {}
#endif
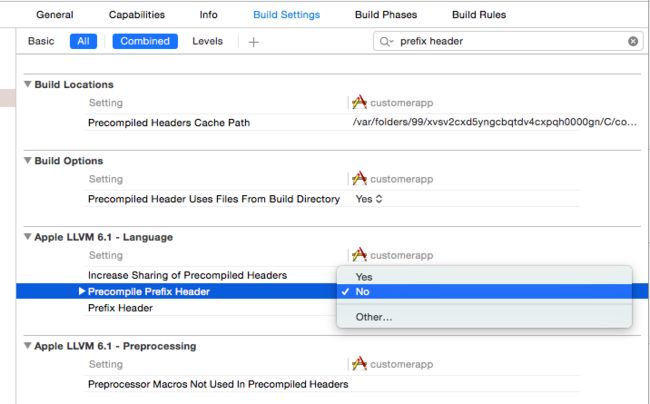
4、进入Targets,Build Settings,搜索Complie Prefix Header,修改为yes
5、然后在Prefix Header中增加pch的文件路径即可。需要在debug和release中都进行添加。
$(SRCROOT)/customerapp/PrefixMain.pch
十二:为UITabBarController添加图标,并完善代码
解决两个问题,一个是TabBar的图标问题,二个是每个页面不仅仅是个UIViewController,应该这个页面还可以跳转到下一个页面,所以这五个页面应该是UINavigationController。
修改AppDelegate.m里的代码如下。
- (BOOL)application:(UIApplication *)application didFinishLaunchingWithOptions:(NSDictionary *)launchOptions {
    self.window = [[UIWindow alloc] initWithFrame:[[UIScreen mainScreen] bounds]];
    self.window.backgroundColor = [UIColor whiteColor];

    //创建并初始化TabBarController
    self.tabBarController=[[UITabBarController alloc] init];
    self.window.rootViewController = self.tabBarController;

    //创建五个视图控制器
    RDMainViewController *VCMain = [[RDMainViewController alloc] init];
    RDProjectListTableViewController *VCProjectList = [[RDProjectListTableViewController alloc] init];
    RDSaleListTableViewController *VCSaleList = [[RDSaleListTableViewController alloc] init];
    RDRentListTableViewController *VCRentList = [[RDRentListTableViewController alloc] init];
    RDMyTableViewController *VCMy = [[RDMyTableViewController alloc] init];

    //为视图控制器添加导航栏控制器
    UINavigationController *navVCMain= [[UINavigationController alloc]initWithRootViewController:VCMain];
    UINavigationController *navVCProjectList = [[UINavigationController alloc]initWithRootViewController:VCProjectList];
    UINavigationController *navVCSaleList = [[UINavigationController alloc] initWithRootViewController:VCSaleList];
    UINavigationController *navVCRentList = [[UINavigationController alloc] initWithRootViewController:VCRentList];
    UINavigationController *navVCMy = [[UINavigationController alloc] initWithRootViewController:VCMy];
    self.tabBarController.viewControllers=[NSArray arrayWithObjects:navVCMain, navVCProjectList, navVCSaleList,navVCRentList,navVCMy,nil];

    //设置标题
    navVCMain.tabBarItem.title=@"首页";
    navVCProjectList.tabBarItem.title=@"新房";
    navVCSaleList.tabBarItem.title=@"二手房";
    navVCRentList.tabBarItem.title=@"租房";
    navVCMy.tabBarItem.title=@"我";

    //设置图标
    navVCMain.tabBarItem.image = [UIImage imageNamed:@"icon_tab_house"];
    navVCProjectList.tabBarItem.image = [UIImage imageNamed:@"icon_tab_building"];
    navVCSaleList.tabBarItem.image = [UIImage imageNamed:@"icon_tab_building"];
    navVCRentList.tabBarItem.image = [UIImage imageNamed:@"icon_tab_building"];
    navVCMy.tabBarItem.image = [UIImage imageNamed:@"icon_tab_user"];
    navVCMain.tabBarItem.selectedImage = [UIImage imageNamed:@"icon_tab_house_press"];
    navVCProjectList.tabBarItem.selectedImage = [UIImage imageNamed:@"icon_tab_building_press"];
    navVCSaleList.tabBarItem.selectedImage = [UIImage imageNamed:@"icon_tab_building_press"];
    navVCRentList.tabBarItem.selectedImage = [UIImage imageNamed:@"icon_tab_building_press"];
    navVCMy.tabBarItem.selectedImage = [UIImage imageNamed:@"icon_tab_user_press"];

    //一些通用颜色设置
    [[UITabBar appearance] setTintColor:BASE_COLOR_MAIN];
    [[UINavigationBar appearance] setBarTintColor:BASE_COLOR_TOPBAR];
    [[UINavigationBar appearance] setBarStyle:UIBarStyleBlack];
    [[UINavigationBar appearance] setTintColor:[UIColor whiteColor]];

    [self.window makeKeyAndVisible];

    return YES;
}
看看模拟器效果,还不错不是。
十三:加入Bugly崩溃日志功能
系统一定要有日志功能!系统一定要有日志功能!系统一定要有日志功能!
不要指望用户替你提交bug,忠诚点的用户崩溃之后再打开一次,普通用户就直接骂句垃圾,然后就卸载了。用C#的时候用Log4NET记录错误日志。iOS程序当然也要有。
1、进入腾讯Bugly创建你的程序,获取监视ID。
2、AppDelegate.m加入如下代码即可。
后面的ID是腾讯给你的监视ID,不是你的APPID哦。
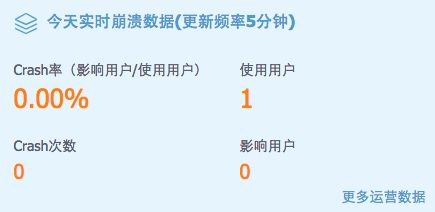
3、模拟器运行一次程序,然后返回腾讯bugly网站,看,成功了。
十四:解决键盘覆盖文本框的问题
1、AppDelegate.m文件中加入如下代码即可。
2、需要用到这个功能的h文件加入。
@property(nonatomic,strong) IQKeyboardReturnKeyHandler *returnKeyHandler;
3、需要用到这个功能的m文件的viewDidLoad方法加入如下代码
以下是引用其他文章的。
“设置returnKeyHandler,可以点击键盘上的next键,自动跳到下一个输入框。最后一个输入框点击done自动收起键盘。 运行后,可以看到输入框随着键盘的弹出自动上下浮动。点击背景,键盘收起。全自动了。 这个库默认支持UITextField、UITextView、UIWebView、UIScrollView、UITableView、UICollectionView 最后要注意一点,它可以自动计算多个textField之间的先后顺序,排列依据是看addSubView的先后顺序。”
最后记录一个问题,NSMutableArray自动释放会造成问题。
It doesn't really matter. [NSMutableArray array] is a nice shortcut, but you have to remember to retain it, so the question really is a matter of [[NSMutableArray array] retain] versus [[NSMutableArray alloc] init]. I usually use the former. The real convenience comes in when you need to statically fill the array; you can do it all in one message. [[NSMutableArray arrayWithObjects:...] retain] is faster than [[NSMutableArray alloc] init] followed by numerous [NSMutableArray addObject:(id)] calls.


