Android发送短消息程序的总结
1.1 准备的基础知识
1.1.1 PendingIntent类
pendingIntent字面意义:等待的,未决定的Intent。
要得到一个pendingIntent对象,使用方法类的静态方法 :
² getActivity(Context,int, Intent, int),
² getBroadcast(Context,int, Intent, int),
² getService(Context, int,Intent, int)
参数有4个,比较重要的事第三个和第一个,其次是第四个和第二个。可以看到,要得到这个对象,必须传入一个Intent作为参数,必须有context作为参数。
pendingIntent是一种特殊的Intent。主要的区别在于Intent的执行立刻的,而pendingIntent的执行不是立刻的。pendingIntent执行的操作实质上是参数传进来的Intent的操作,但是使用pendingIntent的目的在于它所包含的Intent的操作的执行是需要满足某些条件的。
主要的使用的地方和例子:通知Notification的发送,短消息SmsManager的发送和警报器AlarmManager的执行等等。
我们知道Intent有传递信息的作用,它可以在Activity之间传递信息,可以再service之间传递信息也可以在BroadcastReceiver之间传递信息。也可以是在Activity与service,BroadcastReceiver之间传递信息。
第一次接触PendingIntent是在学习appWidget的时候。作者解释PendingIntent很生动形象,他说PendingIntent就好像是锦囊妙计一样,当需要的时候在打开。我在这里就依葫芦画瓢,鹦鹉学舌的在描述一遍,有什么不对的地方请大家多多提议,还望包涵。
在《三国演义》中有这样一个桥段,讲得是周瑜想设计害刘备,就请他到自己的家里做客。这个时候诸葛亮觉得此去必定是危机重重,但是又不能说破。这个时候诸葛亮就送给了随同的将领赵云三个锦囊,说遇到危险的时候就把这三个锦囊交给刘备,希望里面的方法能帮助刘备脱险。
在android中我们就可以把某个Activity,BroadcastReceiver,Service看做是诸葛亮,他拥有的锦囊就看做是PendingIntent,当遇到某种状况(事件)的时候,就把锦囊PendingIntent交给其他的使用者赵云。
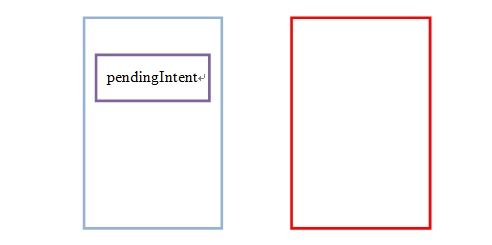
下面用图来解释一下PendingIntent的作用:

两个Activity,其中pendingIntent对象在一个Activity之中创建,当某个事件发生的时候,这个PendingIntent对象会传递到另一个Activity之中,
从而触发Intent这个里面包含的事件。

1.1.2 SmsManager类
发送短信需要用到一个类那就是SmsManager。使用这个类有一点点的特殊,是android.telephony.gsm.SmsManager中定义的用户管理短信应用的类,只需要调用静态方法getDefault()获得SmsManager对象。
例如:
SmsManager sms = SmsManager.getDefault();
再用我们创建的这个对象调用sendTextMessage方法。
|
|
public void sendTextMessage(String destinationAddress, String scAddress, String text, PendingIntent sentIntent, PendingIntent deliveryIntent)
这个方法有五个参数:
destinationAddress第一个参数表示的就是需要发送对象的手机号码。
scAddress第二个参数表示的是服务中心短信的地址,一般情况下我们写为空null。
text第三个参数表示的是要发送的短信内容。
sentIntent是一个PendingIntent 的对象,它用来告诉用户发送短信是否成功。
deliverIntent第五个参数也是一个PendingIntent对象,它用来确认对方是否成功接收。
注意:短信成功发送和对方成功接收是有区别的。成功发送不一定能保证对方能够成功接收
1.2 代码编写
1.2.1 界面编写
思考一下编写一个比较水短信发送程序需要的控件,我们需要一个输入对方的号码的输入框,要是能让用户输入的文本框使用到的文本框就是EditText;之后我们还需要一个能输入短信内容的编辑文本框,所以还需要EditText;所有的内容编写完之后就需要一个发送的按钮所以需要一个Button。当然还可以加两个TextView做提示,代码如下:
<?xmlversion="1.0"encoding="utf-8"?>
<LinearLayoutxmlns:android="http://schemas.android.com/apk/res/android"
    android:layout_width="fill_parent"
    android:layout_height="fill_parent"
    android:orientation="vertical">

    <TextView
        android:layout_width="fill_parent"
        android:layout_height="wrap_content"
        android:text="请输入短信号码:"/>

    <EditText
        android:id="@+id/phoneno"
        android:layout_width="fill_parent"
        android:layout_height="wrap_content"/>

    <TextView
        android:layout_width="fill_parent"
        android:layout_height="wrap_content"
        android:text="短信内容"/>

    <EditText
        android:id="@+id/msgcontent"
        android:layout_width="fill_parent"
        android:layout_height="wrap_content"/>

    <Button
        android:id="@+id/sendmsg"
        android:layout_width="fill_parent"
        android:layout_height="wrap_content"
        android:text="发送短信"/>

</LinearLayout>
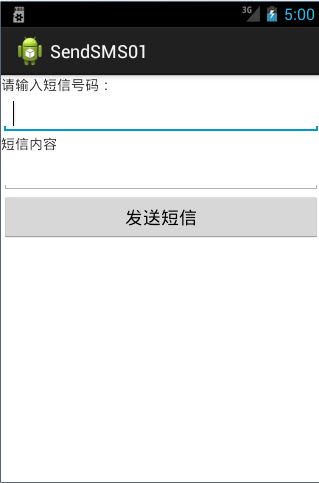
如果不用TextView做提示,也可以在EditView中添加android:hint=””,在输入电话号码的文本框里可以添加android:inputType=“phone”,或者也可以在代码中添加相应的判断的语句,eg: PhoneNumberUtils.isGlobalPhoneNumber(phone)其中phone是我们定义的一个保存电话号码的String变量。得到的界面如图 1所示:
图 1发送短信界面
1.2.2 java文件代码的编写
现在Activity中声明我们在xml文件中定义的那几个变量
    private EditText phoneno = null;
    private EditText message = null;
    private Button send = null;
之后使用findViewById来得到我们的控件
   phoneno = (EditText) findViewById(R.id.phoneno);
        message = (EditText) findViewById(R.id.msgcontent);
        send = (Button)findViewById(R.id.sendmsg);
之后再为发送按钮绑定监听器:
class sendmessage implements android.view.View.OnClickListener {

        @Override
        public void onClick(View v) {
            // TODO Auto-generated method stub
            String phone = phoneno.getText().toString();
            String msg = message.getText().toString();
            if (PhoneNumberUtils.isGlobalPhoneNumber(phone)
                    && phone.length() > 0) {
                sendSMS(phone, msg);
            } else
                Toast.makeText(SendSMS.this,"短信发送失败,请重新输入号码和短信内容!",
                        Toast.LENGTH_LONG).show();
        }
    }
这里的Toast就好像MFC中里的MessageBox一样它会弹出提示的对话框。告诉用户发送短信失败。
注意:在这里我们使用了Toast.makeText(Context context,CharSequence text, int duration) 这个方法,这里有一个易错点是要注意的。
Context是上下文变量,在这里我们要显示的提示是在SendSMS这个Activity里面,所以这里必须要使用SendSMS.this的对象。因为每一个类都有一个自带的this对象代表他自己的对象,在这里我们定义了一个内部类sendmessage,如果这里使用的this,这里代表的就是sendmessage这个类的对象所以就不对了!
之后就是我出错的地方了,我之前在写sendSMS方法的时候使用的是eclipse提供的自带的更正的方法帮助我生成的sendSMS方法,这个方法生成的位置是在内部类里面。之后我在写了如下的代码:
public void sendSMS(String phonenumber, String msg) {//发送短信的类
        PendingIntent pi = PendingIntent.getActivity(this, 0,new Intent(this,
                SendSMS.class), 0);
        SmsManager sms = SmsManager.getDefault();
        sms.sendTextMessage(phonenumber, null, msg, pi, null);//发送信息到指定号码
    }
这个时候eclipse就报错了。错误如下:
| Multiple markers at this line - The constructor Intent(SendSMS.sendmessage, Class<SendSMS>) is undefined - The method getActivity(Context, int, Intent, int) in the type PendingIntent is not applicable for the arguments (SendSMS.sendmessage, int, Intent, int) |
看一下这个错误提示我们知道了其实这个错误就在于这第一个this,这里的this指代就是这里的内部类的对象,但是这里必须就是指的是SendSMS这个Activity对象,所以出错了。这里的PendingIntent的pi对象作用就是当用户按下发送按钮之后退到发送短信的那个界面。请注意这个方法的位置。
再看sms.sendTextMessage(phonenumber, null, msg, pi,null);这句代码,刚才在准备知识里我就说过这几个参数的意思了,之后如果要想知道对方是否成功接收还可以进行进一步的编写。
一个短信发送的代码就这样编写完了,下面贴出完整的代码:
package com.example.sms;

import android.app.Activity;
import android.app.PendingIntent;
import android.content.BroadcastReceiver;
import android.content.ContentValues;
import android.content.Context;
import android.content.Intent;
import android.content.IntentFilter;
import android.net.Uri;
import android.os.Bundle;
import android.telephony.PhoneNumberUtils;
import android.telephony.SmsManager;
import android.view.Menu;
import android.view.View;
import android.widget.Button;
import android.widget.EditText;
import android.widget.Toast;

public class SendSMS extends Activity {
    /** Called when the activity is first created. */
    EditText phoneno =null;
    EditText message =null;
    Button send = null;

    @Override
    public void onCreate(Bundle savedInstanceState) {
        super.onCreate(savedInstanceState);
        setContentView(R.layout.main);
        phoneno = (EditText) findViewById(R.id.phoneno);
        message = (EditText) findViewById(R.id.msgcontent);
        send = (Button) findViewById(R.id.sendmsg);
        send.setOnClickListener(new sendmessage());
    }

    class sendmessage implements android.view.View.OnClickListener {

        @Override
        public void onClick(View v) {
            // TODO Auto-generated method stub
            String phone = phoneno.getText().toString();
            String msg = message.getText().toString();
            if (PhoneNumberUtils.isGlobalPhoneNumber(phone)
                    && phone.length() > 0) {
                sendSMS(phone, msg);

            } else
                Toast.makeText(SendSMS.this,"短信发送失败,请重新输入号码和短信内容!",
                        Toast.LENGTH_LONG).show();
        }

    }

    /**
     * SmsManager 是android.telephony.gsm.SmsManager中定义的用户管理短信应用的类。
     * 开发人员不必实例化SmsManager类,只需要调用静态方法getDefault()获得SmsManager对象,
     * PendingIntent对象用于指向TinySMSActivity.当用户按下‘发送短信’按键后,用户界面重新回到TinySMS的初始界面
     *
     * @param phonenumber
     *            电话号码
     * @param msg
     *            短信内容
     */
    public void sendSMS(String phonenumber, String msg) {//发送短信的类
        PendingIntent pi = PendingIntent.getActivity(this, 0,new Intent(this,
                SendSMS.class), 0);
        SmsManager sms = SmsManager.getDefault();
        sms.sendTextMessage(phonenumber, null, msg, pi, null);//发送信息到指定号码
    }
}
这样是不是就完了呢?当然不是啦,请注意啦android是基于权限的,所以千万不要忘记在AndroidManifest.xml添加上发送短信的权限啊:
<uses-permission android:name="android.permission.SEND_SMS" />
好的这样一个简单的短信发送程序就完成了,是不是很简单。嘻嘻,所以,我们要挑战一下高度,一步步把这个程序改的更好,功能更加完善,说干就干,接下来就来在这个程序上加点东西。
1.3 代码功能改进
我们编写的这个短信发送程序确实可以发送短信,但是有一个缺点你不能在自己的发件箱里面查看你发送的短信是看不到,下面我们就为这个程序添加这个功能。
我们要做的事情就是把数据写入到数据库里。
系统的短信库存在data/data/com.android.providers.telephony/databases/mmssms.db如下图 2蓝框中就是模拟器的短信库
图 2短信数据库
打开mmssms.db 在打开sms表 因为所有短信数据都储存在这张表上,下面分析一下这张表的字段。
² _id 不用说了吧,标示它的唯一性
² date:表示最后接收或者发送消息的时间
² message_count:表示发送消息的数量
² recipient_ids:联系人ID,指向表 canonical_addresses里的id。
² snippet :最后收到或者发送的消息内容,就是上图body中存的东西
我们要做的事情就是首先在AndroidManifest.xml添加更多的权限:
 <!-- 发送消息-->

       <uses-permission android:name="android.permission.SEND_SMS"/>

       <!--  阅读消息-->

       <uses-permission android:name="android.permission.READ_SMS"/>

       <!--  写入消息-->

       <uses-permission android:name="android.permission.WRITE_SMS" />

       <!-- 接收消息 -->

       <uses-permission android:name="android.permission.RECEIVE_SMS" />
之后再在原先的代码中写入添加如下的代码:
if(PhoneNumberUtils.isGlobalPhoneNumber(phone)&&phone.length()>0){

                sendSMS(phone,msg);

                ContentValues values = new ContentValues();

                //发送时间

                 values.put("date", System.currentTimeMillis());

                 //阅读状态

                 values.put("read", 0);

                 //1为收  2为发

                 values.put("type", 2);

                 //送达号码

                 values.put("address", phone);

                 //送达内容

                 values.put("body", msg);

                 //插入短信库

                 getContentResolver().insert(Uri.parse("content://sms"),values);
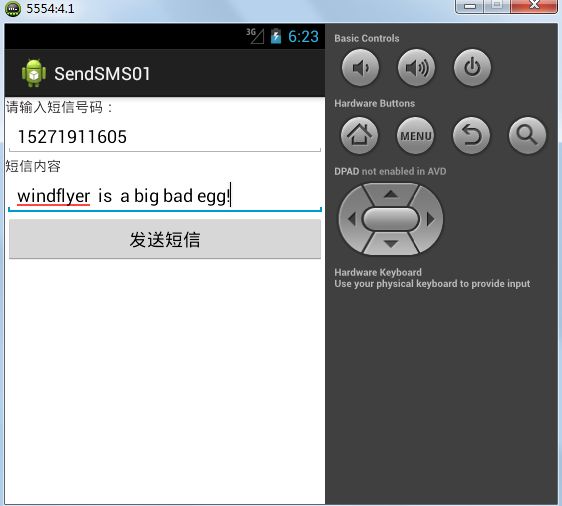
这样我们就可以在发件箱里看见我们写的短信,下面我们来测试一下,如图 3所示
图 3发送短信界面
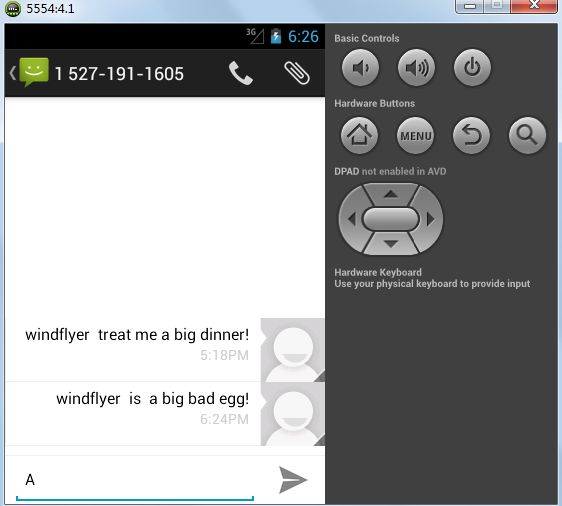
图 4短信成功显示
由图 4可以清楚的看出,短信已经成功的存入了数据库。
之后当然还可以做进一步的改进,详细的可以参考如下网址:http://blog.csdn.net/xys289187120/article/details/6740933
他的教程写的不错,我经常看,嘻嘻^^!
今天就写到这里吧!


