Android 实现ListView 3D效果 - 1
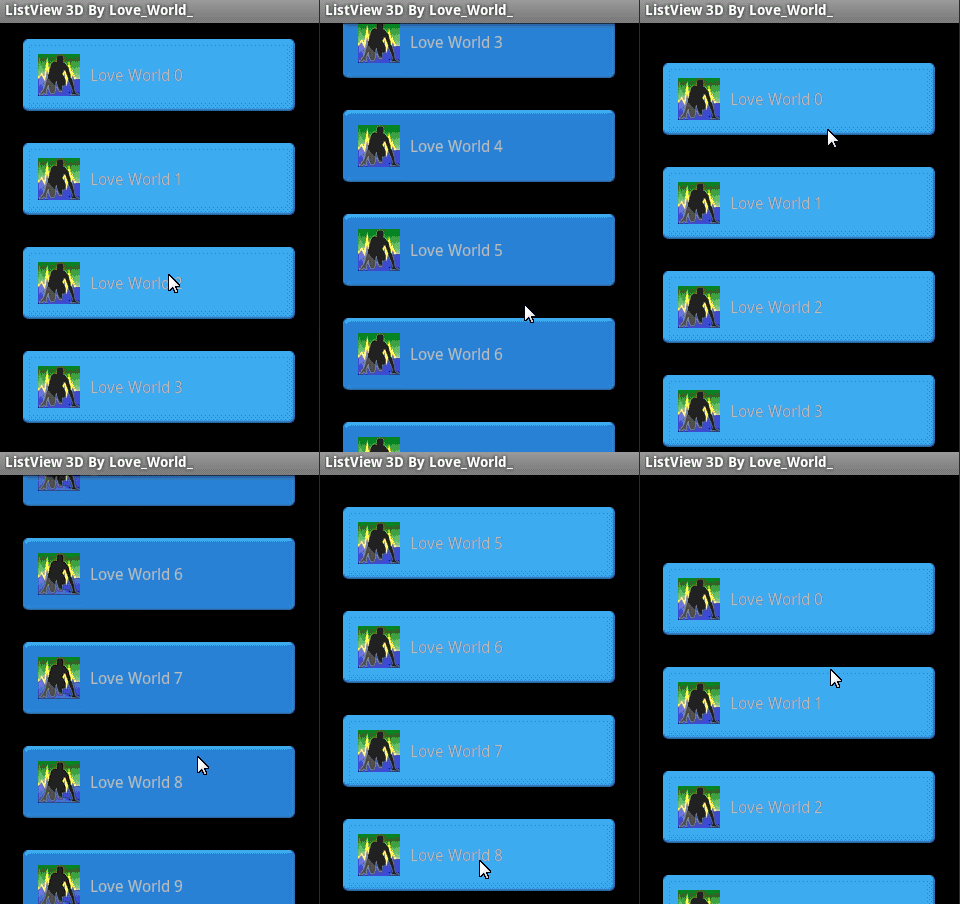
一、有图有真相
二、简单分析
1. ListView 3D实现整体布局使用自定义ListView, 只是继承自ListView父类的父类AdapterView,具体实现可参考之前写的文章:
《Android 自己动手写ListView学习其原理 1 显示第一屏Item》
《Android 自己动手写ListView学习其原理 2 上下滚动》
《Android 自己动手写ListView学习其原理 3 ItemClick,ItemLongClick,View复用》
2. 3D效果其实是伪3D,每个Item绘制两次并存垂直显示就是上面的效果。
三、具体实现步骤分析
1. 预留宽度和高度, 因为每一个Item都需要会滚动,需要宽和高都预留出来一些空间。
	/**
	 * 向当前ListView添加子视图并负责Measure子视图操作
	 *
	 * @param child  需要添加的ListView子视图(Item)
	 * @param layoutMode  在顶部添加上面添加还是在底部下面添加子视图 , LAYOUT_MODE_ABOVE 或 LAYOUT_MODE_BELOW
	 */
	private void addAndMeasureChild(View child, int layoutMode) {
		LayoutParams params = child.getLayoutParams();
		if (params == null) {
			params = new LayoutParams(LayoutParams.WRAP_CONTENT, LayoutParams.WRAP_CONTENT);
		}

		// addViewInLayout  index?
		final int index = layoutMode == LAYOUT_MODE_ABOVE ? 0: -1;
		child.setDrawingCacheEnabled(true);
		addViewInLayout(child, index, params, true);

		final int itemWidth = (int) (getWidth() * ITEM_WIDTH);
		child.measure(MeasureSpec.EXACTLY | itemWidth, MeasureSpec.UNSPECIFIED);
	}
疑问?
MeasureSpec.EXACTLY | itemWidth 进行位运算,以后可分析下MeasureSpec.EXACTLY等三个模式具体的值相关知识。
	private int getChildMargin(View child) {
	    return (int)(child.getMeasuredHeight() * (ITEM_VERTICAL_SPACE - 1) / 2);
	}

	private int getChildTop(View child) {
	    return child.getTop() - getChildMargin(child);
	}

	private int getChildBottom(View child) {
	    return child.getBottom() + getChildMargin(child);
	}

	private int getChildHeight(View child) {
	    return child.getMeasuredHeight() + 2 * getChildMargin(child);
	}
效果图
四、改变移动界面效果
	@Override
	protected boolean drawChild(Canvas canvas, View child, long drawingTime) {
		// 当前Item左侧顶部坐标值
		int left = child.getLeft();
		int top = child.getTop();

		// 当前Item中部偏移
		int centerX = child.getWidth() / 2;
		int centerY = child.getHeight() / 2;

		// 当前Item针对于ListView居中坐标
		float pivotX = left + centerX;
		float pivotY = top + centerY;

		// 计算离中间位置的距离
		float centerScreen = getHeight() / 2;
		// ?
		float distFromCenter = (pivotY - centerScreen) / centerScreen;

		// 计算缩放和旋转
		float scale = (float)(1 - SCALE_DOWN_FACTOR * (1 - Math.cos(distFromCenter)));
		float rotation = 30 * distFromCenter;

		canvas.save();
		canvas.rotate(rotation, pivotX, pivotY);
		canvas.scale(scale, scale, pivotX, pivotY);
		super.drawChild(canvas, child, drawingTime);
		canvas.restore();

		return false;
	}
效果图
疑问,这两个计算公式都不知道为什么要这样写,仅直到什么,怎样用,不知道为什么要这样写?
float distFromCenter = (pivotY - centerScreen) / centerScreen;
float scale = (float)(1 - SCALE_DOWN_FACTOR * (1 - Math.cos(distFromCenter)));
五、添加3D效果
	@Override
	protected boolean drawChild(Canvas canvas, View child, long drawingTime) {
		final Bitmap bitmap = child.getDrawingCache();
		if (bitmap == null) {
			return super.drawChild(canvas, child, drawingTime);
		}

		// 当前Item左侧顶部坐标值
		int left = child.getLeft();
		int top = child.getTop();

		// 当前Item中部偏移
		int centerX = child.getWidth() / 2;
		int centerY = child.getHeight() / 2;


		// 计算离中间位置的距离
		float centerScreen = getHeight() / 2;

		// 计算缩放
		// ?
		float distFromCenter = (top + centerY - centerScreen) / centerScreen;
        float scale = (float)(1 - SCALE_DOWN_FACTOR * (1 - Math.cos(distFromCenter)));

        // 计算旋转
        float childRotation = mListRotation - 20 * distFromCenter;
        childRotation %= 90;
        if (childRotation < 0) {
			childRotation += 90;
		}


        // 绘制当前Item
        if (childRotation < 45) {
        	// 菱角朝上时 - 下侧3D
			drawFace(canvas, bitmap, top, left, centerX, centerY, scale, childRotation - 90);
			// 正中心显示的Item
			drawFace(canvas, bitmap, top, left, centerX, centerY, scale, childRotation);
		} else {
        	// 正中心显示的Item
            drawFace(canvas, bitmap, top, left, centerX, centerY, scale, childRotation);
            // 菱角朝上时 - 上侧3D
            drawFace(canvas, bitmap, top, left, centerX, centerY, scale, childRotation - 90);
		}

		return false;
	}
	/**
	 * 绘制3D界面块
	 *
	 * @param canvas  drawChild回调提供的Canvas对象
	 * @param view
	 * @param top
	 * @param left
	 * @param centerX
	 * @param centerY
	 * @param scale
	 * @param rotation
	 */
	private void drawFace(final Canvas canvas, final Bitmap view, final int top, final int left,
			final int centerX, final int centerY, final float scale, final float rotation) {

		// 如果之前没有创建新对象
		if (mCamera == null) {
			mCamera = new Camera();
		}

		// 保存,以免以下操作对之后系统使用的Canvas造成影响
		mCamera.save();

		// 平移和旋转Camera
		mCamera.translate(0, 0, centerY);
		mCamera.rotateX(rotation);
		mCamera.translate(0, 0, -centerY);

		// 如果之前没有Matrix创建新对象
		if (mMatrix == null) {
			mMatrix = new Matrix();
		}

		mCamera.getMatrix(mMatrix);
		mCamera.restore();

		// 平移和缩放Matrix
		mMatrix.preTranslate(-centerX, -centerY);
		mMatrix.postScale(scale, scale);
		mMatrix.postTranslate(left + centerX, top + centerY);

		// 创建和初始化
		if (mPaint == null) {
			mPaint = new Paint();
			mPaint.setAntiAlias(true);
			mPaint.setFilterBitmap(true);
		}

		//
		if (mLightEnabled) {
			mPaint.setColorFilter(calculateLight(rotation));
		} else {
			//
			mPaint.setAlpha(0xFF - (int)(2 * Math.abs(rotation)));
		}


		// 绘制Bitmap
		canvas.drawBitmap(view, mMatrix, mPaint);

	}


    private LightingColorFilter calculateLight(final float rotation) {
        final double cosRotation = Math.cos(Math.PI * rotation / 180);
        int intensity = AMBIENT_LIGHT + (int)(DIFFUSE_LIGHT * cosRotation);
        int highlightIntensity = (int)(SPECULAR_LIGHT * Math.pow(cosRotation, SHININESS));

        if (intensity > MAX_INTENSITY) {
            intensity = MAX_INTENSITY;
        }
        if (highlightIntensity > MAX_INTENSITY) {
            highlightIntensity = MAX_INTENSITY;
        }

        final int light = Color.rgb(intensity, intensity, intensity);
        final int highlight = Color.rgb(highlightIntensity, highlightIntensity, highlightIntensity);

        return new LightingColorFilter(light, highlight);
    }
六、扩展学习
1. Canvas与rotate等方法参数含义,作用与使用
2. Camera + Matirx如何使用,与Canvas区别
3. 何时使用Paint
4. 计算公式由来
七、源码下载
Android 实现ListView 3D效果 - 1
八、 参考资料
Making your own 3D list – Part 2
转载请注明出处:http://blog.csdn.net/love_world_/article/details/8770127
