CentOS5.5,MRTG全方位监控一台主机(CPU、内存、外设、网卡等)
全方位,监控主机(CPU、内存、外设(磁盘)、网卡)
一. 为什么监控一台主机
服务器宕机了,那所有服务都没有了。
二. 对哪些部分或者哪些主机性能进行监控
1. 先看主机的组成
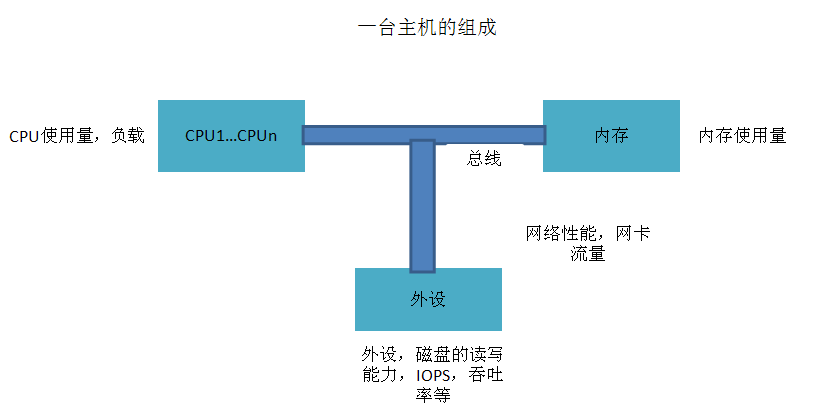
如图所示,主机由CPU、内存、外设等组成,CPU、内存、外设又由总线相连接。
所以监控一台主机,主要是对CPU、内存、外设以及网络(网卡)进行监控
2. 具体监控哪些性能
1) 监控 CPU
主要监控CPU的使用百分比,空闲百分比
相信这个命令,熟悉吧
[root@localhost monitor]# /usr/bin/sar -u 1 3
Linux 2.6.18-194.el5 (localhost.localdomain) 05/25/2011
01:42:56 AM CPU %user %nice %system %iowait %steal %idle
01:42:57 AM all 2.04 0.00 4.08 0.00 0.00 93.88
01:42:58 AM all 6.38 0.00 7.45 0.00 0.00 86.17
01:42:59 AM all 3.09 0.00 10.31 32.99 0.00 53.61
Average: all 3.81 0.00 7.27 11.07 0.00 77.85
2) 监控内存
主要监控mem的使用量,空闲量,比如
[root@localhost monitor]# free
total used free shared buffers cached
Mem: 1035108 1009908 25200 0 341292 474360
-/+ buffers/cache: 194256 840852
Swap: 524264 16 524248
3) 监控磁盘
主要监控磁盘的读写速度,读写量,比如
[root@localhost monitor]# iostat
Linux 2.6.18-194.el5 (localhost.localdomain) 05/25/2011
avg-cpu: %user %nice %system %iowait %steal %idle
2.84 0.16 11.39 2.69 0.00 82.93
Device: tps Blk_read/s Blk_wrtn/s Blk_read Blk_wrtn
sda 12.04 365.52 1167.76 906127 2894884
sda1 0.05 0.86 0.00 2133 4
sda2 11.96 363.44 1167.75 900962 2894864
sda3 0.02 0.96 0.01 2392 16
sdb 0.03 0.87 0.02 2164 48
sdb1 0.02 0.49 0.02 1220 48
sdc 0.03 0.92 0.02 2282 48
sdc1 0.01 0.54 0.02 1338 48
sdd 0.03 0.79 0.01 1954 32
sdd1 0.02 0.41 0.01 1010 32
sde 0.03 0.86 0.01 2122 32
sde1 0.01 0.48 0.01 1178 32
sdf 3.64 1072.49 0.01 2658704 24
sdf1 3.60 1071.64 0.01 2656584 16
md10 0.10 0.79 0.01 1970 16
4) 监控网卡
网卡很重要,如果网卡坏了,如果这台server提供网络服务,那么必须更换网卡。相信我们很熟悉这个,
[root@localhost monitor]# sar
Linux 2.6.18-194.el5 (localhost.localdomain) 05/25/2011
12:20:02 AM CPU %user %nice %system %iowait %steal %idle
12:30:01 AM all 2.65 0.00 7.06 0.35 0.00 89.94
12:40:01 AM all 3.23 0.00 7.99 0.02 0.00 88.76
12:50:01 AM all 6.01 0.00 11.11 0.03 0.00 82.84
01:00:01 AM all 3.41 0.00 8.09 0.09 0.00 88.41
Average: all 3.83 0.00 8.56 0.12 0.00 87.49
01:04:38 AM LINUX RESTART
01:10:01 AM CPU %user %nice %system %iowait %steal %idle
01:20:02 AM all 2.33 0.00 14.81 1.18 0.00 81.69
01:30:01 AM all 1.06 0.00 6.06 0.32 0.00 92.55
01:40:01 AM all 1.51 0.00 5.26 0.50 0.00 92.73
Average: all 1.63 0.00 8.72 0.67 0.00 88.98
除了这些之外,有时候,可能需要监控一下交换分区的使用情况。可以用vmstat得到综合的结果
[root@localhost monitor]# vmstat -n 1 3
procs -----------memory---------- ---swap-- -----io---- --system-- -----cpu------
r b swpd free buff cache si so bi bo in cs us sy id wa st
0 0 16 27772 341688 474648 0 0 667 542 711 243 3 11 84 2 0
1 0 16 27716 341688 474648 0 0 0 0 740 239 2 5 93 0 0
0 0 16 27716 341688 474648 0 0 0 0 1044 613 11 14 74 0 0
三. 通过MRTG绘图,进行监控
关于MRTG安装,请看http://blog.csdn.net/longxibendi/archive/2011/05/24/6443471.aspx
1. 监控网卡
请查看http://blog.csdn.net/longxibendi/archive/2011/05/24/6443471.aspx
可以自己结合sar的输出进行调整
2. 监控CPU
mkdir –p /root/Desktop/monitor
1)编写shell监控程序 cpuinfo.sh
[root@localhost monitor]# cat cpuinfo.sh
#!/bin/bash
#author longxibendi
#blog http://blog.csdn.net/longxibendi
#function get cpu usage information
/usr/bin/sar -u 1 3 > cpu.log
cat cpu.log | grep Average | awk '{ print $3+$5;}'
cat cpu.log | grep Average | awk '{ print $8;}'
/usr/bin/uptime
/sbin/ifconfig | grep "inet addr" | head -n 1 | awk '{print $2;}'
注意赋权: chmod 750 cpuinfo.sh
2)在/etc/mrtg/mrtg.cfg中添加配置信息
Vi /etc/mrtg/mrtg.cfg 按 shift+g 后 按 I 添加以下内容
#####################################longxibendi############################33
Target[localhost_cpu]: `/root/Desktop/monitor/cpuinfo.sh`
Xsize[localhost_cpu]: 300
Ysize[localhost_cpu]: 100
Ytics[localhost_cpu]: 10
MaxBytes[localhost_cpu]: 100
Title[localhost_cpu]: CPU State
PageTop[localhost_cpu]: <H1>CPU State of Server</H1>
ShortLegend[localhost_cpu]: %
YLegend[localhost_cpu]: CPU (%)
Legend1[localhost_cpu]: Used
Legend2[localhost_cpu]: Total
LegendI[localhost_cpu]: CPU Used
LegendO[localhost_cpu]: CPU IDEL
Options[localhost_cpu]: growright,gauge,nopercent
3)制作index.html
indexmaker /etc/mrtg/mrtg.cfg > /var/www/html/index.html
4)执行三次一下命令,生成绘图信息
LANG=C LC_ALL=C /usr/bin/mrtg /etc/mrtg/mrtg.cfg
3. 监控MEM
1) 编写shell监控程序 meminfo.sh
[root@localhost monitor]# cat meminfo.sh
#!/bin/bash
#author longxibendi
#blog http://blog.csdn.net/longxibendi
#function get mem usage information
/usr/bin/free | grep Mem > mem.log
cat mem.log | awk ' { print $3;}'
cat mem.log | awk ' { print $2;}'
/usr/bin/uptime
/sbin/ifconfig | grep "inet addr" | head -n 1 | awk '{print $2;}'
注意赋权: chmod 750 meminfo.sh
2) 在/etc/mrtg/mrtg.cfg中添加配置信息
Vi /etc/mrtg/mrtg.cfg 按 shift+g 后 按 I 添加以下内容
##################################longxibendi############################3
Target[localhost_mem]: `/root/Desktop/monitor/meminfo.sh`
Xsize[localhost_mem]: 300
Ysize[localhost_mem]: 100
Ytics[localhost_mem]: 10
MaxBytes[localhost_mem]: 4096
Title[localhost_mem]: Memory State of Server
PageTop[localhost_mem]: <H1>Memory State of Server</H1>
ShortLegend[localhost_mem]: B
kmg[localhost_mem]: M
YLegend[localhost_mem]: Memory Usage
Legend1[localhost_mem]: Used
Legend2[localhost_mem]: Total
LegendI[localhost_mem]: Used
LegendO[localhost_mem]: Total
Options[localhost_mem]: growright,gauge,nopercent
3) 制作index.html
indexmaker /etc/mrtg/mrtg.cfg > /var/www/html/index.html
4)执行三次一下命令,生成绘图信息
LANG=C LC_ALL=C /usr/bin/mrtg /etc/mrtg/mrtg.cfg
4. 监控磁盘
1) 编写shell监控程序 ioinfo.sh
[root@localhost monitor]# cat ioinfo.sh
#!/bin/bash
#author longxibendi
#blog http://blog.csdn.net/longxibendi
#function get information of sda's io
/usr/bin/iostat | grep "sda " > ioinfo.log
cat ioinfo.log | awk ' { print $3;}'
cat ioinfo.log | awk ' { print $4;}'
/usr/bin/uptime
/sbin/ifconfig | grep "inet addr" | head -n 1 | awk '{print $2;}'
注意赋权: chmod 750 ioinfo.sh
2) 在/etc/mrtg/mrtg.cfg中添加配置信息
Vi /etc/mrtg/mrtg.cfg 按 shift+g 后 按 I 添加以下内容
##################################longxibendi############################3
Target[localhost_io]: `/root/Desktop/monitor/ioinfo.sh`
Xsize[localhost_io]: 300
Ysize[localhost_io]: 100
Ytics[localhost_io]: 10
MaxBytes[localhost_io]: 100
Title[localhost_io]: IO State of Server
PageTop[localhost_io]: <H1>SDA State of Server</H1>
ShortLegend[localhost_io]: blocks
YLegend[localhost_io]: Blk_read/s Blk_wrtn/s
Legend1[localhost_io]: Blk_read/s
Legend2[localhost_io]: Blk_wrtn/s
LegendI[localhost_io]: Blk_read/s
LegendO[localhost_io]: Blk_wrtn/s
Options[localhost_io]: growright,gauge,nopercent
注意:我的是监控 /dev/sda这块磁盘的IO,如果要监控其他磁盘,方法类似。
3) 制作index.html
indexmaker /etc/mrtg/mrtg.cfg > /var/www/html/index.html
4) 执行三次一下命令,生成绘图信息
LANG=C LC_ALL=C /usr/bin/mrtg /etc/mrtg/mrtg.cfg
除了监控上面几项外,也可以监控vmstat 的各个输出,具体方法都是类似的。
比如可以监控vmstat 的 si so 字段等信息
四. /etc/mrtg/mrtg.cfg配置文件解释
##################################longxibendi############################
Target[localhost_io]: `/root/Desktop/monitor/ioinfo.sh`
Xsize[localhost_io]: 300
Ysize[localhost_io]: 100
Ytics[localhost_io]: 10
MaxBytes[localhost_io]: 100
Title[localhost_io]: IO State of Server
PageTop[localhost_io]: <H1>SDA State of Server</H1>
ShortLegend[localhost_io]: blocks
YLegend[localhost_io]: Blk_read/s Blk_wrtn/s
Legend1[localhost_io]: Blk_read/s
Legend2[localhost_io]: Blk_wrtn/s
LegendI[localhost_io]: Blk_read/s
LegendO[localhost_io]: Blk_wrtn/s
Options[localhost_io]: growright,gauge,nopercent
Target:是要执行的脚本
Xsize:生成图表的横向宽度(最大600)
Ysize:生成图表的纵向高度(最大200)
Title:标题
kMG: Change the default multiplier prefixes
Ytics:纵向划分为几个块(格子)
MaxBytes:图表纵向数值的最大上限
PageTop:页面上面的提示
kilo:一般是写1024,如果需要的话,是1000在计算机里的单位
LegendI:从SHELL返回的数据中的第一个
LegendO:从SHELL返回的数据中的第二个
Options: growright,表示图表向右延展
其实,这个解释,可以自己对照 SHELL程序的输出猜出来的。
参考
http://blog.csdn.net/longxibendi/archive/2011/05/24/6443471.aspx
声明:本文档可以随意更改,但必须署名原作者
作者:凤凰舞者 qq:578989855
