Android平台调用WebService详解
上篇文章已经对Web Service及其相关知识进行了介绍(Android开发之WebService介绍 ),相信有的朋友已经忍耐不住想试试在Android应用中调用Web Service。本文将通过一个简单的示例讲解和演示Android平台的Web Service开发。
Ksoap2-android简介
在Android平台调用Web Service需要依赖于第三方类库ksoap2,它是一个SOAP Web service客户端开发包,主要用于资源受限制的Java环境如Applets或J2ME应用程序(CLDC/ CDC/MIDP)。认真读完对ksoap2的介绍你会发现并没有提及它应用于Android平台开发,没错,在Android平台中我们并不会直接使用ksoap2,而是使用ksoap2 android。KSoap2 Android 是Android平台上一个高效、轻量级的SOAP开发包,等同于Android平台上的KSoap2的移植版本。
Ksoap2-android jar包下载
ksoap2 android当前的最新版本为2.5.4,名为ksoap2-android-assembly-2.5.4-jar-with-dependencies.jar,它的下载地址是:http://code.google.com/p/ksoap2-android/,进入页面后,点击“Downloads”标签页,如下图所示:

在“Downloads”页面的下方,找到如下图所示的紫色的链接,然后在链接上点击右键,找到相关下载项进行下载即可。右键菜单中显示的下载项依据浏览器的不同而有所区别,比如我使用的360浏览器,在键接上点击右键,然后选择“使用360安全浏览器下载”即可弹出下载保存对话框。

Android平台调用Web Service示例
下面将通过一个示例讲解如何在Android平台调用Web Service。既然要调用Web Service,那就要先有Web Service。我们还是选择使用上篇文章中介绍的查询手机号码归属地的Web service,它的WSDL为http://webservice.webxml.com.cn/WebServices/MobileCodeWS.asmx?wsdl。
1)新建Android工程,引入上面下载的ksoap2-android类库
Android工程的创建就不多说了,主要想说明的是如何向Android工程中添加第三方jar包。当然,添加第3方jar的方式有多种,我个人比较喜欢用下面这种方式,即先将第三方jar包拷贝到工程某个目录下,再将其加入到工程的Build Path中。
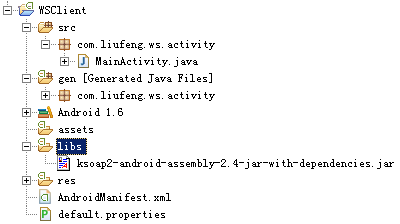
例如,我创建的Android工程名为WSClient,在工程名上点击右键,新建一个Folder(目录或文件夹),名为libs,然后将ksoap2-android类库拷贝到libs目录中,如下图所示:

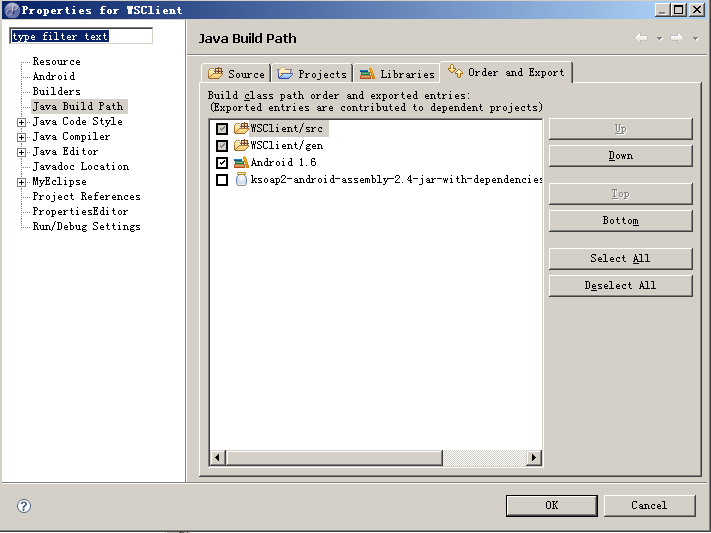
接着,在jar包ksoap2-android-assembly-2.4-jar-with-dependencies.jar上点击右键,依次选择“Build Path”-“Add to Build Path”。再在工程名上点击右键,依次选择“Build Path”-“Config Build Path...”,将看到如下所示界面:

选中ksoap2 jar包前面的选项框,点击OK,则完成了ksoap2 jar包的添加(说明:在Android工程中,添加其它jar包的方法完全一样,操作一两遍后,你会发现其实很简单的)。
2)编写布局文件res/layout/main.xml
- <?xml version="1.0" encoding="utf-8"?>
- <LinearLayout xmlns:android="http://schemas.android.com/apk/res/android"
- android:orientation="vertical"
- android:layout_width="fill_parent"
- android:layout_height="fill_parent"
- android:paddingTop="5dip"
- android:paddingLeft="5dip"
- android:paddingRight="5dip"
- >
- <TextView
- android:layout_width="fill_parent"
- android:layout_height="wrap_content"
- android:text="手机号码(段):"
- />
- <EditText android:id="@+id/phone_sec"
- android:layout_width="fill_parent"
- android:layout_height="wrap_content"
- android:inputType="textPhonetic"
- android:singleLine="true"
- android:hint="例如:1398547"
- />
- <Button android:id="@+id/query_btn"
- android:layout_width="wrap_content"
- android:layout_height="wrap_content"
- android:layout_gravity="right"
- android:text="查询"
- />
- <TextView android:id="@+id/result_text"
- android:layout_width="wrap_content"
- android:layout_height="wrap_content"
- android:layout_gravity="center_horizontal|center_vertical"
- />
- </LinearLayout>
3)编写MainActivity类
- package com.liufeng.ws.activity;
- import org.ksoap2.SoapEnvelope;
- import org.ksoap2.serialization.SoapObject;
- import org.ksoap2.serialization.SoapSerializationEnvelope;
- import org.ksoap2.transport.HttpTransportSE;
- import android.app.Activity;
- import android.os.Bundle;
- import android.view.View;
- import android.view.View.OnClickListener;
- import android.widget.Button;
- import android.widget.EditText;
- import android.widget.TextView;
- /**
- * Android平台调用WebService(手机号码归属地查询)
- *
- * @author liufeng
- * @date 2011-05-18
- */
- public class MainActivity extends Activity {
- private EditText phoneSecEditText;
- private TextView resultView;
- private Button queryButton;
- @Override
- public void onCreate(Bundle savedInstanceState) {
- super.onCreate(savedInstanceState);
- setContentView(R.layout.main);
- phoneSecEditText = (EditText) findViewById(R.id.phone_sec);
- resultView = (TextView) findViewById(R.id.result_text);
- queryButton = (Button) findViewById(R.id.query_btn);
- queryButton.setOnClickListener(new OnClickListener() {
- @Override
- public void onClick(View v) {
- // 手机号码(段)
- String phoneSec = phoneSecEditText.getText().toString().trim();
- // 简单判断用户输入的手机号码(段)是否合法
- if ("".equals(phoneSec) || phoneSec.length() < 7) {
- // 给出错误提示
- phoneSecEditText.setError("您输入的手机号码(段)有误!");
- phoneSecEditText.requestFocus();
- // 将显示查询结果的TextView清空
- resultView.setText("");
- return;
- }
- // 查询手机号码(段)信息
- getRemoteInfo(phoneSec);
- }
- });
- }
- /**
- * 手机号段归属地查询
- *
- * @param phoneSec 手机号段
- */
- public void getRemoteInfo(String phoneSec) {
- // 命名空间
- String nameSpace = "http://WebXml.com.cn/";
- // 调用的方法名称
- String methodName = "getMobileCodeInfo";
- // EndPoint
- String endPoint = "http://webservice.webxml.com.cn/WebServices/MobileCodeWS.asmx";
- // SOAP Action
- String soapAction = "http://WebXml.com.cn/getMobileCodeInfo";
- // 指定WebService的命名空间和调用的方法名
- SoapObject rpc = new SoapObject(nameSpace, methodName);
- // 设置需调用WebService接口需要传入的两个参数mobileCode、userId
- rpc.addProperty("mobileCode", phoneSec);
- rpc.addProperty("userId", "");
- // 生成调用WebService方法的SOAP请求信息,并指定SOAP的版本
- SoapSerializationEnvelope envelope = new SoapSerializationEnvelope(SoapEnvelope.VER10);
- envelope.bodyOut = rpc;
- // 设置是否调用的是dotNet开发的WebService
- envelope.dotNet = true;
- // 等价于envelope.bodyOut = rpc;
- envelope.setOutputSoapObject(rpc);
- HttpTransportSE transport = new HttpTransportSE(endPoint);
- try {
- // 调用WebService
- transport.call(soapAction, envelope);
- } catch (Exception e) {
- e.printStackTrace();
- }
- // 获取返回的数据
- SoapObject object = (SoapObject) envelope.bodyIn;
- // 获取返回的结果
- String result = object.getProperty(0).toString();
- // 将WebService返回的结果显示在TextView中
- resultView.setText(result);
- }
- }
讲解:
注意点1:如代码中的62-69行所示,调用Web Service之前你需要先弄清楚这4个的值分别是什么:命名空间、调用的方法名称、EndPoint和SOAP Action。当在浏览器中访问WSDL时,很容易得知命名空间、调用的方法名称是什么(不明白的请看上篇文章),至于EndPoint通常是将WSDL地址末尾的"?wsdl"去除后剩余的部分;而SOAP Action通常为命名空间 + 调用的方法名称。
注意点2:75-76行是设置调用WebService接口方法需要传入的参数。(在WSDL中能够看到调用方法需要传入的参数个数及参数名称,在设置参数时最好指明每一个传入参数的名称,如本例中的mobileCode、userId。网上有些资料说在需要传入多个参数时,只要多个参数的顺序与WSDL中参数出现的顺序一致即可,名称并不需要和WSDL中的一致,但实际测试发现,大多数情况下并不可行!)
例如下面图版上显示的WSDL片段,调用该Web Service的checkUserInfo方法就需要传入4个参数,参数名称分别为:in0、in1、in2和in3。

注意点3:也许你会对第100行代码产生疑惑,为什么要用object.getProperty("getMobileCodeInfoResult")来取得调用结果?那是因为WSDL中明确告诉了返回结果是String数组,它的名称为getDatabaseInfoResult,WSDL中的描述如下:
<s:elementminOccurs="0" maxOccurs="1" name="getDatabaseInfoResult" type="tns:ArrayOfString" />
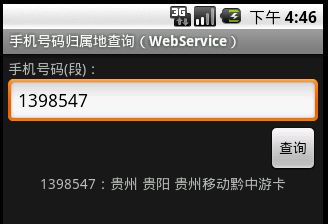
本例中调用WebService后返回的结果如下所示:
<?xml version="1.0" encoding="utf-8"?>
<string xmlns="http://WebXml.com.cn/">1398547:贵州 贵阳 贵州移动黔中游卡</string>
咦,这里明明返回的是xml格式的内容,为什么我们不需要通过解析xml来获取我们需要的内容呢?其实如果你仔细看代码中的96-97行并不难发现:
// 获取返回的数据
SoapObject object = (SoapObject) envelope.bodyIn;
ksoap2能够将返回的xml转换成SoapObject对象,然后我们就可以通过操作对象的方式来获取需要的数据了。
注意点4:同样还是第100行代码。从有些WSDL中我们并不能得知返回结果的名称(如本例中的getMobileCodeInfoResult),那又该如何调用呢?其实上面已经暗示了这个问题:当通过第97行代码获取返回结果并将其转换成SoapObject对象后,如果你并不知道通过该对象的哪个属性来取值,你完全可以调用对象的toString()方法来查看返回的内容,例如将本例中的第100行代码替换成:
// 获取返回的结果
String result = object.toString();
这样得到的返回结果为:
![]()
注意看括号{}里面的内容是一个键-值对形式,以等号=分隔,我们正是通过=号左边的“getMobileCodeInfoResult”来获取右边的查询结果。
其实在不知道返回结果名称时(如本例的100行,我们并不知道返回结果中有属性getMobileCodeInfoResult),有一种更为简便的方法,直接通过索引下标来获取属性值,也就是将第100行代码替换为:
String result = object.getProperty(0).toString();
注意点5:本例中只返回了一个值,但有些WebService会返回多个值该怎么获取?获取方法与本例完全一样,只是需要注意的是如果是返回多个值,通过第100代码object.getProperty(0);得到的可能仍然是一个SoapObject。不断地调用getProperty()方法;总能得到你想要的全部结果。
注意点6:在调用某些WebService时,可能会报一些异常,但你又发现除了调用的WebService不同之外,其它地方的写法和我的完全一样,这又该如何解决呢?尝试改变第79代码中SOAP的版本号,可以分别尝试使用SoapEnvelope.VER10、SoapEnvelope.VER11、SoapEnvelope.VER12这样三个值。另外,在调用某些WebService时,可能在第91行代码中,调用WebService时并不需要传入soapAction,将其置为null即可。
4)在AndroidManifest.xml中配置添加访问网络的权限(千万别忘记!!!)
- <?xml version="1.0" encoding="utf-8"?>
- <manifest xmlns:android="http://schemas.android.com/apk/res/android"
- package="com.liufeng.ws.activity"
- android:versionCode="1"
- android:versionName="1.0">
- <application android:icon="@drawable/icon" android:label="@string/app_name">
- <activity android:name=".MainActivity" android:label="@string/app_name">
- <intent-filter>
- <action android:name="android.intent.action.MAIN" />
- <category android:name="android.intent.category.LAUNCHER" />
- </intent-filter>
- </activity>
- </application>
- <uses-sdk android:minSdkVersion="4" />
- <!-- 访问网络的权限 -->
- <uses-permission android:name="android.permission.INTERNET" />
- </manifest>
