CentOS 6.5环境下使用HAProxy+apache实现web服务的动静分离
HAProxy提供高可用性、负载均衡以及基于TCP和HTTP应用的代理,支持虚拟主机,它是免费、快速并且可靠的一种解决方案。HAProxy特别适用于那些负载特大的web站点,这些站点通常又需要会话保持或七层处理。HAProxy运行在当前的硬件上,完全可以支持数以万计的并发连接。并且它的运行模式使得它可以很简单安全的整合进您当前的架构中,同时可以保护你的web服务器不被暴露到网络上。
HAProxy实现了一种事件驱动,单一进程模型,此模型支持非常大的并发连接数。多进程或多线程模型受内存限制、系统调度器限制以及无处不在的锁限制,很少能处理数千并发连接。事件驱动模型因为在有更好的资源和时间管理的用户端(User-Space) 实现所有这些任务,所以没有这些问题。此模型的弊端是,在多核系统上,这些程序通常扩展性较差。这就是为什么他们必须进行优化以 使每个CPU时间片(Cycle)做更多的工作。
拓扑图:
第一步:,这里我们使用三台虚拟机来做测试,前端一台haproxy做调度,后端两台httpd服务器提供web服务,在做动静分离时时前端haproxy来判断动态和静态内容分别调度到哪台服务器上;
第二步:安装httpd、php以及haproxy,这里我们直接用yum来安装即可,安装好之后给这三台虚拟配置好相关的网络设备以及提供相关的测试页面等,在eth1这张网卡上选择相同的一个通信通道,node5这台虚拟机上haproxy的主机,node1和node2是不同的两台后端提供web服务器的虚拟主机
在node1和node2上设置好相关配置,选择虚拟机上的VMnet2与haproxy上的eth1的同一通信通道,再配置IP地址和默认网关接口,而后再提供不同的页面以便测试用;
192.168.1.20:
192.168.1.30:
测试页面能否正常访问

总结:
HAProxy是一款比较轻量级的负载均衡服务器,特别适用于那些负载特大的web站点,这些站点通常又需要会话保持或七层处理。HAProxy运行在当前的硬件上,完全可以支持数以万计的并发连接。并且它的运行模式使得它可以很简单安全的整合进您当前的架构中,同时可以保护你的web服务器不被暴露到网络上。
HAProxy实现了一种事件驱动,单一进程模型,此模型支持非常大的并发连接数。多进程或多线程模型受内存限制、系统调度器限制以及无处不在的锁限制,很少能处理数千并发连接。事件驱动模型因为在有更好的资源和时间管理的用户端(User-Space) 实现所有这些任务,所以没有这些问题。此模型的弊端是,在多核系统上,这些程序通常扩展性较差。这就是为什么他们必须进行优化以 使每个CPU时间片(Cycle)做更多的工作。
拓扑图:
第一步:,这里我们使用三台虚拟机来做测试,前端一台haproxy做调度,后端两台httpd服务器提供web服务,在做动静分离时时前端haproxy来判断动态和静态内容分别调度到哪台服务器上;
在haproxy node5中添加两块网卡,将新添加的网卡定义在vmnet2中
将两个后端的动静节点也设置到vmnet2中
第二步:安装httpd、php以及haproxy,这里我们直接用yum来安装即可,安装好之后给这三台虚拟配置好相关的网络设备以及提供相关的测试页面等,在eth1这张网卡上选择相同的一个通信通道,node5这台虚拟机上haproxy的主机,node1和node2是不同的两台后端提供web服务器的虚拟主机
[root@node5 ~]# yum install -y haproxy
[root@node5 ~]# ifconfig eth1 192.168.1.10/24 up
[root@node5 ~]# ifconfig
eth0      Link encap:Ethernet  HWaddr 00:0C:29:BA:4E:78
          inet addr:192.168.8.43  Bcast:192.168.8.255  Mask:255.255.255.0
          inet6 addr: fe80::20c:29ff:feba:4e78/64 Scope:Link
          UP BROADCAST RUNNING MULTICAST  MTU:1500  Metric:1
          RX packets:1418 errors:0 dropped:0 overruns:0 frame:0
          TX packets:185 errors:0 dropped:0 overruns:0 carrier:0
          collisions:0 txqueuelen:1000
          RX bytes:103198 (100.7 KiB)  TX bytes:19819 (19.3 KiB)


eth1      Link encap:Ethernet  HWaddr 00:0C:29:BA:4E:82
          inet addr:192.168.1.10  Bcast:192.168.1.255  Mask:255.255.255.0
          inet6 addr: fe80::20c:29ff:feba:4e82/64 Scope:Link
          UP BROADCAST RUNNING MULTICAST  MTU:1500  Metric:1
          RX packets:63 errors:0 dropped:0 overruns:0 frame:0
          TX packets:6 errors:0 dropped:0 overruns:0 carrier:0
          collisions:0 txqueuelen:1000
          RX bytes:3780 (3.6 KiB)  TX bytes:468 (468.0 b)


lo        Link encap:Local Loopback
          inet addr:127.0.0.1  Mask:255.0.0.0
          inet6 addr: ::1/128 Scope:Host
          UP LOOPBACK RUNNING  MTU:16436  Metric:1
          RX packets:12 errors:0 dropped:0 overruns:0 frame:0
          TX packets:12 errors:0 dropped:0 overruns:0 carrier:0
          collisions:0 txqueuelen:0
          RX bytes:1244 (1.2 KiB)  TX bytes:1244 (1.2 KiB)
在node1和node2上设置好相关配置,选择虚拟机上的VMnet2与haproxy上的eth1的同一通信通道,再配置IP地址和默认网关接口,而后再提供不同的页面以便测试用;
192.168.1.20:
# yum install -y php httpd
# ifconfig eth0 192.168.1.20/24 up
# route add defaulte gw 192.168.1.10  # 网关指向haproxy主机的eth1地址
# ping 192.168.1.10  # ping一下haproxy的节点看是否ping通
# vim /var/www/html/index.html
<h1>192.168.1.20</h1>
# for i in {1..10} ; do echo "<h1>192.168.8.20 test$i</h1>" > test$i.html; done # 创建test1~10个静态html页面方便后面测试
# service httpd start # 配置好之后就把web服务启动起来,再访问测试一下,测试的连接改为桥接方式
192.168.1.30:
# yum install -y php httpd
# ifconfig eth0 192.168.1.30/24 up
# route add defaulte gw 192.168.1.10  # 网关指向haproxy主机的eth1地址
# ping 192.168.1.10  # ping一下haproxy的节点看是否ping通
# vim /var/www/html/index.html
<h1>192.168.1.30</h1>
# for i in {1..10} ; do echo "<h1>192.168.8.30 test$i</h1>" > test$i.html; done # 创建test1~10个静态html页面方便后面测试
# service httpd start # 配置好之后就把web服务启动起来,再访问测试一下,测试的连接改为桥接方式
测试页面能否正常访问
[root@node5 ~]# curl -I http://192.168.1.20
HTTP/1.1 200 OK
Date: Mon, 09 May 2016 12:00:53 GMT
Server: Apache/2.2.15 (CentOS)
X-Powered-By: PHP/5.3.3
Connection: close
Content-Type: text/html; charset=UTF-8


[root@node5 ~]# curl -I http://192.168.1.30
HTTP/1.1 200 OK
Date: Fri, 29 Apr 2016 02:55:57 GMT
Server: Apache/2.2.15 (CentOS)
X-Powered-By: PHP/5.3.3
Connection: close
Content-Type: text/html; charset=UTF-8
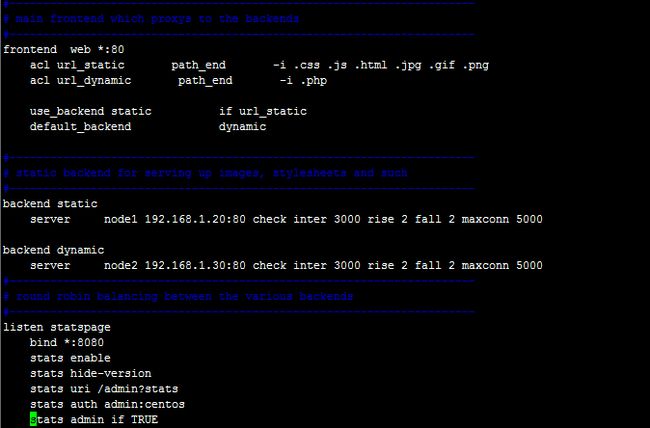
第三步:配置haproxy的相关配置信息;
############## 以上的使用默认配置就可以了 #######################


frontend web *:80   # *表示haproxy监听所有地址,监听的端口为80
   # 定义访问控制,表示以url以.css .js .html .php结尾的分别调度到哪台服务器上访问
    acl url_static       path_end       -i .css .js .html
    acl url_dynamic      path_end       -i .php


    # usr_backend表示使用backend服务,if表示如果满足url_static这个条件就调度到这台服务器上
    use_backend        static          if url_static
    default_backend    dynamic


backend static   # 定义调用后端的静态页面的服务器上
    server node1 192.168.1.20:80 check inter 3000 rise 2 fall 2 maxconn 5000
backend dynamic  # 定义调用后端的动态页面的服务器上
    server node2 192.168.1.30:80 check inter 3000 rise 2 fall 2 maxconn 5000
listen statspage # 定义监控管理接口的界面
    bind *:8888    # 定义访问页面端口
    stats enable    # 启用管理界面
    stats hide-version    # 隐藏版本
    stats uri /admin?stats    # 访问路径
    stats auth admin:centos    # 访问时需要验证登录
    stats admin if TRUE    # 如果登录成功就可以管理在线服务器

访问管理页面:
总结:
HAProxy是一款比较轻量级的负载均衡服务器,特别适用于那些负载特大的web站点,这些站点通常又需要会话保持或七层处理。HAProxy运行在当前的硬件上,完全可以支持数以万计的并发连接。并且它的运行模式使得它可以很简单安全的整合进您当前的架构中,同时可以保护你的web服务器不被暴露到网络上。
