自定义View之绘图篇(四):baseLine和FontMetrics
乐观是一首激昂优美的进行曲,时刻鼓舞着你向事业的大路勇猛前进。——大仲马
相关文章:
自定义View之绘图篇(一):基础图形的绘制
自定义View之绘图篇(二):路径(Path)
自定义View之绘图篇(三):文字(Text)
了解baseLine和FontMetrics有助于我们理解drawText()绘制文字的原理,下面我们一起来看看呗。
一、baseLine 基线
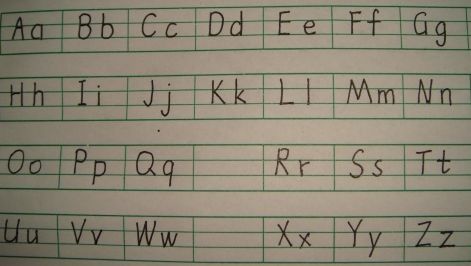
记得小时候练习字母用的是四线格本,把字母写在四线格内,如下:
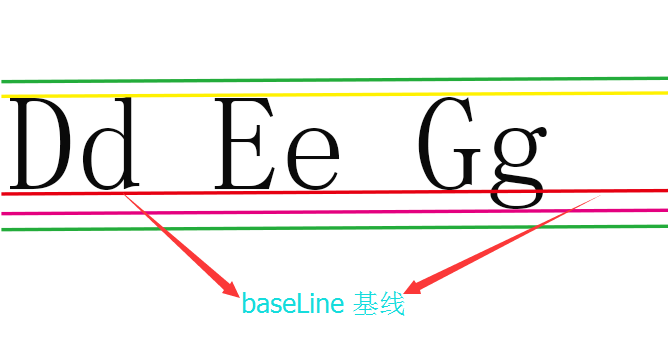
那么在canvas中drawText绘制文字时候,也是有规则的,这个规则就是baseLine(基线)。什么又是基线了,说白了就是一条直线,我们这里理解的是确定它的位置。我们先来看一下基线:
从上图看出:基线等同四线格的第三条线,在Android中基线的位置定了,那么文字的位置也就定了。
1、canvas.drawText()
方法预览:
drawText(String text, float x, float y, Paint paint)参数:
text 需要绘制的文字
x 绘制文字原点X坐标
y 绘制文字原点Y坐标
paint 画笔
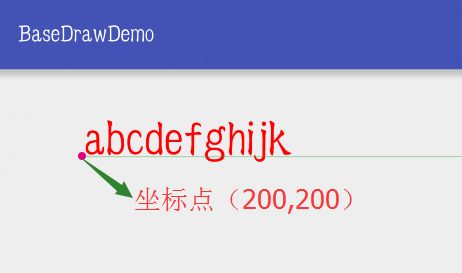
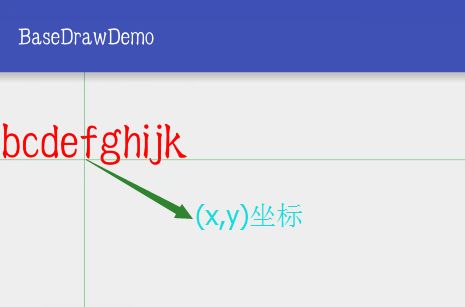
我们先来看一张图:
需要注意的是x,y并不是文字左上角的坐标点,它比较特殊,y所代表的是基线坐标y的坐标。
我们具体来看看drawText()方法,这里以一个例子的形式来理解:
      mPaint.setAntiAlias(true);
      mPaint.setColor(Color.RED);
      mPaint.setStyle(Paint.Style.FILL);
      mPaint.setTextSize(120);

      canvas.drawText("abcdefghijk",200,200,mPaint);

      mPaint.setColor(Color.parseColor("#23AC3B"));
      canvas.drawLine(200,200,getWidth(),200,mPaint);
效果图:
证实了y是基线y的坐标点。
结论:
1、canvas.drawText()中参数y是基线y的坐标
2、x坐标、基线位置、文字大小确定,文字的位置就是确定的了。
2、mPaint.setTextAlign(Paint.Align.XXX);
我们可以从上面的例子看出,x代表的是文字开始绘制的地方。我第一次使用的时候也是这么认为的,可是我写了几个例子,发现我理解错了。那么正确的理解又是什么呢?
x代表所要绘制文字所在矩形的相对位置。相对位置就是指定点(x,y)在所要绘制矩形的位置。我们知道所绘制矩形的纵坐标是由Y值来确定的,而相对x坐标的位置,只有左、中、右三个位置了。也就是所绘制矩形可能是在x坐标相对于文字的左侧,中间或者右边绘制,而定义在x坐标在所绘制矩形相对位置的函数是:
setTextAlign(Paint.Align align)Paint.Align是枚举类型,值分别为 : Paint.Align.LEFT,Paint.Align.CENTER和Paint.Align.RIGHT。
我们来分别看一看设置不同值时,绘制的结果是怎么样的。
(1)、Paint.Align.LEFT
        mPaint.setTextAlign(Paint.Align.LEFT);//主要是这里的取值不一样
        mPaint.setAntiAlias(true);
        mPaint.setColor(Color.RED);
        mPaint.setStyle(Paint.Style.FILL);
        mPaint.setTextSize(120);

        canvas.drawText("abcdefghijk", 200, 200, mPaint);

        mPaint.setColor(Color.parseColor("#23AC3B"));
        canvas.drawLine(0, 200, getWidth(), 200, mPaint);
        canvas.drawLine(200, 0, 200, getHeight(), mPaint);
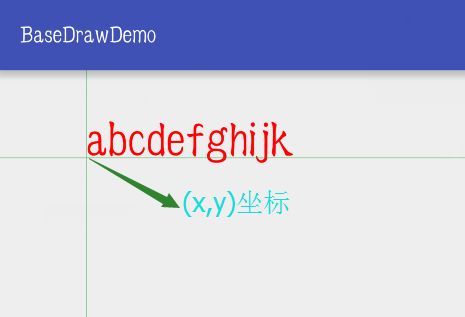
效果图如下:
可以看出(x,y)在文字矩形下边的左边。
(2)、Paint.Align.CENTER
        mPaint.setTextAlign(Paint.Align.CENTER);
        mPaint.setAntiAlias(true);
        mPaint.setColor(Color.RED);
        mPaint.setStyle(Paint.Style.FILL);
        mPaint.setTextSize(120);

        canvas.drawText("abcdefghijk", 200, 200, mPaint);

        mPaint.setColor(Color.parseColor("#23AC3B"));
        canvas.drawLine(0, 200, getWidth(), 200, mPaint);
        canvas.drawLine(200, 0, 200, getHeight(), mPaint);
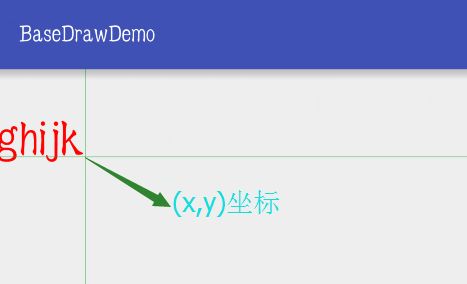
效果图:
可以看出(x,y)位于文字矩形下边的中间,换句话说,系统会根据(x,y)的位置和文字矩形大小,会计算出当前开始绘制的点。以使原点(x,y)正好在所要绘制的矩形下边的中间。
(3)、Paint.Align.RIGHT
        mPaint.setTextAlign(Paint.Align.RIGHT);
        mPaint.setAntiAlias(true);
        mPaint.setColor(Color.RED);
        mPaint.setStyle(Paint.Style.FILL);
        mPaint.setTextSize(120);

        canvas.drawText("abcdefghijk", 200, 200, mPaint);

        mPaint.setColor(Color.parseColor("#23AC3B"));
        canvas.drawLine(0, 200, getWidth(), 200, mPaint);
        canvas.drawLine(200, 0, 200, getHeight(), mPaint);
效果图:
可以看出(x,y)在文字矩形下边的右边。
二、FontMetrics
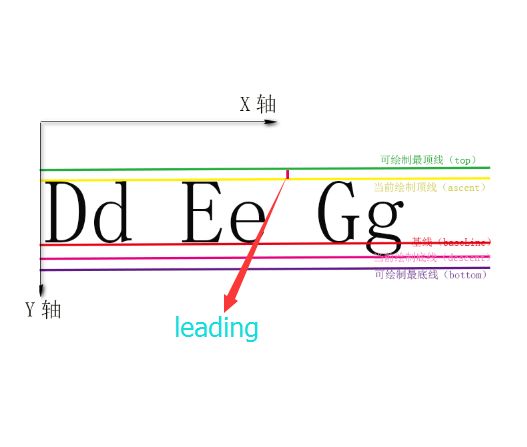
从图中可以知道,除了基线,还有另外的四条线,它们分别是 top,ascent,descent和bottom,它们的含义分别为:
- top:可绘制的最高高度所在线
- bottom:可绘制的最低高度所在线
- ascent :系统建议的,绘制单个字符时,字符应当的最高高度所在线
- descent:系统建议的,绘制单个字符时,字符应当的最低高度所在线
1、获取实例
Paint.FontMetrics fontMetrics = mPaint.getFontMetrics();

Paint.FontMetricsInt fm= mPaint.getFontMetricsInt();两个构造方法的区别是,得到对象的成员变量的值一个为float类型,一个为int类型。
2、成员变量
FontMetrics,它里面有如下五个成员变量:
        float ascent = fontMetrics.ascent;
        float descent = fontMetrics.descent;
        float top = fontMetrics.top;
        float bottom = fontMetrics.bottom;
        float leading = fontMetrics.leading;
ascent,descent,top,bottom,leading 这些线的位置要怎么计算出来呢?我们先来看个图:
那么它们的计算方法如下:
ascent = ascent线的y坐标 - baseline线的y坐标;//负数

descent = descent线的y坐标 - baseline线的y坐标;//正数

top = top线的y坐标 - baseline线的y坐标;//负数

bottom = bottom线的y坐标 - baseline线的y坐标;//正数

leading = top线的y坐标 - ascent线的y坐标;//负数FontMetrics的这几个变量的值都是以baseLine为基准的,对于ascent来说,baseline线在ascent线之下,所以必然baseline的y值要大于ascent线的y值,所以ascent变量的值是负的。其他几个同理。
同样我们可以推算出:
ascent线Y坐标 = baseline线的y坐标 + fontMetric.ascent;

descent线Y坐标 = baseline线的y坐标 + fontMetric.descent;

top线Y坐标 = baseline线的y坐标 + fontMetric.top;

bottom线Y坐标 = baseline线的y坐标 + fontMetric.bottom;
3、绘制ascent,descent,top,bottom线
直接贴代码:
        int baseLineY = 200;

        mPaint.setTextSize(120);

        canvas.drawText("abcdefghijkl's", 200, baseLineY, mPaint);

        Paint.FontMetrics fontMetrics = mPaint.getFontMetrics();

        float top = fontMetrics.top + baseLineY;
        float ascent = fontMetrics.ascent + baseLineY;
        float descent = fontMetrics.descent + baseLineY;
        float bottom = fontMetrics.bottom + baseLineY;

        //绘制基线
        mPaint.setColor(Color.parseColor("#FF1493"));
        canvas.drawLine(0, baseLineY, getWidth(), baseLineY, mPaint);

        //绘制top直线
        mPaint.setColor(Color.parseColor("#FFB90F"));
        canvas.drawLine(0, top, getWidth(), top, mPaint);

        //绘制ascent直线
        mPaint.setColor(Color.parseColor("#b03060"));
        canvas.drawLine(0, ascent, getWidth(), ascent, mPaint);

        //绘制descent直线
        mPaint.setColor(Color.parseColor("#912cee"));
        canvas.drawLine(0, descent, getWidth(), descent, mPaint);

        //绘制bottom直线
        mPaint.setColor(Color.parseColor("#1E90FF"));
        canvas.drawLine(0, bottom, getWidth(), bottom, mPaint);
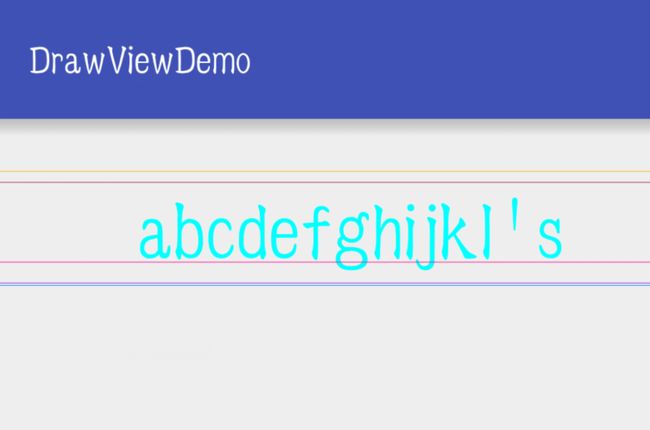
在这段代码中,我们需要注意的是:canvas.drawText()中参数y是基线y的位置; mPaint.setTextAlign(Paint.Align.LEFT);指点(200,200)在文字矩形的左边。然后计算各条直线的y坐标:
        float top = fontMetrics.top + baseLineY;
        float ascent = fontMetrics.ascent + baseLineY;
        float descent = fontMetrics.descent + baseLineY;
        float bottom = fontMetrics.bottom + baseLineY;
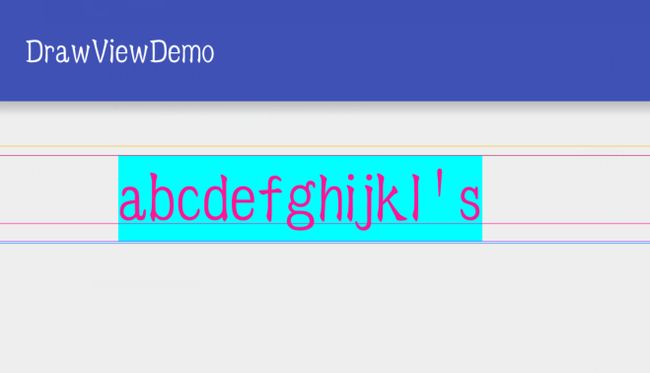
效果图:
4、绘制文字最小矩形、文字宽度、文字高度
(1)绘制文字最小矩形
由drawRect(float left, float top, float right, float bottom, @NonNull Paint paint)需要绘制矩形就需要知道矩形左上角坐标点,矩形长和宽。以上面例子为例:
left = 200
top = ascent ;
right= 200+矩形宽度;
bottom = descent;
这样我们就可以绘制出最小矩形:
(2)文字高度
        float top = fontMetrics.top + baseLineY;
        float bottom = fontMetrics.bottom + baseLineY;
        //文字高度
        float height= bottom + top; //注意top为负数
        //文字中点y坐标
        float center = (bottom - top) / 2;
当然也可以: float height=Math.abs(top-bottom);
(3)文字宽度
 String text="abcdefghijkl's";
 //文字宽度
 float width = mPaint.measureText(text);
本篇到这里就差不多结束了,源码比较简单,需要的留言。
