UICollectionView(纯代码方式)实现带上下拉刷新的瀑布流式
瀑布流(WaterFlow)是项目开发过程中的常见布局,有关于瀑布流(WaterFlow)的实现方式:在UICollectionView未出现之前,瀑布流的实现多半是采用UIScrollView或是UITableView。对于我们这种用惯了表视图的人来说,UICollectionView倒略显陌生。有关于UICollectionView的介绍我就不一一赘述,因为一两句话也很难说清楚。网上有很多优秀的文章专门对其进行了一系列的解说,另有苹果官方文档可以查阅。本文主要是介绍如何采用纯代码的方式利用UICollectionView实现带上下拉刷新的瀑布流式(WaterFlow)布局。废话少说,直接入题。
一、UICollectionView集成上下拉刷新
(1)简单的介绍UICollectionView
UICollectionView和UITableView很相似,如果你对表视图非常熟悉,上手的速度也会快很多。使用它时需要相应的设置DataSource(UICollectionViewDataSoure)数据源协议和Delegate(UICollectionViewDelegate)事件协议,并实现相应的协议方法。它与UITableView不同的地方是它有UICollectionViewLayout,可以通过它的子类来定制布局。系统默认的布局方式是UICollectionViewDelegateFlowLayout,实现相应的协议(UICollectionViewDelegateFlowLayout)方法,便可达到默认布局效果。
UICollectionViewCell与UITableViewCell的使用也差不多,一样的有ReuseIdentifier,可以复用。使用UICollectionViewCell时,需要先注册,然后再出列使用。至于注册并出列使用Cell的具体方式,请自行下载文章末尾的BGWaterFlowView或者自行Google。
(2)集成上下拉刷新方式
一般UITableView添加上下拉刷新的方式,是把下拉或者上拉刷新视图的UI放置UITableView的表头属性(tableHeaderView)或者表尾属性(tableFooterView)。但是,在UICollectionView中没有这两个属性。那么我们该如何来集成上下拉刷新呢?这就得说到
UICollectionView布局中的三种显示内容视图:Cells、Supplementary views、Decoration views。(关于这三种视图的介绍可以去官网查阅相关文档,上面有详细的解释)。我们一般是把上下拉刷新的UI放置在Supplementary views(官方解释:它能显示数据但是不同于Cells。不像Cell,Supplementary views是不能被用户选定的。相反,你可以用它去实现类似于给一个指定的section或者整个CollectionView添加页眉和页脚视图这样的功能)上面,其实,Supplementary views就和TableView的section头视图和尾视图差不多。但是用法却大不相同。在自定义瀑布流布局中一定要把它也计算进去,不然显示就会有异常。
- 注册头视图和尾视图单元格类型
//注册头视图:kind代表Supplementary视图类型,UICollectionElementKindSectionHeader表示组头

[self registerClass:[UICollectionReusableView class] forSupplementaryViewOfKind:UICollectionElementKindSectionHeader withReuseIdentifier:@"bGCollectionHeaderView"];

//注册尾视图:UICollectionElementKindSectionHeader表示组尾

    [self registerClass:[UICollectionReusableView class] forSupplementaryViewOfKind:UICollectionElementKindSectionFooter withReuseIdentifier:@"bGCollectionFooterView"];
- 实现自定义组视图viewForSupplementaryElementOfKind代理方法
- (UICollectionReusableView *)collectionView:(UICollectionView *)collectionView viewForSupplementaryElementOfKind:(NSString *)kind atIndexPath:(NSIndexPath *)indexPath {

    //kind代表Supplementary视图类型:头或尾视图(header OR footer)

    if([kind isEqual:UICollectionElementKindSectionHeader]) {
        UICollectionReusableView *collectionHeaderView = [collectionView dequeueReusableSupplementaryViewOfKind:UICollectionElementKindSectionHeader withReuseIdentifier:@"bGCollectionHeaderView" forIndexPath:indexPath];

        //初始化下拉刷新或者自定义页眉视图UI界面
        ...

        return collectionHeaderView;
    } else if([kind isEqual:UICollectionElementKindSectionFooter]) {
        UICollectionReusableView *collectionFooterView = [collectionView dequeueReusableSupplementaryViewOfKind:UICollectionElementKindSectionFooter withReuseIdentifier:@"bGCollectionFooterView" forIndexPath:indexPath];

        //初始化上拉刷新或者自定义页脚视图UI界面
        ...

        return collectionFooterView;
    }

    return nil;
}
完成以上两步,集成上下拉刷新的功能总算完成了。接下来你可以运行一下工程,看结果是否符合预期。如果你CollectionView使用的是系统的UICollectionViewFlowLayout布局,一定要返回组头或者组尾的高度,否则就会出现组头或者组尾无法显示(本文的下拉刷新视图所在的组头不返回高度不受影响,是因为它的纵坐标(y值)本来就是负数)。另外,还有一点需要注意的是,如果你的CollectionView中存在多组,最好是把上下拉刷新所在的组头或者组尾与其他组(section)的组头或组尾分开,相应的需要多注册一个组头或者组尾视图,分情况进行判断(这部分如果还有问题,可以在文章末尾留言,我会及时回复)。
二、自定义瀑布流(WaterFlow)式布局
(1)简单的介绍UICollectionView布局形式
一般来讲,UICollectionView的布局形式分为两种:
布局与内容独立,其布局不需要根据显示的单元格内容来计算。Cell的显示顺序与内容顺序一致。Cell排满一行则换至下一行继续排列。系统的UICollectionViewFlowLayout就是这样。
布局需要计算内容,本文的瀑布流Demo局部正是如此。UICollectionViewFlowLayout系统布局在换行的时候,由于每个item高度不同,从而导致布局错乱,无法满足你的需求。所以,这个时候你需要计算每个item的高度,最终用来确定item显示的位置。
从上述内容我们可以看出,一般如果布局需要计算内容的时候,我们就不应该直接使用UICollectionViewFlowLayout布局了,而是应该子类化一个UICollectionViewLayout,从而达到私人定制的目的。
(2)创建自定义布局
https://developer.apple.com/library/ios/documentation/WindowsViews/Conceptual/CollectionViewPGforIOS/CreatingCustomLayouts/CreatingCustomLayouts.html#//apple_ref/doc/uid/TP40012334-CH5-SW1“>官方文档中有提到,在布局的过程中,CollectionView会调用布局对象的具体方法。这些方法有机会使你计算这些项的位置以及给CollectionView提供它所需要的主要信息。其他的方法也有可能会被调用,但是在布局的过程中这些方法总是会按照以下的顺序调用:
- 使用”prepareLayout”方法去执行一些CollectionView所需要的布局信息的预先计算操作。
- 使用”collectionViewContentSize”方法去返回根据你最初计算的整个内容区域的总体大小。
- 使用”layoutAttributesForElementsInRect:”方法来返回指定区域的单元格与视图属性。
下面我们通过Demo来详细的讲解一下如何自定义瀑布流,废话不多说,直接上代码(本文采用的Demo为BGWaterFlowView,GitHub传送门:https://github.com/yangshebing/BGWaterFlowView‘>请点击这里):
- 重写”prepareLayout”方法计算布局信息。
- (void)prepareLayout{
    [super prepareLayout];
    ...

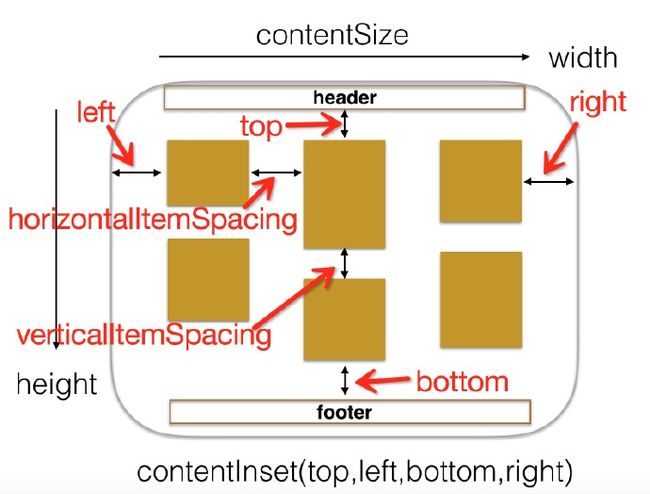
    //计算每个显示项的宽度,horizontalItemSpacing代表项与项之间的水平间隔,
    columnNum代表总列数,contentInset代表上下左右的内填充。详见下图说明

    self.itemWidth = (self.collectionView.frame.size.width - (self.horizontalItemSpacing * (self.columnNum - 1)) - self.contentInset.left - self.contentInset.right) / self.columnNum;

    //如有下拉刷新需求的则需要提供头视图(Supplementary view)布局属性。
    demo中的headerHeight属性可设置是否显示头视图(是否计算头视图的布局属性)。

    if(self.headerHeight > 0){

    //通过layoutAttributesForSupplementaryViewOfKind:withIndexPath:方法来创建Supplementary视图布局属性对象,kind用来区分Supplementary视图类型(header或者footer)。

        self.headerLayoutAttributes = [UICollectionViewLayoutAttributes layoutAttributesForSupplementaryViewOfKind:UICollectionElementKindSectionHeader withIndexPath:[NSIndexPath indexPathForItem:0 inSection:0]];

        //修改布局参数frame属性

        self.headerLayoutAttributes.frame = CGRectMake(0, 0, self.collectionView.frame.size.width, self.headerHeight);
    }

    //初始化保存布局属性的字典
    NSMutableDictionary *cellLayoutInfoDic = [NSMutableDictionary dictionary];
    //初始化列高数组
    NSMutableArray *columnInfoArray = [self columnInfoArray];
    NSInteger numSections = [self.collectionView numberOfSections];
    for(NSInteger section = 0; section < numSections; section++)  {
        NSInteger numItems = [self.collectionView numberOfItemsInSection:section];
        for(NSInteger item = 0; item < numItems; item++){
            //获取列高最小的model,以它的高作为y坐标
            BGWaterFlowModel *firstModel = columnInfoArray.firstObject;
            CGFloat y = firstModel.height;
            CGFloat x = self.contentInset.left + (self.horizontalItemSpacing + self.itemWidth) * firstModel.column;

            NSIndexPath *indexPath = [NSIndexPath indexPathForItem:item inSection:section];

            //通过代理方法传入对应item的高度。

            CGFloat itemHeight = [((id<BGWaterFlowLayoutDelegate>)self.collectionView.delegate) collectionView:self.collectionView layout:self heightForItemAtIndexPath:indexPath];

            //通过layoutAttributesForCellWithIndexPath:方法来创建cell的布局属性对象。

            UICollectionViewLayoutAttributes *itemAttributes = [UICollectionViewLayoutAttributes layoutAttributesForCellWithIndexPath:indexPath];
            //计算item的布局属性
            itemAttributes.frame = CGRectMake(x, y+self.contentInset.top+self.headerHeight, self.itemWidth, itemHeight);
            //计算当前列高,verticalItemSpacing代表项与项之间的垂直间隔。
            firstModel.height += (itemHeight + self.verticalItemSpacing);
            //保存新的列高,并进行排序:从后往前查找,查找到高度比它小的对象,就插入到该对象之后。
            [self sortArrayByHeight:columnInfoArray];

     //保存计算好的item布局属性
     cellLayoutInfoDic[indexPath] = itemAttributes;
        }
    }

    //保存局部布局属性字典到全局字典中
    self.cellLayoutInfoDic = [cellLayoutInfoDic copy];

    //按照前面的排序逻辑,列高数组中的最后一个元素,就是高度最大的一列。
    BGWaterFlowModel *lastModel = columnInfoArray.lastObject;

    //如有上拉刷新需求的则需要提供尾视图布局属性。
    demo中的footerHeight属性可设置是否显示尾视图(是否计算尾视图的布局属性)。

    if(self.footerHeight > 0){
        self.footerLayoutAttributes = [UICollectionViewLayoutAttributes layoutAttributesForSupplementaryViewOfKind:UICollectionElementKindSectionFooter withIndexPath:[NSIndexPath indexPathForItem:0 inSection:0]];
        //计算尾视图的布局属性
        self.footerLayoutAttributes.frame = CGRectMake(0, lastModel.height+self.headerHeight+self.contentInset.top+self.contentInset.bottom, self.collectionView.frame.size.width, self.footerHeight);
    }

    //直接计算出collectionView的contentSize
    self.contentSize = CGSizeMake(self.collectionView.frame.size.width, lastModel.height+self.headerHeight+self.contentInset.top+self.contentInset.bottom+self.footerHeight);
}
好吧,这么一大坨代码看到就头疼了,来张图帮助理解一下!图糙理不糙,理解万岁

这样看上去是不是更清晰了?
- 重写”collectionViewContentSize”方法返回collectionView的内容高度。
- (CGSize)collectionViewContentSize{
    //返回计算好的collectionView内容高度
    return self.contentSize;
}
- 重写”layoutAttributesForElementsInRect”方法返回指定矩形区域中的cell或者其他类型视图布局属性。
- (NSArray *)layoutAttributesForElementsInRect:(CGRect)rect {

    //返回一组已经计算好的布局属性。

    NSMutableArray *attributesArrs = [NSMutableArray array];
    [self.cellLayoutInfoDic enumerateKeysAndObjectsUsingBlock:^(NSIndexPath *indexPath,
                                                                UICollectionViewLayoutAttributes *attributes,
                                                                BOOL *stop) {
        //遍历布局属性保存字典,添加布局属性至数组中
        if (CGRectIntersectsRect(rect, attributes.frame)) {
            [attributesArrs addObject:attributes];
        }
    }];

    //如果有头视图或者尾视图则需要添加头视图与尾视图的布局属性

    if (self.headerLayoutAttributes && CGRectIntersectsRect(rect, self.headerLayoutAttributes.frame)) {
        [attributesArrs addObject:self.headerLayoutAttributes];
    }


    if (self.footerLayoutAttributes && CGRectIntersectsRect(rect, self.footerLayoutAttributes.frame)) {
        [attributesArrs addObject:self.footerLayoutAttributes];
    }

    return attributesArrs;
}
结语:
https://developer.apple.com/library/ios/documentation/UIKit/Reference/UICollectionViewLayout_class/index.html#//apple_ref/occ/cl/UICollectionViewLayout“>UICollectionViewLayout相关的内容姿势非常多,相关文章也非常多。本文介绍的瀑布流布局也只是其中的冰山一角,很多东西官方文档中已经介绍的非常详细了。所以,还是建议多看官方文档。本文主要注重项目的实用性,在后面就直接上代码了,可能在理论方面还是有所欠缺,对于不足的地方,希望大家多提建议,一起交流学习,一起进步。如果文中有看不懂的地方,还请您留言。我会及时进行回复。最后,本文的Demo就在于方便徒手撸代码的人使用。你懂的。后期会不断的更新优化,进一步的完善。敬请期待…
点击此处下载本文的Demo:BGWaterFlowView
Demo使用方式详见:README.md
Demo运行瀑布流效果截图如下所示:
参考博客地址:
- http://objccn.io/issue-3-3/“>自定义 Collection View 布局
转载请注明出处
