Android中关于Volley的使用(一)认识Volley的架构
1)通过Volley类获得一个RequestQueue对象:
2)创建一个Request对象,并将请求添加上面创建的mQueue中,如下:
一开始会不会觉得有点怔,为什么只需要将请求添加到队列中,不需要去发送请求吗?当然是要的,只是这一切都被封装在Volley后面而已。
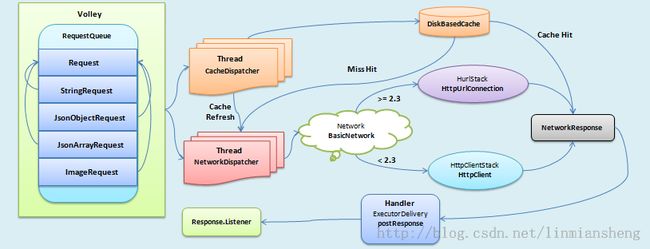
我们先来看一下隐藏在Volley后面的这个架构是怎么样的吧,如下图:
首先,我们要先了解一下Volley的架构,简单地来说,就是三层:
1)队列:将请求添加到Queue中
2)缓存:在Cache中查找有没有缓存这个请求要的数据,
2.1)有,请求如果过期了,到第 3)步,如果没有过期,直接返回一个Response。
2.2)没有,到第 3)步
3)网络:通过传进来的url 来发送请求,到网络中获取数据,然后返回一个Response,并判断是否要存到Cache中。
结合上图,我们来简单地先说一下Volley的流程是怎么样的。
第一步:通过Volley.newRequestQueue方法创建一个RequestQueue队列,而且同时会创建如下三个对象:
a)一个HttpStack对象,Volley会根据SDK的版本来判断是基于HttpUrlConnection还是基于HttpClient来创建对象,一个HttpStack对象,只用一件事,就是去真正的执行这个请求,去网络上拿回数据,其定义如下:
看一下它的实现类BasicNetwork中是如何实现的这个接口中的方法的,看下面代码中的最后一行:
c)一个Cache对象,这是一个缓存对象,Volley中默认的实现类是DiskBasedCache类。
第二步:创建好RequestQueue之后,就会调用其start方法。而在其start方法呢,就会去创建两个线程,就是图上面的CacheDispatcher和NetworkDispatcher了,如下:
当然,也需要让这两个线程跑起来,我们也可以在这里看到,在Volley类中创建的Network接口对象,Cache接口对象,还有一个包装了Handler类的对象mDelivery都会在这里作为参数传给CacheDispatcher和NetworkDispatcher,当然,最重要的,也会将RequestQueue这个装请求的队列给传进去,而这两个线程一旦开始之后,就会一直处理或者等待请求。
第三步:如果Cache中没有记录的话,还是需要通过NetworkDispatcher去实现的,所以接下来就是Network在后面做事情了,看下面的代码:
其实也就是调用Network去发送请求,而Network又会调用HttpStack去发送请求。
第四步:通过Handler将Response给传回主线程中定义的Listener,
而每个具体的请求都需要去实现自己的逻辑,比如在ImageRequest中,
我们可以看到,它其实也就是调用Listener中的onResponse方法,而Listener的这个方法,则是我们在创建Request对象的时候,需要去实现的一个方法,所以一切都跑回到
主线程中方法去了。
嗯,隐藏在Volley后面大概的流程就是这样。结束。
- mQueue = Volley.newRequestQueue(this);
2)创建一个Request对象,并将请求添加上面创建的mQueue中,如下:
- ImageRequest imgRequest = new ImageRequest(imgUrl,
- new Response.Listener<Bitmap>() {
- @Override
- public void onResponse(Bitmap arg0) {
- // TODO Auto-generated method stub
- imageView.setImageBitmap(arg0);
- }
- },
- 300,
- 200,
- Config.ARGB_8888,
- new ErrorListener() {
- @Override
- public void onErrorResponse(VolleyError arg0) {
- }
- });
- mQueue.add(imgRequest);
一开始会不会觉得有点怔,为什么只需要将请求添加到队列中,不需要去发送请求吗?当然是要的,只是这一切都被封装在Volley后面而已。
我们先来看一下隐藏在Volley后面的这个架构是怎么样的吧,如下图:
首先,我们要先了解一下Volley的架构,简单地来说,就是三层:
1)队列:将请求添加到Queue中
2)缓存:在Cache中查找有没有缓存这个请求要的数据,
2.1)有,请求如果过期了,到第 3)步,如果没有过期,直接返回一个Response。
2.2)没有,到第 3)步
3)网络:通过传进来的url 来发送请求,到网络中获取数据,然后返回一个Response,并判断是否要存到Cache中。
结合上图,我们来简单地先说一下Volley的流程是怎么样的。
第一步:通过Volley.newRequestQueue方法创建一个RequestQueue队列,而且同时会创建如下三个对象:
a)一个HttpStack对象,Volley会根据SDK的版本来判断是基于HttpUrlConnection还是基于HttpClient来创建对象,一个HttpStack对象,只用一件事,就是去真正的执行这个请求,去网络上拿回数据,其定义如下:
- public interface HttpStack {
- /**
- * Performs an HTTP request with the given parameters.
- *
- * <p>A GET request is sent if request.getPostBody() == null. A POST request is sent otherwise,
- * and the Content-Type header is set to request.getPostBodyContentType().</p>
- *
- * @param request the request to perform
- * @param additionalHeaders additional headers to be sent together with
- * {@link Request#getHeaders()}
- * @return the HTTP response
- */
- public HttpResponse performRequest(Request<?> request, Map<String, String> additionalHeaders)
- throws IOException, AuthFailureError;
- }
b)一个Network对象,在Volley的实现是BasicNetwork类,在构建这个对象的时候,一个HttpStack对象去传给它作为参数,而它将会调用这个HttpStack去获取事情。它是对HttpUrlConnection和HttpClient的一个包装,让外面的对象不用去关心到底是通过哪个接口来获取数据。
- public interface Network {
- /**
- * Performs the specified request.
- * @param request Request to process
- * @return A {@link NetworkResponse} with data and caching metadata; will never be null
- * @throws VolleyError on errors
- */
- public NetworkResponse performRequest(Request<?> request) throws VolleyError;
- }
看一下它的实现类BasicNetwork中是如何实现的这个接口中的方法的,看下面代码中的最后一行:
- public NetworkResponse performRequest(Request<?> request) throws VolleyError {
- long requestStart = SystemClock.elapsedRealtime();
- while (true) {
- HttpResponse httpResponse = null;
- byte[] responseContents = null;
- Map<String, String> responseHeaders = new HashMap<String, String>();
- try {
- // Gather headers.
- Map<String, String> headers = new HashMap<String, String>();
- addCacheHeaders(headers, request.getCacheEntry());
- httpResponse = mHttpStack.performRequest(request, headers);
c)一个Cache对象,这是一个缓存对象,Volley中默认的实现类是DiskBasedCache类。
第二步:创建好RequestQueue之后,就会调用其start方法。而在其start方法呢,就会去创建两个线程,就是图上面的CacheDispatcher和NetworkDispatcher了,如下:
- public void start() {
- stop(); // Make sure any currently running dispatchers are stopped.
- // Create the cache dispatcher and start it.
- mCacheDispatcher = new CacheDispatcher(mCacheQueue, mNetworkQueue, mCache, mDelivery);
- mCacheDispatcher.start();
- // Create network dispatchers (and corresponding threads) up to the pool size.
- for (int i = 0; i < mDispatchers.length; i++) {
- NetworkDispatcher networkDispatcher = new NetworkDispatcher(mNetworkQueue, mNetwork,
- mCache, mDelivery);
- mDispatchers[i] = networkDispatcher;
- networkDispatcher.start();
- }
- }
当然,也需要让这两个线程跑起来,我们也可以在这里看到,在Volley类中创建的Network接口对象,Cache接口对象,还有一个包装了Handler类的对象mDelivery都会在这里作为参数传给CacheDispatcher和NetworkDispatcher,当然,最重要的,也会将RequestQueue这个装请求的队列给传进去,而这两个线程一旦开始之后,就会一直处理或者等待请求。
第三步:如果Cache中没有记录的话,还是需要通过NetworkDispatcher去实现的,所以接下来就是Network在后面做事情了,看下面的代码:
- public void run() {
- Process.setThreadPriority(Process.THREAD_PRIORITY_BACKGROUND);
- Request<?> request;
- while (true) {
- ...
- // Perform the network request.
- NetworkResponse networkResponse = mNetwork.performRequest(request);
- request.addMarker("network-http-complete");
其实也就是调用Network去发送请求,而Network又会调用HttpStack去发送请求。
第四步:通过Handler将Response给传回主线程中定义的Listener,
- mDelivery.postResponse(request, response);
而mDelivery其实是一个ExecutorDelivery对象,它封装了Handler,通过它,会调用到请求的deliverResponse方法,如下:
- // Deliver a normal response or error, depending.
- if (mResponse.isSuccess()) {
- mRequest.deliverResponse(mResponse.result);
- } else {
- mRequest.deliverError(mResponse.error);
- }
而每个具体的请求都需要去实现自己的逻辑,比如在ImageRequest中,
- private final Response.Listener<Bitmap> mListener;
- @Override
- protected void deliverResponse(Bitmap response) {
- mListener.onResponse(response);
- }
我们可以看到,它其实也就是调用Listener中的onResponse方法,而Listener的这个方法,则是我们在创建Request对象的时候,需要去实现的一个方法,所以一切都跑回到
主线程中方法去了。
嗯,隐藏在Volley后面大概的流程就是这样。结束。
