tilemap之基础使用
感谢 毛叔 网友 翻译。
在这篇教程里,我们会讲解如何使用cocos2d和Tiled Map Editor创建一个基于tiled map的游戏.作为例子,我们会制作一个小游戏.游戏的主要内容是一个忍者在沙漠里寻找可口的西瓜吃.
这篇教程主要学习的内容有:
- 如何创建Tiled Map。
- 如何将地图载入到游戏内。
- 如何让地图跟随玩家滚动;如何使用对象层。
- 如何在地图里创建可碰撞(不可穿越)区域。
- 如何使用tile属性。
- 如何使用可碰撞物体和动态修改地图。
- 如何确定你的主角没有产生穿越
创建游戏骨架
下面我们要创建游戏骨架.并且准备好需要的资源文件,打开XCode,File\New Project,选择cocos2d Application创建一个新工程。
接下来,下载这个zip文件,这里面包含了游戏需要的资源:
- 主角精灵
- 一些游戏音效(使用cxfr工具制作)
- 游戏背景音(使用Garage Band制作,详细信息)
- 用于构造tiled map的元件
- 一些特殊的元件,后面会详细解释
将下载到的资源解包拖入xcode的resources组,记得选中”Copy items into destination group’s folder(if needed)”。
这样,一切准备就绪.
创建游戏地图
Cocos2d支持使用开源软件Tiled Map Editor(貌似被伟大的墙挡住了,天朝的用户可以直接访问它在sourceforge的项目主页,杯具!)创建的TMX格式地图.如果你访问上面的链接,你会发现有两个版本可用.
一个使用Qt应用程序框架编写,另一个使用Java编写.这是因为最初Tiled Map Editor使用Java编写,后来移植到Qt框架上.使用哪个版本都可以.在这篇教程里,我们以使用Qt版本的为例,因为它将作为今后的开发主线.
有些人喜欢使用java版本,是因为还有些老版本上的功能尚未移植到Qt框架上.
运行Tiled Map Editor,新建一个地图.填写如下对话框:

在orientation选项内,可以选择Orthogonal(平面直角)或Isometric(45度视角,传说中的2.5D),这里选择Orthogonal.
接下来需要设置地图大小.这里的数值是指有多少格tiled元件,并不是像素.选择50×50即可.
最后,确定tile元件的大小.根据美工提供的元件大小设置.这个教成立,我们使用32×32的大小. 接下来,将tile元件添加到地图内绘制地图.在Map菜单许做呢New Tileset,填写下面的对话框:
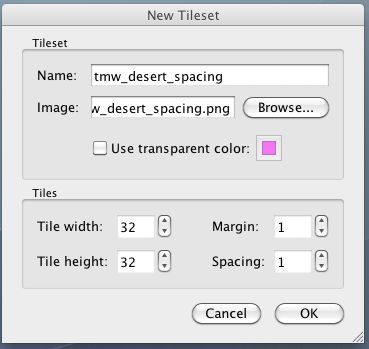
点击Browser从电脑里找到tmw_desert_spacing.png文件(下载的资源包内)
保持长宽数据为32×32.
对于margin和spacing,我没有找到文档说明,但是我认为它们的意义是:
- Margin 表示当前tiled在开始搜索实际像素时应该忽略多少个像素 (译者注:我理解应该是两个tiled元件之间的间距)
- Spacing 表示读取下一个tiled数据后应该向前推进多少个像素(译者注:我理解应该是两个tiled元件之间的空隙,不过,这好像与Margin重复了…)

点击OK,tiled元件将被显示在Tilesets窗口内.现在你可以开始绘制地图了.点击工具条上的Stamp(印章)图标,选择一个tiled元件,在地图内需要的位置点击放置地图元件.

按上面的方法绘制一张地图. 至少在地图上绘制几个建筑,因为后面我们要用到它们.

一些快速技巧最好记住:
- 你可以一次添加多个tiled元件到地图里.(画一个方块选中多个tiled元件).
- 可以使用油漆筒按钮填充地图背景.
- 可以在view菜单里放大缩小地图.
将Tiled Map添加到Cocos2d Scene中,将刚才创建的tmx文件拖入项目resources内.打开HelloWorldLayer.h文件,添加一些代码:
// HelloWorld Layer
@interface HelloWorld : CCLayer
{
CCTMXTiledMap *_tileMap;
CCTMXLayer *_background;
}
@property (nonatomic, retain) CCTMXTiledMap *tileMap;
@property (nonatomic, retain) CCTMXLayer *background;
// returns a Scene that contains the HelloWorld as the only child
+(id) scene;
@end
#import "HelloWorldScene.h"
// HelloWorld implementation
@implementation HelloWorld
// Right after the implementation section
@synthesize tileMap = _tileMap;
@synthesize background = _background;
// Replace the init method with the following
-(id) init
{
if( (self=[super init] )) {
self.tileMap = [CCTMXTiledMap tiledMapWithTMXFile:@"TileMap.tmx"];
self.background = [_tileMap layerNamed:@"Background"];
[self addChild:_tileMap z:-1];
}
return self;
}
+(id) scene
{
// 'scene' is an autorelease object.
CCScene *scene = [CCScene node];
// 'layer' is an autorelease object.
HelloWorld *layer = [HelloWorld node];
// add layer as a child to scene
[scene addChild: layer];
// return the scene
return scene;
}
// on "dealloc" you need to release all your retained objects
- ( void) dealloc
{
self.tileMap = nil;
self.background = nil;
[super dealloc];
}
@end
这里我们调用CCTMXTiledMap从map文件创建了一个地图.
关于CCTMXTiledMap的一些简要介绍
- 它是CCNode的子类.所以我们可以设置position, scale等.
- 这个node包含着地图的层,并且包含一些函数使你可以通过名字找到它们.
- 为了提高性能,每一层使用的都是CCSpriteSheet的子 类. 这也意味着每个tiled元件在每一层都只有一个实例.

看起来不错!不过作为一个游戏,我们还需要做三件事:
- 一个游戏主角;
- 一个放置主角的起始点;
- 移动视图,让我们的视角一直跟随主角.
对象层和设置Tiled Map的位置.
Tiled Map Editor支持两种层: tile layers(铺展层,前面我们使用过)和object layers(对象层).
Object layers 允许你以一点为中心在地图上圈定一个区域.这个区域内可以触发一些事件.比如:你可以制作一个区域来产生怪物,或者制作一个区域进去就会死亡.在我们的例子里,我们制作一个区域作为主角的产生点.
打开TiledMapEditor,在Layer菜单选择Add Object Layer.新layer取名objects.注意,在object layer里不会绘制tiled元件,它会绘制一些灰色的圆角形状.你可以展开或者移动这些形状.
我们是想选择一个tile元件作为主角的进入点.所以,在地图里点击一个tiled元件,产生的形状的大小无所谓,我们会使用x,y坐标来指定.

接下来,右键选择刚才添加的灰色形状,点击Properties.设置名字为 “SpawnPoint”
也许你可以设置这个对象的Type为Cocos2D的类名.并且它会创建一个对象(比如CCSprite),但是我没有找到源代码里如何完成这些工作.不管它,我们保留type区域为空,它将创建一个NSMutableDictionary用来访问对象的各种参数,比如x,y坐标.保存地图回到xcode.
修改HelloWorldScene.h
CCSprite *_player;
// After the class declaration
@property (nonatomic, retain) CCSprite *player;
修改HelloWorldScene.m
@synthesize player = _player;
// In dealloc
self.player = nil;
// Inside the init method, after setting self.background
CCTMXObjectGroup *objects = [_tileMap objectGroupNamed:@"Objects"];
NSAssert(objects != nil, @"'Objects' object group not found");
NSMutableDictionary *spawnPoint = [objects objectNamed:@"SpawnPoint"];
NSAssert(spawnPoint != nil, @"SpawnPoint object not found");
int x = [[spawnPoint valueForKey:@"x"] intValue];
int y = [[spawnPoint valueForKey:@"y"] intValue];
self.player = [CCSprite spriteWithFile:@"Player.png"];
_player.position = ccp(x, y);
[self addChild:_player];
[self setViewpointCenter:_player.position];
我们先花一点时间解释一下object layer和object groups.
首先, 我们通过CCTMXTiledMap对象的objectGroupNamed方法取回object layers.这个方法返回的是一个CCTMXObjectGroup对象.
接下来, 调用CCTMXObjectGroup对象的objectNamed方法得到包含一组重要信息的NSMutableDictionary.包括x,y坐标,宽度,高度等.
在这里, 我们主要需要的是x,y坐标.我们取得坐标并用它们来设置主角精灵的位置.
最后, 我们要把主角作为视觉中心来显示.现在,添加下面的代码:
{
CGSize winSize = [[CCDirector sharedDirector] winSize];
int x = MAX(position.x, winSize.width / 2);
int y = MAX(position.y, winSize.height / 2);
x = MIN(x, (_tileMap.mapSize.width * _tileMap.tileSize.width)
- winSize.width / 2);
y = MIN(y, (_tileMap.mapSize.height * _tileMap.tileSize.height)
- winSize.height/2);
CGPoint actualPosition = ccp(x, y);
CGPoint centerOfView = ccp(winSize.width/2, winSize.height/2);
CGPoint viewPoint = ccpSub(centerOfView, actualPosition);
self.position = viewPoint;
}
同样做一下简要的解释.想象这个函数是把视线设置到取景中心.我们可以在地图里设置任何x,y坐标,但是有些坐标不能正确的处理显示.比如,我们不能让显示区域超出地图的边界.否则就会出现空白区.下面的图片更能说明这个问题:

屏幕的宽高计算后,要与显示区域的宽高做相应的适配.我们需要检测屏幕到达地图边缘的情况.
在cocos2d里本来有一些操控camera(可以理解为可视取景区)的方法,但是使用它可能搞得更复杂.还不如靠直接移动layer里的元素来解决更简单有效.
继续看下面这张图:

把整张地图想象为一个大的世界,我们的可见区是其中的一部分.主角实际的坐标并不是世界实际的中心.但是在我们的视觉内,要把主角放在中心点,所以,我们只需要根据主角的坐标便宜,调整世界中心的相对位置就可以了.
实现的方法是把实际中心与屏幕中心做一个差值,然后把HelloWorld Layer设置到相应的位置.好,现在编译运行,我们会看到小忍者出现在屏幕上.

使主角移动
前面进行的都不错,但是到目前为止,我们的小忍者还不会动.
接下来,我们让小忍者根据用户在屏幕上点击的位置方向来移动(点击屏幕上半部分向上移,依此类推),修改HelloWorldScene.m的代码:
self.isTouchEnabled = YES;
-( void) registerWithTouchDispatcher
{
[[CCTouchDispatcher sharedDispatcher] addTargetedDelegate:self
priority:0 swallowsTouches:YES];
}
-(BOOL) ccTouchBegan:(UITouch *)touch withEvent:(UIEvent *) event
{
return YES;
}
-( void)setPlayerPosition:(CGPoint)position {
_player.position = position;
}
-( void) ccTouchEnded:(UITouch *)touch withEvent:(UIEvent *) event
{
CGPoint touchLocation = [touch locationInView: [touch view]];
touchLocation = [[CCDirector sharedDirector] convertToGL: touchLocation];
touchLocation = [self convertToNodeSpace:touchLocation];
CGPoint playerPos = _player.position;
CGPoint diff = ccpSub(touchLocation, playerPos);
if (abs(diff.x) > abs(diff.y)) {
if (diff.x > 0) {
playerPos.x += _tileMap.tileSize.width;
} else {
playerPos.x -= _tileMap.tileSize.width;
}
} else {
if (diff.y > 0) {
playerPos.y += _tileMap.tileSize.height;
} else {
playerPos.y -= _tileMap.tileSize.height;
}
}
if (playerPos.x <= (_tileMap.mapSize.width * _tileMap.tileSize.width) &&
playerPos.y <= (_tileMap.mapSize.height * _tileMap.tileSize.height) &&
playerPos.y >= 0 &&
playerPos.x >= 0 )
{
[self setPlayerPosition:playerPos];
}
[self setViewpointCenter:_player.position];
}
首先,我们在init方法里设置屏幕接受触摸事件.接下来,覆盖registerWithTouchDispatcher方法来注册我们自己的触摸 事件句柄.
这样,ccTouchBegan/ccTouchEnded方法会在触摸发生时回调(单点触摸),并且屏蔽掉ccTouchesBegan /ccTouchesEnded方法的回调(多点触摸)
你可能奇怪,为什么不能使用ccTouchesBegan/ccTouchesEnded方法呢?是的,我们的确可以使用,但是不建议这么做,有两点原因:
- 你不需要再处理NSSets,事件分发器会帮你处理它们,你会在每次触摸得到独立的回调.
- 你可以在ccTouchBegan事件返回YES来告知delegate这事你想要的事件,这样你可以在move/ended/cancelled等后续的事件里方便的处理.这比起使用多点触摸要省去很多的工作.
这是因为触摸点给我们的是显示区的坐标,而我们其实已经移动过地图的位置.所以,调用这个方法来得到便宜后的坐标.
接下来,我们要搞清楚触摸点与主角位置的相对关系.然后根据向量的正负关系,决定主角的移动方向.我们相应的调节主角的位置,然后设置屏幕中心到主角上.
注意: 我们需要做一个安全检查,不要让我们的主角移出了地图.
好了,现在可以编译运行了,尝试触摸屏幕来移动一下小忍者吧.

这里是根据这篇教程完成的代码: 猛击这里下载
接下来,我们将学习如何在地图里创建可碰撞(不可穿越)区域,如何使用tile属性,如何使用可碰撞物体和动态修改地图,如何确定你的主角没有产生穿越。
Tiled Maps和碰撞
你可能注意到了,上一篇里完成的游戏,小忍者可以穿过各种障碍。它是忍者,不是上帝!所以,我们要想办法让地图里的障碍物产生碰撞(不可穿越)。
有很多办法可以解决这个问题(包括使用对象层objects layers),但是我准备告诉你种新技术,我认为这种技术更有效,同时也是作为学习课程的好素材。使用meta layer和层属性。废话少说,我们开始吧。
你会在Tilesets窗口看到meta_tiles的标签。

这些tiles元件其实没什么特别的,只是带有透明特性的红色和绿色方块。我们拟定红色表示“可碰撞”的(绿色的后面会用到)。选中Meta层,选择印章(stamp)工具,选择红色tile元件。把它绘制到忍者不能穿越的地方。绘制好之后,看起来应该是这样的:

接下来,我们要给这些Tile元件设置一些标记属性,这样在代码里我们可以确定哪些tile元件是不可穿越的。在Tilesets窗口里右键点击红色tile元件。添加一个新的属性Collidable”,设置值为true。

保存地图,回到xcode。修改HelloWorldScene.h文件。
CCTMXLayer *_meta;
// After the class declaration
@property (nonatomic, retain) CCTMXLayer *meta;
[\cc]
修改HelloWorldScene.m文件
[cc lang="objc"]
// Right after the implementation section
@synthesize meta = _meta;
// In dealloc
self.meta = nil;
// In init, right after loading background
self.meta = [_tileMap layerNamed:@"Meta"];
_meta.visible = NO;
// Add new method
- (CGPoint)tileCoordForPosition:(CGPoint)position {
int x = position.x / _tileMap.tileSize.width;
int y = ((_tileMap.mapSize.height * _tileMap.tileSize.height) - position.y) / _tileMap.tileSize.height;
return ccp(x, y);
}
简单的对上面的代码做一些解释。我们定义了一个CCTMXLayer对象meta作为类成员。注意,我们将这个层设置为不可见,因为它只是用来处理碰撞的。
接下来我们编写了一个tileCoordForPosition方法,用来将x,y坐标转换为地图网格坐标。地图左上角为(0,0)右下角为(49,49)。
上面带有坐标显示的截图来自java版本的编辑器。顺便说一声,我觉得在Qt版本里这个功能可能不再会被移植了。
不管怎么样,用地图网格坐标要比用x,y坐标方便。得到x坐标比较方便,但是y坐标有点麻烦,因为在cocos2d里,是以左下作为原点的。也就是说,y坐标的向量与地图网格坐标是相反的。
接下来,我们要修改一下setPlayerPosition方法。
int tileGid = [_meta tileGIDAt:tileCoord];
if (tileGid) {
NSDictionary *properties = [_tileMap propertiesForGID:tileGid];
if (properties) {
NSString *collision = [properties valueForKey:@"Collidable"];
if (collision && [collision compare:@"True"] == NSOrderedSame) {
return;
}
}
}
_player.position = position;
这里,我们将主角的坐标系从x,y坐标(左下原点)系转换为tile坐标系(左上原点)。接下来,我们使用meta layer里的tileGIDAt函数获取tile坐标系里的GID。噢?什么是GID? GID应该是“全局唯一标识”(我认为).但是在这个例子里,把它作为tile层的id更贴切。
我们使用GID来查找tile层的属性,返回值是一个包含属性列表的dictionary。我们检查“Collidable”属性是否设置为ture。如果是,则说明不可以穿越。很好,编译运行工程,你再也不能走入你在tile里设置为红色的区域了。

动态改变Tiled Maps
现在,你的小忍者可以在地图上漫游了,不过,整个游戏还是略显沉闷。假设我们的小忍者非常饿,那么我们设置一些食物,让小忍者可以找到并吃掉它们。
为了实现这个想法,我们要创建一个前端层,承载所有用于触碰(吃掉)的物体。这样,我们可以在忍者吃掉它们的同时,方便的从层上删除它。并且背景层不受任何影响。
打开Tiled Map Editor,Layer菜单的Add Tile Layer。命名新层为Foreground。选中这个层,添加一些可触碰的物件。我比较喜欢用西瓜。

接下来,要让西瓜变为可触碰的。这次我们用绿色方块来标记。记得要在meta_tiles里做这件事。

同样的,给绿色方块添加属性“Collectable”设置值为 “True”.
保存地图,回到xcode。修改代码:
// Inside the HelloWorld class declaration
CCTMXLayer *_foreground;
// After the class declaration
@property (nonatomic, retain) CCTMXLayer *foreground;
// Right after the implementation section
@synthesize foreground = _foreground;
// In dealloc
self.foreground = nil;
// In init, right after loading background
self.foreground = [_tileMap layerNamed:@"Foreground"];
// Add to setPlayerPosition, right after the if clause with the return in it
NSString *collectable = [properties valueForKey:@"Collectable"];
if (collectable && [collectable compare:@"True"] == NSOrderedSame) {
[_meta removeTileAt:tileCoord];
[_foreground removeTileAt:tileCoord];
}
这里有个基本的原则,要同时删除meta layer 和the foreground layer的匹配对象。编译运行,小忍者可以吃到美味的甜西瓜了。

创建分数计数器
小忍者现有吃有喝很开心,但是,我们想知道到底他吃了多少个西瓜。
通常,我们在layer上看着顺眼的地方加个label来显示数量。但是,我们一直在移动层,这样会给我们带来很多的困扰。
这是一个演示在一个场景里使用多个层的好例子。我们保留HelloWorld层来进行游戏,同时,增加一个HelloWorldHud层用来显示label(Hub = heads up display)。
当然,这两个层需要一些方法来互相通讯。Hub层需要知道小忍者吃到了西瓜。有很多很多方法实现两个层之间的通信,但是我们使用尽量简单的方法来实现。我 们会让HelloWorld层管理一个HelloworldHub层的引用,在忍者迟到西瓜的时候,可以调用一个方法来通知Hub层。修改代码:
// Before HelloWorld class declaration
@interface HelloWorldHud : CCLayer
{
CCLabel *label;
}
- ( void)numCollectedChanged:( int)numCollected;
@end
// Inside HelloWorld class declaration
int _numCollected;
HelloWorldHud *_hud;
// After the class declaration
@property (nonatomic, assign) int numCollected;
@property (nonatomic, retain) HelloWorldHud *hud;
// At top of file
@implementation HelloWorldHud
-(id) init
{
if ((self = [super init])) {
CGSize winSize = [[CCDirector sharedDirector] winSize];
label = [CCLabel labelWithString:@"0" dimensions:CGSizeMake(50, 20)
alignment:UITextAlignmentRight fontName:@"Verdana-Bold"
fontSize:18.0];
label.color = ccc3(0,0,0);
int margin = 10;
label.position = ccp(winSize.width - (label.contentSize.width/2)
- margin, label.contentSize.height/2 + margin);
[self addChild:label];
}
return self;
}
- ( void)numCollectedChanged:( int)numCollected {
[label setString:[NSString stringWithFormat:@"%d", numCollected]];
}
@end
// Right after the HelloWorld implementation section
@synthesize numCollected = _numCollected;
@synthesize hud = _hud;
// In dealloc
self.hud = nil;
// Add to the +(id) scene method, right before the return
HelloWorldHud *hud = [HelloWorldHud node];
[scene addChild: hud];
layer.hud = hud;
// Add inside setPlayerPosition, in the case where a tile is collectable
self.numCollected++;
[_hud numCollectedChanged:_numCollected];
没什么稀奇的,第二个层继承CCLayer,并且在右下角添加了一个label。我们将第二个层添加到场景(Scene)里并且把hub层的引用传递给HelloWorld层。然后修改HelloWorld层调用通知计数改变的方法。
编译运行,应该可以在右下角看到吃瓜计数器了。
音效和音乐
众所周知,没有音效和音乐的游戏,称不上是个完整的游戏。接下来,我们做一些简单的修改,让我们的游戏带有音效和背景音。
// At top of file
#import "SimpleAudioEngine.h"
// At top of init for HelloWorld layer
[[SimpleAudioEngine sharedEngine] preloadEffect:@"pickup.caf"];
[[SimpleAudioEngine sharedEngine] preloadEffect:@"hit.caf"];
[[SimpleAudioEngine sharedEngine] preloadEffect:@"move.caf"];
[[SimpleAudioEngine sharedEngine] playBackgroundMusic:@"TileMap.caf"];
// In case for collidable tile
[[SimpleAudioEngine sharedEngine] playEffect:@"hit.caf"];
// In case of collectable tile
[[SimpleAudioEngine sharedEngine] playEffect:@"pickup.caf"];
// Right before setting player position
[[SimpleAudioEngine sharedEngine] playEffect:@"move.caf"];