Mybatis学习(6)与Spring MVC 的集成
前面几篇文章已经讲到了mybatis与spring 的集成。但这个时候,所有的工程还不是web工程,虽然我一直是创建的web 工程。今天将直接用mybatis与Spring mvc 的方式集成起来,源码在本文结尾处下载.主要有以下几个方面的配置
1. web.xml 配置 spring dispatchservlet ,比如为:mvc-dispatcher
2. mvc-dispatcher-servlet.xml 文件配置
3. spring applicationContext.XML文件配置(与数据库相关,与mybatis sqlSessionFaction 整合,扫描所有mybatis mapper 文件等.)
4. 编写controller 类
5. 编写页面代码.
先有个大概映像,整个工程图如下:
[/code]
不知道为什么,一旦我用了 MapperScannerConfigurer 去扫描所有的mapper 接口时,数据库配置datasource 就不能用读取database.properties文件了。报错: Cannot load JDBC driver class '${jdbc.driverClassName}',网上有人说在spring 3.1.1 下用 sqlSessionFactionBean 注入可以解决,但我用 spring 3.1.3 还是有问题,所以只好把数据库连接信息直接配置在了XML 文件里面。
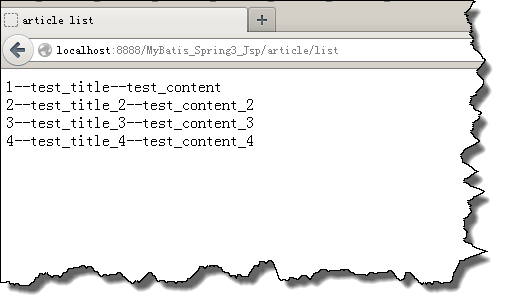
运行结果:

当然还有 mybatis 的Configure.xml 配置文件,与上一讲的差不多,唯一不同的就是不用再配置类似如下的: <mapper resource="com/yihaomen/mapper/User.xml"/> ,所有这些都交给 在配置 sqlSessionFactory 的时候,由 <property name="mapperLocations" value="classpath*:com/yihaomen/mapper/*.xml" /> 去导入了。
1. web.xml 配置 spring dispatchservlet ,比如为:mvc-dispatcher
2. mvc-dispatcher-servlet.xml 文件配置
3. spring applicationContext.XML文件配置(与数据库相关,与mybatis sqlSessionFaction 整合,扫描所有mybatis mapper 文件等.)
4. 编写controller 类
5. 编写页面代码.
先有个大概映像,整个工程图如下:
[/code]

1. web.xml 配置 spring dispatchservlet ,比如为:mvc-dispatcher
<context-param>
    <param-name>contextConfigLocation</param-name>
    <param-value>classpath*:config/applicationContext.xml</param-value>
  </context-param>
  <listener>
    <listener-class>org.springframework.web.context.ContextLoaderListener</listener-class>
  </listener>
  <listener>
    <listener-class>
            org.springframework.web.context.ContextCleanupListener</listener-class>
  </listener>
  <servlet>
    <servlet-name>mvc-dispatcher</servlet-name>
    <servlet-class>org.springframework.web.servlet.DispatcherServlet</servlet-class>
    <load-on-startup>1</load-on-startup>
  </servlet>
  <servlet-mapping>
    <servlet-name>mvc-dispatcher</servlet-name>
    <url-pattern>/</url-pattern>
  </servlet-mapping>
2. 在web.xml 同目录下配置 mvc-dispatcher-servlet.xml 文件,这个文件名前面部分必须与你在web.xml里面配置的DispatcherServlet 的servlet名字对应.其内容为:
<beans xmlns="http://www.springframework.org/schema/beans"
    xmlns:context="http://www.springframework.org/schema/context"
    xmlns:mvc="http://www.springframework.org/schema/mvc" xmlns:xsi="http://www.w3.org/2001/XMLSchema-instance"
    xsi:schemaLocation="
        http://www.springframework.org/schema/beans
        http://www.springframework.org/schema/beans/spring-beans-3.0.xsd
        http://www.springframework.org/schema/context
        http://www.springframework.org/schema/context/spring-context-3.0.xsd
        http://www.springframework.org/schema/mvc
        http://www.springframework.org/schema/mvc/spring-mvc-3.0.xsd">
    <context:component-scan base-package="com.yihaomen.controller" />
    <mvc:annotation-driven />
    <mvc:resources mapping="/static/**" location="/WEB-INF/static/"/>
    <mvc:default-servlet-handler/>
    <bean
        class="org.springframework.web.servlet.view.InternalResourceViewResolver">
        <property name="prefix">
            <value>/WEB-INF/pages/</value>
        </property>
        <property name="suffix">
            <value>.jsp</value>
        </property>
    </bean>
< /beans>
3. 在源码目录 config 目录下配置 spring 配置文件 applicationContext.xml
< !--本示例采用DBCP连接池,应预先把DBCP的jar包复制到工程的lib目录下。 -->
    <context:property-placeholder    location="classpath:/config/database.properties" />
    <bean id="dataSource" class="org.apache.commons.dbcp.BasicDataSource"
        destroy-method="close" p:driverClassName="com.mysql.jdbc.Driver"
        p:url="jdbc:mysql://127.0.0.1:3306/mybatis?characterEncoding=utf8"
        p:username="root" p:password="password"
        p:maxActive="10" p:maxIdle="10">
    </bean>
    <bean id="transactionManager" class="org.springframework.jdbc.datasource.DataSourceTransactionManager">
      <property name="dataSource" ref="dataSource" />
    </bean>
  <bean id="sqlSessionFactory" class="org.mybatis.spring.SqlSessionFactoryBean">
     <!--dataSource属性指定要用到的连接池-->
     <property name="dataSource" ref="dataSource"/>
     <!--configLocation属性指定mybatis的核心配置文件-->
     <property name="configLocation" value="classpath:config/Configuration.xml" />
     <!-- 所有配置的mapper文件 -->
     <property name="mapperLocations" value="classpath*:com/yihaomen/mapper/*.xml" />
  </bean>
  <bean class="org.mybatis.spring.mapper.MapperScannerConfigurer">
     <property name="basePackage" value="com.yihaomen.inter" />
  </bean>
不知道为什么,一旦我用了 MapperScannerConfigurer 去扫描所有的mapper 接口时,数据库配置datasource 就不能用读取database.properties文件了。报错: Cannot load JDBC driver class '${jdbc.driverClassName}',网上有人说在spring 3.1.1 下用 sqlSessionFactionBean 注入可以解决,但我用 spring 3.1.3 还是有问题,所以只好把数据库连接信息直接配置在了XML 文件里面。
4. 编写 controller 层
package com.yihaomen.controller;
import java.util.List;
import javax.servlet.http.HttpServletRequest;
import javax.servlet.http.HttpServletResponse;
import org.springframework.beans.factory.annotation.Autowired;
import org.springframework.stereotype.Controller;
import org.springframework.web.bind.annotation.RequestMapping;
import org.springframework.web.servlet.ModelAndView;
import com.yihaomen.inter.IUserOperation;
import com.yihaomen.model.Article;
@Controller
@RequestMapping("/article")
public class UserController {
    @Autowired
    IUserOperation userMapper;
    @RequestMapping("/list")
    public ModelAndView listall(HttpServletRequest request,HttpServletResponse response){
        List<Article> articles=userMapper.getUserArticles(1);
        ModelAndView mav=new ModelAndView("list");
        mav.addObject("articles",articles);
        return mav;
    }
}
5. 页面文件:
< c:forEach items="${articles}" var="item">
        ${item.id }--${item.title }--${item.content }<br />
</c:forEach>
运行结果:

当然还有 mybatis 的Configure.xml 配置文件,与上一讲的差不多,唯一不同的就是不用再配置类似如下的: <mapper resource="com/yihaomen/mapper/User.xml"/> ,所有这些都交给 在配置 sqlSessionFactory 的时候,由 <property name="mapperLocations" value="classpath*:com/yihaomen/mapper/*.xml" /> 去导入了。