Diffuse Lighting(漫反射光)
Diffuse Lighting(漫反射光)
不同的材质表面反射光的方式也不同。在镜面上光的反射角度与入身角度相等。当在一只猫的眼睛里看到一束怪异的光芒,这就是光的反射性:这是由于猫的眼睛反射光的方向与光源的照射方向平行,但是方向相反。漫反射表面对光的反射在各个方向上都一样。
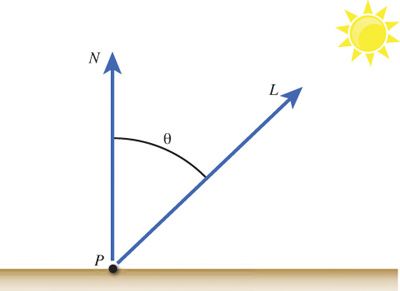
近似计算一个漫反射光,最简单并且最常用的模型是Lambert’s cosine law(朗伯余弦定律)。根据Lambert’s cosine law,照射到材质表面的光照亮度,与光源方向向量和面法线的夹角的余弦成正比。光源向量描述了光的照射方向,法向量确定了表面的朝向。图6.3说明了这些术语。
近似计算一个漫反射光,最简单并且最常用的模型是Lambert’s cosine law(朗伯余弦定律)。根据Lambert’s cosine law,照射到材质表面的光照亮度,与光源方向向量和面法线的夹角的余弦成正比。光源向量描述了光的照射方向,法向量确定了表面的朝向。图6.3说明了这些术语。
回想一下第二章,“A 3D/Math Primer”,所讨论的向量运算,通过向量的dot product可以得到光源向量与法向量(这两个向量都是单位向量)夹角的余弦值。一般的,法向量在3D object加载时由每一个vertex提供(或者通过triangle两条边的cross-product计算得出)。
Directional Lights
在3D图形学中定义了三种常用的光源:directional lights,point lights,spotlights(方向光,点光源,聚光灯)。一个directional light表示距离3D objects无穷远的光源,也就是说相对于objects没有坐标位置的意义。因此,照射到objects上的光线都是平行的,来自于同一个方向。Directional light的一个很好的例子是太阳光(虽然太阳不是严格意义上的无穷远)。图6.4描述了direction light的概念。

图6.4 An illustration of a directional light.
模拟一个directional light,只需要简单的用一个三维向量定义光的方向。也可以像ambient light那样,包括光的颜色和强度。列表6.2列出了一种diffuse lighting effect的代码,该effect使用了一种简单的directional light。本书中讲述的十分有限,建议把代码拷贝到NVIDIA FX Composer中,一步一步的测试该lighting effect。(也可以,从本书的配套网站上下载该代码)
列表6.2 DiffuseLighting.fx
#include "include\\Common.fxh"

/************* Resources *************/

cbuffer CBufferPerFrame
{
	float4 AmbientColor : AMBIENT <
		string UIName =  "Ambient Light";
		string UIWidget = "Color";
	> = {1.0f, 1.0f, 1.0f, 0.0f};

	float4 LightColor : COLOR <
		string Object = "LightColor0";
		string UIName =  "Light Color";
		string UIWidget = "Color";
	> = {1.0f, 1.0f, 1.0f, 1.0f};

	float3 LightDirection : DIRECTION <
		string Object = "DirectionalLight0";
		string UIName =  "Light Direction";
		string Space = "World";
	> = {0.0f, 0.0f, -1.0f};
}

cbuffer CBufferPerObject
{
	float4x4 WorldViewProjection : WORLDVIEWPROJECTION < string UIWidget="None"; >;
	float4x4 World : WORLD < string UIWidget="None"; >;
}

Texture2D ColorTexture <
    string ResourceName = "default_color.dds";
    string UIName =  "Color Texture";
    string ResourceType = "2D";
>;

SamplerState ColorSampler
{
	Filter = MIN_MAG_MIP_LINEAR;
	AddressU = WRAP;
	AddressV = WRAP;
};

RasterizerState DisableCulling
{
    CullMode = NONE;
};

/************* Data Structures *************/

struct VS_INPUT
{
    float4 ObjectPosition : POSITION;
    float2 TextureCoordinate : TEXCOORD;
	float3 Normal : NORMAL;
};

struct VS_OUTPUT
{
    float4 Position : SV_Position;
    float3 Normal : NORMAL;
	float2 TextureCoordinate : TEXCOORD0;
	float3 LightDirection : TEXCOORD1;
};

/************* Vertex Shader *************/

VS_OUTPUT vertex_shader(VS_INPUT IN)
{
	VS_OUTPUT OUT = (VS_OUTPUT)0;

    OUT.Position = mul(IN.ObjectPosition, WorldViewProjection);
    OUT.TextureCoordinate = get_corrected_texture_coordinate(IN.TextureCoordinate);
	OUT.Normal = normalize(mul(float4(IN.Normal, 0), World).xyz);
	OUT.LightDirection = normalize(-LightDirection);

	return OUT;
}

/************* Pixel Shader *************/

float4 pixel_shader(VS_OUTPUT IN) : SV_Target
{
	float4 OUT = (float4)0;

	float3 normal = normalize(IN.Normal);
    float3 lightDirection = normalize(IN.LightDirection);
	float n_dot_l = dot(lightDirection, normal);

	float4 color = ColorTexture.Sample(ColorSampler, IN.TextureCoordinate);
	float3 ambient = AmbientColor.rgb * AmbientColor.a * color.rgb;

	float3 diffuse = (float3)0;

	if (n_dot_l > 0)
	{
		diffuse = LightColor.rgb * LightColor.a * n_dot_l * color.rgb;
	}

	OUT.rgb = ambient + diffuse;
	OUT.a = color.a;

	return OUT;
}

/************* Techniques *************/

technique10 main10
{
    pass p0
	{
        SetVertexShader(CompileShader(vs_4_0, vertex_shader()));
		SetGeometryShader(NULL);
        SetPixelShader(CompileShader(ps_4_0, pixel_shader()));

		SetRasterizerState(DisableCulling);
    }
}
Diffuse Lighting Effect Preamble
DiffuseLighting.fx代码的第一行使用了一种C风格的#include方法,包含了一个头文件,该头文件中提供了一些通用的函数,用于越来越丰富的effects中。列表6.3列出了头文件Common.fxh的内容,头文件中带有_COMMON_FXH宏定义的头文件卫士,以及从之前的代码中转移过来的FLIP_TEXTURE_Y宏和get_corrected_texture_coordinate()函数。
列表6.3 Common.fxh
列表6.3 Common.fxh
#ifndef _COMMON_FXH
#define _COMMON_FXH

/************* Constants *************/

#define FLIP_TEXTURE_Y 1

/************* Utility Functions *************/

float2 get_corrected_texture_coordinate(float2 textureCoordinate)
{
    #if FLIP_TEXTURE_Y
        return float2(textureCoordinate.x, 1.0 - textureCoordinate.y);
    #else
        return textureCoordinate;
    #endif
}

float3 get_vector_color_contribution(float4 light, float3 color)
{
    // Color (.rgb) * Intensity (.a)
    return light.rgb * light.a * color;
}

float3 get_scalar_color_contribution(float4 light, float color)
{
    // Color (.rgb) * Intensity (.a)
    return light.rgb * light.a * color;
}

#endif /* _COMMON_FXH */
最后需要注意的是,在CBufferPerObject中增加的World变量。该变量值与VS_INPUT结构体中新加的Normal成员变量有关。与object的vertices一样,面的法线存储在object space中。计算pixel的diffuse color是通过把法线向量与光的方向向量进行dot-product,但由于光源的方向是在world space中,因此法向量也要变换到wrold space中,而World矩阵就是用于这种变换。之所以不能使用组合矩阵World-View-Projection进行变换,是因为该矩阵是变换到homogeneous space而不仅仅是world space。World矩阵有可能包含了scaling变换,而面的法向量必须是一个规范化向量;因此,在变换后必须再进行normalizing(规范化)。
Diffuse Lighting Vertex Shader
接下来,讲解VS_OUTPUT结构体的两个新成员变量:Normal和LightDirection。Normal用于从CPU中传递变换后的面法线向量,而LightDirection有点特别,因为有一个shader constant叫LightDirection。LightDirection shader constant是一个global变量,存储了光源的方向,而VS_OUTPUT中的LightDirection成员表示object表面的光线方向。因此,在vertex shader中对global LightDirection取反,并赋值给对应的输出成员LightDirection。当然,可以在CPU中计算正确的光线方向,再传递到vertex shader中,这样在vertex shader中就不用进行取反操作。但是在使用NVIDIA FX Composer的情况下,必须这样做,因为光照的数据都由FX Composer发送到shader中,要想在Render panel中得到正确的预览效果必须要在shader对光线方向向量进行取反。对LightDirection取反时,还进行了normalize()操作,这是为了保证light direction向量是规范化的,如果可以保证从CPU传递过来的数据已经是规范化的,就可以省略normalize()了。
Diffuse Lighting Pixel Shader
尽管与ambient lighting effect有一些相似的地方,但是diffuse lighting pixel shader(见列表6.4)包含了更多新的代码。
列表6.4 The Pixel Shader from DiffuseLighting.fx
列表6.4 The Pixel Shader from DiffuseLighting.fx
float4 pixel_shader(VS_OUTPUT IN) : SV_Target
{
	float4 OUT = (float4)0;

	float3 normal = normalize(IN.Normal);
    float3 lightDirection = normalize(IN.LightDirection);
	float n_dot_l = dot(lightDirection, normal);

	float4 color = ColorTexture.Sample(ColorSampler, IN.TextureCoordinate);
	float3 ambient = AmbientColor.rgb * AmbientColor.a * color.rgb;

	float3 diffuse = (float3)0;

	if (n_dot_l > 0)
	{
		diffuse = LightColor.rgb * LightColor.a * n_dot_l * color.rgb;
	}

	OUT.rgb = ambient + diffuse;
	OUT.a = color.a;

	return OUT;
}
首先,对于textrue sampling和calculation of the ambient引入了两个局部变量color和ambient。虽然有一点点改进,但与之前的步骤基本一样;其中的ambient变量被分离出来用于进一步计算最终的pixel color。
接下来介绍输入参数的成员变量Normal和LightDirection的规范化。传递到rasterizer阶段的数据是经过插值计算的,而该运算过程会导致向量变成非规范化的。与相应的视觉效果一样,插值运算导致的差错是微小的。因此,如果对性能有比较严格的要求,只需要简单地省略这些规范化运算即可。
下一步,把light direction和surface normal向量的dot product结果赋值给局部变量n_dot_l,用于下面计算diffuse color。其中if-statement(if条件语句)确保变量n_dot_l的值大于0。如果dot product为负值,表示光源在表面的背面,因此就不需要计算。正确的dot product值应该介于0.0和1.0之间。值为0.0表示光源的方向与表面平行(也就没有光照效果),值为1.0表示光源方向与表面垂直(能得到最在强度的光照)。而局部变量diffuse的值则由sampled color和directional light color,intensity以及前面计算的dot product相乘得到。
Diffuse Lighting Output
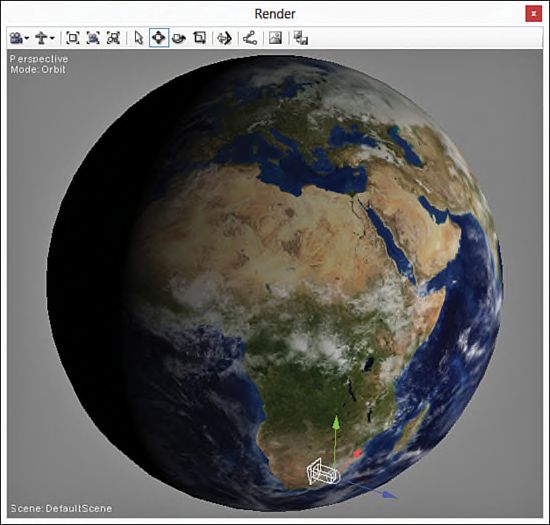
最终的pixel color由局部变量ambient和diffuse相加得到。Alpha通道值直接使用color texture的alpha值。图6.5是把diffuse lighting effect应用到sphere的结果,同时使用了与图6.1一样的Earth texture。可以看到,当sphere的surfaces与光源的距离越远,显示的图片变得越暗。

图6.5 DiffuseLighting.fx applied to a sphere with the texture of Earth. (Original texture from Reto
Stöckli, NASA Earth Observatory. Additional texturing by Nick Zuccarello, Florida Interactive Entertainment
Academy.)
在图片的下边有一个diretional light。NVIDIA FX Composer支持在Render panel中创建ambient,point,spot和directional lights。要添加不同的光源,只需要点击工具栏上对应的按钮或者在主菜单上点击Create再选择对应的选项。要在lighting effect使用directional light,必须把directional light与LightColor和LightDirection shader constant进行绑定。这就是之前说的Object annotations的作用。在Render panel中选中sphere,再在Properties panel中点击MaterialInstance按钮(如图6.6,Properties panel工具栏中的第5个按钮),就可以绑定light。然后选择directional light作为directionallight0和lightcolor0的绑定对象。把light绑定与shader constants绑定之后,light的任何修改都会立即在Render panel中显示。例如,旋转light并观察sphere的光照区域相对light的方向如何变化。但是,如果只是平移改变light的位置,你会发现没有影响,因为directional lights没有真正意义上的坐标位置。在Render panel中用于表示directional lights的模型所处的位置,对传递到shader effect的数据没有影响。

Figure 6.6 Material Instance Properties within NVIDIA FX Composer.
在Render panel中选中light,并在Properties panel中打开Color property的颜色选择器(color picker),就可以修改directional light的color和intensity(强度,使用alpha通道表示)。在图6.5所示的输出图片中,directional light的颜色为纯白色,强度为1.0,ambient light的强度为0(等同于禁用了ambient light)。
警告
NVIDIA FX Composer支持自动和手动两种绑定方式。当自动绑定可用时,NVIDIA FX Composer会尽量把lights与最合适的shader constants绑定。但是,这种方式并不能保证问题成功的。查看material instance properties,并检查哪些已经绑定了,如果有必要,就手动修改设定。但是要注意的是,一旦recomplile effect,所有手动绑定都会删除。
NVIDIA FX Composer支持自动和手动两种绑定方式。当自动绑定可用时,NVIDIA FX Composer会尽量把lights与最合适的shader constants绑定。但是,这种方式并不能保证问题成功的。查看material instance properties,并检查哪些已经绑定了,如果有必要,就手动修改设定。但是要注意的是,一旦recomplile effect,所有手动绑定都会删除。
