Jenkins+Gitlab+Ansible自动化部署(五)
Freestyle Job实现静态网站部署交付(接Jenkins+Gitlab+Ansible自动化部署(四)https://www.cnblogs.com/zd520pyx1314/p/10244504.html)
- 环境构建
- 编写ansible playbook脚本实现静态网页远程部署
- 将playbook部署脚本提交到GitLab仓库
- 构建Freestyle Job任务框架
- Jenkins集成Ansible与Gitlab实现静态网页的自动化部署
首先确定自己的环境已经准备完毕。
登录gitlab查看
登录Jenkins首页
登录Jenkins主机查看Ansible2.5+python 3.6虚拟环境
$ ssh root@192.168.244.131
Last login: Wed Jan  9 13:40:48 2019 from 192.168.244.1
[root@jenkins ~]# su - deploy
Last login: Wed Jan  9 20:24:43 CST 2019 on pts/0
[deploy@jenkins ~]$ source /home/deploy/.py3-a2.5-env/bin/activate           (.py3-a2.5-env) [deploy@jenkins ~]$ source /home/deploy/.py3-a2.5-env/ansible/hacking/env-setup -q
(.py3-a2.5-env) [deploy@jenkins ~]$ ansible --version
ansible 2.5.14 (stable-2.5 c748512c4c) last updated 2019/01/09 20:03:39 (GMT +800)
  config file = None
  configured module search path = ['/home/deploy/.ansible/plugins/modules', '/usr/share/ansible/plugins/modules']
  ansible python module location = /home/deploy/.py3-a2.5-env/ansible/lib/ansible
  executable location = /home/deploy/.py3-a2.5-env/ansible/bin/ansible
  python version = 3.6.8 (default, Jan  9 2019, 19:44:42) [GCC 4.8.5 20150623 (Red Hat 4.8.5-36)]
(.py3-a2.5-env) [deploy@jenkins ~]$
准备就绪,开始编写ansible playbook脚本实现静态网页远程部署,打开Git bash命令行,将之前创建好的ansible-playbook-repo仓库clone到本地:
xueji@xueji MINGW64 ~
$ git config --global http.sslVerify false
xueji@xueji MINGW64 ~
$ cd Desktop/repo/
$  git clone https://gitlab.example.com/root/ansible-playbook-repo.git
Cloning into 'ansible-playbook-repo'...
remote: Enumerating objects: 3, done.
remote: Counting objects: 100% (3/3), done.
remote: Total 3 (delta 0), reused 0 (delta 0)
Unpacking objects: 100% (3/3), done.
xueji@xueji MINGW64 ~/Desktop/repo/ansible-playbook-repo (master)
$ ll
total 9
-rw-r--r-- 1 xueji 1049089   0 1月  10 11:57 ansible-playbook.txt
drwxr-xr-x 1 xueji 1049089   0 1月  10 12:02 nginx_playbooks/
-rw-r--r-- 1 xueji 1049089 312 7月  15 08:33 nginx-freestyle-job.sh
drwxr-xr-x 1 xueji 1049089   0 1月  10 12:02 test_playbooks/
开始配置
xueji@xueji MINGW64 ~/Desktop/repo/ansible-playbook-repo/nginx_playbooks (master)
$ ll
total 2
-rw-r--r-- 1 xueji 1049089 17 7月  17 21:06 deploy.retry
-rw-r--r-- 1 xueji 1049089 80 7月  17 21:06 deploy.yml
drwxr-xr-x 1 xueji 1049089  0 1月  10 12:02 inventory/
drwxr-xr-x 1 xueji 1049089  0 1月  10 12:02 roles/

xueji@xueji MINGW64 ~/Desktop/repo/ansible-playbook-repo/nginx_playbooks (master)
$ vim deploy.yml
- hosts: "nginx"
  gather_facts: true
  remote_user: root
  roles:
    - nginx

xueji@xueji MINGW64 ~/Desktop/repo/ansible-playbook-repo/nginx_playbooks (master)
$ vim inventory/prod
[nginx]
test.example.com

[nginx:vars]
server_name=test.example.com
port=80
user=deploy
worker_processes=4
max_open_file=65505
root=/www

xueji@xueji MINGW64 ~/Desktop/repo/ansible-playbook-repo/nginx_playbooks (master)
$ vim inventory/dev
[nginx]
test.example.com

[nginx:vars]
server_name=test.example.com
port=80
user=deploy
worker_processes=4
max_open_file=65505
root=/www

xueji@xueji MINGW64 ~/Desktop/repo/ansible-playbook-repo/nginx_playbooks (master)
$ vim roles/nginx/files/health_check.sh
#!/bin/sh

URL=$1

curl -Is http://$URL > /dev/null && echo "The remote side is healthy" || echo "The remote side is failed, please check"

xueji@xueji MINGW64 ~/Desktop/repo/ansible-playbook-repo/nginx_playbooks (master)
$ cat roles/nginx/files/index.html
This is my first website


xueji@xueji MINGW64 ~/Desktop/repo/ansible-playbook-repo/nginx_playbooks (master)
$ vim roles/nginx/templates/nginx.conf.j2
# For more information on configuration, see:
user              {{ user }};
worker_processes  {{ worker_processes }};

error_log  /var/log/nginx/error.log;

pid        /var/run/nginx.pid;

events {
    worker_connections  {{ max_open_file }};
}


http {
    include       /etc/nginx/mime.types;
    default_type  application/octet-stream;

    log_format  main  '$remote_addr - $remote_user [$time_local] "$request" '
                      '$status $body_bytes_sent "$http_referer" '
                      '"$http_user_agent" "$http_x_forwarded_for"';

    access_log  /var/log/nginx/access.log  main;

    sendfile        on;
    #tcp_nopush     on;

    #keepalive_timeout  0;
    keepalive_timeout  65;

    #gzip  on;

    # Load config files from the /etc/nginx/conf.d directory
    # The default server is in conf.d/default.conf
    #include /etc/nginx/conf.d/*.conf;
    server {
        listen       {{ port }} default_server;
        server_name  {{ server_name }};

        #charset koi8-r;

        #access_log  logs/host.access.log  main;

        location / {
            root   {{ root }};
            index  index.html index.htm;
        }

        error_page  404              /404.html;
        location = /404.html {
            root   /usr/share/nginx/html;
        }

        # redirect server error pages to the static page /50x.html
        #
        error_page   500 502 503 504  /50x.html;
        location = /50x.html {
            root   /usr/share/nginx/html;
        }

    }

}


xueji@xueji MINGW64 ~/Desktop/repo/ansible-playbook-repo/nginx_playbooks (master)
$ vim roles/nginx/tasks/main.yml
- name: Disable system firewall
  service: name=firewalld state=stopped

- name: Disable SELINUX
  selinux: state=disabled

- name: setup nginx yum source
  yum: pkg=epel-release state=latest

- name: write then nginx config file
  template: src=roles/nginx/templates/nginx.conf.j2 dest=/etc/nginx/nginx.conf

- name: create nginx root folder
  file: 'path={{ root }} state=directory owner={{ user }} group={{ user }} mode=0755'

- name: copy index.html to remote
  copy: 'remote_src=no src=roles/nginx/files/index.html dest=/www/index.html mode=0755'

- name: restart nginx service
  service: name=nginx state=restarted

- name: run the health check locally
  shell: "sh roles/nginx/files/health_check.sh {{ server_name }}"
  delegate_to: localhost
  register: health_status

- debug: msg="{{ health_status.stdout }}"
将配置好的文件,提交到远程gitlab
xueji@xueji MINGW64 ~/Desktop/repo/ansible-playbook-repo/nginx_playbooks (master)
$ cd ~/Desktop/repo/ansible-playbook-repo/

xueji@xueji MINGW64 ~/Desktop/repo/ansible-playbook-repo (master)
$ git add .

xueji@xueji MINGW64 ~/Desktop/repo/ansible-playbook-repo (master)
$ git commit -m"First commit"
[master 06431dc] First commit
 8 files changed, 122 deletions(-)
 delete mode 100644 test_playbooks/deploy.retry
 delete mode 100644 test_playbooks/deploy.yml
 delete mode 100644 test_playbooks/inventory/dev
 delete mode 100644 test_playbooks/inventory/prod
 delete mode 100644 test_playbooks/roles/nginx/files/health_check.sh
 delete mode 100644 test_playbooks/roles/nginx/files/index.html
 delete mode 100644 test_playbooks/roles/nginx/tasks/main.yml
 delete mode 100644 test_playbooks/roles/nginx/templates/nginx.conf.j2

xueji@xueji MINGW64 ~/Desktop/repo/ansible-playbook-repo (master)
$ git push origin master
Enumerating objects: 3, done.
Counting objects: 100% (3/3), done.
Delta compression using up to 4 threads
Compressing objects: 100% (2/2), done.
Writing objects: 100% (2/2), 212 bytes | 212.00 KiB/s, done.
Total 2 (delta 1), reused 0 (delta 0)
To https://gitlab.example.com/root/ansible-playbook-repo.git
   169dec7..06431dc  master -> master
返回到Jenkins web管理页,点击“New 任务”
添加描述
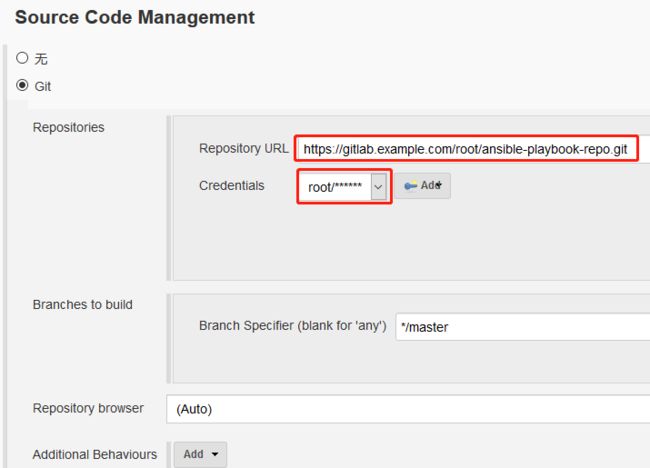
添加Git仓库(该仓库地址即为上述配置的ansible-playbook-repo的仓库地址)
参数化构建过程
添加构建步骤
在执行shell弹出的输入框内输入以下内容
#/bin/sh

set +x
source /home/deploy/.py3-a2.5-env/bin/activate
source /home/deploy/.py3-a2.5-env/ansible/hacking/env-setup -q

cd $WORKSPACE/nginx_playbooks
ansible --version
ansible-playbook --version

ansible-playbook -i inventory/$deploy_env ./deploy.yml -e project=nginx -e branch=$branch -e env=$deploy_env
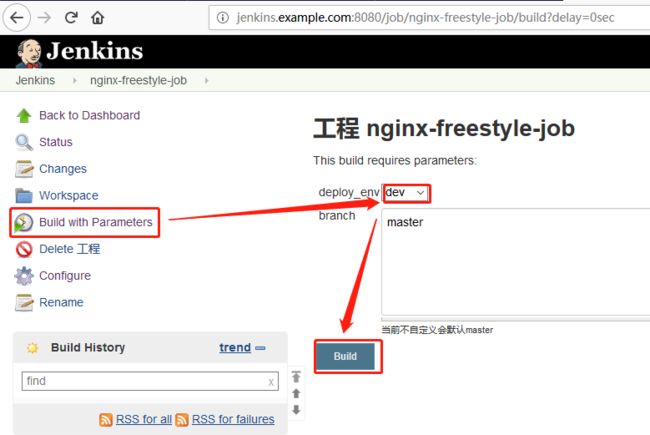
点击“Save”,然后点击“Build with Parameters”,在右侧下拉列表中选择dev,点击“Build”
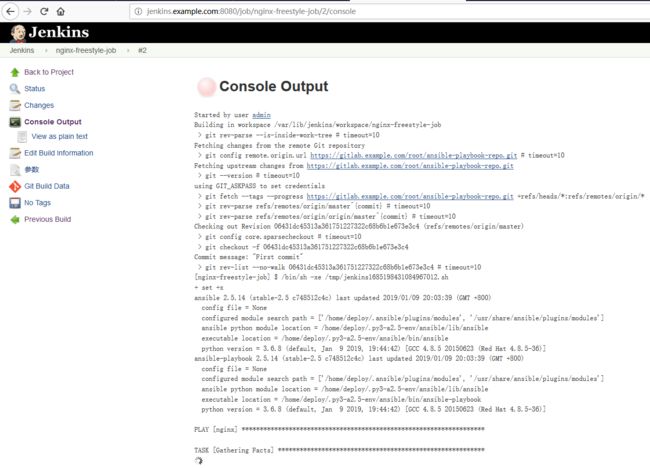
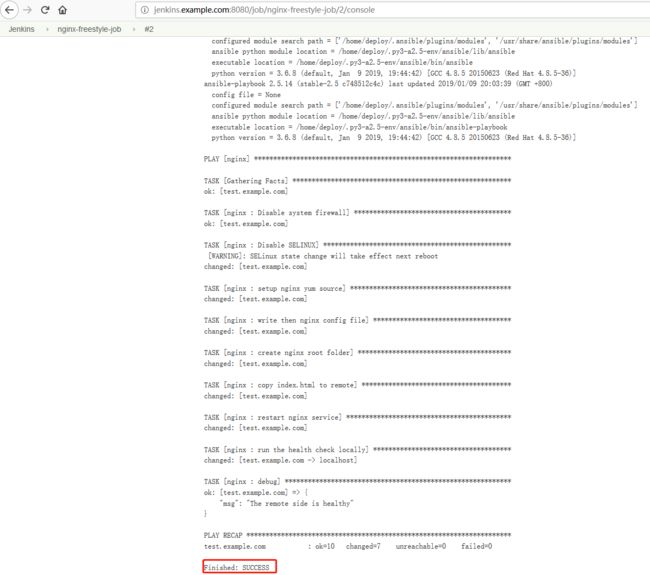
查看输出信息
验证目标主机是否部署成功,在浏览器输入test.exmaple.com查看
前提是保证本地windows主机下的C:\Windows\System32\drivers\etc\hosts文件中末尾有如下对应关系
192.168.244.130 gitlab.example.com
192.168.244.131 jenkins.example.com
192.168.244.132 ansible.example.com
192.168.244.133 test.example.com
可以看到已经成功部署~
posted on 2019-01-10 20:07 Lucky_7 阅读(...) 评论(...) 编辑 收藏


