Android-View的绘制及自定义View
视图View主要分为两类:
| 类别 | 解释 | 特点 |
|---|---|---|
| 单一视图 | 即一个View,如TextView | 不包含子View |
| 视图组 | 即多个View组成的ViewGroup,如LinearLayout | 包含子View |
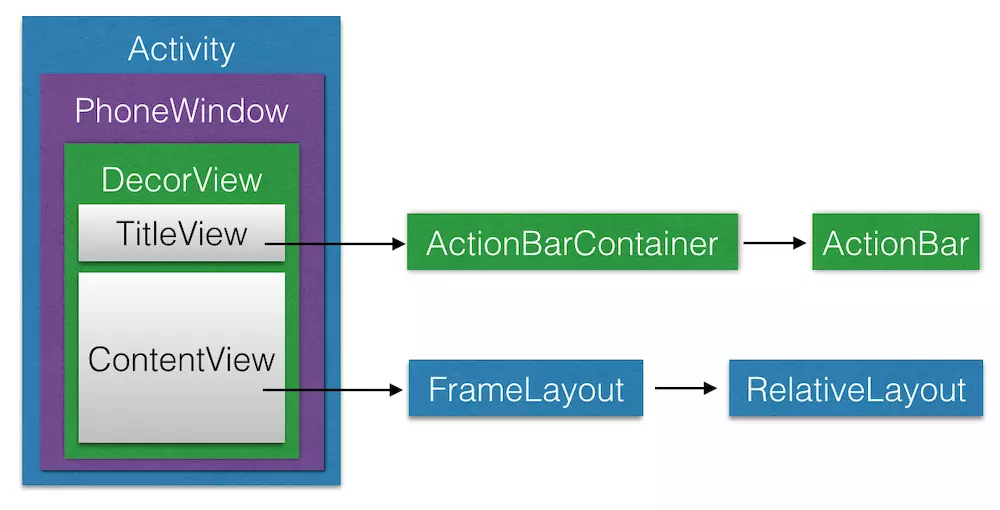
DecorView是一个应用窗口的根容器,它本质上是一个FrameLayout。DecorView有唯一一个子View,它是一个垂直LinearLayout,包含两个子元素,一个是TitleView(ActionBar的容器),另一个是ContentView(窗口内容的容器)。关于ContentView,它是一个FrameLayout(android.R.id.content),我们平常用的setContentView就是设置它的子View。上图还表达了每个Activity都与一个Window(具体来说是PhoneWindow)相关联,用户界面则由Window所承载。
Window
Window即窗口,这个概念在Android Framework中的实现为android.view.Window这个抽象类,这个抽象类是对Android系统中的窗口的抽象。在介绍这个类之前,我们先来看看究竟什么是窗口呢?
实际上,窗口是一个宏观的思想,它是屏幕上用于绘制各种UI元素及响应用户输入事件的一个矩形区域。通常具备以下两个特点:
- 独立绘制,不与其它界面相互影响;
- 不会触发其它界面的输入事件;
在Android系统中,窗口是独占一个Surface实例的显示区域,每个窗口的Surface由WindowManagerService分配。我们可以把Surface看作一块画布,应用可以通过Canvas或OpenGL在其上面作画。画好之后,通过SurfaceFlinger将多块Surface按照特定的顺序(即Z-order)进行混合,而后输出到FrameBuffer中,这样用户界面就得以显示。
android.view.Window这个抽象类可以看做Android中对窗口这一宏观概念所做的约定,而PhoneWindow这个类是Framework为我们提供的Android窗口概念的具体实现。接下来我们先来介绍一下android.view.Window这个抽象类。
这个抽象类包含了三个核心组件:
- WindowManager.LayoutParams: 窗口的布局参数;
- Callback: 窗口的回调接口,通常由Activity实现;
- ViewTree: 窗口所承载的控件树。
下面我们来看一下Android中Window的具体实现(也是唯一实现)——PhoneWindow。
PhoneWindow
前面我们提到了,PhoneWindow这个类是Framework为我们提供的Android窗口的具体实现。我们平时调用setContentView()方法设置Activity的用户界面时,实际上就完成了对所关联的PhoneWindow的ViewTree的设置。我们还可以通过Activity类的requestWindowFeature()方法来定制Activity关联PhoneWindow的外观,这个方法实际上做的是把我们所请求的窗口外观特性存储到了PhoneWindow的mFeatures成员中,在窗口绘制阶段生成外观模板时,会根据mFeatures的值绘制特定外观。
从setContentView()说开去
在分析setContentView()方法前,我们需要明确:这个方法只是完成了Activity的ContentView的创建,而并没有执行View的绘制流程。
当我们自定义Activity继承自android.app.Activity时候,调用的setContentView()方法是Activity类的,源码如下:
public void setContentView(@LayoutRes int layoutResID) {
  getWindow().setContentView(layoutResID);
  . . .
}
getWindow()方法会返回Activity所关联的PhoneWindow,也就是说,实际上调用到了PhoneWindow的setContentView()方法,源码如下:
@Override
public void setContentView(int layoutResID) {
  if (mContentParent == null) {
    // mContentParent即为上面提到的ContentView的父容器,若为空则调用installDecor()生成
    installDecor();
  } else if (!hasFeature(FEATURE_CONTENT_TRANSITIONS)) {
    // 具有FEATURE_CONTENT_TRANSITIONS特性表示开启了Transition
    // mContentParent不为null,则移除decorView的所有子View
    mContentParent.removeAllViews();
  }
  if (hasFeature(FEATURE_CONTENT_TRANSITIONS)) {
    // 开启了Transition,做相应的处理,我们不讨论这种情况
    // 感兴趣的同学可以参考源码
    . . .
  } else {
    // 一般情况会来到这里,调用mLayoutInflater.inflate()方法来填充布局
    // 填充布局也就是把我们设置的ContentView加入到mContentParent中
    mLayoutInflater.inflate(layoutResID, mContentParent);
  }
  . . .
  // cb即为该Window所关联的Activity
  final Callback cb = getCallback();
  if (cb != null && !isDestroyed()) {
    // 调用onContentChanged()回调方法通知Activity窗口内容发生了改变
    cb.onContentChanged();
  }

  . . .
}
LayoutInflater.inflate()
在上面我们看到了,PhoneWindow的setContentView()方法中调用了LayoutInflater的inflate()方法来填充布局,这个方法的源码如下:
public View inflate(@LayoutRes int resource, @Nullable ViewGroup root) {
  return inflate(resource, root, root != null);
}

public View inflate(@LayoutRes int resource, @Nullable ViewGroup root, boolean attachToRoot) {
  final Resources res = getContext().getResources();
  . . .
  final XmlResourceParser parser = res.getLayout(resource);
  try {
    return inflate(parser, root, attachToRoot);
  } finally {
    parser.close();
  }
}
在PhoneWindow的setContentView()方法中传入了decorView作为LayoutInflater.inflate()的root参数,我们可以看到,通过层层调用,最终调用的是inflate(XmlPullParser, ViewGroup, boolean)方法来填充布局。这个方法的源码如下:
public View inflate(XmlPullParser parser, @Nullable ViewGroup root, boolean attachToRoot) {
synchronized (mConstructorArgs) {
. . .
final Context inflaterContext = mContext;
final AttributeSet attrs = Xml.asAttributeSet(parser);
Context lastContext = (Context) mConstructorArgs[0];
mConstructorArgs[0] = inflaterContext;
View result = root;
try {
// Look for the root node.
int type;
// 一直读取xml文件,直到遇到开始标记
while ((type = parser.next()) != XmlPullParser.START_TAG &&
type != XmlPullParser.END_DOCUMENT) {
// Empty
}
// 最先遇到的不是开始标记,报错
if (type != XmlPullParser.START_TAG) {
throw new InflateException(parser.getPositionDescription()
+ ": No start tag found!");
}
final String name = parser.getName();
. . .
// 单独处理标签,不熟悉的同学请参考官方文档的说明
if (TAG_MERGE.equals(name)) {
// 若包含标签,父容器(即root参数)不可为空且attachRoot须为true,否则报错
if (root == null || !attachToRoot) {
throw new InflateException(" 在上面的源码中,首先对于布局文件中的
void rInflate(XmlPullParser parser, View parent, Context context,
AttributeSet attrs, boolean finishInflate) throws XmlPullParserException, IOException {
// 获取当前标记的深度,根标记的深度为0
final int depth = parser.getDepth();
int type;
while (((type = parser.next()) != XmlPullParser.END_TAG ||
parser.getDepth() > depth) && type != XmlPullParser.END_DOCUMENT) {
// 不是开始标记则继续下一次迭代
if (type != XmlPullParser.START_TAG) {
continue;
}
final String name = parser.getName();
// 对一些特殊标记做单独处理
if (TAG_REQUEST_FOCUS.equals(name)) {
parseRequestFocus(parser, parent);
} else if (TAG_TAG.equals(name)) {
parseViewTag(parser, parent, attrs);
} else if (TAG_INCLUDE.equals(name)) {
if (parser.getDepth() == 0) {
throw new InflateException("做处理
parseInclude(parser, context, parent, attrs);
} else if (TAG_MERGE.equals(name)) {
throw new InflateException(" 我们可以看到,上面的inflate()和rInflate()方法中都调用了rInflateChildren()方法,这个方法的源码如下:
final void rInflateChildren(XmlPullParser parser, View parent, AttributeSet attrs, boolean finishInflate) throws XmlPullParserException, IOException {
    rInflate(parser, parent, parent.getContext(), attrs, finishInflate);
}
从源码中我们可以知道,rInflateChildren()方法实际上调用了rInflate()方法。
到这里,setContentView()的整体执行流程我们就分析完了,至此我们已经完成了Activity的ContentView的创建与设置工作。接下来,我们开始进入正题,分析View的绘制流程。
ViewRoot
在介绍View的绘制前,首先我们需要知道是谁负责执行View绘制的整个流程。实际上,View的绘制是由ViewRoot来负责的。每个应用程序窗口的decorView都有一个与之关联的ViewRoot对象,这种关联关系是由WindowManager来维护的。
那么decorView与ViewRoot的关联关系是在什么时候建立的呢?答案是Activity启动时,ActivityThread.handleResumeActivity()方法中建立了它们两者的关联关系。这里我们不具体分析它们建立关联的时机与方式,感兴趣的同学可以参考相关源码。下面我们直入主题,分析一下ViewRoot是如何完成View的绘制的。
View的整个绘制流程可以分为以下三个阶段:
- measure: 判断是否需要重新计算View的大小,需要的话则计算;
- layout: 判断是否需要重新计算View的位置,需要的话则计算;
- draw: 判断是否需要重新绘制View,需要的话则重绘制。
这三个子阶段可以用下图来描述:


measure 和 layout
从整体上来看 Measure 和 Layout 两个步骤的执行:
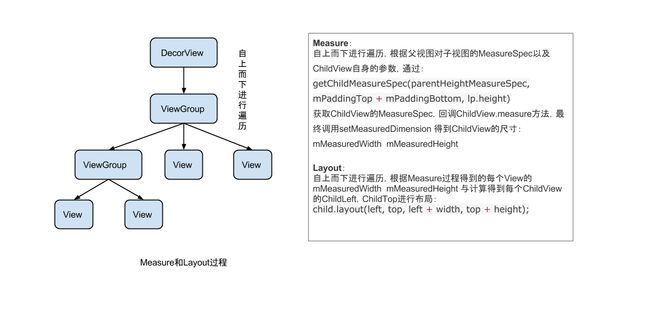
树的遍历是有序的,由父视图到子视图,每一个 ViewGroup 负责测绘它所有的子视图,而最底层的 View 会负责测绘自身。
具体分析
measure 过程由measure(int, int)方法发起,从上到下有序的测量 View,在 measure 过程的最后,每个视图存储了自己的尺寸大小和测量规格。 layout 过程由layout(int, int, int, int)方法发起,也是自上而下进行遍历。在该过程中,每个父视图会根据 measure 过程得到的尺寸来摆放自己的子视图。
measure 过程会为一个 View 及所有子节点的 mMeasuredWidth 和 mMeasuredHeight 变量赋值,该值可以通过getMeasuredWidth()和getMeasuredHeight()方法获得。而且这两个值必须在父视图约束范围之内,这样才可以保证所有的父视图都接收所有子视图的测量。如果子视图对于 Measure 得到的大小不满意的时候,父视图会介入并设置测量规则进行第二次 measure。比如,父视图可以先根据未给定的 dimension 去测量每一个子视图,如果最终子视图的未约束尺寸太大或者太小的时候,父视图就会使用一个确切的大小再次对子视图进行 measure。
measure 过程传递尺寸的两个类
- ViewGroup.LayoutParams (View 自身的布局参数)
- MeasureSpecs 类(父视图对子视图的测量要求)
ViewGroup.LayoutParams
这个类我们很常见,就是用来指定视图的高度和宽度等参数。对于每个视图的 height 和 width,你有以下选择:
- 具体值
- MATCH_PARENT 表示子视图希望和父视图一样大(不包含 padding 值)
- WRAP_CONTENT 表示视图为正好能包裹其内容大小(包含 padding 值)
ViewGroup 的子类有其对应的 ViewGroup.LayoutParams 的子类。比如 RelativeLayout 拥有的 ViewGroup.LayoutParams 的子类 RelativeLayoutParams。
有时我们需要使用 view.getLayoutParams() 方法获取一个视图 LayoutParams,然后进行强转,但由于不知道其具体类型,可能会导致强转错误。其实该方法得到的就是其所在父视图类型的 LayoutParams,比如 View 的父控件为 RelativeLayout,那么得到的 LayoutParams 类型就为 RelativeLayoutParams。
MeasureSpecs
测量规格,包含测量要求和尺寸的信息,有三种模式:
-
UNSPECIFIED
父视图不对子视图有任何约束,它可以达到所期望的任意尺寸。比如 ListView、ScrollView,一般自定义 View 中用不到, -
EXACTLY
父视图为子视图指定一个确切的尺寸,而且无论子视图期望多大,它都必须在该指定大小的边界内,对应的属性为 match_parent 或具体值,比如 100dp,父控件可以通过MeasureSpec.getSize(measureSpec)直接得到子控件的尺寸。 -
AT_MOST
父视图为子视图指定一个最大尺寸。子视图必须确保它自己所有子视图可以适应在该尺寸范围内,对应的属性为 wrap_content,这种模式下,父控件无法确定子 View 的尺寸,只能由子控件自己根据需求去计算自己的尺寸,这种模式就是我们自定义视图需要实现测量逻辑的情况。
3. measure 核心方法
-
measure(int widthMeasureSpec, int heightMeasureSpec)
该方法定义在View.java类中,为 final 类型,不可被复写,但 measure 调用链最终会回调 View/ViewGroup 对象的onMeasure()方法,因此自定义视图时,只需要复写onMeasure()方法即可。 -
onMeasure(int widthMeasureSpec, int heightMeasureSpec)
该方法就是我们自定义视图中实现测量逻辑的方法,该方法的参数是父视图对子视图的 width 和 height 的测量要求。在我们自身的自定义视图中,要做的就是根据该 widthMeasureSpec 和 heightMeasureSpec 计算视图的 width 和 height,不同的模式处理方式不同。 -
setMeasuredDimension()
测量阶段终极方法,在onMeasure(int widthMeasureSpec, int heightMeasureSpec)方法中调用,将计算得到的尺寸,传递给该方法,测量阶段即结束。该方法也是必须要调用的方法,否则会报异常。在我们在自定义视图的时候,不需要关心系统复杂的 Measure 过程的,只需调用setMeasuredDimension()设置根据 MeasureSpec 计算得到的尺寸即可,你可以参考 ViewPagerIndicator 的 onMeasure 方法。
下面我们取 ViewGroup 的 measureChildren(int widthMeasureSpec, int heightMeasureSpec) 方法对复合 View 的 Measure 流程做一个分析: MeasureChild 的方法调用流程图: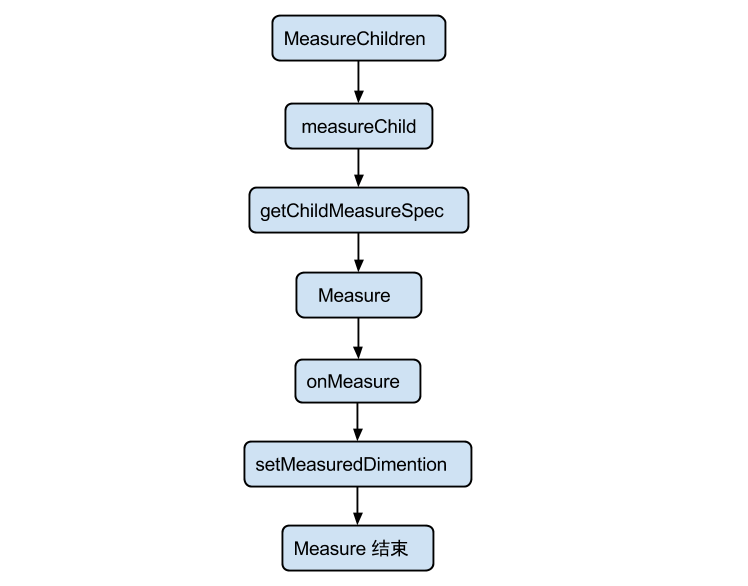
源码分析
    /**
     * 请求所有子 View 去 measure 自己,要考虑的部分有对子 View 的测绘要求 MeasureSpec 以及其自身的 padding
     * 这里跳过所有为 GONE 状态的子 View,最繁重的工作是在 getChildMeasureSpec 方法中处理的
     *
     * @param widthMeasureSpec  对该 View 的 width 测绘要求
     * @param heightMeasureSpec 对该 View 的 height 测绘要求
     */
    protected void measureChildren(int widthMeasureSpec, int heightMeasureSpec) {
        final int size = mChildrenCount;
        final View[] children = mChildren;
        for (int i = 0; i < size; ++i) {
            final View child = children[i];
            if ((child.mViewFlags & VISIBILITY_MASK) != GONE) {
                measureChild(child, widthMeasureSpec, heightMeasureSpec);
            }
        }
    }

    protected void measureChild(View child, int parentWidthMeasureSpec,
            int parentHeightMeasureSpec) {
        final LayoutParams lp = child.getLayoutParams();//获取 Child 的 LayoutParams

        final int childWidthMeasureSpec = getChildMeasureSpec(parentWidthMeasureSpec,// 获取 ChildView 的 widthMeasureSpec
                mPaddingLeft + mPaddingRight, lp.width);
        final int childHeightMeasureSpec = getChildMeasureSpec(parentHeightMeasureSpec,// 获取 ChildView 的 heightMeasureSpec
                mPaddingTop + mPaddingBottom, lp.height);

        child.measure(childWidthMeasureSpec, childHeightMeasureSpec);
    }

   /**
     * 该方法是 measureChildren 中最繁重的部分,为每一个 ChildView 计算出自己的 MeasureSpec。
     * 目标是将 ChildView 的 MeasureSpec 和 LayoutParams 结合起来去得到一个最合适的结果。
     *
     * @param spec 对该 View 的测绘要求
     * @param padding 当前 View 在当前唯独上的 paddingand,也有可能含有 margins
     *
     * @param childDimension 在当前维度上(height 或 width)的具体指
     * @return 子视图的 MeasureSpec
     */
    public static int getChildMeasureSpec(int spec, int padding, int childDimension) {

            .........

        // 根据获取到的子视图的测量要求和大小创建子视图的 MeasureSpec
        return MeasureSpec.makeMeasureSpec(resultSize, resultMode);
    }

   /**
     *
     * 用于获取 View 最终的大小,父视图提供了宽、高的约束信息
     * 一个 View 的真正的测量工作是在 onMeasure(int, int) 中,由该方法调用。
     * 因此,只有 onMeasure(int, int) 可以而且必须被子类复写
     *
     * @param widthMeasureSpec 在水平方向上,父视图指定的的 Measure 要求
     * @param heightMeasureSpec 在竖直方向上,控件上父视图指定的 Measure 要求
     *
     */
    public final void measure(int widthMeasureSpec, int heightMeasureSpec) {
      ...

      onMeasure(widthMeasureSpec, heightMeasureSpec);

      ...
    }

    protected void onMeasure(int widthMeasureSpec, int heightMeasureSpec) {
        setMeasuredDimension(getDefaultSize(getSuggestedMinimumWidth(), widthMeasureSpec),
                getDefaultSize(getSuggestedMinimumHeight(), heightMeasureSpec));
    }
4. layout 相关概念及核心方法
首先要明确的是,子视图的具体位置都是相对于父视图而言的。View 的 onLayout 方法为空实现,而 ViewGroup 的 onLayout 为 abstract 的,因此,如果自定义的 View 要继承 ViewGroup 时,必须实现 onLayout 函数。
在 layout 过程中,子视图会调用getMeasuredWidth()和getMeasuredHeight()方法获取到 measure 过程得到的 mMeasuredWidth 和 mMeasuredHeight,作为自己的 width 和 height。然后调用每一个子视图的layout(l, t, r, b)函数,来确定每个子视图在父视图中的位置。
LinearLayout 的 onLayout 源码分析
  @Override
    protected void onLayout(boolean changed, int l, int t, int r, int b) {
        if (mOrientation == VERTICAL) {
            layoutVertical(l, t, r, b);
        } else {
            layoutHorizontal(l, t, r, b);
        }
    }

    /**
     * 遍历所有的子 View,为其设置相对父视图的坐标
     */
    void layoutVertical(int left, int top, int right, int bottom) {
    for (int i = 0; i < count; i++) {
                final View child = getVirtualChildAt(i);
                if (child == null) {
                    childTop += measureNullChild(i);
                } else if (child.getVisibility() != GONE) {//不需要立即展示的 View 设置为 GONE 可加快绘制
                    final int childWidth = child.getMeasuredWidth();//measure 过程确定的 Width
                    final int childHeight = child.getMeasuredHeight();//measure 过程确定的 height

                    ...确定 childLeft、childTop 的值

                    setChildFrame(child, childLeft, childTop + getLocationOffset(child),
                            childWidth, childHeight);
                }
            }
    }

    private void setChildFrame(View child, int left, int top, int width, int height) {
        child.layout(left, top, left + width, top + height);
    }

    View.java
    public void layout(int l, int t, int r, int b) {
        ...
        setFrame(l, t, r, b)
    }

    /**
     * 为该子 View 设置相对其父视图上的坐标
     */
     protected boolean setFrame(int left, int top, int right, int bottom) {
         ...
     }
5. 绘制流程相关概念及核心方法
先来看下与 draw 过程相关的函数:
-
View.draw(Canvas canvas): 由于 ViewGroup 并没有复写此方法,因此,所有的视图最终都是调用 View 的 draw 方法进行绘制的。在自定义的视图中,也不应该复写该方法,而是复写
onDraw(Canvas)方法进行绘制,如果自定义的视图确实要复写该方法,那么请先调用super.draw(canvas)完成系统的绘制,然后再进行自定义的绘制。 -
View.onDraw():
View 的onDraw(Canvas)默认是空实现,自定义绘制过程需要复写的方法,绘制自身的内容。 -
dispatchDraw() 发起对子视图的绘制。View 中默认是空实现,ViewGroup 复写了
dispatchDraw()来对其子视图进行绘制。该方法我们不用去管,自定义的 ViewGroup 不应该对dispatchDraw()进行复写。
绘制流程图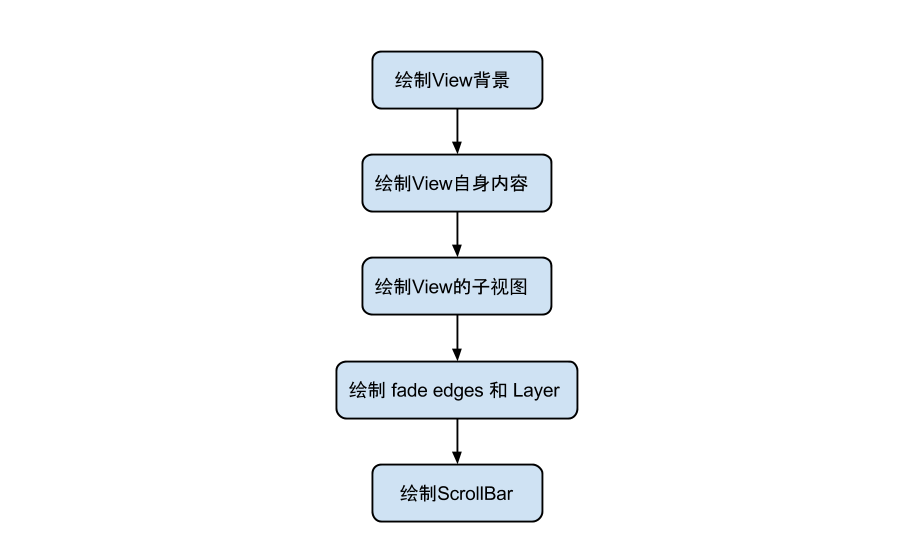
- View.draw(Canvas) 源码分析
 /**
     * Manually render this view (and all of its children) to the given Canvas.
     * The view must have already done a full layout before this function is
     * called.  When implementing a view, implement
     * {@link #onDraw(android.graphics.Canvas)} instead of overriding this method.
     * If you do need to override this method, call the superclass version.
     *
     * @param canvas The Canvas to which the View is rendered.
     *
     * 根据给定的 Canvas 自动渲染 View(包括其所有子 View)。在调用该方法之前必须要完成 layout。当你自定义 view 的时候,
     * 应该去是实现 onDraw(Canvas) 方法,而不是 draw(canvas) 方法。如果你确实需要复写该方法,请记得先调用父类的方法。
     */
    public void draw(Canvas canvas) {

        / * Draw traversal performs several drawing steps which must be executed
         * in the appropriate order:
         *
         *      1. Draw the background if need
         *      2. If necessary, save the canvas' layers to prepare for fading
         *      3. Draw view's content
         *      4. Draw children (dispatchDraw)
         *      5. If necessary, draw the fading edges and restore layers
         *      6. Draw decorations (scrollbars for instance)
         */

     // Step 1, draw the background, if needed
        if (!dirtyOpaque) {
            drawBackground(canvas);
        }

         // skip step 2 & 5 if possible (common case)
        final int viewFlags = mViewFlags;
        if (!verticalEdges && !horizontalEdges) {
            // Step 3, draw the content
            if (!dirtyOpaque) onDraw(canvas);

            // Step 4, draw the children
            dispatchDraw(canvas);

            // Step 6, draw decorations (scrollbars)
            onDrawScrollBars(canvas);

            if (mOverlay != null && !mOverlay.isEmpty()) {
                mOverlay.getOverlayView().dispatchDraw(canvas);
            }

            // we're done...
            return;
        }

        // Step 2, save the canvas' layers
        ...

        // Step 3, draw the content
        if (!dirtyOpaque)
            onDraw(canvas);

        // Step 4, draw the children
        dispatchDraw(canvas);

        // Step 5, draw the fade effect and restore layers

        // Step 6, draw decorations (scrollbars)
        onDrawScrollBars(canvas);
    }
由上面的处理过程,我们也可以得出一些优化的小技巧:当不需要绘制 Layer 的时候第二步和第五步会跳过。因此在绘制的时候,能省的 layer 尽可省,可以提高绘制效率
ViewGroup.dispatchDraw() 源码分析
dispatchDraw(Canvas canvas){

...

 if ((flags & FLAG_RUN_ANIMATION) != 0 && canAnimate()) {//处理 ChildView 的动画
     final boolean buildCache = !isHardwareAccelerated();
            for (int i = 0; i < childrenCount; i++) {
                final View child = children[i];
                if ((child.mViewFlags & VISIBILITY_MASK) == VISIBLE) {//只绘制 Visible 状态的布局,因此可以通过延时加载来提高效率
                    final LayoutParams params = child.getLayoutParams();
                    attachLayoutAnimationParameters(child, params, i, childrenCount);// 添加布局变化的动画
                    bindLayoutAnimation(child);//为 Child 绑定动画
                    if (cache) {
                        child.setDrawingCacheEnabled(true);
                        if (buildCache) {
                            child.buildDrawingCache(true);
                        }
                    }
                }
            }

     final LayoutAnimationController controller = mLayoutAnimationController;
            if (controller.willOverlap()) {
                mGroupFlags |= FLAG_OPTIMIZE_INVALIDATE;
            }

    controller.start();// 启动 View 的动画
}

 // 绘制 ChildView
 for (int i = 0; i < childrenCount; i++) {
            int childIndex = customOrder ? getChildDrawingOrder(childrenCount, i) : i;
            final View child = (preorderedList == null)
                    ? children[childIndex] : preorderedList.get(childIndex);
            if ((child.mViewFlags & VISIBILITY_MASK) == VISIBLE || child.getAnimation() != null) {
                more |= drawChild(canvas, child, drawingTime);
            }
        }

...

}

protected boolean drawChild(Canvas canvas, View child, long drawingTime) {
        return child.draw(canvas, this, drawingTime);
}

/**
     * This method is called by ViewGroup.drawChild() to have each child view draw itself.
     * This draw() method is an implementation detail and is not intended to be overridden or
     * to be called from anywhere else other than ViewGroup.drawChild().
     */
    boolean draw(Canvas canvas, ViewGroup parent, long drawingTime) {
        ...
    }
-
drawChild(canvas, this, drawingTime)
直接调用了 View 的child.draw(canvas, this,drawingTime)方法,文档中也说明了,除了被ViewGroup.drawChild()方法外,你不应该在其它任何地方去复写或调用该方法,它属于 ViewGroup。而View.draw(Canvas)方法是我们自定义控件中可以复写的方法,具体可以参考上述对view.draw(Canvas)的说明。从参数中可以看到,child.draw(canvas, this, drawingTime)肯定是处理了和父视图相关的逻辑,但 View 的最终绘制,还是View.draw(Canvas)方法。 -
invalidate()
请求重绘 View 树,即 draw 过程,假如视图发生大小没有变化就不会调用layout()过程,并且只绘制那些调用了invalidate()方法的 View。 -
requestLayout()
当布局变化的时候,比如方向变化,尺寸的变化,会调用该方法,在自定义的视图中,如果某些情况下希望重新测量尺寸大小,应该手动去调用该方法,它会触发measure()和layout()过程,但不会进行 draw。
自定义View浅析 :
目录
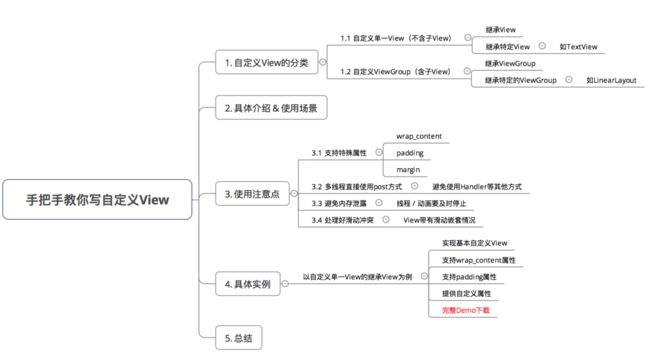
1. 自定义View的分类
自定义View一共分为两大类,具体如下图: 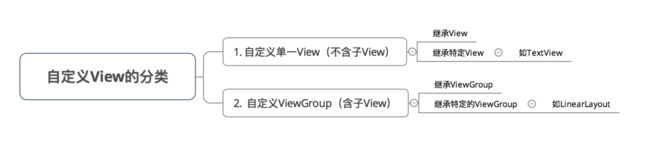
2. 具体介绍 & 使用场景
对于自定义View的类型介绍及使用场景如下图: 
3. 使用注意点
在使用自定义View时有很多注意点(坑),希望大家要非常留意: 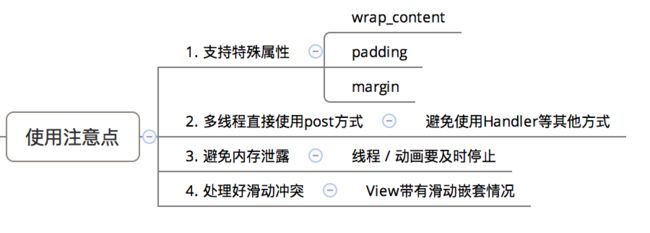
1)  自定义属性;
2)  选择和设置构造方法;
3)  重写onMeasure()方法;
4)  重写onDraw()方法;
5)  重写onLayout()方法;
6)  重写其他事件的方法(滑动监听等)。
自定义属性定义在/values/attr.xml文件中
?xml version="1.0" encoding="utf-8"?>
可以看到,我们先是定义了一个属性rightPadding,然后又在CustomMenu中引用了这个属性。下面说明一下:
- 首先,我们可以在declare-stylable标签中直接定义属性而不需要引用外部定义好的属性,但是为了属性的重用,我们可以选择上面的这种方法:先定义,后引用;
- declare-stylable标签只是为了给自定义属性分类。一个项目中可能又多个自定义控件,但只能又一个attr.xml文件,因此我们需要对不同自定义控件中的自定义属性进行分类,这也是为什么declare-stylable标签中的name属性往往定义成自定义控件的名称;
- 所谓的在declare-stylable标签中的引用,就是去掉了外部定义的format属性,如果没有去掉format,则会报错;如果外部定义中没有format而在内部引用中又format,也一样会报错。
常用的format类型:
![]()
1)  string:字符串类型;
2)  integer:整数类型;
3)  float:浮点型;
4)  dimension:尺寸,后面必须跟dp、dip、px、sp等单位;
5)  Boolean:布尔值;
6)  reference:引用类型,传入的是某一资源的ID,必须以“@”符号开头;
7)  color:颜色,必须是“#”符号开头;
8)  fraction:百分比,必须是“%”符号结尾;
9)  enum:枚举类型
在XML布局文件中使用自定义的属性时,我们需要先定义一个namespace。Android中默认的namespace是android,因此我们通常可以使用“android:xxx”的格式去设置一个控件的某个属性,android这个namespace的定义是在XML文件的头标签中定义的,通常是这样的:
xmlns:android="http://schemas.android.com/apk/res/android"我们自定义的属性不在这个命名空间下,因此我们需要添加一个命名空间。
自定义属性的命名空间如下:
xmlns:app="http://schemas.android.com/apk/res-auto"可以看出来,除了将命名空间的名称从android改成app之外,就是将最后的“res/android”改成了“res-auto”。
注意:自定义namespace的名称可以自己定义,不一定非得是app。
onMeasure()方法中主要负责测量,决定控件本身或其子控件所占的宽高。我们可以通过onMeasure()方法提供的参数widthMeasureSpec和heightMeasureSpec来分别获取控件宽度和高度的测量模式和测量值(测量 = 测量模式 + 测量值)。
widthMeasureSpec和heightMeasureSpec虽然只是int类型的值,但它们是通过MeasureSpec类进行了编码处理的,其中封装了测量模式和测量值,因此我们可以分别通过MeasureSpec.getMode(xMeasureSpec)和MeasureSpec. getSize(xMeasureSpec)来获取到控件或其子View的测量模式和测量值。
测量模式分为以下三种情况:
1)  EXACTLY:当宽高值设置为具体值时使用,如100DIP、match_parent等,此时取出的size是精确的尺寸;
2)  AT_MOST:当宽高值设置为wrap_content时使用,此时取出的size是控件最大可获得的空间;
3)  UNSPECIFIED:当没有指定宽高值时使用(很少见)。
onMeasure()方法中常用的方法:
1)  getChildCount():获取子View的数量;
2)  getChildAt(i):获取第i个子控件;
3)  subView.getLayoutParams().width/height:设置或获取子控件的宽或高;
4)  measureChild(child, widthMeasureSpec, heightMeasureSpec):测量子View的宽高;
5)  child.getMeasuredHeight/width():执行完measureChild()方法后就可以通过这种方式获取子View的宽高值;
6)  getPaddingLeft/Right/Top/Bottom():获取控件的四周内边距;
7)  setMeasuredDimension(width, height):重新设置控件的宽高。如果写了这句代码,就需要删除“super. onMeasure(widthMeasureSpec, heightMeasureSpec);”这行代码。
注意:onMeasure()方法可能被调用多次,这是因为控件中的内容或子View可能对分配给自己的空间“不满意”,因此向父空间申请重新分配空间。
onDraw()方法负责绘制,即如果我们希望得到的效果在Android原生控件中没有现成的支持,那么我们就需要自己绘制我们的自定义控件的显示效果。
要学习onDraw()方法,我们就需要学习在onDraw()方法中使用最多的两个类:Paint和Canvas。
注意:每次触摸了自定义View/ViewGroup时都会触发onDraw()方法。
Paint画笔对象,这个类中包含了如何绘制几何图形、文字和位图的样式和颜色信息,指定了如何绘制文本和图形。画笔对象右很多设置方法,大体上可以分为两类:一类与图形绘制有关,一类与文本绘制有关。
Paint类中有如下方法:
1、图形绘制:
1)  setArgb(int a, int r, int g, int b):设置绘制的颜色,a表示透明度,r、g、b表示颜色值;
2)  setAlpha(int a):设置绘制的图形的透明度;
3)  setColor(int color):设置绘制的颜色;
4)  setAntiAlias(boolean a):设置是否使用抗锯齿功能,抗锯齿功能会消耗较大资源,绘制图形的速度会减慢;
5)  setDither(boolean b):设置是否使用图像抖动处理,会使图像颜色更加平滑饱满,更加清晰;
6)  setFileterBitmap(Boolean b):设置是否在动画中滤掉Bitmap的优化,可以加快显示速度;
7)  setMaskFilter(MaskFilter mf):设置MaskFilter来实现滤镜的效果;
8)  setColorFilter(ColorFilter cf):设置颜色过滤器,可以在绘制颜色时实现不同颜色的变换效果;
9)  setPathEffect(PathEffect pe):设置绘制的路径的效果;
10) setShader(Shader s):设置Shader绘制各种渐变效果;
11) setShadowLayer(float r, int x, int y, int c):在图形下面设置阴影层,r为阴影角度,x和y为阴影在x轴和y轴上的距离,c为阴影的颜色;
12) setStyle(Paint.Style s):设置画笔的样式:FILL实心;STROKE空心;FILL_OR_STROKE同时实心与空心;
13) setStrokeCap(Paint.Cap c):当设置画笔样式为STROKE或FILL_OR_STROKE时,设置笔刷的图形样式;
14) setStrokeJoin(Paint.Join j):设置绘制时各图形的结合方式;
15) setStrokeWidth(float w):当画笔样式为STROKE或FILL_OR_STROKE时,设置笔刷的粗细度;
16) setXfermode(Xfermode m):设置图形重叠时的处理方式;
2、文本绘制:
1)  setTextAlign(Path.Align a):设置绘制的文本的对齐方式;
2)  setTextScaleX(float s):设置文本在X轴的缩放比例,可以实现文字的拉伸效果;
3)  setTextSize(float s):设置字号;
4)  setTextSkewX(float s):设置斜体文字,s是文字倾斜度;
5)  setTypeFace(TypeFace tf):设置字体风格,包括粗体、斜体等;
6)  setUnderlineText(boolean b):设置绘制的文本是否带有下划线效果;
7)  setStrikeThruText(boolean b):设置绘制的文本是否带有删除线效果;
8)  setFakeBoldText(boolean b):模拟实现粗体文字,如果设置在小字体上效果会非常差;
9)  setSubpixelText(boolean b):如果设置为true则有助于文本在LCD屏幕上显示效果;
3、其他方法:
1)  getTextBounds(String t, int s, int e, Rect b):将页面中t文本从s下标开始到e下标结束的所有字符所占的区域宽高封装到b这个矩形中;
2)  clearShadowLayer():清除阴影层;
3)  measureText(String t, int s, int e):返回t文本中从s下标开始到e下标结束的所有字符所占的宽度;
4)  reset():重置画笔为默认值。
这里需要就几个方法解释一下:
1、setPathEffect(PathEffect pe):设置绘制的路径的效果:
常见的有以下几种可选方案:
1)  CornerPathEffect:可以用圆角来代替尖锐的角;
2)  DathPathEffect:虚线,由短线和点组成;
3)  DiscretePathEffect:荆棘状的线条;
4)  PathDashPathEffect:定义一种新的形状并将其作为原始路径的轮廓标记;
5)  SumPathEffect:在一条路径中顺序添加参数中的效果;
6) ComposePathEffect:将两种效果组合起来,先使用第一种效果,在此基础上应用第二种效果。![]()
2、setXfermode(Xfermode m):设置图形重叠时的处理方式:
关于Xfermode的多种效果,我们可以参考下面一张图:
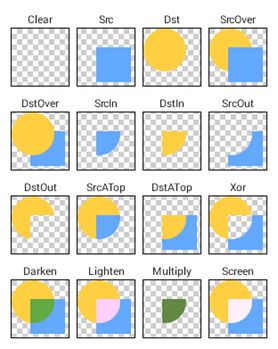
在使用的时候,我们需要通过paint. setXfermode(new PorterDuffXfermode(PorterDuff.Mode.XXX))来设置,XXX是上图中的某种模式对应的常量参数,如DST_OUT。
这16中情况的具体解释如下:
1.PorterDuff.Mode.CLEAR:所绘制不会提交到画布上。
2.PorterDuff.Mode.SRC:显示上层绘制图片
3.PorterDuff.Mode.DST:显示下层绘制图片
4.PorterDuff.Mode.SRC_OVER:正常绘制显示,上下层绘制叠盖。
5.PorterDuff.Mode.DST_OVER:上下层都显示。下层居上显示。
6.PorterDuff.Mode.SRC_IN:取两层绘制交集。显示上层。
7.PorterDuff.Mode.DST_IN:取两层绘制交集。显示下层。
8.PorterDuff.Mode.SRC_OUT:上层绘制非交集部分。
9.PorterDuff.Mode.DST_OUT:取下层绘制非交集部分。
10.PorterDuff.Mode.SRC_ATOP:取下层非交集部分与上层交集部分
11.PorterDuff.Mode.DST_ATOP:取上层非交集部分与下层交集部分
12.PorterDuff.Mode.XOR:异或:去除两图层交集部分
13.PorterDuff.Mode.DARKEN:取两图层全部区域,交集部分颜色加深
14.PorterDuff.Mode.LIGHTEN:取两图层全部,点亮交集部分颜色
15.PorterDuff.Mode.MULTIPLY:取两图层交集部分叠加后颜色
16.PorterDuff.Mode.SCREEN:取两图层全部区域,交集部分变为透明色
Canvas即画布,其上可以使用Paint画笔对象绘制很多东西。
Canvas对象中可以绘制:
1)  drawArc():绘制圆弧;
2)  drawBitmap():绘制Bitmap图像;
3)  drawCircle():绘制圆圈;
4)  drawLine():绘制线条;
5)  drawOval():绘制椭圆;
6)  drawPath():绘制Path路径;
7)  drawPicture():绘制Picture图片;
8)  drawRect():绘制矩形;
9)  drawRoundRect():绘制圆角矩形;
10) drawText():绘制文本;
11) drawVertices():绘制顶点。
Canvas对象的其他方法:
1)  canvas.save():把当前绘制的图像保存起来,让后续的操作相当于是在一个新图层上绘制;
2)  canvas.restore():把当前画布调整到上一个save()之前的状态;
3)  canvas.translate(dx, dy):把当前画布的原点移到(dx, dy)点,后续操作都以(dx, dy)点作为参照;
4)  canvas.scale(x, y):将当前画布在水平方向上缩放x倍,竖直方向上缩放y倍;
5)  canvas.rotate(angle):将当前画布顺时针旋转angle度。
onLayout()方法负责布局,大多数情况是在自定义ViewGroup中才会重写,主要用来确定子View在这个布局空间中的摆放位置。
onLayout(boolean changed, int l, int t, int r, int b)方法有5个参数,其中changed表示这个控件是否有了新的尺寸或位置;l、t、r、b分别表示这个View相对于父布局的左/上/右/下方的位置。
以下是onLayout()方法中常用的方法:
1)  getChildCount():获取子View的数量;
2)  getChildAt(i):获取第i个子View
3)  getWidth/Height():获取onMeasure()中返回的宽度和高度的测量值;
4)  child.getLayoutParams():获取到子View的LayoutParams对象;
5)  child.getMeasuredWidth/Height():获取onMeasure()方法中测量的子View的宽度和高度值;
6)  getPaddingLeft/Right/Top/Bottom():获取控件的四周内边距;
7)  child.layout(l, t, r, b):设置子View布局的上下左右边的坐标。
generateLayoutParams()
generateLayoutParams()方法用在自定义ViewGroup中,用来指明子控件之间的关系,即与当前的ViewGroup对应的LayoutParams。我们只需要在方法中返回一个我们想要使用的LayoutParams类型的对象即可。
在generateLayoutParams()方法中需要传入一个AttributeSet对象作为参数,这个对象是这个ViewGroup的属性集,系统根据这个ViewGroup的属性集来定义子View的布局规则,供子View使用。
例如,在自定义流式布局中,我们只需要关心子控件之间的间隔关系,因此我们需要在generateLayoutParams()方法中返回一个new MarginLayoutParams()即可。
onTouchEvent()
onTouchEvent()方法用来监测用户手指操作。我们通过方法中MotionEvent参数对象的getAction()方法来实时获取用户的手势,有UP、DOWN和MOVE三个枚举值,分别表示用于手指抬起、按下和滑动的动作。每当用户有操作时,就会回掉onTouchEvent()方法。
onScrollChanged()
如果我们的自定义View / ViewGroup是继承自ScrollView / HorizontalScrollView等可以滚动的控件,就可以通过重写onScrollChanged()方法来监听控件的滚动事件。
这个方法中有四个参数:l和t分别表示当前滑动到的点在水平和竖直方向上的坐标;oldl和oldt分别表示上次滑动到的点在水平和竖直方向上的坐标。我们可以通过这四个值对滑动进行处理,如添加属性动画等。
invalidate()
invalidate()方法的作用是请求View树进行重绘,即draw()方法,如果视图的大小发生了变化,还会调用layout()方法。
一般会引起invalidate()操作的函数如下:
1)  直接调用invalidate()方法,请求重新draw(),但只会绘制调用者本身;
2)  调用setSelection()方法,请求重新draw(),但只会绘制调用者本身;
3)  调用setVisibility()方法,会间接调用invalidate()方法,继而绘制该View;
4)  调用setEnabled()方法,请求重新draw(),但不会重新绘制任何视图,包括调用者本身。
postInvalidate()
功能与invalidate()方法相同,只是postInvalidate()方法是异步请求重绘视图。
requestLayout()
requestLayout()方法只是对View树进行重新布局layout过程(包括measure()过程和layout()过程),不会调用draw()过程,即不会重新绘制任何视图,包括该调用者本身。
requestFocus()
请求View树的draw()过程,但只会绘制需要重绘的视图,即哪个View或ViewGroup调用了这个方法,就重绘哪个视图。
- onMeasure()会在初始化之后调用一到多次来测量控件或其中的子控件的宽高;
- onLayout()会在onMeasure()方法之后被调用一次,将控件或其子控件进行布局;
- onDraw()会在onLayout()方法之后调用一次,也会在用户手指触摸屏幕时被调用多次,来绘制控件。
https://blog.csdn.net/carson_ho/article/details/56011064