摘要:AI时代在我们生活中扮演着愈加重要的角色,其显著特征就是对海量数据的处理。所谓海量数据即大数据,我们首先获取到数据才能够挖掘其信息,达到AI层面的应用。而数据的存在形式,绝大多数是非结构化的,网页存储就是典型的非结构化数据。由此引出了网络爬虫技术,本文主要介绍Scrapy的原理和入门应用,以及本地化存储。
学习Python中有不明白推荐加入交流群
            号:864573496
            群里有志同道合的小伙伴,互帮互助,
            群里有不错的视频学习教程和PDF!
基础准备
IDE:sublime
开发环境:win10+mysql5.0+navicat10.0.11
编程语言:python3.7+Anaconda4.4
技术选型:scrapy+requests
爬取目标: http://blog.jobbole.com/all-posts/
相关插件:python最近插件均可
建议豆瓣源镜像下载,可以提升下载速度。如:django
pip install -i https://pypi.doubanio.com/simple/ Django
基础知识
scrapy 与 requests+beautifulsoup 区别
- requests和beautifulsoup都是库,scrapy是框架
- scrapy框架可以加入requests和beautifulsoup
- scrapy基于twisted,性能的最大的优势
- scrapy方便扩展,提供丰富功能
- scrapy内置css和xpath selector非常方便,beautifulsoup速度慢
爬虫的作用
- 搜索引擎 百度。google、垂直领域搜索引擎(有目的性的)
- 推荐引擎 今日头条(用户习惯)
- 机器学习的数据样本
- 数据分析、舆情分析等
正则表达式
- 特殊字符的提取 ^ $ . * ? + {2} {2,} {2,5}
- ^ 表示开头
- . 任意字符
-
- 任意次数
- $ 结尾
- ? 非贪婪模式,提取第一个字符
-
- 至少出现一次
- {1} 出现一次
- {3,} 出现3次以上
- {2,5} 最少2次最多5次
- | 或的关系
- [] 满足任意一个都可以,[2435]任意 [0-9]区间非1
- \s 为空格 \S非空格
- \w 匹配[A-Za-z0-9_]
- \W 反匹配[A-Za-z0-9_]
- [\u4E00-\u9FA5] 汉字的匹配
- \d 匹配数字
爬虫去重策略
- 将访问的url保存到数据库中,效率比较低
- 将访问过的url保存到set中,只需要o(1)的代价可以查询url1亿 2byte 50字符/1024/1024/1024=9G。一亿url就有9G内容,占用内存大
- url经过md5等方式哈希编码后保存到set中,此时一亿url大约3G左右内容
- 用bitmap方法,将访问过的url通过hash函数映射到某一位,存在冲突问题
- bloomfilter方法对bitmap进行改进,多重hash函数降低冲突
scrapy爬取技术网站
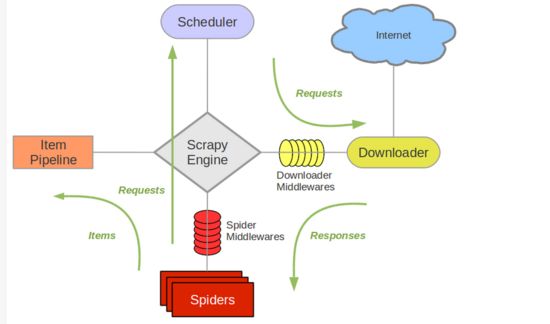
Scrapy技术原理(绿线是数据流向)
架构图
- Scrapy Engine(引擎): 负责Spider、ItemPipeline、Downloader、Scheduler中间的通讯,信号、数据传递等。
- Scheduler(调度器): 它负责接受引擎发送过来的Request请求,并按照一定的方式进行整理排列,入队,当引擎需要时,交还给引擎。
- Downloader(下载器):负责下载Scrapy Engine(引擎)发送的所有Requests请求,并将其获取到的Responses交还给Scrapy Engine(引擎),由引擎交给Spider来处理,
- Spider(爬虫):它负责处理所有Responses,从中分析提取数据,获取Item字段需要的数据,并将需要跟进的URL提交给引擎,再次进入Scheduler(调度器).
- Item Pipeline(管道):它负责处理Spider中获取到的Item,并进行进行后期处理(详细分析、过滤、存储等)的地方。
- Downloader Middlewares(下载中间件):你可以当作是一个可以自定义扩展下载功能的组件。
- Spider Middlewares(Spider中间件):你可以理解为是一个可以自定扩展和操作引擎和Spider中间通信的功能组件(比如进入Spider的Responses;和从Spider出去的Requests)
制作 Scrapy 爬虫步骤:
1 新建项目 (scrapy startproject xxx):新建一个新的爬虫项目
2 明确目标 (编写items.py):明确你想要抓取的目标
3 制作爬虫 (spiders/xxspider.py):制作爬虫开始爬取网页
4 存储内容 (pipelines.py):设计管道存储爬取内容
scrapy安装和项目创建
1 安装scrapy,pip install scrapy
2 进入一个根目录文件夹下,创建Scrapy项目:scrapy startproject mySpider
3 其中, mySpider 为项目名称,可以看到将会创建一个 mySpider 文件夹,目录结构大致如下:下面来简单介绍一下各个主要文件的作用:
mySpider/
scrapy.cfg
mySpider/
init.py
items.py
pipelines.py
settings.py
spiders/
init.py
这些文件分别是:
- scrapy.cfg: 项目的配置文件。
- mySpider/: 项目的Python模块,将会从这里引用代码。
- mySpider/items.py: 项目的目标文件。
- mySpider/pipelines.py: 项目的管道文件。
- mySpider/settings.py: 项目的设置文件。
- mySpider/spiders/: 存储爬虫代码目录。
项目准备
WIN+R调出cmd,并新建项目名为【BoLeSpider】如下:
scrapy startproject BoLeSpider
在 BoLeSpider 项目下创建爬虫目录
cd BoLeSpider
Scrapy genspider jobbole http://www.jobbole.com/
在 BoLeSpider 目录下创建main.py
-- coding: utf-8 --
author = 'BaiNingchao'
import sys,os
from scrapy.cmdline import execute
sys.path.append(os.path.dirname(os.path.abspath(file)))
execute(["scrapy", "crawl", "jobbole"]) # scrapy crawl jobbole
main.py中的方法与cmd下执行效果是一致的,这个遍历执行程序创建该主函数。
爬取技术网站内容
打开setting.py修改:
ROBOTSTXT_OBEY = False。意思为不符合协议的也继续爬取,如果True很快就会停止爬虫
ITEM_PIPELINES = {
'BoLeSpider.pipelines.BolespiderPipeline': 1,
}
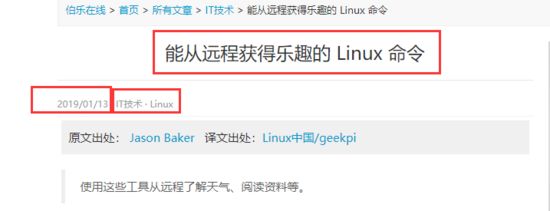
分析目标网站设置提取特征
对以上文章内容,我们试图提取【新闻题目、创建时间、URL、点赞数、收藏数、评论数】这些内容
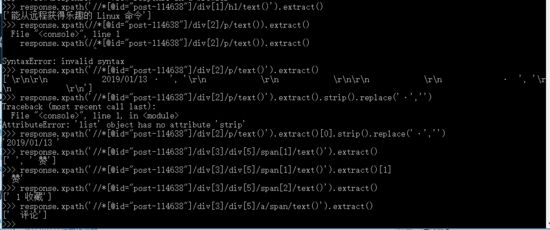
cmd下shell对各个字段调试(xpath或者css方法):
scrapy shell http://blog.jobbole.com/114638/
打开页面F12,复制对应的xpath路径
对网页特征提取我们一般是shell里面调试(如上图所示),特征抽取有两种方式,一种的基于xpath方法,一种基于css方法,根据大家喜好去使用。
基于xpath方法
title = response.xpath('//[@id="post-114638"]/div[1]/h1/text()').extract() # 新闻题目
crate_date = response.xpath('//[@id="post-114638"]/div[2]/p/text()').extract()[0].strip().replace('·','') # 创建时间
url = response.url # url
dianzan = self.re_match(response.xpath('//[@id="post-114638"]/div[3]/div[5]/span[1]/text()').extract()[1]) # 点赞数
soucang = self.re_match(response.xpath('//[@id="post-114638"]/div[3]/div[5]/span[2]/text()').extract()[0]) # 收藏数
comment = self.re_match(response.xpath('//*[@id="post-114638"]/div[3]/div[5]/a/span/text()').extract()[0]) # 评论数
基于css方法
css获取内容
title = response.css('.entry-header h1::text').extract() # 新闻题目
crate_date = response.css('p.entry-meta-hide-on-mobile::text').extract()[0].strip().replace('·','') # 创建时间
url = response.url # url
dianzan = self.re_match(response.css('.vote-post-up h10::text').extract()[0]) # 点赞数
soucang = self.re_match(response.css('.bookmark-btn::text').extract()[0]) # 收藏数
comment = self.re_match(response.css('a[href="#article-comment"] span::text').extract()[0]) # 评论数
print(title,'\n',crate_date,'\n',url,'\n',dianzan,'\n',soucang,'\n',comment)
编写jobbole.py完整代码:
-- coding: utf-8 --
-- coding: utf-8 --
import scrapy,re
class JobboleSpider(scrapy.Spider):
name = 'jobbole'
allowed_domains = ['http://www.jobbole.com/']
start_urls = ['http://blog.jobbole.com/114638']
'''获得单页的信息'''
def parse(self, response):
    # css获取内容
    title = response.css('.entry-header h1::text').extract()   # 新闻题目
    crate_date = response.css('p.entry-meta-hide-on-mobile::text').extract()[0].strip().replace('·','')  # 创建时间
    url = response.url     # url
    dianzan = self.re_match(response.css('.vote-post-up h10::text').extract()[0]) # 点赞数
    soucang = self.re_match(response.css('.bookmark-btn::text').extract()[0]) # 收藏数
    comment = self.re_match(response.css('a[href="#article-comment"] span::text').extract()[0]) # 评论数

    print('标题:',title,'\n','发布时间:',crate_date,'\n','文章地址:',url,'\n','点赞数:',dianzan,'\n','收藏数',soucang,'\n','评论数',comment)

# 对点赞数、收藏数、评论数等进行正则数字提取
def re_match(self,value):
    match_value = re.match('.*?(\d+).*',value)
    if match_value:
        value = int(match_value.group(1))
    else:
        value = 0
    return value
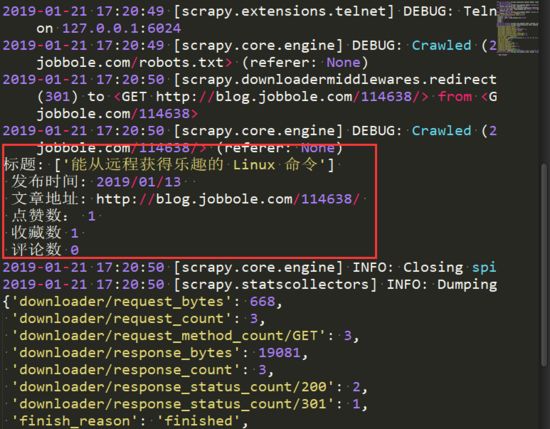
运行main.py函数,便提前到所有信息:
获取列表页所有文章
获取列表下所有页的信息,找到列表页F12分析,使其下一页自动爬取.在cmd的项目根目录下
scrapy shell http://blog.jobbole.com/all-posts/
response.css("#archive .floated-thumb .post-thumb a::attr(href)").extract()
设置items.py
-- coding: utf-8 --
Define here the models for your scraped items
See documentation in:
https://doc.scrapy.org/en/latest/topics/items.html
import scrapy
from scrapy.loader.processors import MapCompose
class BolespiderItem(scrapy.Item):
# define the fields for your item here like:
# name = scrapy.Field()
pass
设置提取字段的实体类
class JobBoleItem(scrapy.Item):
title = scrapy.Field() # 文章题目
create_date = scrapy.Field() #发布时间
url = scrapy.Field() #当前文章url路径
dianzan = scrapy.Field() #点赞数
soucang = scrapy.Field() # 收藏数
comment = scrapy.Field() # 评论数
jobbole.py 的代码改为:
-- coding: utf-8 --
import scrapy,re,datetime
from scrapy.http import Request
from urllib import parse
from BoLeSpider.items import JobBoleItem
class JobboleSpider(scrapy.Spider):
name = 'jobbole'
allowed_domains = ['http://www.jobbole.com/']
# start_urls = ['http://blog.jobbole.com/114638']
start_urls = ['http://blog.jobbole.com/all-posts/'] # 所有页信息
# 获取列表下所有页信息
def parse(self, response):
    # 1 获取文章列表中的具体文章url并交给解析函数具体字段解析
    post_urls = response.css("#archive .floated-thumb .post-thumb a::attr(href)").extract()
    for post_url in post_urls:
        yield Request(url=parse.urljoin(response.url,post_url),callback=self.parses_detail, dont_filter=True) # scrapy下载

    #  2 提取下一页并交给scrapy提供下载
    next_url = response.css(".next.page-numbers::attr(href)").extract_first("")
    if next_url:
        yield Request(url=parse.urljoin(response.url, post_url), callback=self.parse, dont_filter=True)

# scrapy shell http://blog.jobbole.com/114638/
def parses_detail(self, response):
    article_item =JobBoleItem()
    article_item['title'] = response.css('.entry-header h1::text').extract()
    article_item['create_date'] = date_convert(response.css("p.entry-meta-hide-on-mobile::text").extract()[0].strip().replace("·","").strip())
    article_item['url'] = response.url
    article_item['dianzan'] = re_match(response.css('.vote-post-up h10::text').extract()[0])
    article_item['soucang'] = re_match(response.css('.bookmark-btn::text').extract()[0])
    article_item['comment'] = re_match(response.css('a[href="#article-comment"] span::text').extract()[0])
    yield article_item
**************************正则对字段格式化处理******************************
对点赞数、收藏数、评论数等进行正则数字提取
def re_match(value):
match_value = re.match('.?(\d+).',value)
if match_value:
nums = int(match_value.group(1))
else:
nums = 0
return nums
对时间格式化处理
def date_convert(value):
try:
create_date = datetime.datetime.strptime(value, "%Y/%m/%d").date()
except Exception as e:
create_date = datetime.datetime.now().date()
return create_date
网页提取后的结果
本地化存储爬取的网页内容
将结果保存在json文件中
在pipline.py下修改代码如下
-- coding: utf-8 --
Define your item pipelines here
Don't forget to add your pipeline to the ITEM_PIPELINES setting
See: https://doc.scrapy.org/en/latest/topics/item-pipeline.html
from scrapy.exporters import JsonItemExporter
import codecs
class BolespiderPipeline(object):
def process_item(self, item, spider):
return item
调用scrapy提供的json export导出json文件
class JsonExporterPipleline(object):
def init(self):
self.file = open('articleexport.json', 'wb')
self.exporter = JsonItemExporter(self.file, encoding="utf-8", ensure_ascii=False)
self.exporter.start_exporting()
def close_spider(self, spider):
    self.exporter.finish_exporting()
    self.file.close()

def process_item(self, item, spider):
    self.exporter.export_item(item)
    return item
在setting.py 中修改代码如下:
ITEM_PIPELINES = {
'BoLeSpider.pipelines.JsonExporterPipleline': 1,
}
在main.py运行程序,查看articleexport.json结果如下:
将结果保存在MySql数据库中
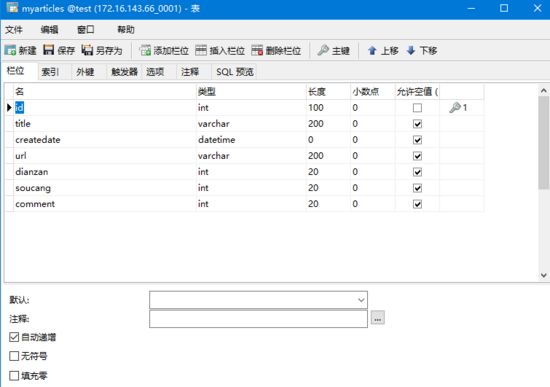
数据库中表的设计
本地数据库,用户名:root,密码:admin,数据库:test
pipline.py修改如下:
from scrapy.exporters import JsonItemExporter
import codecs
class BolespiderPipeline(object):
def process_item(self, item, spider):
return item
调用scrapy提供的json export导出json文件
class JsonExporterPipleline(object):
def init(self):
self.file = open('articleexport.json', 'wb')
self.exporter = JsonItemExporter(self.file, encoding="utf-8", ensure_ascii=False)
self.exporter.start_exporting()
def close_spider(self, spider):
    self.exporter.finish_exporting()
    self.file.close()

def process_item(self, item, spider):
    self.exporter.export_item(item)
    return item
将爬取的数据字段存储在mysql数据
import MySQLdb
import MySQLdb.cursors
MYSQL数据库存储方法1
class MysqlPipeline(object):
#采用同步的机制写入mysql
def init(self):
self.conn = MySQLdb.connect('127.0.0.1', 'root', 'admin', 'test', charset="utf8", use_unicode=True)
self.cursor = self.conn.cursor()
def process_item(self, item, spider):
    insert_sql = """
        insert into myarticles(title, createdate,url,dianzan,soucang,comment) VALUES(%s,%s,%s,%s,%s,%s)
    """
    self.cursor.execute(insert_sql, (item["title"], item["create_date"], item["url"], item["dianzan"],item["soucang"],item["comment"]))
    self.conn.commit()
在setting.py 中修改代码如下:
ITEM_PIPELINES = {
'BoLeSpider.pipelines.MysqlPipeline': 1,
}
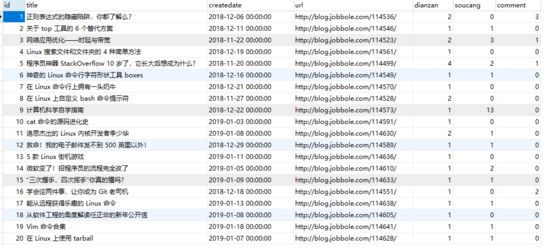
在main.py运行程序,查看数据库表结果如下:
对网站图片爬取并本地化存储
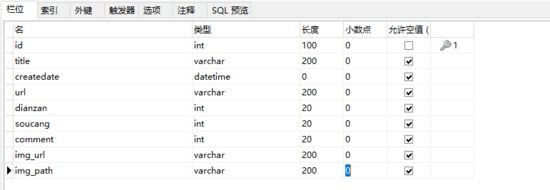
本地化存储爬取的网页内容 重新进行数据库表的设计
jobbole.py 修改如下:
获取列表下所有页信息
def parse(self, response):
# 1 获取文章列表中的具体文章url并交给解析函数具体字段解析
post_nodes = response.css("#archive .floated-thumb .post-thumb a")
for post_node in post_nodes:
image_url = post_node.css("img::attr(src)").extract_first("")
post_url = post_node.css("::attr(href)").extract_first("")
yield Request(url=parse.urljoin(response.url,post_url), meta={"front_image_url":image_url},callback=self.parses_detail, dont_filter=True) # scrapy下载
#  2 提取下一页并交给scrapy提供下载
next_url = response.css(".next.page-numbers::attr(href)").extract_first("")
if next_url:
    yield Request(url=parse.urljoin(response.url, post_url), callback=self.parse, dont_filter=True)
scrapy shell http://blog.jobbole.com/114638/
def parses_detail(self, response):
article_item =JobBoleItem()
article_item['front_image_url'] = [response.meta.get("front_image_url", "")] # 文章封面图
article_item['title'] = response.css('.entry-header h1::text').extract()
article_item['create_date'] = date_convert(response.css("p.entry-meta-hide-on-mobile::text").extract()[0].strip().replace("·","").strip())
article_item['url'] = response.url
article_item['dianzan'] = re_match(response.css('.vote-post-up h10::text').extract()[0])
article_item['soucang'] = re_match(response.css('.bookmark-btn::text').extract()[0])
article_item['comment'] = re_match(response.css('a[href="#article-comment"] span::text').extract()[0])
yield article_item
items.py 修改如下
设置提取字段的实体类
class JobBoleItem(scrapy.Item):
title = scrapy.Field() # 文章题目
create_date = scrapy.Field() #发布时间
url = scrapy.Field() #当前文章url路径
dianzan = scrapy.Field() #点赞数
soucang = scrapy.Field() # 收藏数
comment = scrapy.Field() # 评论数
front_image_url = scrapy.Field() # 原图片文件路径
front_image_path = scrapy.Field() # 下载到本地图片路径
pipline.py设置如下:
from scrapy.pipelines.images import ImagesPipeline
获取下载后图片文件的路径
class ArticleImagePipeline(ImagesPipeline):
def item_completed(self, results, item, info):
if "front_image_url" in item:
for ok, value in results:
image_file_path = value["path"]
item["front_image_path"] = image_file_path
return item
将爬取的数据字段存储在mysql数据
import MySQLdb
import MySQLdb.cursors
'''MYSQL数据库存储方法1'''
class MysqlPipeline(object):
#采用同步的机制写入mysql
def init(self):
self.conn = MySQLdb.connect('127.0.0.1', 'root', 'admin', 'test', charset="utf8", use_unicode=True)
self.cursor = self.conn.cursor()
def process_item(self, item, spider):
    insert_sql = """
        insert into myarticles(title, createdate,url,dianzan,soucang,comment,img_url,img_path) VALUES(%s,%s,%s,%s,%s,%s,%s,%s)
    """
    self.cursor.execute(insert_sql, (item["title"], item["create_date"], item["url"], item["dianzan"],item["soucang"],item["comment"],item["front_image_url"],item["front_image_path"]))
    self.conn.commit()
setting.py修改:
ITEM_PIPELINES = {
# 'BoLeSpider.pipelines.BolespiderPipeline': 1,
# 'BoLeSpider.pipelines.JsonExporterPipleline': 1,
'BoLeSpider.pipelines.ArticleImagePipeline':1,
'BoLeSpider.pipelines.MysqlPipeline': 2,
}
import os
IMAGES_URLS_FIELD = "front_image_url" # 原图片路径
project_dir = os.path.abspath(os.path.dirname(file))
IMAGES_STORE = os.path.join(project_dir, 'images') # 下载后图片保存位置
mian.py运行结果
数据库异步存储
当我们爬虫海量网络数据的时候,爬取速度与存储速度便造成了冲突。采用前面交代的数据库存储技术可能会出现数据阻塞的情况。基于此,我们改进数据存储方式,使用异步存储。
pipline.py添加如下
from twisted.enterprise import adbapi
'''MYSQL数据库存储方法2:异步操作处理,针对大数据量'''
class MysqlTwistedPipline(object):
def init(self, dbpool):
self.dbpool = dbpool
@classmethod
def from_settings(cls, settings): # cls即MysqlTwistedPipline
dbparms = dict(
host = settings["MYSQL_HOST"],
db = settings["MYSQL_DBNAME"],
user = settings["MYSQL_USER"],
passwd = settings["MYSQL_PASSWORD"],
charset='utf8',
cursorclass=MySQLdb.cursors.DictCursor,
use_unicode=True
)
dbpool = adbapi.ConnectionPool("MySQLdb", **dbparms)
return cls(dbpool)
def process_item(self, item, spider):
    #使用twisted将mysql插入变成异步执行
    query = self.dbpool.runInteraction(self.do_insert, item)
    query.addErrback(self.handle_error, item, spider) #处理异常

def handle_error(self, failure, item, spider):
    #处理异步插入的异常
    print (failure)

def do_insert(self, cursor,item):
    insert_sql = """
        insert into myarticles(title, createdate,url,dianzan,soucang,comment,img_url,img_path) VALUES(%s,%s,%s,%s,%s,%s,%s,%s)
    """
    cursor.execute(insert_sql, (item["title"], item["create_date"], item["url"], item["dianzan"],item["soucang"],item["comment"],item["front_image_url"],item["front_image_path"]))
setting.py添加如下
数据库设置
MYSQL_HOST = "127.0.0.1"
MYSQL_DBNAME = "test"
MYSQL_USER = "root"
MYSQL_PASSWORD = "admin"
mian.py运行结果
