docker-compose编排动态配置的pbsPro容器集群
简介
docker-compose是一种容器编排工具,可以将多个docker容器关联部署。通过yaml文件,可以描述应用的架构,如使用什么镜像、数据卷、网络、绑定服务端口等等,然后再用一条命令就可以管理所有的服务(如启动、停止、重启、日志监控等等),可以鼎泰扩展容器的规模等等,和docker swarm非常相似又有区别。
本次博客将对前一节利用Dockerfile编排pbspro集群进行升级,使用docker-compose来将pbsPro集群部署起来,结合shell脚本,可以动态配置整个集群的编排。所有脚本已上传至github上。
编排文件脚本下载
- 构建基础镜像maya-pbsPro
从前一步的zxj/maya-pbspro:latest镜像开始,该镜像的获取可参考前面镜像制作文章:利用Dockerfile编排pbspro集群,或者拉取本人的镜像库
$# docker pull zxj2017/maya-pbspro- 构建新镜像zxj/maya-pbs:onbuild
$# cd centos-maya-openpbs/onbuild
#copy configutation file and ssh
FROM zxj/maya-pbs:latest
MAINTAINER zxj
USER root

RUN yum install openssh-clients \
    yum install openssh-server

# # ------------------------------------------------------------
# # Utility shell scripts
# # ------------------------------------------------------------

COPY mpi_bootstrap /usr/local/bin/mpi_bootstrap
RUN chmod +x /usr/local/bin/mpi_bootstrap

COPY get_hosts /usr/local/bin/get_hosts
RUN chmod +x /usr/local/bin/get_hosts

COPY auto_update_hosts /usr/local/bin/auto_update_hosts
RUN chmod +x /usr/local/bin/auto_update_hosts

# # ------------------------------------------------------------
# # Miscellaneous setup for better user experience
# # ------------------------------------------------------------

# Set welcome message to display when user ssh login
COPY welcome.txt /etc/motd

# Default hostfile location for mpirun. This file will be updated automatically.
ENV HYDRA_HOST_FILE /etc/opt/hosts
RUN echo "export HYDRA_HOST_FILE=${HYDRA_HOST_FILE}" >> /etc/profile

RUN touch ${HYDRA_HOST_FILE}
RUN chown ${USER}:${USER} ${HYDRA_HOST_FILE}

# Auto go to default working directory when user ssh login
RUN echo "cd $WORKDIR" >> ${USER_HOME}/.profile

# # ------------------------------------------------------------
# # Set up SSH Server
# # ------------------------------------------------------------

# Add host keys
RUN cd /etc/ssh/ && ssh-keygen -A -N ''

# Config SSH Daemon
RUN  sed -i "s/#PasswordAuthentication.*/PasswordAuthentication no/g" /etc/ssh/sshd_config \
  && sed -i "s/#PermitRootLogin.*/PermitRootLogin no/g" /etc/ssh/sshd_config \
  && sed -i "s/#AuthorizedKeysFile/AuthorizedKeysFile/g" /etc/ssh/sshd_config

# Unlock non-password USER to enable SSH login
RUN echo "123456" | passwd --stdin "root"
#passwd -u ${USER}

# Set up user's public and private keys
ENV SSHDIR ${USER_HOME}/.ssh
RUN mkdir -p ${SSHDIR}

# Default ssh config file that skips (yes/no) question when first login to the host
RUN echo "StrictHostKeyChecking no" > ${SSHDIR}/config
# This file can be overwritten by the following onbuild step if ssh/ directory has config file

# Switch back to default user
USER ${USER}

# # ------------------------------------------------------------
# # ONBUILD (require ssh/ directory in the build context)
# # ------------------------------------------------------------
ONBUILD USER root

ONBUILD COPY ssh/ ${SSHDIR}/

ONBUILD RUN cat ${SSHDIR}/*.pub >> ${SSHDIR}/authorized_keys
ONBUILD RUN chmod -R 600 ${SSHDIR}/* \
         && chown -R ${USER}:${USER} ${SSHDIR}

# Switch back to default user when continue the build process
ONBUILD USER ${USER}
使用编译命令,构建成为一个zxj/maya-pbs:onbuild镜像
$# docker build -t zxj/maya-pbs:onbuild .
2 .构建docker-compose.yml文件
由上一步构建的镜像zxj/maya-pbs:onbuild,后续继续使用docker compose在这个镜像上编排,编排文件如下
cd centos-maya-openpbs/cluster

version: "2"

services:
  registry:
    image: registry
    ports:
      - "${REGISTRY_PORT}:5000"

  master:
    image: $REGISTRY_ADDR:$REGISTRY_PORT/$IMAGE_NAME
    user: root
    hostname: master
    privileged: true
    entrypoint: ["mpi_bootstrap", "role=master", "mpi_master_service_name=master", "mpi_worker_service_name=worker"]
    ports:
      - "${SSH_PORT}:22"
    networks:
      - net
    volumes:
      - /pbs:/pbs

  worker:
    image: $REGISTRY_ADDR:$REGISTRY_PORT/$IMAGE_NAME
    user: root
    entrypoint: ["mpi_bootstrap", "role=worker", "mpi_master_service_name=master", "mpi_worker_service_name=worker"]
    networks:
      - net
    volumes_from:
      - master

networks:
  net:
3.将pbsPro安装文件放置在集群的共享目录/pbs下,便于后去安装,共享文件地址为:pbs安装文件
- 在shell中结合docker-compose编排pbs集群
$# chmod a+x cluster.sh
$# ./cluster.sh up size=3
$# docker ps -a
我们发现容器已经自动编排完成
4. 安装openpbs
法一:参照上一节的手动安装办法:利用Dockerfile编排pbspro集群
法二:我们同过放置在共享目录下/pbs下下的安装监本来自动化安装这下文件和过程。
$  cd /pbs/master/
#安装master节点的文件
$# ./login_master.sh cluster_master_1
在docker容器上执行安装pbs文件的shell
$# docker exec -it cluster_master_1 /etc/init.d/pbs status
$# 安装worke节点
# cd /pbs/worker# /login_Singleworker cluster_worker_1
$# docker exec -it cluster_master_1 /etc/init.d/pbs status
- 开启并提交作业
每个节点开启pbs操作
$# /etc/init.d/pbs start在maseter上加入slaver1,和slaver2
$# . /etc/profile.d/pbs.sh
$#  qmgr -c 'create node  slaver1'
$#  qmgr -c 'create node  slaver2'
为三个节点添加同意的UID的用户user1每个节点执行如下操作
# useradd user1
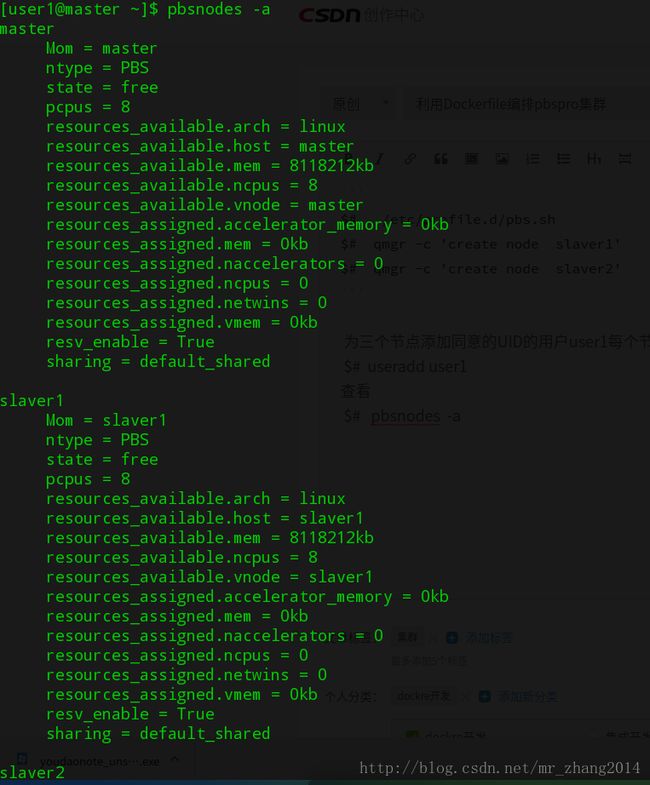
查看# pbsnodes -a
运行作业:
$# echo 'sleep 10' | qsub
$# qstat -a
至此,整个pbs Pro搭建完毕,此过程可动态调整参数实现集群的扩展。


