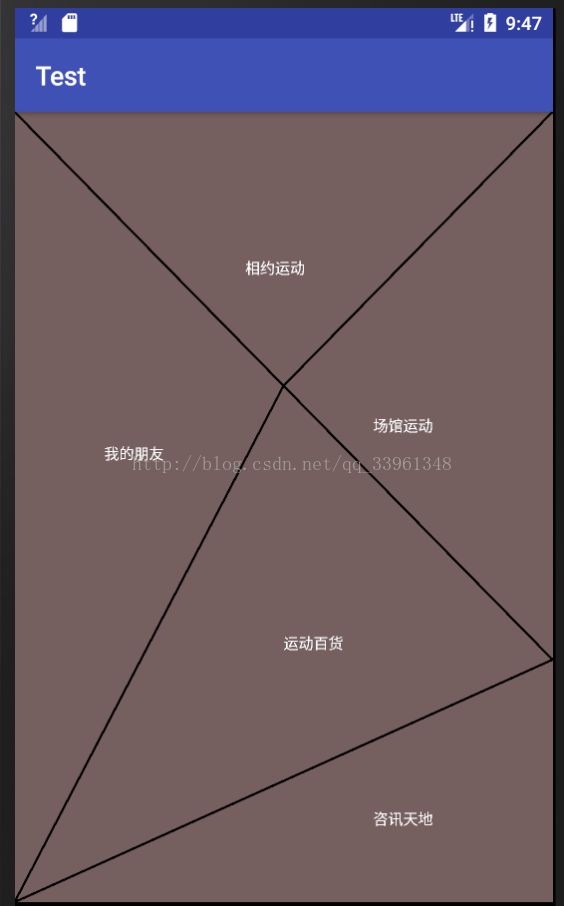
关于android自定义切割view并在每个区域设置点击事件
在开发的过程中,觉得仿win10风格的主界面会比较好看,但是常规的规则图形看着又没新意,所以决定自己写一个view。在ondraw()方法中绘图。在ontouchevent()方法中写点击事件。而点击事件的具体实现通过接口完成。这一过程涉及一些数学问题。
封装的view:
public class UserMainView extends View {
    private UserMainTouchListener clickListener;
     float  toolbar=(float)getResources().getDimension(R.dimen.abc_action_bar_default_height_material);

    float statusbar=(float)getStatusBarHeight(super.getContext());
    Resources resources = this.getResources();
    DisplayMetrics dm = resources.getDisplayMetrics();
    float width = dm.widthPixels;
    float height = dm.heightPixels;

    public UserMainView(Context context) {
        super(context);
    }

    public UserMainView(Context context, AttributeSet attrs) {
        super(context, attrs);
    }
    int getStatusBarHeight(Context context) {
        int result = 0;
        int resourceId = context.getResources().getIdentifier("status_bar_height", "dimen", "android");
        if (resourceId > 0) {
            result = context.getResources().getDimensionPixelSize(resourceId);
        }
        return result;
    }
    public interface UserMainTouchListener{          //五大功能入口
        void ClinckOne();                     //今天元气满满的
        void ClickTwo();
        void ClickThree();
        void ClickFour();
        void ClickFive();
    }
    public void setClickListener(UserMainTouchListener clickListener) {
        this.clickListener=clickListener;

    }


    protected void onDraw(Canvas canvas){
        Paint paint=new Paint();
        paint.setStyle(Paint.Style.FILL);
        paint.setColor(Color.BLACK);
        paint.setStrokeWidth(5);
        //float[]pts={0,toolbar,width,toolbar/3+(height/3)*2,width,toolbar,width/2,(toolbar/3)*2+height/3,width/2,(toolbar/3)*2+height/3,0,height,0,height,width,toolbar/3+(height/3)*2};
        float[]pts={0,0,width,toolbar/3+(height/3)*2-toolbar,width,0,width/2,(toolbar/3)*2+height/3-toolbar,width/2,(toolbar/3)*2+height/3-toolbar,0,height-toolbar-statusbar,0,height-toolbar-statusbar,width,toolbar/3+(height/3)*2-toolbar};
        canvas.drawLines(pts,paint);
        Paint text=new Paint();
        text.setTextSize(30);
        text.setStrokeWidth(5);
        text.setColor(Color.WHITE);
        canvas.drawText("相约运动",3*width/7,toolbar/6+height/6,text);
        canvas.drawText("我的朋友",width/6,2*toolbar/3+height/3,text);
        canvas.drawText("场馆运动",2*width/3,toolbar/4+height/3+5,text);
        canvas.drawText("运动百货",width/2,3*height/5,text);
        canvas.drawText("咨讯天地",2*width/3,toolbar+5*height/7,text);

    }
    public boolean onTouchEvent(MotionEvent motionEvent){
        double x=(double)motionEvent.getRawX();
        double y=(double)(motionEvent.getRawY()-toolbar-statusbar);
        double l1=2*(height-toolbar)/(3*width)*x;
        double l2=2*(toolbar-height)/(3*width)*x-2*(toolbar-height)/3;
        double l3=(4*(toolbar-height)/(3*width)+2*statusbar/width)*x+height-toolbar-statusbar;
        double l4=((toolbar-height)/(3*width)+statusbar/width)*x+height-toolbar-statusbar;
        int action=motionEvent.getAction();
        switch (action) {
            case MotionEvent.ACTION_DOWN:
                break;
            case MotionEvent.ACTION_MOVE:
                break;
            case MotionEvent.ACTION_UP:
                if (y>0&&y0&&y>l1&&yl2&&yl3&&y>l1&&yl4)
                    clickListener.ClickFive();
                break;
        }
        return true;
    }


}
然后我简单的实现了一下接口。
public class MainActivity extends AppCompatActivity{
    private ImageView loge1;

    @Override
    protected void onCreate(Bundle savedInstanceState) {
        super.onCreate(savedInstanceState);
        setContentView(R.layout.activity_main);

        UserMainView view=(UserMainView)findViewById(R.id.usermainview);
        view.setClickListener(new UserMainView.UserMainTouchListener() {
            @Override
            public void ClinckOne() {
                Log.d("MainActivity","one");
            }

            @Override
            public void ClickTwo() {
                Log.d("MainActivity","two");

            }

            @Override
            public void ClickThree() {
                Log.d("MainActivity","three");

            }

            @Override
            public void ClickFour() {
                Log.d("MainActivity","four");

            }

            @Override
            public void ClickFive() {
                Log.d("MainActivity","five");

            }
        });
    }


}以我这个作为例子。有几点说一下:1、绘图时坐标系的原点时bar的左下角,不是屏幕的左上角。
2、在获取点击事件坐标时,用
motionEvent.getRawY()3、计算要仔细,最好是将大多数对精度要求高的部分换成double类型。
4、点击特效问题。这是我目前缺少的,尚未解决。
