在JAVA-WEB项目使用Editor.md实现MarkDown编辑器
官网:http://pandao.github.io/editor.md/
Editor.md的安装使用:
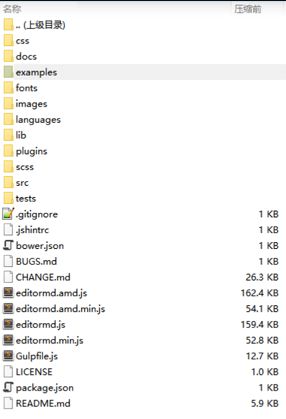
基本使用markdown是相当简单的,比ueditor还要简单,从git上下载回来的Editor.md是1.5版,压缩包里有分门别类详细的文件夹。
在
examples文件夹中有一个简单的示例simple.html,可以在浏览器里打开,并查看源代码,我这里做一个简单的总结,并加上表单提交的配置:
- 在HTML中加载CSS:editormd.css
- 在HTML中加载JS:顺序为jQuery,editormd.min.js,
- 在HTML中写一个div节点,包含两个textarea,格式如下:
Editor.md代码黑色主题:
习惯了黑色背景的代码样式,就希望editor.md也能实现代码黑色样式,果然,editor.md从1.5版本以后为大家提供了dark样式主题,但是会让除代码以外的其他编辑区域也变黑色,所以根据个人需要来小小的改造一下:
- 首先添加样式配置,在原来的editor.md配置基础上,添加配置项:
var testEditor = editormd("test-editormd", {
        width: "90%",
        height: 640,
        saveHTMLToTextarea: true,
        path: "/webjars/editor.md/lib/",
        syncScrolling: "single",
        //下面这一行将使用dark主题
        previewTheme : "dark"
    });
修改了editormd.css后,别忘了使用CSS压缩工具再压缩一遍,生成editormd.min.css,这样正式部署时能减轻一点服务器压力,提高加载效率。我把压缩好重新生成的editormd.min.css放出来,有需要的可以直接下载。 https://leanote.com/api/file/getAttach?fileId=57ac14c3ab644133ed0476bb
文档的显示:
编辑区的代码格式已经调整成为我们喜欢的样式了,在表单POST提交时,editormd将我们的markdown语法文档翻译成了HTML语言,并将html字符串提交给了我们的后台,后台应该将这些HTML字符串持久化到数据库中,在文章显示时将他们显示在页面上。具体的做法是:
新建文章页面:
显示文章页面:
${article.text }
图片上传:
有了基本的Markdown功能,集成editor.md就完成了一半了,下面开始处理图片上传。图片上传的语法是,这个用来嵌入互联网上现成的图片是很方便的,但是如果想要上传本地图片就要后台代码配合了,我下面以JAVA为例(官方文档有PHP的示例),配合SpringMVC和commons-fileupload-1.3.1.jar,简单给个DEMO:根据Editor.md的官方文档介绍,上传图片功能需要添加一点配置,如下:
editormd("test-editormd", {
  width   : "90%",
  height  : 640,
  syncScrolling : "single",
  path    : "<%=request.getContextPath()%>/resources/editormd/lib/",
  imageUpload : true,
  imageFormats : ["jpg", "jpeg", "gif", "png", "bmp", "webp"],
  imageUploadURL : "/uploadfile",
  saveHTMLToTextarea : true,
});
  //editor.md期望得到一个json格式的上传后的返回值,格式是这样的:
  /*
  {
      success : 0 | 1,           // 0 表示上传失败,1 表示上传成功
      message : "提示的信息,上传成功或上传失败及错误信息等。",
      url     : "图片地址"        // 上传成功时才返回
  }
*/package com.newflypig.jblog.controller;
import java.io.File;
import java.io.IOException;
import javax.servlet.http.HttpServletRequest;
import javax.servlet.http.HttpServletResponse;
import org.apache.commons.io.FileUtils;
import org.springframework.stereotype.Controller;
import org.springframework.web.bind.annotation.RequestMapping;
import org.springframework.web.bind.annotation.RequestMethod;
import org.springframework.web.bind.annotation.RequestParam;
import org.springframework.web.multipart.MultipartFile;
@Controller
public class UploadController {
@RequestMapping(value="/uploadfile",method=RequestMethod.POST)
public void hello(HttpServletRequest request,HttpServletResponse response,@RequestParam(value = "editormd-image-file", required = false) MultipartFile attach){
try {
request.setCharacterEncoding( "utf-8" );
response.setHeader( "Content-Type" , "text/html" );
String rootPath = request.getSession().getServletContext().getRealPath("/resources/upload/");
/**
* 文件路径不存在则需要创建文件路径
*/
File filePath=new File(rootPath);
if(!filePath.exists()){
filePath.mkdirs();
}
//最终文件名
File realFile=new File(rootPath+File.separator+attach.getOriginalFilename());
FileUtils.copyInputStreamToFile(attach.getInputStream(), realFile);
//下面response返回的json格式是editor.md所限制的,规范输出就OK
response.getWriter().write( "{\"success\": 1, \"message\":\"上传成功\",\"url\":\"/resources/upload/" + attach.getOriginalFilename() + "\"}" );
} catch (Exception e) {
try {
response.getWriter().write( "{\"success\":0}" );
} catch (IOException e1) {
e1.printStackTrace();
}
}
}
}使用SpringBoot实现图片文件上传:
在properties文件中配置文件上传key-value:
#默认支持文件上传
spring.http.multipart.enabled =true
spring.http.multipart.file-size-threshold =0
# 上传文件的临时目录
#spring.http.multipart.location=E:/upload/temp/
# 最大支持文件大小
spring.http.multipart.max-file-size =100MB
# 最大支持请求大小
spring.http.multipart.max-request-size =100Mb 

